
Categorie popolari
State cercando un filato?


Commenti / Domande (90)
![]() Sarah ha scritto:
Sarah ha scritto:
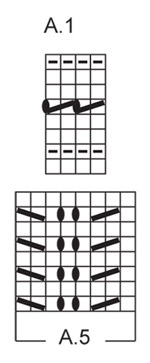
Hi, ich noch mal. Danke für die letzte Antwort... eine Frage hätte ich noch. Strickt man A5 wirklich 6x in der Höhe? Auf der Abbildung sieht es anders aus... als wären es nur 4x.. dann käme ich natürlich auch nicht auf die Maschenzahl von 325... PS. Die Angabe der Spitzen passt glaube ich nicht. Sind 45
23.10.2025 - 09:35DROPS Design ha risposto:
Liebe Sarah, stricken Sie auf jeden Fall die benötigten Rapporte, um die Maschenzahl zu erreichen, auch wenn es auf dem Foto anders wirkt. Was die Zahl der Spitzen ergibt, müssten es rechnerisch tatsächlich 45 sein, das wird dann noch mal geprüft und ggf. geändert. Viel Spaß beim Weiterstricken!
23.10.2025 - 09:48
![]() Sarah ha scritto:
Sarah ha scritto:
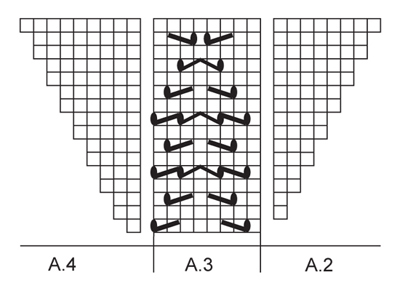
Hey, ich hab das Diagramm A1 fertig und komme auch auf die angegebene M Zahl... Nun A2/A3/A4/ Meine Frage: stricke ich nach A4, Umschlag, Mittel-M, Umschlag, A4 ... wieder bin rechts nach links nach A3? Weil es dann doch nicht symmetrisch ist oder?
13.10.2025 - 20:13DROPS Design ha risposto:
Liebe Sarah, Sie stricken A2, A3 bis noch 1 M vor der Mittel-Masche übrig ist, über diese Masche stricken Sie A.4. Dann kommt der Umschlag, Mittel-M, Umschlag, dann beginnen Sie wieder mit A.2 (in der ersten Reihe hat A.2 keine Masche, daher kommt direkt A.3), stricken A.3 und ganz am Ende A.4. Das Muster wird insgesamt symmetrisch. Gutes Gelingen weiterhin!
21.10.2025 - 21:53
![]() Wanda Burns ha scritto:
Wanda Burns ha scritto:
I am ready to start the border on 153-2. The pattern instructions say to add 14 stitches from the wrong side. Would you recommend the "cast on with loops" that is shown in the video provided? In order to do the cable cast on wouldn't we need to turn the work? Thanks so much for the clarification.
16.12.2022 - 00:59DROPS Design ha risposto:
Dear Mrs Burns, you can use any technique to cast on these new 14 sts as long as they are on the correct place on the piece so that you can work together at the end of every row from right side the last stitch of edge with the next stitch of the shawl. Happy knitting!
16.12.2022 - 08:36
![]() Inge ha scritto:
Inge ha scritto:
Hi, I have got to the part where you have 197 stiches and have to do A2-A3-A4. It says repeat on the other side of the mid stitch. Does this imply that you do A4-A3 repeats-A2? or A2-A3 repeats? I did the latter. Somehow neither option appears to be symmetrical
06.09.2022 - 15:13DROPS Design ha risposto:
Dear Inge, you will work on each side of the middle stitch the same way: A.2 x 1 time, repeat A.3 and work A.4 x 1 time (A.2 and A.4 are both stocking stitches) so that you will increase as before on each side of shawl + on each side of the middle stitch and work the new sts in stocking stitch (= as shown in A.2 and A.4). Happy knitting!
06.09.2022 - 16:25
![]() Sandra ha scritto:
Sandra ha scritto:
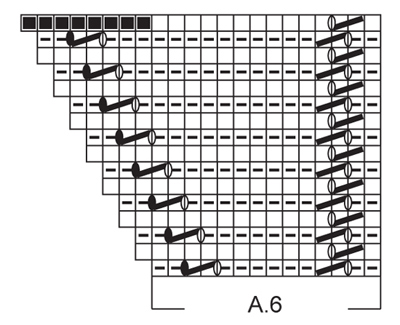
Danke, aber nein. Ich meine die beiden Absätze vor "BORDÜRE:". Es soll zuletzt eine Rück-R re gestrickt werden und somit ist die nächste R eine Hin-R wenn mit der Bordüre begonnen wird. So kann man die Bordüre nicht richtig anstricken. Egal, ich habe es für mich angepasst und bin sonst mit der Anleitung sehr zufrieden. Danke für die vielen Anleitungen und schöne Grüße.
06.10.2021 - 23:02DROPS Design ha risposto:
Liebe Sandra, die letzte Reihe über die 360 Maschen ist ja eine Rückreihe, am Ende dieser Reihe schlagen Sie 14 neuen Maschen (= Bordüre = A.6), wenden Sie und stricken Sie die 14 M rechts = Hinreihe, wenden Sie und jetzt stricken Sie bei der nächsten Rückreihe die 1. Reihe in A.6 (lesen Sie von links nach rechts), und so weiter stricken, bei der nächsten Reihe = Hinreihe stricken sie die letzten Masche von A.6 zs mit der nächsten M vom Tuch, usw. Kan es Ihnen helfen?
07.10.2021 - 08:40
![]() Sandra ha scritto:
Sandra ha scritto:
Danke, aber irgendwie stimmt in der Anleitung etwas nicht. Nach 6 x A.5 soll eine Hinreihe mit Umschlägen und dann eine Rück-R re gestickt werden. Also bin ich dann am re Rand am Beginn einer neuen Hin-R. Wie soll ich dann am Ende der Reihe nach 14 M Neuanschlag mit der Rück-R von A.6 anfangen. Ich habe jetzt noch eine Hin-R re gestrickt und komme so hin. Es sieht jetzt auch richtig und gut aus. Zum Glück bin ich eine erfahrene Strickerin. Die Anleitung verwirrt etwas.
06.10.2021 - 07:34DROPS Design ha risposto:
Liebe Sandra, meinen Sie A.6 anstatt A.5? A.6 wird jedesmal wie zuvor gestrickt: es sind 360 M am Ende vom Tuch und 8 Hin-Reihen in A.6 wo Sie A.6 und Tuch zusammen stricken = 45 Spitzen insgesamt. Kan das Ihnen helfen?
06.10.2021 - 07:48
![]() Sandra ha scritto:
Sandra ha scritto:
Hallo, nun bin ich bei der Bordüre. Beginnen soll ich die Bordüre an der rechten Ecke des Tuches. Auf der Abbildung ist die Bordüre aber zweifelsfrei ab dem linken Rand gestickt, da das Lochmuster der Spitze entsprechend verläuft. Was passt nun? Mit dem Stricken ab der rechten Ecke wird auch die Abnahmelinie nach den Umschlägen in jeder Reihe (Lochreihe) sehr unschön, da die linke Seite zu sehen ist. Vielen Dank
05.10.2021 - 09:11DROPS Design ha risposto:
Liebe Sandra, die 1. Reihe von A.6 ist eine Rückreihe, die Bordüre wird zusammen mit dem Tuch am Ende den Hinreihen gestrickt, vielleicht kann Ihnen dieses Video helfen?
06.10.2021 - 07:16
![]() Sandra Witte ha scritto:
Sandra Witte ha scritto:
Negeer mijn vorige vraag maar, ik heb het al ontdekt! De omslagdoek wordt van boven naar beneden gebreid en ik dacht van onder naar boven. Foutje van mij :-)
24.10.2020 - 13:52DROPS Design ha risposto:
Dag Sandra,
Mooi dat het opgelost is en dat je nu verder kan. Dankjewel voor de terugkoppeling en veel breiplezier!
25.10.2020 - 19:10
![]() Sandra Witte ha scritto:
Sandra Witte ha scritto:
Als het eerste deel van het patroon is gebreid, moet je toch eerst dit aflaten en dan de steken langs de zijkanten opnemen? Dit staat niet in de beschrijving.
24.10.2020 - 13:25
![]() Carolyn Bremner ha scritto:
Carolyn Bremner ha scritto:
Butterfly Dance Shawl: Under the section titled "INC REPETITION" it says Every time inc repetition has been worked, piece inc 8 sts. Should that not be 4 stitches as you drop the second loop off when knitting from the wrong side?
01.04.2019 - 20:22DROPS Design ha risposto:
Dear Mrs Brenner, on row 1 and 3 you are increasing 4 stitches with a double yarn over: make 1 double yarn over after the first stitch, 1 double yarn over before the middle stitch, 1 double yarn over after the middle stitch, and 1 double yarn over before the last stitch = 4 double yarn overs = 4 stitches increased on row 1 + 4 stitches increased on row 3 = 8 stitches have been increased after these 4 rows have been worked. Happy knitting!
02.04.2019 - 09:55
|
|||||||||||||||||||||||||
Butterfly Dance#butterflydanceshawl |
|||||||||||||||||||||||||
|
|
|||||||||||||||||||||||||
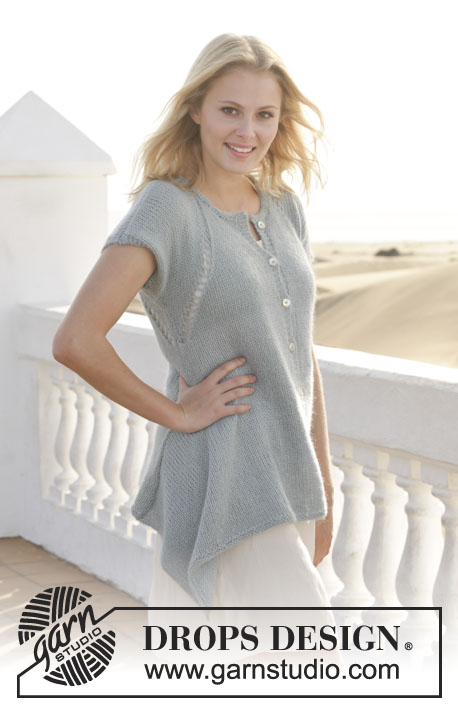
Scialle DROPS lavorato ai ferri a maglia legaccio con motivo a pizzo in "Alpaca".
DROPS 153-2 |
|||||||||||||||||||||||||
|
M LEGACCIO (avanti e indietro sui f): Lavorare tutti i f a dir. 1 “costa” a m legaccio = 2 f dir. MOTIVO: Vedere i diagrammi A.1-A.6. I diagrammi mostrano tutti i f del motivo visti dal diritto del lavoro. RIPETIZIONI DEGLI AUMENTI: Aumentare su ogni f dal diritto del lavoro come segue con i doppi gettati: 1° f: aumentare con doppio gettato prima/dopo la m di vivagno a ogni lato dello scialle e a ogni lato della m centrale. 2° f: lavorare tutte le m a dir, lavorare il 1° gettato a dir per fare un buco, far cadere il 2° gettato dal f. 3°: aumentare con doppio gettato prima/dopo la m di vivagno a ogni lato dello scialle e a ogni lato della m centrale. 4° f: lavorare tutte le m a dir, lavorare il 1° gettato a dir per fare un buco, far cadere il 2° gettato dal f. Ogni volta che una ripetizione degli aumenti è stata lavorata, il lavoro aumenta di 8 m. ---------------------------------------------------------- SCIALLE: Avviare 3 m con i f circolari n° 3,5 mm con Alpaca. Inserire un segnapunti nella 2° m = m centrale. Lavorare il 1° f come segue: 1 m dir, 1 gettato, 1 m dir, 1 gettato, e 1 m dir, girare e lavorare a dir = 5 m sul f. Continuare a M LEGACCIO – leggere la spiegazione sopra, ALLO STESSO TEMPO lavorare le RIPETIZIONI DEGLI AUMENTI (lavorarlo per tutto lo scialle) – leggere la spiegazione sopra, fino a quando le ripetizioni degli aumenti sono state lavorate 22 volte e ci sono 44 buchi verso l’alto a ogni lato della m centrale = 181 m sul f. Il n° di m ora può essere diviso per 8 + 5. Poi lavorare il diagramma A.1 (lavorare gli aumenti come prima e la m di vivagno e la m centrale a m legaccio). Sul f nel diagramma con 2 m insieme a dir e il gettato lavorare fino a quando rimane 1 m prima della m centrale, 1 m dir, m centrale e aumenti come prima a ogni lato di questa, 1 m dir e continuare con il diagramma A.1. Dopo aver lavorato il diagramma 1 volta in verticale, sul f ci sono 197 m. Poi lavorare secondo il diagramma A.2, A.3 e A.4 come segue: lavorare la m di vivagno e il gettato come prima, lavorare A.2 (NOTA! il n° di m da lavorare in A.2 sul 1° f del diagramma), ripetere A.3 fino a quando rimane 1 m prima della m centrale, lavorare A.4 su questa m, il gettato e m centrale come prima. Ripetere sull’altro lato dello scialle. Continuare a lavorare secondo A.2, A.3 e A.4 in questo modo. Quando i diagramma A.2 - A.4 sono stati lavorati 1 volta in verticale, ci sono 229 m sul f. Ora sostituire il diagramma A.3 con il diagramma A.5, gli aumenti sono stati fatti per combaciare con 2 ripetizioni extra di A.5 a ogni lato dello scialle. Lavorare secondo il diagramma A.2, A.5 e A.4 e lavorare più ripetizioni di A.5 quando combaciano. Continuare in questo modo fino a quando A.5 è stato lavorato 6 volte in totale in verticale. Ora ci sono 325 m sul f e il n° di m è ancora divisibile per 8 + 5. Sul f successivo dal diritto del lavoro lavorare senza ripetizioni degli aumenti dal diritto del lavoro come segue: 2 m dir nella 1° m, poi * 4 m dir, 1 gettato *, ripetere *-* 8 volte, 97 m dir, ripetere *-* 8 volte. 2 m dir nella m centrale, ripetere *-* 8 volte, 97 m dir, ripetere *-* 8 volte e finire con 2 m dir nell'ultima m = 360 m sul f, il n° di m può essere diviso per 8. Lavorare 1 f dir dal rovescio del lavoro, lavorare i gettati dal f precedente a dir ritorto per evitare buchi. Lavorare ora il bordo dello scialle. BORDO: Non girare il lavoro, ma avviare 14 nuove m per il bordo dello scialle dal rovescio del lavoro. Girare il lavoro, lavorare 1 f dir sulle 14 nuove m. Girare il lavoro. Poi lavorare secondo il diagramma A.6 su queste m dal rovescio del lavoro (1° f del diagramma = rovescio del lavoro). NOTA! Su ogni f dal diritto del lavoro lavorare l’ultima m insieme alla m libera successiva dello scialle – in questo modo il bordo dello scialle viene lavorato insieme e affrancato allo scialle. Sul f successivo passare la 1° m a rov senza lavorarla. Continuare a lavorare A.6 lungo tutto il bordo dello scialle = 43 punte lungo il bordo. Tagliare e affrancare il filo. |
|||||||||||||||||||||||||
Spiegazioni del diagramma |
|||||||||||||||||||||||||
|
|||||||||||||||||||||||||
 |
|||||||||||||||||||||||||
 |
|||||||||||||||||||||||||
 |
|||||||||||||||||||||||||
Avete terminato questo modello?Allora taggate le vostre foto con #dropspattern #butterflydanceshawl o inviatele alla #dropsfan gallery. Avete bisogno di aiuto con questo modello?Troverete 18 video tutorial, una sezione per i commenti/domande e molto altro guardando il modello su www.garnstudio.com © 1982-2026 DROPS Design A/S. Ci riserviamo tutti i diritti. Questo documento, compreso tutte le sue sotto-sezioni, è protetto dalle leggi sul copyright. Potete leggere quello che potete fare con i nostri modelli alla fine di ogni modello sul nostro sito. |
|||||||||||||||||||||||||


Con oltre 40 anni di esperienza nel design di modelli di maglia e uncinetto, DROPS Design offre la più estesa collezione di modelli gratuiti su internet - tradotti in 17 lingue. Ad oggi vi possiamo fornire 325 cataloghi e 12298 modelli - 9569 dei quali sono tradotti in Italiano.
Ci stiamo impegnando molto per darvi il meglio che vi possiamo offrire in termini di maglia e uncinetto, ispirazioni e consigli così come filati di grande qualità ad un prezzo incredibile! Volete utilizzare i nostri modelli per qualcosa d'altro oltre al vostro uso personale? Potete leggere tutto ciò che è consentito nel testo sul Copyright in basso su tutte le pagine dei nostri modelli. Buon lavoro!
Lasciare un commento sul modello DROPS 153-2
Noi saremmo felici di ricevere i tuoi commenti e opinioni su questo modello!
Se vuoi fare una domanda, fai per favore attenzione a selezionare la categoria corretta nella casella qui sotto per velocizzare il processo di risposta. I campi richiesti sono indicati da *.