
Categorie popolari
State cercando un filato?














Commenti / Domande (121)
 Jayne Bradbury ha scritto:
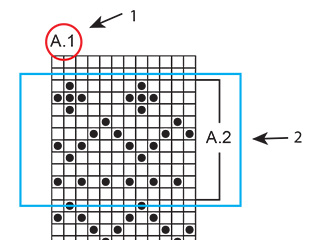
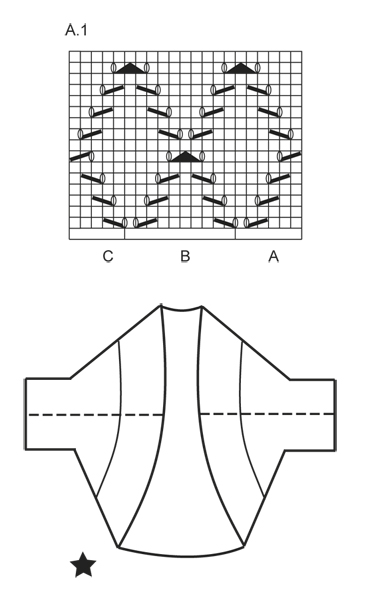
Regarding the chart: Are all rows, both right and wrong side, on the chart? Or just the right side? There are no numbers on the side of the chart to clarify and I want to be sure.
31.05.2016 - 16:17DROPS Design ha risposto:
Dear Mrs Bradbury, diagram shows all rows both from RS and from WS, seen from RS - read more about diagrams here. Happy knitting!
31.05.2016 - 17:01
 Sue ha scritto:
I do not understand the construction of this garment. Where are the sleeves? Where is the head?
29.05.2016 - 02:59DROPS Design ha risposto:
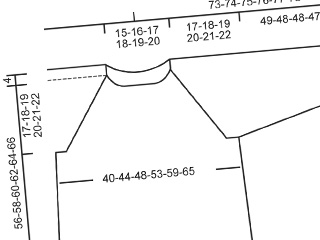
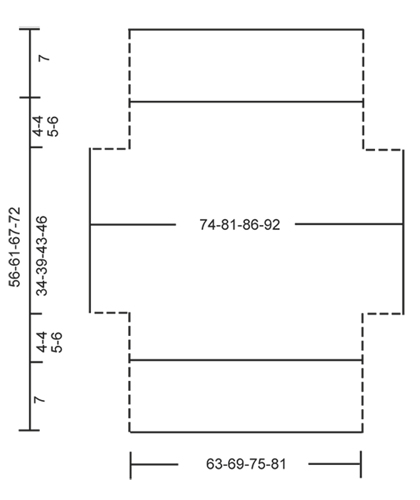
Dear Sue, the moss st edge around opening consists on the 7 cm worked at the beg of piece and the 7 cm worked at the end of piece (see measurement chart). The sts cast on /cast off on each side are for sleeves. The dotted lines on each side are the sides you will sew tog to create sleeves. In chart with black star, you can see the dotted line (seam for sleeves) and the 7 cm moss st edge around opening. Happy knitting!
30.05.2016 - 09:26
Jayne Bradbury ha scritto:
I am just beginning this project and cannot visualize how the two diagrams given relate to one another, nor can I visualize even how this is constructed. I imagine that once I get going, I may figure it out, but I want to be sure to select the correct size. My bust measurement is 36, which of course is between sizes S and M. Can you give me some guidance as to how this is constructed and perhaps which size might be best?
25.04.2016 - 02:33DROPS Design ha risposto:
Dear Mrs Bradbury, check the measurement from chart compared to a similar garment you have. The dotted line in measurement chart are the seam on sides and sleeves (34-46 cm = around sleeve), and the 7 cm at the beg (bottom) and end (top) of chart = the garter st edge worked at the beg and end of piece. Happy knitting!
25.04.2016 - 10:24
Marlie ha scritto:
This looks like a great pattern but in the picture it looks like there is a seam in the garter stitch border. Is that right? Is there any way to make that less obvious? I am looking forward to making something in Big Merino...it is so soft! Many thanks
11.04.2016 - 15:09DROPS Design ha risposto:
Dear Marlie, yes that's correct, there is a seam on each side: you sew tog side and underarm seams in one - see also dotted line in chart and how the bolero looks when it's ready to wear. Happy knitting!
11.04.2016 - 16:04
Rose ha scritto:
I am very confused about construction. I cannot seem to figure out how to fold and "seam the sides and underarm seams. Your diagram is not helping me.
27.07.2015 - 01:29DROPS Design ha risposto:
Dear Rose, fold piece along the line where you see (74-81-86-92) on the measurement chart and sew tog the dotted lines from upper part to the dotted line on the lower part, the 34-39-343-46 cm in each side = armholes. Happy knitting!
27.07.2015 - 17:57
 Inger Andersson ha scritto:
Jag har monterat boleron men det blir så konstigt vid ärmen. Det blir inte någon ärm utan snarare en strut. Ser väldigt konstigt ut. Jag har kollat igenom mönstret och enligt diagrammet är måtten helt rätt.
07.07.2015 - 15:08DROPS Design ha risposto:
Har du måttet på ärmen enligt måttskissen nederst i mönstret innan du syr ihop? Den skall se ut som på bilden om du följer beskrivningen!
08.07.2015 - 14:56
 Tina ha scritto:
Fertig! Ich habe den Bolero in Farbe Natur gestrickt - ich brauchte allerdings 1 Knäuel mehr in Größe XXXL.
03.12.2014 - 07:23
Brigitte ha scritto:
Ich bin jetzt an der Reihe in der jeweils am Anfang und Ende die 10 M zugenommen werden. Wie füge ich die jetzt in das Muster ein? Wenn ich 3 M kraus und dann 6 M Muster stricke, sind das nur 9 Maschen bevor der Rapport kommt. Ich verstehe das leider nicht? Grüße Brigitte
06.09.2014 - 17:37DROPS Design ha risposto:
Liebe Brigitte, zählen Sie das Muster am besten ausgehend von den Rapporten vor den Ärmelzunahmen ab und setzen es einfach fort. Lesen Sie auch die Frage und Antwort weiter unten in der Kommentarliste vom 16.08.2013/19.08.2013.
11.09.2014 - 10:05
 Suponte ha scritto:
Hola: voy a tejer este bolero pero mi pregunta es como tejo las vueltas del reves del diagrama ? con punto reves?
06.08.2014 - 15:14DROPS Design ha risposto:
Hola. El diagrama muestra todas las filas del patrón vistas por el LD. Las filas por el LR se trabajan con pt revés.
06.08.2014 - 22:44
Pat Y ha scritto:
Thanks for your response. I realized afterwards that the pattern folds crosswise and thus the differing stitches are not an issue.
02.08.2014 - 15:49
|
|||||||||||||||||||
Cassie#cassiebolero |
|||||||||||||||||||
 |
 |
||||||||||||||||||
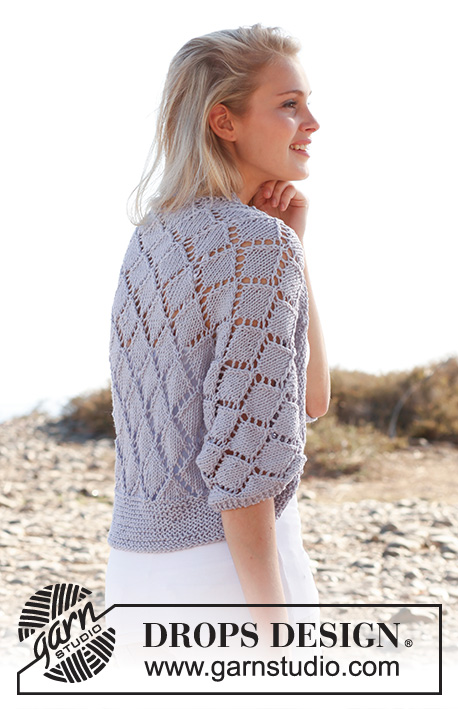
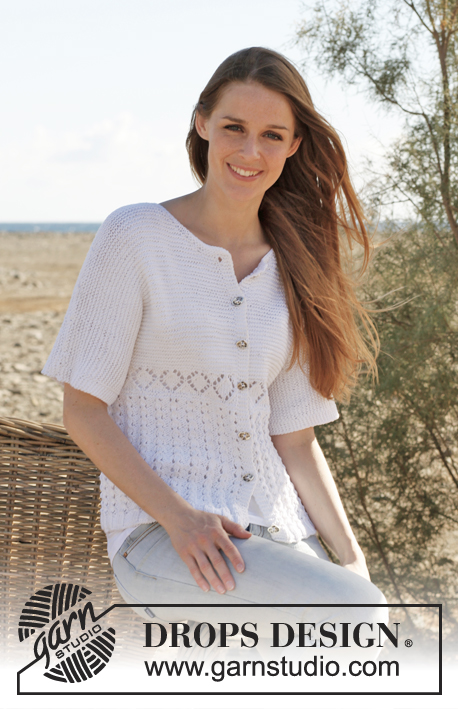
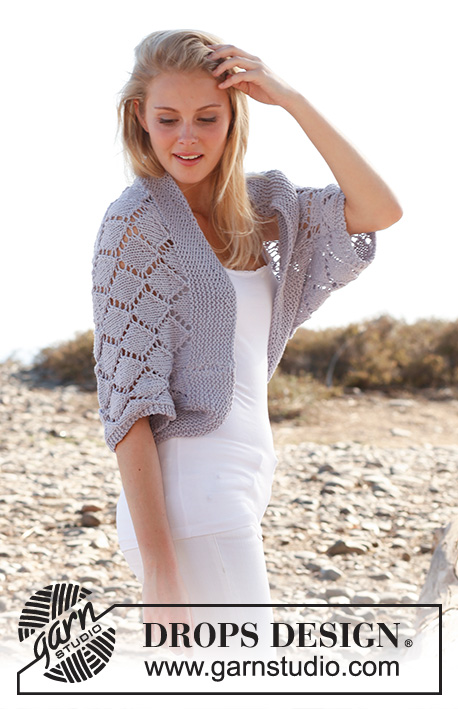
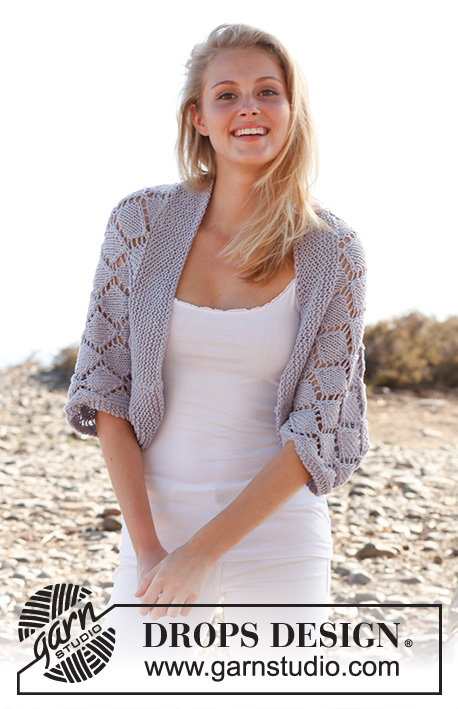
Bolero DROPS ai ferri, con motivo traforato, in "Big Merino". Taglie: Dalla S alla XXXL.
DROPS 146-16 |
|||||||||||||||||||
|
PUNTO LEGACCIO (avanti e indietro sui ferri): Lavorare tutti i ferri a dir. 1 “costa” a legaccio = 2 ferri a dir. MOTIVO: Vedere il diagramma A.1. Il diagramma mostra tutti i ferri del motivo, visti sul diritto del lavoro. --------------------------------------------------------- BOLERO: Si lavora avanti e indietro sui ferri circolari per avere sufficiente spazio per tutte le m. Avviare 107-117-127-137 m sui ferri circolari n° 5 con il filato Big Merino. Lavorare a punto legaccio finché il lavoro non misura 7 cm. Proseguire come segue, sul diritto del lavoro: 3 m a PUNTO LEGACCIO - vedere le spiegazioni sopra, diagramma A.1A (= 6 m), diagramma A.1 B sulle 90-100-110-120 m successive, finire con il diagramma A.1 C (= 5 m) e 3 m a PUNTO LEGACCIO. Proseguire con il diagramma A.1 e 3 m a punto legaccio da ciascun lato. RICORDARSI LA TENSIONE DEL LAVORO! Quando il lavoro misura 11-11-12-13 cm, avviare 10 nuove m alla fine dei 2 ferri successivi per le maniche = 127-137-147-157 m. Lavorare come segue: 3 m a punto legaccio, diagramma A.1A (= 6 m), diagramma A.1 B sulle 110-120-130-140 m successive, finire con il diagramma A.1 C (= 5 m) e 3 m a PUNTO LEGACCIO. ATTENZIONE! Lavorare il diagramma A.1 in modo che prosegua correttamente sulla parte del corpo e proseguirlo sulle maniche. Quando il lavoro misura 45-50-55-59 cm, intrecciare 10 m all’inizio dei 2 ferri successivi = 107-117-127-137 m. Lavorare come segue: 3 m a punto legaccio, diagramma A.1A (= 6 m), diagramma A.1 B sulle 90-100-110-120 m successive, finire con il diagramma A.1 C (= 5 m) e con 3 m a punto legaccio. Quando il lavoro misura 49-54-60-65 cm, lavorare a punto legaccio tutte le m. Intrecciare le m quando il lavoro misura 56-61-67-72 cm. CONFEZIONE: Cucire i lati delle maniche e del corpo all’interno della m vivagno - vedere la linea tratteggiata nel diagramma. |
|||||||||||||||||||
Spiegazioni del diagramma |
|||||||||||||||||||
|
|||||||||||||||||||
 |
|||||||||||||||||||
 |
|||||||||||||||||||
Avete terminato questo modello?Allora taggate le vostre foto con #dropspattern #cassiebolero o inviatele alla #dropsfan gallery. Avete bisogno di aiuto con questo modello?Troverete 8 video tutorial, una sezione per i commenti/domande e molto altro guardando il modello su www.garnstudio.com © 1982-2026 DROPS Design A/S. Ci riserviamo tutti i diritti. Questo documento, compreso tutte le sue sotto-sezioni, è protetto dalle leggi sul copyright. Potete leggere quello che potete fare con i nostri modelli alla fine di ogni modello sul nostro sito. |
|||||||||||||||||||

Con oltre 40 anni di esperienza nel design di modelli di maglia e uncinetto, DROPS Design offre la più estesa collezione di modelli gratuiti su internet - tradotti in 17 lingue. Ad oggi vi possiamo fornire 333 cataloghi e 12548 modelli - 9822 dei quali sono tradotti in Italiano.
Ci stiamo impegnando molto per darvi il meglio che vi possiamo offrire in termini di maglia e uncinetto, ispirazioni e consigli così come filati di grande qualità ad un prezzo incredibile! Volete utilizzare i nostri modelli per qualcosa d'altro oltre al vostro uso personale? Potete leggere tutto ciò che è consentito nel testo sul Copyright in basso su tutte le pagine dei nostri modelli. Buon lavoro!
Lasciare un commento sul modello DROPS 146-16
Noi saremmo felici di ricevere i tuoi commenti e opinioni su questo modello!
Se vuoi fare una domanda, fai per favore attenzione a selezionare la categoria corretta nella casella qui sotto per velocizzare il processo di risposta. I campi richiesti sono indicati da *.