
Categorie popolari
State cercando un filato?


Commenti / Domande (118)
Carla ha scritto:
Drops 146-16. I’ve never read a pattern like this before and I’m very lost is there a tutorial showing what to do after doing the garter st for 7cm??
12.11.2018 - 00:51DROPS Design ha risposto:
Dear Carla, you can find the videos, related to this pattern at the left of the page, below the pictures. Also there are detailed explanation of the symbos of the pattern chart. If you need further help you can also ask for it in person in the store where you bought your DROPS yarn from. Happy Crafting!
12.11.2018 - 01:50
![]() Kitty Neijssel ha scritto:
Kitty Neijssel ha scritto:
Voor dit patroon zou voor maat XXXL 350 gram nodig zijn. Ik heb dus 7 bolletjes besteld. Al na 1 bolletje zag ik dat die hoeveelheid lang niet genoeg zou zijn. Na 4 bollen ben ik nog niet op de helft. Volgens mijn berekening heb ik nog 2 bollen nodig. Ik ben zeker geen beginnende breister ( ex-lerares Textiele Werkvormen en gedegen hobby-breister). Alles klopt volgens de stekenproef e.d. Ik ben een enthousiaste fan van Drops en tot nog toe heb ik nog nooit een probleem gehad met de patronen.
26.03.2018 - 13:20
![]() Anna ha scritto:
Anna ha scritto:
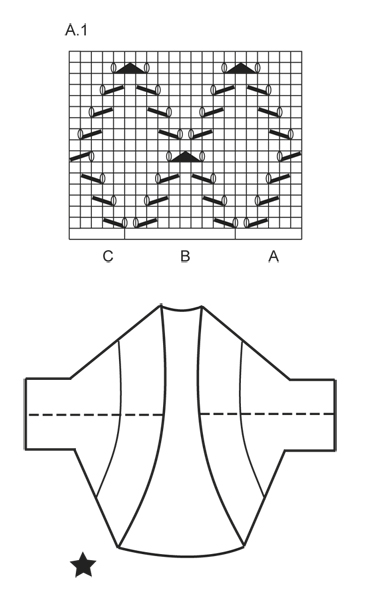
Da quale lato va letto il diagramma A1? La linea tratteggiata è la manica?
20.11.2017 - 07:53DROPS Design ha risposto:
Buongiorno Anna. Il diagramma si legge dal basso verso l’alto e da destra verso sinistra (lavorando avanti e indietro, i ferri pari si leggono da sinistra verso destra). Nel grafico con le misure, le linee tratteggiate sono le parti che verranno cucite: dovrà cucire sotto le maniche e i lati del davanti e dietro. Buon lavoro!
20.11.2017 - 11:04
![]() Natasja ha scritto:
Natasja ha scritto:
Hi. Im about to cast on for the sleeves, and i dont understand the 10 st. Is it 10 st in each side or 5 st in each side, and how ?
07.08.2017 - 12:24DROPS Design ha risposto:
Hi Natasja, You cast on 10 new stitches at the end of the next 2 rows, so 10 stitches at the end of the first row and then 10 new stitches at the end of the next row. So 20 stitches all in all. I hope this helps. Happy knitting!
07.08.2017 - 15:53
![]() Karine ha scritto:
Karine ha scritto:
Bonjour, Je tricote la taille L J'ai un souci à la première ligne du diagramme A1. 3 m. pt mousse - A1a - A1b - terminer par A1c OK mais il me reste 6 mailles avant de terminer 3 m pt mousse de la fin ? Logiquement, répétition de 5 fois diagramme A1 sur la ligne c'est juste ? Je refais plusieurs fois, j'arrive toujours pareil, je ne comprends pas :(
03.04.2017 - 17:49DROPS Design ha risposto:
Bonjour Karine, vérifiez bien que vous avez bien 6 m pour A.1A, 10 m pour chaque motif de A.1B et 5 m pour A.1C, ainsi, vous devriez bien avoir: 3 m point mousse, 6 m de A.1A, 11-12-13-14 fois A.1B (= 110-120-130-140 m en A1B), 5 m de A.1C et 3 m point mousse = 127-1237-147-157 m. Bon tricot!
04.04.2017 - 10:04
![]() April ha scritto:
April ha scritto:
Reading the pattern as we add the sleeves which pattern do we follow. It says to fit A.1 in before the increase. I'm confused as to which diagram we use for the sleeves.
18.07.2016 - 04:05DROPS Design ha risposto:
Dear April, start with 3 sts in garter st, then work A.1A on the next 6 sts (= new sts cast on for sleeve), now work first A.1B over the next 10 sts (= last st cast on for sleeve + the next 3 sts previously worked in garter st + the next 6 sts previously worked in A.1A), then repeat A.1B and A.1C as before until end of row, cast on the 10 new sts and continue as before. Happy knitting!
18.07.2016 - 09:35
![]() Arika ha scritto:
Arika ha scritto:
There is no way size L needs just 300 g. I am at 24 cm and I'm starting my 4th skein. I did the gauge and it was correct so it is not an issue of my loose knitting style. Now I have to order one more skein just to finish the garment. This is extremely frustrating as I'm not even sure if the dye lots match. Not to mention extra shipping cost (I was not planning to buy any yarn anytime soon). PLEASE correct the yardage for other knitters!
15.06.2016 - 05:07
![]() Jayne Bradbury ha scritto:
Jayne Bradbury ha scritto:
Regarding the chart: Are all rows, both right and wrong side, on the chart? Or just the right side? There are no numbers on the side of the chart to clarify and I want to be sure.
31.05.2016 - 16:17DROPS Design ha risposto:
Dear Mrs Bradbury, diagram shows all rows both from RS and from WS, seen from RS - read more about diagrams here. Happy knitting!
31.05.2016 - 17:01
![]() Sue ha scritto:
Sue ha scritto:
I do not understand the construction of this garment. Where are the sleeves? Where is the head?
29.05.2016 - 02:59DROPS Design ha risposto:
Dear Sue, the moss st edge around opening consists on the 7 cm worked at the beg of piece and the 7 cm worked at the end of piece (see measurement chart). The sts cast on /cast off on each side are for sleeves. The dotted lines on each side are the sides you will sew tog to create sleeves. In chart with black star, you can see the dotted line (seam for sleeves) and the 7 cm moss st edge around opening. Happy knitting!
30.05.2016 - 09:26
![]() Jayne Bradbury ha scritto:
Jayne Bradbury ha scritto:
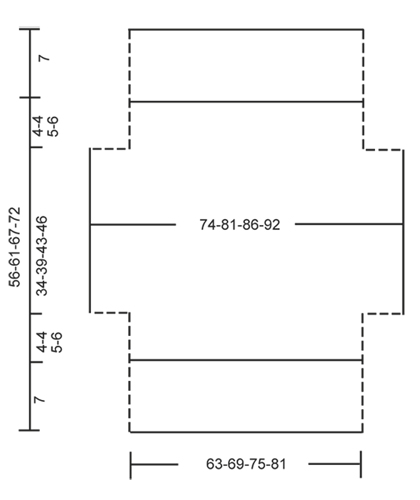
I am just beginning this project and cannot visualize how the two diagrams given relate to one another, nor can I visualize even how this is constructed. I imagine that once I get going, I may figure it out, but I want to be sure to select the correct size. My bust measurement is 36, which of course is between sizes S and M. Can you give me some guidance as to how this is constructed and perhaps which size might be best?
25.04.2016 - 02:33DROPS Design ha risposto:
Dear Mrs Bradbury, check the measurement from chart compared to a similar garment you have. The dotted line in measurement chart are the seam on sides and sleeves (34-46 cm = around sleeve), and the 7 cm at the beg (bottom) and end (top) of chart = the garter st edge worked at the beg and end of piece. Happy knitting!
25.04.2016 - 10:24
|
|||||||||||||||||||
Cassie#cassiebolero |
|||||||||||||||||||
 |
 |
||||||||||||||||||
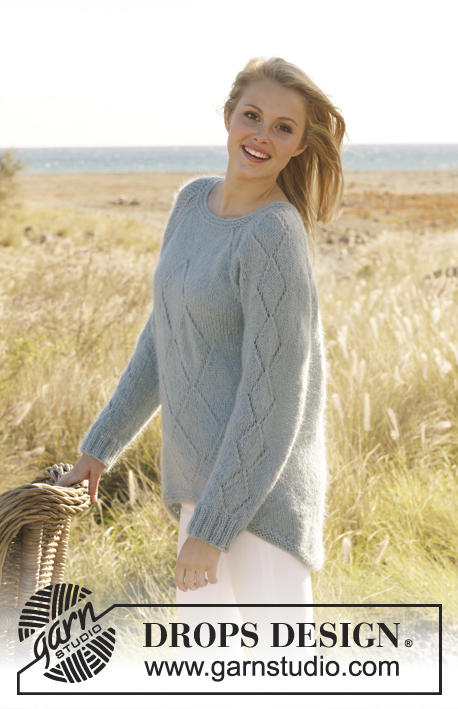
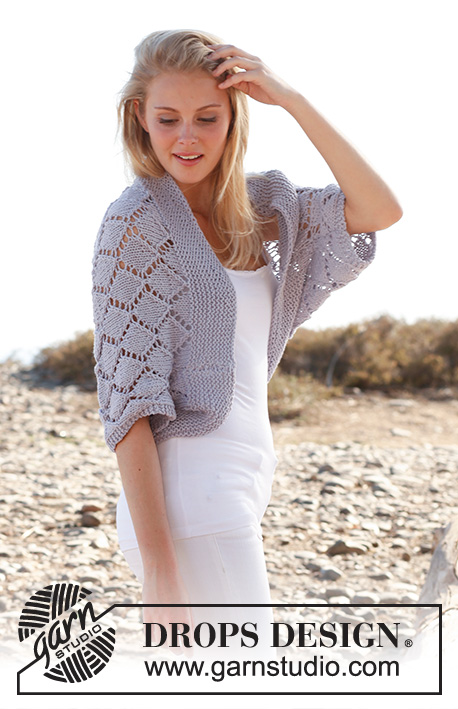
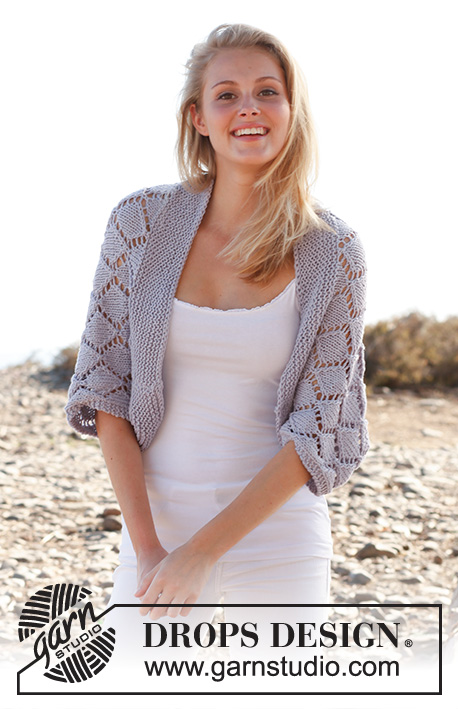
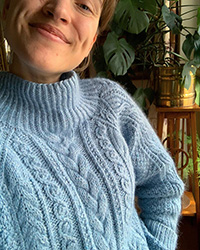
Bolero DROPS ai ferri, con motivo traforato, in "Big Merino". Taglie: Dalla S alla XXXL.
DROPS 146-16 |
|||||||||||||||||||
|
PUNTO LEGACCIO (avanti e indietro sui ferri): Lavorare tutti i ferri a dir. 1 “costa” a legaccio = 2 ferri a dir. MOTIVO: Vedere il diagramma A.1. Il diagramma mostra tutti i ferri del motivo, visti sul diritto del lavoro. --------------------------------------------------------- BOLERO: Si lavora avanti e indietro sui ferri circolari per avere sufficiente spazio per tutte le m. Avviare 107-117-127-137 m sui ferri circolari n° 5 con il filato Big Merino. Lavorare a punto legaccio finché il lavoro non misura 7 cm. Proseguire come segue, sul diritto del lavoro: 3 m a PUNTO LEGACCIO - vedere le spiegazioni sopra, diagramma A.1A (= 6 m), diagramma A.1 B sulle 90-100-110-120 m successive, finire con il diagramma A.1 C (= 5 m) e 3 m a PUNTO LEGACCIO. Proseguire con il diagramma A.1 e 3 m a punto legaccio da ciascun lato. RICORDARSI LA TENSIONE DEL LAVORO! Quando il lavoro misura 11-11-12-13 cm, avviare 10 nuove m alla fine dei 2 ferri successivi per le maniche = 127-137-147-157 m. Lavorare come segue: 3 m a punto legaccio, diagramma A.1A (= 6 m), diagramma A.1 B sulle 110-120-130-140 m successive, finire con il diagramma A.1 C (= 5 m) e 3 m a PUNTO LEGACCIO. ATTENZIONE! Lavorare il diagramma A.1 in modo che prosegua correttamente sulla parte del corpo e proseguirlo sulle maniche. Quando il lavoro misura 45-50-55-59 cm, intrecciare 10 m all’inizio dei 2 ferri successivi = 107-117-127-137 m. Lavorare come segue: 3 m a punto legaccio, diagramma A.1A (= 6 m), diagramma A.1 B sulle 90-100-110-120 m successive, finire con il diagramma A.1 C (= 5 m) e con 3 m a punto legaccio. Quando il lavoro misura 49-54-60-65 cm, lavorare a punto legaccio tutte le m. Intrecciare le m quando il lavoro misura 56-61-67-72 cm. CONFEZIONE: Cucire i lati delle maniche e del corpo all’interno della m vivagno - vedere la linea tratteggiata nel diagramma. |
|||||||||||||||||||
Spiegazioni del diagramma |
|||||||||||||||||||
|
|||||||||||||||||||
 |
|||||||||||||||||||
 |
|||||||||||||||||||
Avete terminato questo modello?Allora taggate le vostre foto con #dropspattern #cassiebolero o inviatele alla #dropsfan gallery. Avete bisogno di aiuto con questo modello?Troverete 15 video tutorial, una sezione per i commenti/domande e molto altro guardando il modello su www.garnstudio.com © 1982-2026 DROPS Design A/S. Ci riserviamo tutti i diritti. Questo documento, compreso tutte le sue sotto-sezioni, è protetto dalle leggi sul copyright. Potete leggere quello che potete fare con i nostri modelli alla fine di ogni modello sul nostro sito. |
|||||||||||||||||||


Con oltre 40 anni di esperienza nel design di modelli di maglia e uncinetto, DROPS Design offre la più estesa collezione di modelli gratuiti su internet - tradotti in 17 lingue. Ad oggi vi possiamo fornire 324 cataloghi e 12190 modelli - 9461 dei quali sono tradotti in Italiano.
Ci stiamo impegnando molto per darvi il meglio che vi possiamo offrire in termini di maglia e uncinetto, ispirazioni e consigli così come filati di grande qualità ad un prezzo incredibile! Volete utilizzare i nostri modelli per qualcosa d'altro oltre al vostro uso personale? Potete leggere tutto ciò che è consentito nel testo sul Copyright in basso su tutte le pagine dei nostri modelli. Buon lavoro!
Lasciare un commento sul modello DROPS 146-16
Noi saremmo felici di ricevere i tuoi commenti e opinioni su questo modello!
Se vuoi fare una domanda, fai per favore attenzione a selezionare la categoria corretta nella casella qui sotto per velocizzare il processo di risposta. I campi richiesti sono indicati da *.