
Categorie popolari
State cercando un filato?


Commenti / Domande (126)
![]() Michaela ha scritto:
Michaela ha scritto:
Pre českú verziu chyba dôležitá veta, ktorú som našla v komentároch ešte z roku 2018 a do návodu to nebolo doplnene. Ak budete pliesť predný diel treba pri oddelení ociek na pomocnú ihlicu ďalej uberať nasledovne: AT THE SAME TIME bind off at beg of every row from neck: 2 sts 3 times and 1 st 3 times = 26-27-29-30-32-33 sts remain on shoulder.
17.01.2023 - 00:04
![]() Sara Jones ha scritto:
Sara Jones ha scritto:
Thanks for your last reply. The video about casting on is really helpful. Please could you just clarify where in the pattern I cast on the extra two stitches? Is it right at the end of the sleeve when it is the full 63cm before casting off, or does it not matter where they go?! Thanks again
28.11.2022 - 22:29DROPS Design ha risposto:
Dear Mrs Jones, you will cast on these 2 new stitches when sleeve measures 61-60-59-58-56-54 cm from the cast on edge, then continue working the sleeve cap back and forth on needle . Happy knitting!
29.11.2022 - 10:04
![]() Sara Jones ha scritto:
Sara Jones ha scritto:
I’m coming towards the end of my first sleeve & wonder when I should “cast on one new stitch in each side”. I’ve finished the pattern M1 & am about to continue just in the blue until the finished measurement. I’m unsure when to cast on the new stitches & which technique would be best. Am I casting on these two extra stitches on one occasion or repeatedly? Thank you
28.11.2022 - 09:07DROPS Design ha risposto:
Dear Mrs Jones, this video shows how to cast on new stitches on the side; use this technique to cast one only 1 stitch at the end of the first row from the right side then 1 stitch at the end of the first row from the wrong side; Happy knitting!
28.11.2022 - 10:36
![]() Sara Jones ha scritto:
Sara Jones ha scritto:
Just discovered I’ve knitted too far in the front so need to rip back a few rows to cast off the middle 19 stitches for the neck (size XL). I’m not sure what to do with the instructions to cast off 2 stitches 3 times & 1 stitch 3 times. Is this on consecutive rows & always in the middle of the front i.e. closest to the neck opening? This would mean casting off on a knit row then a purl row? Is there a video to help with this? Thank you
29.10.2022 - 22:18DROPS Design ha risposto:
Dear Sara, you need to cast off at the beginning of each row from the neck (that is, the stitches closest to the neckline). So, you cast off in rows from the right side when working the right front and rows from the wrong side when working the left front. Cast off 2 stitches in the next 3 rows from the right side, for example, and then cast off 1 stitch in the next 3 rows (from the same side as before). You can see all relevant videos for this pattern under the pattern instructions. Happy knitting!
30.10.2022 - 22:35
![]() Ellen ha scritto:
Ellen ha scritto:
Ik wil deze trui op rechte pennen breien. Kan ik het aantal steken delen door 2 + een kantsteek aan elke kant, en kom ik dan nog uit met het telpatroon?
25.10.2022 - 22:45DROPS Design ha risposto:
Dag Ellen,
Ja, dat kan je inderdaad op die manier doen en je kunt het patroon dan ook gewoon breien. Het telpatroon wordt vanuit midden voor/ midden achter gepositioneerd.
26.10.2022 - 08:34
![]() Sara Jones ha scritto:
Sara Jones ha scritto:
Hello. I have reached the point of casting off for the under arms. I cast off 10 at the beginning of the round, 10 either side of the half way stitch marker & 10 at the end of the round. Of course this has meant that I now have a random stitch on its own in the middle of the cast off stitches & no way of getting back to my working garment. Should I have cast off at the end of a round for 10 stitches first, then 10 more at the beginning of the next round & then my 10 either side of the middle?
22.10.2022 - 10:19DROPS Design ha risposto:
Dear Sara, if you are working size XL, cast off initial 10 stitches, cast off 10 stitches on each side of the marker on the other side and cast off the last 10 stitches before ending the round. Cut the thread and pass it through the last cast-off stitch. Now you will start working the front or the back with a new thread. Happy knitting!
22.10.2022 - 19:00
![]() CHALANI FONSEKA JENSEN ha scritto:
CHALANI FONSEKA JENSEN ha scritto:
Hi There, Thank you so much for this great pattern. But I got a question here related to the casting off. What exactly mean "AT THE SAME TIME cast off at beg of every row from neck: 2 sts 3 times and 1 st 3 times = 26-27-29-30-32-33 sts remain on shoulder." ? what mean 2 st 3 times and 1st 3 times? Thanks in advance!
15.09.2022 - 22:02DROPS Design ha risposto:
Hi, you will cast off for neck 2 sts at the beginning of next 3 rows from neck , then cast off 1 stitch at the beginning of the next 3 rows. (you will cast off 9 extra sts for neck). This will be worked at the beginning of a RS row (right shoulder when garment is worn) or of a WS row (left shoulder when garment is worn). Happy knitting!
16.09.2022 - 09:38
![]() Anita Hagen ha scritto:
Anita Hagen ha scritto:
Ik heb het patroon Drops u_650 ( herentrui met Noors patroon). Dar wordt gebreid op rondbreinaalden. Betekent dit automatisch dat ik rondbrei? Het lijkt in het patroon alsof ik het heen en weer brei met één naad. Anita Hagen
09.08.2022 - 10:19DROPS Design ha risposto:
Dag Anita,
Klopt, het werk wordt in de rondte gebreid, dus zonder zijnaden in het lijf en zonder naad onderaan de mouw.
10.08.2022 - 17:17
![]() Pascale PB ha scritto:
Pascale PB ha scritto:
J’ai préféré tricoter ce modèle sur des aiguilles normales (pas circulaires). Tout s’est bien passé pour le dos et le devant. Je ne comprends pas bien les explications pour le haut de la manche. Est-ce qu’il faut qu’il soit arrondi ou est-ce que j'arrête toutes les maille d’un coup à 63cm? Merci de m’aider!
12.05.2022 - 22:33DROPS Design ha risposto:
Bonjour Pascale, vous avez déjà dû monter 1 m lis en plus de chaque côté pour les coutures, donc, vous continuez tout droit jusqu'à ce que la manche mesure 63 cm et vous rabattez toutes les mailles en une seule fois. Bon tricot!
16.05.2022 - 10:46
![]() Stine ha scritto:
Stine ha scritto:
Hej jeg har brug for hjælp da jeg ikke kan finde nogen video om det i jeres opskrift står der under ærmet, strik frem og tilbage på p fra midt under ærmet slå en ny maske op i hver side hvad mener i præcis med det? Og helst en video af det tak. Ved godt hvordan jeg slår masker op.
14.12.2021 - 19:45
|
||||||||||
Nordic Midnight#nordicmidnightsweater |
||||||||||
 |
 |
|||||||||
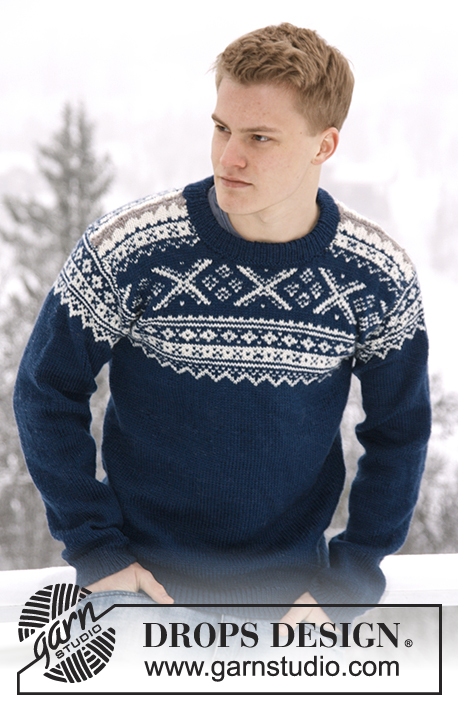
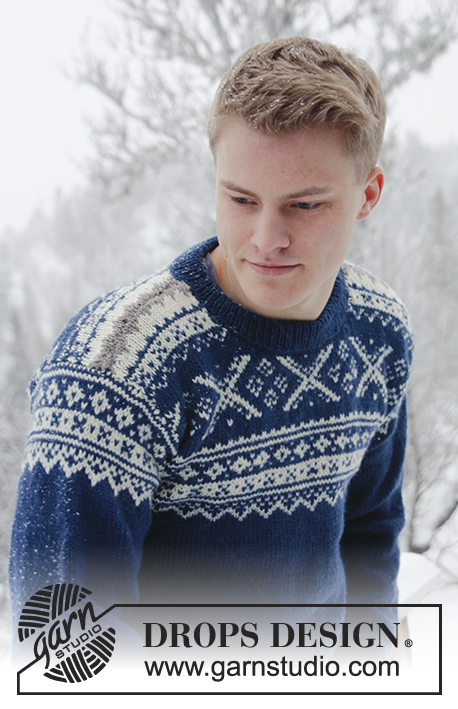
Maglione DROPS con il jacquard norvegese in "Karisma". Dalla S alla XXXL.
DROPS Extra 0-809 |
||||||||||
|
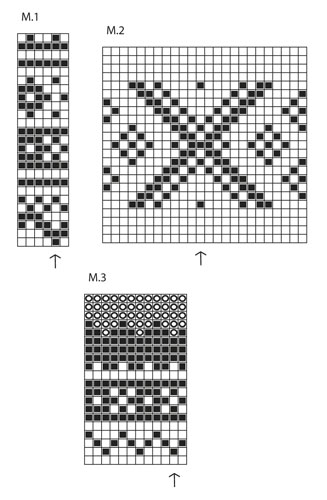
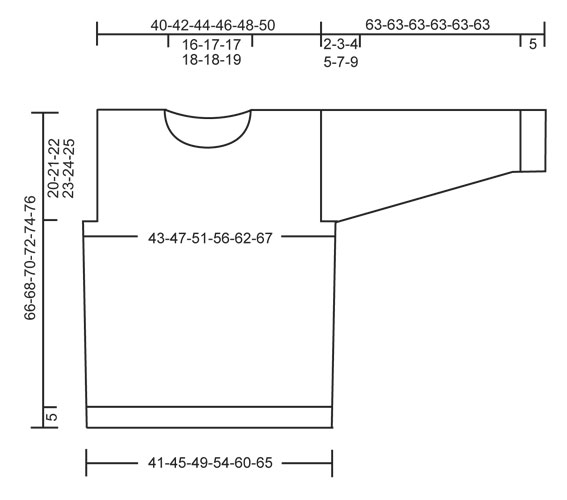
MOTIVO: Ved diag M.1 a M.3 – si lavora il diag a maglia rasata ed il diag mostra 1 ripetizione del motivo. -------------------------------------------------------- DAVANTI & DIETRO (CORPO): Si lavora in tondo sui ferri circolari. Avviare 210-228-246-270-306-330 m con i ferri circolari 3 ed il color blu/verde scuro Karisma. Lavorare le coste = 1 m dir / 1 m rov per 5 cm. Continuare con i ferri circolari 4 e lavorare 1 giro dir ALLO STESSO TEMPO, distribuire uniformemente 36-38-40-44-52-56 diminuzioni = 174-190-206-226-254-274 m. Inserire 1 segnapunti all’inizio del giro e 1 segnapunti dopo 87-95-103-113-127-137 m (indicano i lati). Continuare a maglia rasata. RICORDATI LA TENSIONE DEL LAVORO! Quando il lavoro misura 15 cm aumentare 1 m ad ogni lato dei 2 segnapunti. Ripetere questi aumenti quando il lavoro misura 30 cm = 182-198-214-234-262-282 m. Quando il lavoro misura 41-43-45-46-48-50 cm, inserire 1 segnapunti nella m centrale davanti e dietro. Lavorare poi M.1 – la m indicata con una freccia nel diag corrisponde alla m con il segnapunti davanti/dietro – contare le m fino al lato. Continuare a contare di nuovo quando arrivi al segnapunto al lato perché il motivo sia uguale davanti che dietro. ALLO STESSO TEMPO, quando il lavoro misura 46-47-48-49-50-51 cm, intrecciare 6-10-14-20-30-36 m ad ogni lato per gli scalfi (questo vuol dire 3-5-7-10-15-18 m ad ogni lato dei segnapunti ad ogni lato). Terminare il davanti ed il dietro separatamente avanti e indietro sul f. DAVANTI: = 85-89-93-97-101-105 m. Finire M.1, lavorare poi M.2 ed alla fine M.3 prima di continuare con il marrone mix chiaro fino alla fine del lavoro (la m con la freccia nel diag deve corrispondere con la m con il segnapunti in mezzo davanti/dietro – contare verso il lato). Quando il lavoro misura 58-60-62-64-66-68 cm, passare le 15-17-17-19-19-21 m centrali in attesa su un fermamaglie/filo per lo scollo e terminare ogni spalla separatamente. ALLO STESSO TEMPO, diminuire all’inizio di ogni ferro lato scollo: 2 m 3 volte e 1 m 3 volte = rimangono 26-27-29-30-32-33 m per la spalla. Intrecciare quando il lavoro misura 66-68-70-72-74-76 cm. DIETRO: = 85-89-93-97-101-105 m. Lavorare come per il davanti, ma non intrecciare per lo scollo prima che il lavoro misuri 64-66-68-70-72-74 cm. Intrecciare ora le 29-31-31-33-33-35 m centrali per lo scollo e terminare ogni spalla separatamente - ALLO STESSO TEMPO, al ferro seguente, diminuire 2 m lato scollo = rimangono 26-27-29-30-32-33 m per la spalla. Intrecciare quando il lavoro misura ca 66-68-70-72-74-76 cm – intrecciare allo stesso ferro del motivo come per il davanti. MANICHE: Si lavora in tondo con i ferri a doppia punta, continuare con i ferri circolari quando sarà necessario. Avviare 62-64-66-66-68-68 m con i ferri a doppia punta 3 ed i colore blu/verde scuro. Lavorare le coste = 1 m dir / 1 m rov per 5 cm. Continuare con i ferri a doppia punta 4 e lavorare 1 giro dir, ALLO STESSO TEMPO, distribuire 11 diminuzioni uniformemente = 51-53-55-55-57-57 m. Inserire 1 segnapunti all’inizio del giro (= in mezzo sotto la manica) e continuare a maglia rasata. Quando il lavoro misura 6 cm, aumentare 1 m ad ogni lato del segnapunti. Ripetere questi aumenti in totale 17-18-19-21-22-24 volte per la taglia S: ogni 9 giri, taglia M: alternativamente ogni 8 e 9 giri, taglia L: ogni 8 giri, taglia XL: ogni 7 giri, taglia XXL: alternativamente ogni 6 e 7 giri e taglia XXXL: alternativamente ogni 5 e 6 giri = 85-89-93-97-101-105 m. ALLO STESSO TEMPO, quando il lavoro misura 53 cm per tutte le taglie, lavorare M.1 (la m con la freccia nel diag = in mezzo sopra la manica – contare le m fino al lato). Dopo M.1 continuare con il blu/verde scuro fino alla fine. ALLO STESSO TEMPO, quando il lavoro misura 61-60-59-58-56-54 cm (più corto per le taglie grandi dovuto all'arrotondamento della manica più lungo e le spalle più larghe) terminare il lavoro lavorando avanti e indietro a partire dal sotto la manica in mezzo. Avviare 1 nuova m ad ogni lato (= m vivagno per cucire il lavoro) e lavorare finché la manica non misuri 63 cm per tutte le taglie, intrecciare. CONFEZIONE: Cucire le spalle e attaccare le maniche (la sezione lavorata avanti e indietro in alto della manica deve combaciare con le maglie intrecciate per lo scalfo). COLLO: Riprendere sul diritto ca 82 a 98 m intorno allo scollo (incl le m sul fermamaglie/filo davanti) con i ferri circolari piccoli n° 3 ed il blu/verde scuro. Lavorare 1 giro rov, poi 1 giro dir ALLO STESSO TEMPO, distribuire uniformemente degli aumenti per arrivare a 102-108-110-116-118-122 m. Continuare con le coste = 1 m dir / 1 m rov per ca 7 cm, intrecciare con il dir sopra il dir e il rov sopra il rov. Piegare le coste in due verso il rovescio e cucire il bordo del collo con punti piccoli e lenti sul rovescio. |
||||||||||
Spiegazioni del diagramma |
||||||||||
|
||||||||||
 |
||||||||||
 |
||||||||||
Avete terminato questo modello?Allora taggate le vostre foto con #dropspattern #nordicmidnightsweater o inviatele alla #dropsfan gallery. Avete bisogno di aiuto con questo modello?Troverete 26 video tutorial, una sezione per i commenti/domande e molto altro guardando il modello su www.garnstudio.com © 1982-2026 DROPS Design A/S. Ci riserviamo tutti i diritti. Questo documento, compreso tutte le sue sotto-sezioni, è protetto dalle leggi sul copyright. Potete leggere quello che potete fare con i nostri modelli alla fine di ogni modello sul nostro sito. |
||||||||||


Con oltre 40 anni di esperienza nel design di modelli di maglia e uncinetto, DROPS Design offre la più estesa collezione di modelli gratuiti su internet - tradotti in 17 lingue. Ad oggi vi possiamo fornire 324 cataloghi e 12290 modelli - 9561 dei quali sono tradotti in Italiano.
Ci stiamo impegnando molto per darvi il meglio che vi possiamo offrire in termini di maglia e uncinetto, ispirazioni e consigli così come filati di grande qualità ad un prezzo incredibile! Volete utilizzare i nostri modelli per qualcosa d'altro oltre al vostro uso personale? Potete leggere tutto ciò che è consentito nel testo sul Copyright in basso su tutte le pagine dei nostri modelli. Buon lavoro!
Lasciare un commento sul modello DROPS Extra 0-809
Noi saremmo felici di ricevere i tuoi commenti e opinioni su questo modello!
Se vuoi fare una domanda, fai per favore attenzione a selezionare la categoria corretta nella casella qui sotto per velocizzare il processo di risposta. I campi richiesti sono indicati da *.