
Categorie popolari
State cercando un filato?


Commenti / Domande (126)
![]() Ruth Young ha scritto:
Ruth Young ha scritto:
Hello, I am struggling to understand the instructions for the top of the sleeve. Would it be possible for you to provide more detailed instructions and how th top of the sleeve construction fits with the decreased stitches on the front and back. Clearly others have figured it out, but I am afraid that I need more help. Thank you! Ruth
18.09.2024 - 19:37DROPS Design ha risposto:
Dear Mrs Young, when sleeves measures 61-54 cm from cast on edge (see size), divide sleeve mid under sleeve, ie from where the rounds were beginning and work now back and forth casting on 1 stitch on each side (seam allowance); when sleeve measures 63 cm cast off all stitches. Then the sides of sleeve top worked back and forth will be sewn together to the bottom of armholes (the stitches cast off for armhole on body). Happy knitting!
19.09.2024 - 09:26
![]() Laura ha scritto:
Laura ha scritto:
Hallo, wird beim Halsausschnitt in der Hin- und Rückreihe abgekettet oder in jeder 2. Reihe also zB nur in jeder Hinreihe? Danke für eure Hilfe!
11.09.2024 - 09:41DROPS Design ha risposto:
Liebe Laura, beim Halsausschnitt wird es in jeder 2. Reihe abgekettet, dh am Anfang jeder Reihe ab Halsausschnitt = Hin-Reihe beim rechten Schulter/Rückreihe beim linken Schulter (Vorderteil). Viel Spaß beim Stricken!
12.09.2024 - 09:02
![]() Laura ha scritto:
Laura ha scritto:
Hallo, ich stricke den Pullover in Größe M und könnte jetzt mit dem Muster M1 anfangen. In der Beschreibung steht, dass man mit M1 nach 43 cm anfängt. Sind die 43 cm mit dem Bündchen oder ohne? Vielen Danke für Eure Hilfe!
08.08.2024 - 11:03DROPS Design ha risposto:
Liebe Laura, messen Sie diese 43 cm ab der Anschlagskante. Viel Spaß beim Stricken!
08.08.2024 - 13:03
![]() Stacia Jenkins ha scritto:
Stacia Jenkins ha scritto:
Hello, the 4th photo of this pattern on Ravelry shows a flower design in place of the X’s. Is a chart available for that design for the men’s sweater? I’d love to make this for a gardener friend!
30.05.2024 - 04:27DROPS Design ha risposto:
Dear Mrs Jenkins, you can browse all our nordic patterns here (with same tension as this jumper, but feel free to add/remove filters), one of them might inspire you. Happy knitting!
30.05.2024 - 08:11
![]() Joan Mikkelsen ha scritto:
Joan Mikkelsen ha scritto:
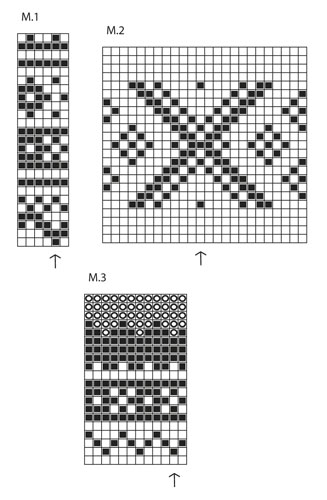
Hejsa Når man læser opskriften og kommer til mønsteret, så står der at man skal starte med M.1. Men ser man på billedet af trøjen er det ikke denne mønster man starter med. Der ser det ud til at det er noget af M.3. også måske ikke, da det første mønster på ærmet og trøjer ikke ser ens ud på billedet. Så spørgsmålet er hvad skal man starte med??
11.10.2023 - 21:44DROPS Design ha risposto:
Hej Joan, du skal faktisk starte med M.1 både på ryg & forstykke og på ærmerne så de bliver ens. M.3 bruger du først når du kommer op til skulderen :)
17.10.2023 - 13:55
![]() Olga ha scritto:
Olga ha scritto:
Ik heb de mouw af en ik snap niet helemaal hoe ik hem vast moet maken aan de mouwkop. Welke vorm hoort de mouw te hebben? Het lijkt me dat de bovenkant van de mouw langer moet zijn dan de onderkant, maar ik kant geen steken af? Waarom moet ik heen en weer breiden als ik de naden toch aan elkaar moet naaien?
20.09.2023 - 16:02DROPS Design ha risposto:
Dag Olga,
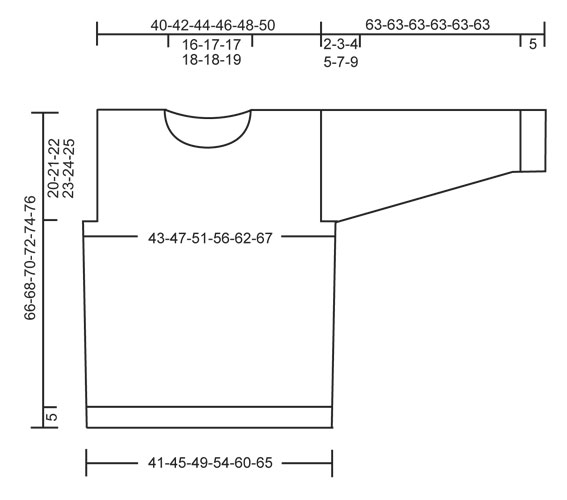
De mouw heeft geen ronding (mouwkop) aan de bovenkant. Je breit het laatste stukje heen en weer omdat de mouw als het waar een stukje in het pand wordt geschoven. Dus een klein stukje van de onderarmnaad wordt aan het voorpand/achterpand genaaid. Zie ook de maattekening onderaan. Hier kun je zien dat er een kleine inham bij de oksel zit.
20.09.2023 - 19:50
![]() Eva Wikman ha scritto:
Eva Wikman ha scritto:
Vill ha svar på min fråga så jag kan fortsätta sticka, varför ska jag minska maskor efter resåren och inte öka som man brukar. Resåren blir ju större om mag gör så. Tacksam för svar snarast
31.07.2023 - 16:19DROPS Design ha risposto:
Hej Eva, om du inte minskar blir tröjan för bred. Resåren stickar du på mindre stickor och resåren drar ihop arbetet om du inte har ökat för resår.
07.08.2023 - 11:57
![]() Eva Wikman ha scritto:
Eva Wikman ha scritto:
Är det fel på mönstret ?? Ska man minska maskor efter resåren ? Har aldrig varit med om det på alla tröjor jag har stickat
28.07.2023 - 15:59DROPS Design ha risposto:
Hej Eva, ja, eller så vil bolen bli for smal (du behöver flere masker i resåren, da den ellers trækker arbejdet sammen) :)
04.08.2023 - 14:42
![]() CHALANI FONSEKA JENSEN ha scritto:
CHALANI FONSEKA JENSEN ha scritto:
Hi I knitted the sweater with the smallest size but its bit bigger than I want. How I go to the next smaller size which XS ?
21.02.2023 - 20:24DROPS Design ha risposto:
Dar Mrs Fonseka Jensen, you will find all finished measurements for each size in the chart at the bottom of the pattern - this might help you to adjust to the required measurments/size. This lesson might help you. Happy knitting!
22.02.2023 - 08:35
![]() Catrin Håkansson ha scritto:
Catrin Håkansson ha scritto:
Fattar inte hur man gör under armen när det står att jag ska sticka fram och tillbaka, och lägga upp en maska , jag stickar ju med rundstickar , ska man inte maska av för ärmhålen som fram och bak stycket ?
20.01.2023 - 21:16DROPS Design ha risposto:
Hei Catrin. Du strikker rundt til ermet måler 61-60-59-58-56-54 cm, legg opp 1 ny maske og snu arbeidet. Strikk fra vrangen pinnen ut og legg opp 1 ny maske. Strikk frem og tilbake (på rundpinne) til ermet måler 63 cm. Det felles ikke av masker på ermet, slik det gjøres på for-bakstykket. mvh DROPS Design
23.01.2023 - 10:44
|
||||||||||
Nordic Midnight#nordicmidnightsweater |
||||||||||
 |
 |
|||||||||
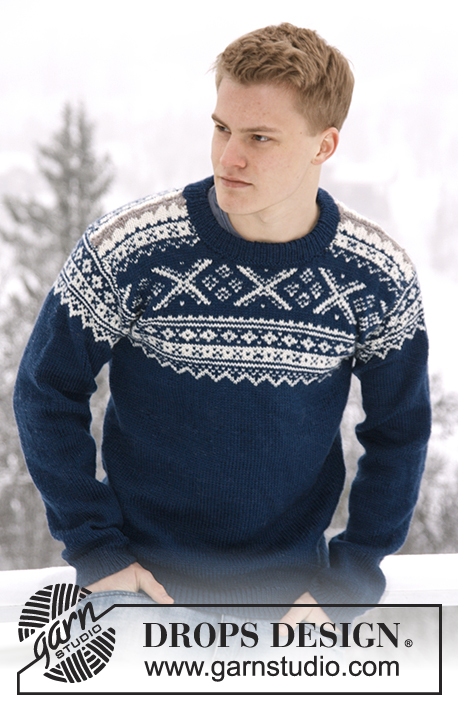
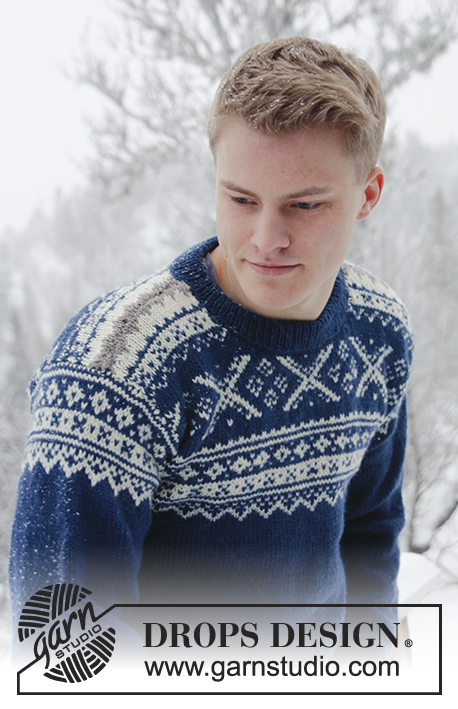
Maglione DROPS con il jacquard norvegese in "Karisma". Dalla S alla XXXL.
DROPS Extra 0-809 |
||||||||||
|
MOTIVO: Ved diag M.1 a M.3 – si lavora il diag a maglia rasata ed il diag mostra 1 ripetizione del motivo. -------------------------------------------------------- DAVANTI & DIETRO (CORPO): Si lavora in tondo sui ferri circolari. Avviare 210-228-246-270-306-330 m con i ferri circolari 3 ed il color blu/verde scuro Karisma. Lavorare le coste = 1 m dir / 1 m rov per 5 cm. Continuare con i ferri circolari 4 e lavorare 1 giro dir ALLO STESSO TEMPO, distribuire uniformemente 36-38-40-44-52-56 diminuzioni = 174-190-206-226-254-274 m. Inserire 1 segnapunti all’inizio del giro e 1 segnapunti dopo 87-95-103-113-127-137 m (indicano i lati). Continuare a maglia rasata. RICORDATI LA TENSIONE DEL LAVORO! Quando il lavoro misura 15 cm aumentare 1 m ad ogni lato dei 2 segnapunti. Ripetere questi aumenti quando il lavoro misura 30 cm = 182-198-214-234-262-282 m. Quando il lavoro misura 41-43-45-46-48-50 cm, inserire 1 segnapunti nella m centrale davanti e dietro. Lavorare poi M.1 – la m indicata con una freccia nel diag corrisponde alla m con il segnapunti davanti/dietro – contare le m fino al lato. Continuare a contare di nuovo quando arrivi al segnapunto al lato perché il motivo sia uguale davanti che dietro. ALLO STESSO TEMPO, quando il lavoro misura 46-47-48-49-50-51 cm, intrecciare 6-10-14-20-30-36 m ad ogni lato per gli scalfi (questo vuol dire 3-5-7-10-15-18 m ad ogni lato dei segnapunti ad ogni lato). Terminare il davanti ed il dietro separatamente avanti e indietro sul f. DAVANTI: = 85-89-93-97-101-105 m. Finire M.1, lavorare poi M.2 ed alla fine M.3 prima di continuare con il marrone mix chiaro fino alla fine del lavoro (la m con la freccia nel diag deve corrispondere con la m con il segnapunti in mezzo davanti/dietro – contare verso il lato). Quando il lavoro misura 58-60-62-64-66-68 cm, passare le 15-17-17-19-19-21 m centrali in attesa su un fermamaglie/filo per lo scollo e terminare ogni spalla separatamente. ALLO STESSO TEMPO, diminuire all’inizio di ogni ferro lato scollo: 2 m 3 volte e 1 m 3 volte = rimangono 26-27-29-30-32-33 m per la spalla. Intrecciare quando il lavoro misura 66-68-70-72-74-76 cm. DIETRO: = 85-89-93-97-101-105 m. Lavorare come per il davanti, ma non intrecciare per lo scollo prima che il lavoro misuri 64-66-68-70-72-74 cm. Intrecciare ora le 29-31-31-33-33-35 m centrali per lo scollo e terminare ogni spalla separatamente - ALLO STESSO TEMPO, al ferro seguente, diminuire 2 m lato scollo = rimangono 26-27-29-30-32-33 m per la spalla. Intrecciare quando il lavoro misura ca 66-68-70-72-74-76 cm – intrecciare allo stesso ferro del motivo come per il davanti. MANICHE: Si lavora in tondo con i ferri a doppia punta, continuare con i ferri circolari quando sarà necessario. Avviare 62-64-66-66-68-68 m con i ferri a doppia punta 3 ed i colore blu/verde scuro. Lavorare le coste = 1 m dir / 1 m rov per 5 cm. Continuare con i ferri a doppia punta 4 e lavorare 1 giro dir, ALLO STESSO TEMPO, distribuire 11 diminuzioni uniformemente = 51-53-55-55-57-57 m. Inserire 1 segnapunti all’inizio del giro (= in mezzo sotto la manica) e continuare a maglia rasata. Quando il lavoro misura 6 cm, aumentare 1 m ad ogni lato del segnapunti. Ripetere questi aumenti in totale 17-18-19-21-22-24 volte per la taglia S: ogni 9 giri, taglia M: alternativamente ogni 8 e 9 giri, taglia L: ogni 8 giri, taglia XL: ogni 7 giri, taglia XXL: alternativamente ogni 6 e 7 giri e taglia XXXL: alternativamente ogni 5 e 6 giri = 85-89-93-97-101-105 m. ALLO STESSO TEMPO, quando il lavoro misura 53 cm per tutte le taglie, lavorare M.1 (la m con la freccia nel diag = in mezzo sopra la manica – contare le m fino al lato). Dopo M.1 continuare con il blu/verde scuro fino alla fine. ALLO STESSO TEMPO, quando il lavoro misura 61-60-59-58-56-54 cm (più corto per le taglie grandi dovuto all'arrotondamento della manica più lungo e le spalle più larghe) terminare il lavoro lavorando avanti e indietro a partire dal sotto la manica in mezzo. Avviare 1 nuova m ad ogni lato (= m vivagno per cucire il lavoro) e lavorare finché la manica non misuri 63 cm per tutte le taglie, intrecciare. CONFEZIONE: Cucire le spalle e attaccare le maniche (la sezione lavorata avanti e indietro in alto della manica deve combaciare con le maglie intrecciate per lo scalfo). COLLO: Riprendere sul diritto ca 82 a 98 m intorno allo scollo (incl le m sul fermamaglie/filo davanti) con i ferri circolari piccoli n° 3 ed il blu/verde scuro. Lavorare 1 giro rov, poi 1 giro dir ALLO STESSO TEMPO, distribuire uniformemente degli aumenti per arrivare a 102-108-110-116-118-122 m. Continuare con le coste = 1 m dir / 1 m rov per ca 7 cm, intrecciare con il dir sopra il dir e il rov sopra il rov. Piegare le coste in due verso il rovescio e cucire il bordo del collo con punti piccoli e lenti sul rovescio. |
||||||||||
Spiegazioni del diagramma |
||||||||||
|
||||||||||
 |
||||||||||
 |
||||||||||
Avete terminato questo modello?Allora taggate le vostre foto con #dropspattern #nordicmidnightsweater o inviatele alla #dropsfan gallery. Avete bisogno di aiuto con questo modello?Troverete 26 video tutorial, una sezione per i commenti/domande e molto altro guardando il modello su www.garnstudio.com © 1982-2026 DROPS Design A/S. Ci riserviamo tutti i diritti. Questo documento, compreso tutte le sue sotto-sezioni, è protetto dalle leggi sul copyright. Potete leggere quello che potete fare con i nostri modelli alla fine di ogni modello sul nostro sito. |
||||||||||


Con oltre 40 anni di esperienza nel design di modelli di maglia e uncinetto, DROPS Design offre la più estesa collezione di modelli gratuiti su internet - tradotti in 17 lingue. Ad oggi vi possiamo fornire 324 cataloghi e 12290 modelli - 9561 dei quali sono tradotti in Italiano.
Ci stiamo impegnando molto per darvi il meglio che vi possiamo offrire in termini di maglia e uncinetto, ispirazioni e consigli così come filati di grande qualità ad un prezzo incredibile! Volete utilizzare i nostri modelli per qualcosa d'altro oltre al vostro uso personale? Potete leggere tutto ciò che è consentito nel testo sul Copyright in basso su tutte le pagine dei nostri modelli. Buon lavoro!
Lasciare un commento sul modello DROPS Extra 0-809
Noi saremmo felici di ricevere i tuoi commenti e opinioni su questo modello!
Se vuoi fare una domanda, fai per favore attenzione a selezionare la categoria corretta nella casella qui sotto per velocizzare il processo di risposta. I campi richiesti sono indicati da *.