
Categorie popolari
State cercando un filato?


Commenti / Domande (70)
![]() Willy Kammeijer ha scritto:
Willy Kammeijer ha scritto:
Bij de mouw op het moment van de gerstekorrel steeds minderen. Dan past het niet meer in trui/mouw opening.
30.09.2024 - 12:00
![]() Collignon Nicole ha scritto:
Collignon Nicole ha scritto:
J\'aime beaucoup ce modèle mais j\'aurais aimé avoir les indications avec des aiguilles droites en aller retour. Est ce possible ? Merci beaucoup pour votre réponse
12.09.2024 - 11:57
![]() Silke ha scritto:
Silke ha scritto:
Hallo, da ist einiges nicht so erschienen, wie ich es wollte. Sorry! Die Angaben nach 47-51 cm sollte es heissen.
21.03.2024 - 17:29
![]() Silke ha scritto:
Silke ha scritto:
Hallo, ich versuche den o.a. Pulli nach zu stricken. Die Angaben nach 47-41 cm sind incl. Bündchen oder nicht?
21.03.2024 - 17:27DROPS Design ha risposto:
Liebe Silke, die gesamte Höhe werden jeweils von der Anschlagskante gemessen, dh mit Bündchen. Viel Spaß beim Stricken!
22.03.2024 - 07:29
![]() Veerle Heymans ha scritto:
Veerle Heymans ha scritto:
Geel oker wol, hoeveel wol voor een large trui nemen ? En waar te koop aub? Prachtige trui is dit.
25.01.2024 - 21:37DROPS Design ha risposto:
Dag Veerle,
Bovenaan bij de materialenlijst bij ieder patroon op onze site staat per maat aangegeven hoeveel gram je nodig hebt. (Het eerste getal geldt voor maat S, het tweede getal voor maat M, enzovoort). 1 bol weegt meestal 50 gram, maar let erop dat dit per garensoort verschillend kan zijn. Dus als er bijvoorbeeld 400 gram staat dan zou je 8 bollen nodig hebben als 1 bol 50 gram weegt.
Het bestellen van garens gaat via een van de verkooppunten die onze artikelen verkopen. Via deze link vind je een lijst met verkooppunten.
28.01.2024 - 18:46
![]() Sharon Hunt ha scritto:
Sharon Hunt ha scritto:
Thank, thank you ao much. This was not a difficult pattern but I just could bot wrap my head around it. First time making a pullover this way. Love drops patterns and the support to knitters having a hard time understanding your patteren. Am a better knitter because of the help I get here. Thanks so, so, so much
03.01.2024 - 16:00
![]() Sharon Hunt- Edwards ha scritto:
Sharon Hunt- Edwards ha scritto:
Hi Drops am stuck her. THE SAME TIME after 5 cm / 2'' in seed st on next row from RS bind off middle 2 sts for neck and complete each shoulder separately. Now bind off by knitting first 2 sts towards neck tog. Please explain this to so I understand and can proceed. Am now ripping back. Not enough sts to decrease for armhole an neck. Hope for a quick response so I complete as this is a birthday gift. Thank you.
02.01.2024 - 21:38DROPS Design ha risposto:
Dear Mrs Hunt-Edwards, you will cast off the 2 middle stitches (divide the number of stitches in 2 minus 2 sts and from RSwork this number of stitches for left shoulder, cast off the next 2 sts and work the same number of stitches for right shoulder) now finish each shoulder separately starting with right shoulder. Decrease now at the beg of every row starting from neck by working the first 2 sts together (at the beg of row from RS for right shoulder then at the beg of row from WS for left shoulder). Happy knitting!
03.01.2024 - 08:32
![]() Sharon Hunt ha scritto:
Sharon Hunt ha scritto:
Hi Drops😂🤣 not sure why am not understanding armhole shaping. Anyways am doing the body. working on back and have decreased 3 sts on the knit side and 3 purl side. Instruks says dec 2 sts 6t. If i dec 2sts 1,2,3,4.5,6t on right side then on wrong side that is 12 sts if i dec 2 sts 2,4,6 then 5 sts 5t i don’t end up with 84 sts per pattern and i cannot figure out what am doing wrong. Hoping for a quick reply as this is a birthday gift and i need to complete this asap. S
30.12.2023 - 03:06DROPS Design ha risposto:
Dear Sharon, there must be some misunderstanding: you not dec 6 times, but dec 1 st on each side of marker every 3 a total of 15 times = 90 sts for size XXL. After that (piece measures 56 cm) you work the sleeve cap (work in double moss st): 3 sts on each side of marker 1 time and now in rows: at the beg. of each row (ie both sides of piece) 2 sts 4 times, 1 st 5 times. After that 2 sts on each side till 66 cms, 3 sts 1 time on each side and cast off. Happy knitting!
30.12.2023 - 09:39
![]() Sharon Hunt ha scritto:
Sharon Hunt ha scritto:
Hi! Working on the body. Pattern says to decrease 78 sts. Knitting XXL. It then says to decrease place marked to distinguish the sides. Here increase 2 sts both sides on markers after 15 cm then after 25 cm. Seem to me the numbers don’t add up if am supposed to have to have 248 sts after increases. Am I missing something? Thanks for your help.
27.12.2023 - 02:12DROPS Design ha risposto:
Dear Sharon, after the decrease, simply place 2 markers to distinguish the sides. Then increase 1 st on each side of each marker when the piece measures 15 cm and 25 cm. So, from 240 sts, you have 4 increases at 15 cm and 4 increases at 25cm = 248 stitches. Happy knitting!
28.12.2023 - 23:58
![]() Sharon Hunt ha scritto:
Sharon Hunt ha scritto:
Continue back and forth on circular needle and continue to bind off for sleeve cap at beg of each row each side as follows: 2 sts 3-3-4-4-4-3 times and then 1 st 3-4-4-5-8-13 times. Making large. Is it 2 stitches on each side or 4 stiches each side? Is there a problem with the double seed stitch pattern comes out like a messed up 2x2 rib when i follow the pattern.😢 ripped out too many times already
23.12.2023 - 22:11DROPS Design ha risposto:
Dear Sharon, cast off 2 sts at the beginning of 4 rows from the right side and 4 rows from the wrong side (4 times on each side). Now repeat but casting off 1 stitch instead of 2, (so 1 st at the beginning of 4 rows from the right side and 4 rows from the wrong side). Finally, continue casting off 2 sts at the beginning of the rows from each side until the piece measures 65 cm. Happy knitting!
28.12.2023 - 19:00
|
|
Twilight#twilightsweater |
|
|
|
|
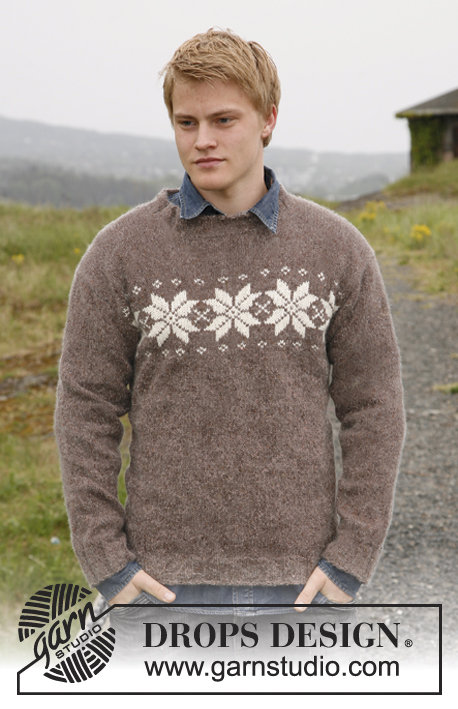
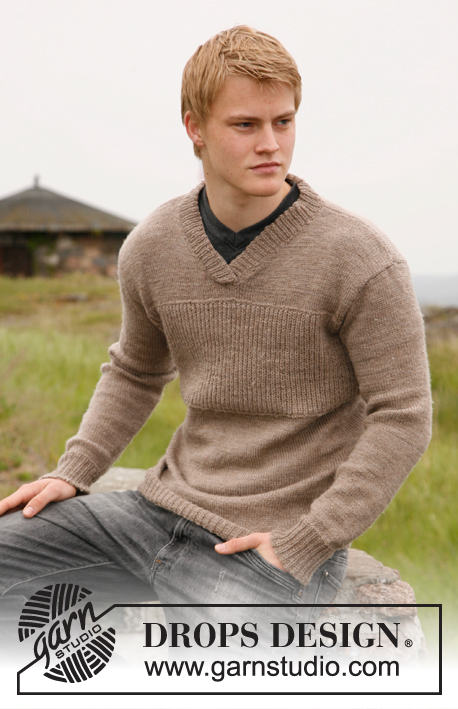
Maglione da uomo lavorato ai ferri con sprone a grana di riso e collo a V, in DROPS Lima. Taglie: dalla S alla XXXL.
DROPS 135-39 |
|
|
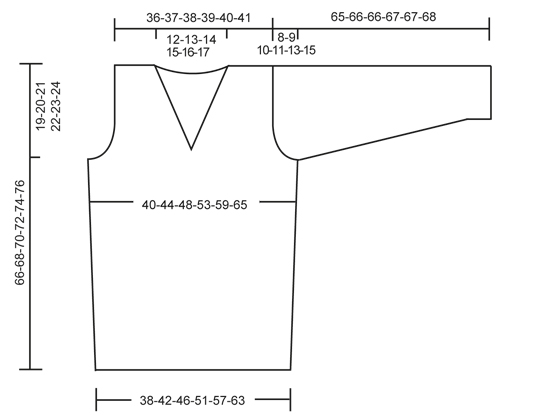
M. A GRANA DI RISO DOPPIA: Ferro 1 (= dal diritto del lavoro): * 1 m. dir., 1 m. rov. *, ripetere da *-*. Ferro 2 (= dal rovescio del lavoro): dir. su dir. e rov. su rov. Ferro 3 (= dal diritto del lavoro): * 1 m. rov., 1 m. dir. *, ripetere da *-*. Ferro 4 (= dal rovescio del lavoro): rov. su rov. e dir. su dir. -------------------------------------------------------- CORPO: Lavorato in tondo con i ferri circolari. Avviare 213-234-255-288-318-351 m. con i ferri circolari misura 3,5 mm con il filato Lima. Lavorare a coste 1 m. dir./2 m. rov. Quando il lavoro misura 4 cm, lavorare 1 giro a m. rasata e ALLO STESSO TEMPO distribuire 53-58-63-72-78-87 diminuzioni in modo uniforme (diminuire lavorando insieme ogni 3 e 4 maglie circa) = 160-176-192-216-240-264 m. Inserire 2 segnapunti nel lavoro: all’inizio del giro e dopo 80-88-96-108-120-132 m. (indicano i lati). Passare ai ferri circolari misura 4 mm. Poi lavorare a m. rasata in tondo. FARE ATTENZIONE ALLA TENSIONE DEL LAVORO! Quando il lavoro misura 15 cm, aumentare 1 m. da ogni lato di tutti i segnapunti lavorando 1 gettato. Sul giro successivo lavorare il gettato a dir. ritorto (cioè lavorarlo nel filo dietro della m. anziché in quello davanti) per evitare buchi. Ripetere gli aumenti quando il lavoro misura 25 cm = 168-184-200-224-248-272 m. Quando il lavoro misura 47-48-49-50-51-52 cm, lavorare a M. A GRANA DI RISO DOPPIA – leggere la spiegazione sopra – e ALLO STESSO TEMPO intrecciare 6 m. da ogni lato per gli scalfi (intrecciare 3 m. da ogni lato di tutti i segnapunti). Finire ogni parte in modo separato. DIETRO: = 78-86-94-106-118-130 m. (primo f. = rovescio del lavoro). Continuare a M. A GRANA DI RISO DOPPIA e ALLO STESSO TEMPO intrecciare per gli scalfi all’inizio del f. da ogni lato come segue: 2 m. 0-1-2-4-6-8 volte e 1 m. 1-2-3-4-5-6 volte = 76-78-80-82-84-86 m. Quando il lavoro misura 64-66-68-70-72-74 cm, intrecciare le 24-26-28-30-32-34 m. centrali per il collo e finire ogni spalla in modo separato. Poi diminuire 1 m. sul f. successivo dal collo (diminuire lavorando insieme le 2 m. più esterne verso il collo) = 25 m. rimaste sulla spalla per tutte le taglie. Intrecciare quando il lavoro misura 66-68-70-72-74-76 cm. DAVANTI: = 78-86-94-106-118-130 m. (primo f. = rovescio del lavoro). Lavorare a m. a grana di riso doppia e intrecciare per gli scalfi come sul dietro e ALLO STESSO TEMPO quando sono stati lavorati 5 cm in verticale a m. a grana di riso, intrecciare le 2 m. centrali per il collo sul f. successivo dal diritto del lavoro e finire ogni spalla in modo separato. Poi diminuire lavorando insieme le 2 m. più esterne verso il collo (lavorarle insieme in modo che rientrino nel motivo) all’inizio di ogni f. dal collo per un totale di 12-13-14-15-16-17 volte. Alla fine di tutte le diminuzioni, rimangono 25 m. sulla spalla per tutte le taglie. Intrecciare quando il lavoro misura 66-68-70-72-74-76 cm. MANICA: Lavorata in tondo con i ferri a doppia punta. Avviare 63-66-69-72-75-78 m. con i ferri a doppia punta misura 3,5 mm con il filato Lima. Lavorare a coste 1 m. dir./2 m. rov. Quando il lavoro misura 4 cm, lavorare 1 giro a dir. e ALLO STESSO TEMPO distribuire 15-16-17-18-19-20 diminuzioni in modo uniforme (diminuire lavorando insieme a dir. ogni 3 e 4 maglie circa) = 48-50-52-54-56-58 m. Passare ai ferri a doppia punta misura 4 mm. Inserire un segnapunti all’inizio del giro. Poi lavorare a m. rasata. Quando il lavoro misura 8 cm, aumentare 1 m. da ogni lato del segnapunti. Ripetere gli aumenti ogni 5-4½-3½-3-2½-2½ cm per un totale di 10-11-13-15-17-18 volte = 68-72-78-84-90-94 m. Quando il lavoro misura 57-57-56-56-54-53 cm (NOTA! Misure più corte per le taglie più grandi a causa dello scalfo più lungo e della maggiore ampiezza delle spalle) lavorare a m. a grana di riso doppia su tutte le m. e ALLO STESSO TEMPO intrecciare 6 m. al centro sotto la manica (intrecciare 3 m. da ogni lato del segnapunti). Poi lavorare avanti e indietro con i ferri circolari. Continuare a intrecciare per l’arrotondamento della manica all’inizio del f. da ogni lato come segue: 2 m. 3-3-4-4-4-3 volte e poi 1 m. 3-4-4-5-8-13 volte. Poi intrecciare 2 m. da ogni lato fino a quando il lavoro misura 64-65-65-66-66-67 cm. Poi intrecciare 3 m. 1 volta da ogni lato. Intrecciare. Il lavoro misura 65-66-66-67-67-68 cm. CONFEZIONE: Cucire i margini delle spalle. Attaccare le maniche. BORDO DEL COLLO: Lavorato avanti e indietro con i ferri circolari dal centro davanti del collo. Riprendere 92-98-104-110-118-124 m. attorno al bordo del collo con i ferri circolari misura 3,5 mm, iniziando dal centro davanti. Lavorare 1 f. a dir. dal rovescio del lavoro e ALLO STESSO TEMPO distribuire 37-37-40-43-47-50 aumenti in modo uniforme (aumentare con 1 gettato tra ogni terza e quarta m. circa e a volte più vicino). Sul f. successivo lavorare i gettati a ritorto. Sul f. successivo dal diritto del lavoro lavorare a coste come segue: 1 m. a m. legaccio, * 1 m. dir., 2 m. rov. *, ripetere da *-* fino a quando rimangono 2 m., finire con 1 m. dir. e 1 m. a m. legaccio. Continuare in questo modo e intrecciare senza stringere con dir. su dir. e rov. su rov. quando le coste misurano 3,5 cm. Mettere la parte destra del bordo del collo sopra la parte sinistra e affrancare entrambi i margini con una paio di piccolo punti ordinati in basso. |
|
 |
|
Avete terminato questo modello?Allora taggate le vostre foto con #dropspattern #twilightsweater o inviatele alla #dropsfan gallery. Avete bisogno di aiuto con questo modello?Troverete 12 video tutorial, una sezione per i commenti/domande e molto altro guardando il modello su www.garnstudio.com © 1982-2026 DROPS Design A/S. Ci riserviamo tutti i diritti. Questo documento, compreso tutte le sue sotto-sezioni, è protetto dalle leggi sul copyright. Potete leggere quello che potete fare con i nostri modelli alla fine di ogni modello sul nostro sito. |


Con oltre 40 anni di esperienza nel design di modelli di maglia e uncinetto, DROPS Design offre la più estesa collezione di modelli gratuiti su internet - tradotti in 17 lingue. Ad oggi vi possiamo fornire 324 cataloghi e 12290 modelli - 9561 dei quali sono tradotti in Italiano.
Ci stiamo impegnando molto per darvi il meglio che vi possiamo offrire in termini di maglia e uncinetto, ispirazioni e consigli così come filati di grande qualità ad un prezzo incredibile! Volete utilizzare i nostri modelli per qualcosa d'altro oltre al vostro uso personale? Potete leggere tutto ciò che è consentito nel testo sul Copyright in basso su tutte le pagine dei nostri modelli. Buon lavoro!
Lasciare un commento sul modello DROPS 135-39
Noi saremmo felici di ricevere i tuoi commenti e opinioni su questo modello!
Se vuoi fare una domanda, fai per favore attenzione a selezionare la categoria corretta nella casella qui sotto per velocizzare il processo di risposta. I campi richiesti sono indicati da *.