
Categorie popolari
State cercando un filato?


Commenti / Domande (112)
![]() VU Anna ha scritto:
VU Anna ha scritto:
Merci de tout mon coeur pour votre idée géniale de faire un échantillon avec les deux laines et d'ajuster en fonction pour les aiguilles à prendre. Je tiens vraiment à avoir un fil Muskat car la texture de ce coton donne un maintien rare au dernier modèle que j'ai terminé récemment (123-4) qui est magnifique. Mélange de Muskat et de Baby Mérino. Anna
20.10.2017 - 17:48
![]() VU Anna ha scritto:
VU Anna ha scritto:
Bonjour Madame, Merci infiniment d'avoir répondu rapidement à ma question. Comme j'aime beaucoup les qualités muskat et mérino, pourrais-je prendre un fil Big mérino et un fil muskat ? Merci Madame pour votre aide. Anna
20.10.2017 - 09:31DROPS Design ha risposto:
Bonjour Mme Vu, l'idéal serait d'échantillonner avec ces 2 laines pour trouver la taille d'aiguilles idéale pour obtenir l'effet que vous voulez et aimez. Il vous faudra peut-être ajuster en fonction de votre échantillon. Bon tricot!
20.10.2017 - 14:11
![]() VU Anna ha scritto:
VU Anna ha scritto:
Bonjour Madame, Je voudrais faire ce modèle avec un fil muskat et un fil Mérino extra fin. Pourriez-vous me dire si cela est faisable ou il faudrait que je prenne une qualité de laine plus grosse. merci infiniment pour votre réponse. Anna
19.10.2017 - 17:57DROPS Design ha risposto:
Bonjour Mme Vu, Muskat et Merino Extra Fine sont toutes 2 du groupe B de nos fils, et 2 fils du groupe B = 1 fil du groupe D, or cette veste se tricote en Puddel (groupe E), vous pouvez par exemple la remplacer par 1 fil Brushed Alpaca Silk + 1 fil Alpaca Bouclé - voir ici. Vous trouverez ici plus d'infos sur les alternatives. Bon tricot!
20.10.2017 - 09:03
![]() Ineke ha scritto:
Ineke ha scritto:
Kan je ook gewoon rechte naalden gebruiken ipv rondbreinaalden?
18.10.2017 - 11:53DROPS Design ha risposto:
Hallo Ineke, Ja, dat kan bij dit patroon prima! Vaak staat er standaard rondbreinaalden aangegeven, maar omdat je de panden los van elkaar breit en heen en weer breit, kun je dit patroon prima met rechte naalden maken.
19.10.2017 - 13:41
![]() Fabienne De Vree ha scritto:
Fabienne De Vree ha scritto:
Goedemiddag, Ik wil dit model in L breien met Andes; vermits dit een totaal ander garen is weet ik niet hoeveel bollen ik moet nemen. Het verkoopunt kon me niet helpen. Alvast bedankt! Mvg, Fabienne De Vree
07.08.2017 - 13:53DROPS Design ha risposto:
Hoi Fabienne, Andes is wel een ander garen met een andere uitstraling (wat zwaarder) dan puddel, maar het valt in dezelfde garencategorie, dus je kunt het wel vervangen hiervoor. Lees de informatie via deze link over het vervangen van garen even goed door. En via deze link> vind je een ander alternatief voor puddel
15.08.2017 - 17:55
![]() Joanne Kiepura ha scritto:
Joanne Kiepura ha scritto:
Hi! I would like to knit this pattern in a size medium. I have just 654 yards of super bulky yarn and thought I might just knit the entire piece in a shorter length. Can you advise me on how much shorter to adjust the pattern to allow for my amount of yarn? Thank you in advance of your support and guidance.
13.02.2017 - 01:37DROPS Design ha risposto:
Dear Mrs Kiepura, we are unfortunately not able to adjust each pattern to every individual request. For any personnal assistance you are welcome to request help from the store where you bought your yarn. Happy knitting!
13.02.2017 - 12:09
![]() Sophie ha scritto:
Sophie ha scritto:
Bonjour, Je suis très déçue, j ai tricoté tout le dos en Cloud et me rend compte que la largeur n'est pas suffisante (taille M) et que la longueur des manches (30 mailles) arrive à peine au coude. Pourtant je ne tricote pas spécialement serré. Cela vient il de la laine qui n'est pas celle préconisée dans le modèle? Il s'agit pourtant de la même grosseur de fil ,E.
18.12.2016 - 00:10DROPS Design ha risposto:
Bonjour Sophie, avez-vous bien le bon échantillon? soit 10 m x 14 rangs = 10 x 10 cm - pensez également à bien conserver la même tension que pour l'échantillon quand vous tricotez. Vous obtiendrez ainsi les mesures indiquées pour chaque taille dans le schéma. Bon tricot!
19.12.2016 - 09:46
![]() Eva Karlsson ha scritto:
Eva Karlsson ha scritto:
Hej, jag håller på med höger framstycke och har kommit till där jag avmaskat tills 22 m återstår och det står: sticka räta fram o tillbaka ö de yttersta 14 m sticka räta fram o tillbaka ö alla maskor. Ska det stickas räta även på avigsidan eller aviga på avigsidan?
04.12.2016 - 20:53DROPS Design ha risposto:
Hej Eva. Du strikker ret over alle pinde: * Sticka räta fram och tillbaka över de yttersta 12-12-13-14-14-15 m, sticka räta fram och tillbaka över alla m *.
05.12.2016 - 14:24
![]() Dianne Campbell ha scritto:
Dianne Campbell ha scritto:
It's me, again. Sorry. I have 2 questions. Does outermost mean near the shoulder or down the front? And, I watched the short row video, but it only did 1 short row. Don't I need to go back and for until the shorter edge measures 10cm? If I don't pick up a stitch where the short row meets the regular row, it leaves a hole. What am I doing wrong? I really appreciate your help!!
11.11.2016 - 17:27DROPS Design ha risposto:
Dear Mrs Campbell, on right front piece, you work short rows over the first 12-15 sts from RS, ie the sts towards front (= bef of row from RS on right front piece). To avoid holes when working the short rows, lift the first st after turning and tighten thread (see video) - you can also use the wrap&turn method if you rather like (see video). Happy knitting!
14.11.2016 - 08:54
![]() Dianne Campbell ha scritto:
Dianne Campbell ha scritto:
Thank you so much! I've got it now!
07.11.2016 - 18:04
|
|
Autumn Elegance#autumnelegancecardigan |
|
|
|
|
Giacca DROPS ai ferri con collo a scialle in "Puddel". Taglie: Dalla S alla XXXL.
DROPS 134-43 |
|
|
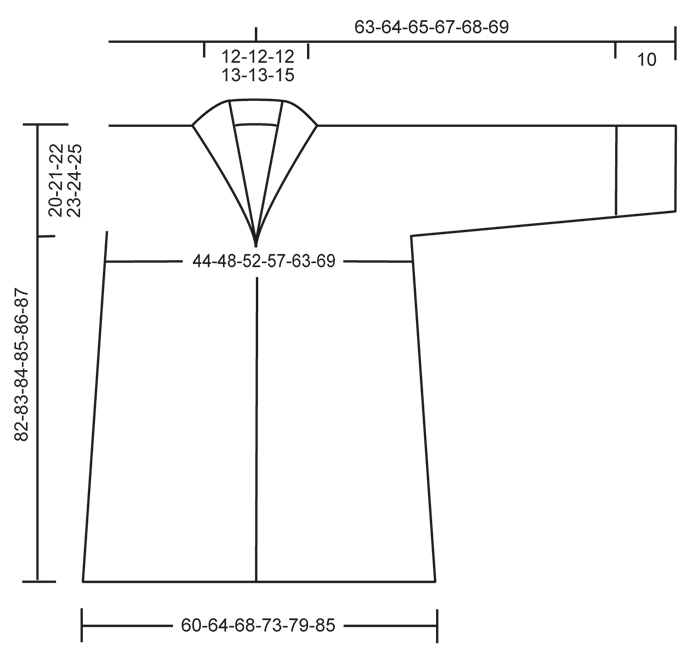
PUNTO LEGACCIO (avanti e indietro sui ferri): Lavorare tutti i ferri a dir. SUGGERIMENTO PER GLI AUMENTI: Aumentare inserendo 1 m gettata. Al ferro successivo lavorare la m gettata ritorta (prendere la m nell'asola posteriore e non in quella anteriore) per evitare che si formi un buco. ASOLE: Chiudere per le 2 asole sul davanti destro. 1 asola = chiudere la 4a e la 5a m dall’inizio del bordo. Al ferro successivo, avviare 2 nuove m in corrispondenza delle m chiuse. Chiudere per le asole quando il lavoro misura: TAGLIA S: 31 e 41 cm TAGLIA M: 32 e 42 cm TAGLIA L: 33 e 43 cm TAGLIA XL: 34 e 44 cm TAGLIA XXL: 35 e 45 cm TAGLIA XXXL: 36 e 46 cm -------------------------------------------------------- DIETRO: Si lavora avanti e indietro sui ferri. Avviare 62-66-70-75-81-87 m (comprese 1 m vivagno da ciascun lato) sul ferro circolare n° 7 con il filato Puddel. Lavorare 6 ferri a punto legaccio – vedere le spiegazioni sopra. Proseguire poi a maglia rasata lavorando le m vivagno ai lati a punto legaccio. RICORDARSI LA TENSIONE DEL LAVORO! Quando il lavoro misura 20 cm, diminuire 1 m da ciascun lato; ripetere queste diminuzioni ogni 4½-4½-5-5-5-5 cm per un totale di 8 volte = 46-50-54-59-65-71 m. Quando il lavoro misura 62 cm (per tutte le taglie) avviare le nuove m per le maniche alla fine di ogni ferro, da ciascun lato, come segue: 10 m per 2 volte, 11-10-9-8-6-4 m per 1 volta = 108-110-112-115-117-119 m. Lavorare tutte le m finché il lavoro non misura 80-81-82-83-84-85 cm. Chiudere ora per il collo le 12-12-12-13-13-15 m centrali e finire ogni parte separatamente = per la manica e per la spalla rimangono 48-49-50-51-52-52 m. Proseguire finché il lavoro non misura 82-83-84-85-86-87 cm. Chiudere le m senza stringere troppo il filo. DAVANTI DESTRO: Si lavora avanti e indietro sui ferri. Avviare 37-39-41-44-47-50 m (comprese 6 m per il bordo centrale e 1 m vivagno al lato) sui ferri n° 7. Lavorare 6 ferri a punto legaccio. Proseguire poi a maglia rasata lavorando la m vivagno al lato a punto legaccio e le 6 m del bordo centrale a punto legaccio. Quando il lavoro misura 20 cm, cominciare a diminuire al lato, come per il dietro. Ricordarsi di chiudere per le ASOLE – vedere le spiegazioni sopra. Allo stesso tempo, quando il lavoro misura 42-43-44-45-46-47 cm, aumentare 1 m sul diritto del lavoro, dopo le m del bordo centrale, come segue: lavorare 6 m a punto legaccio, aumentare 1 m – vedere il SUGGERIMENTO PER GLI AUMENTI sopra, lavorare le rimanenti m. ATTENZIONE: Lavorare le m aumentate a punto legaccio. Ripetere questi aumenti (dopo le m a punto legaccio del bordo centrale) ogni 4½ cm per un totale di 9 volte. Quando il lavoro misura 62 cm (per tutte le taglie), avviare le nuove m per le maniche alla fine di ogni ferro verso il lato esterno, come segue: 10 m per 2 volte, 11-10-9-8-6-4 m per 1 volta = 69-70-71-73-74-75 m. Proseguire finché il lavoro non misura 82-83-84-85-86-87 cm. Al ferro successivo sul rovescio del lavoro, chiudere le m senza stringere troppo il filo, finché non rimangono 21-21-21-22-22-23 m per il collo; lavorare le m rimaste. Lavorare il collo come segue (1° ferro = diritto del lavoro): * lavorare 2 ferri a dir sulle prime 12-12-13-14-14-15 m, lavorare 2 ferri a dir su tutte le m *. Ripetere da *-* finché il collo non misura 9-9-9-10-10-11 cm misurato sul lato più corto partendo da quando sono state chiuse le m per le spalle. Chiudere le m senza stringere troppo il filo. DAVANTI SINISTRO: Lavorare come il davanti destro, ma in senso inverso e senza chiudere per le asole. CONFEZIONE: Cucire le spalle e la parte superiore delle maniche, all’interno della m vivagno. Unire i lembi del collo al centro, sul dietro e cucirlo alla scollo sul dietro. Cucire i bottoni sul bordo davanti sinistro. BORDO ATTORNO ALLE MANICHE: Si lavora avanti e indietro sul ferro circolare. Riprendere sul diritto del lavoro 44-44-50-50-56-56 m all’interno della m vivagno, sul bordo inferiore delle maniche. Lavorare a punto legaccio per ca. 10 cm. La manica misura ca. 63-64-65-67-68-69 cm, misurata dal centro, sul dietro. Chiudere le m senza stringere troppo il filo. Lavorare il bordo sull’altra manica. CONFEZIONE: Cucire i lati del corpo e delle maniche all’interno della m vivagno. |
|
 |
|
Avete terminato questo modello?Allora taggate le vostre foto con #dropspattern #autumnelegancecardigan o inviatele alla #dropsfan gallery. Avete bisogno di aiuto con questo modello?Troverete 12 video tutorial, una sezione per i commenti/domande e molto altro guardando il modello su www.garnstudio.com © 1982-2026 DROPS Design A/S. Ci riserviamo tutti i diritti. Questo documento, compreso tutte le sue sotto-sezioni, è protetto dalle leggi sul copyright. Potete leggere quello che potete fare con i nostri modelli alla fine di ogni modello sul nostro sito. |


Con oltre 40 anni di esperienza nel design di modelli di maglia e uncinetto, DROPS Design offre la più estesa collezione di modelli gratuiti su internet - tradotti in 17 lingue. Ad oggi vi possiamo fornire 324 cataloghi e 12290 modelli - 9561 dei quali sono tradotti in Italiano.
Ci stiamo impegnando molto per darvi il meglio che vi possiamo offrire in termini di maglia e uncinetto, ispirazioni e consigli così come filati di grande qualità ad un prezzo incredibile! Volete utilizzare i nostri modelli per qualcosa d'altro oltre al vostro uso personale? Potete leggere tutto ciò che è consentito nel testo sul Copyright in basso su tutte le pagine dei nostri modelli. Buon lavoro!
Lasciare un commento sul modello DROPS 134-43
Noi saremmo felici di ricevere i tuoi commenti e opinioni su questo modello!
Se vuoi fare una domanda, fai per favore attenzione a selezionare la categoria corretta nella casella qui sotto per velocizzare il processo di risposta. I campi richiesti sono indicati da *.