
Categorie popolari
State cercando un filato?


Commenti / Domande (260)
![]() Nathalie Lagrange ha scritto:
Nathalie Lagrange ha scritto:
Bonsoir ! Un grand merci pour la réponse à la question que je vous ai posée hier à propos des modifications ! Rapidité efficacité merci encore Bien à vous Nathalie Lagrange
12.01.2021 - 17:09
![]() Nathalie Lagrange ha scritto:
Nathalie Lagrange ha scritto:
Bonjour Je suis un peu ennuyée car il est signalé une modification sur ce modèle et en cliquant sur le lien je ne vois aucune explication de changement Pouvez vous me Renseigner svp? D’avance merci c’est un si joli modèle que j’ai hâte de le commencer Cordialement Bonne journée Nathalie
11.01.2021 - 11:13DROPS Design ha risposto:
Bonjour Mme Lagrange, si vous avez imprimé les explications après la date des deux corrections, le modèle est à jour; si vous l'aviez imprimé auparavant, il peut être sage de les imprimer à nouveau pour avoir la totalité des explications et des diagrammes corrects. Bon tricot!
11.01.2021 - 14:17
![]() Elisabeth Bürger ha scritto:
Elisabeth Bürger ha scritto:
Hallo,die 20 Rechtecke sind fertig. Nun habe ich grosse Schwierigkeiten, die unterschiedlichen Ränder (Knötchenrand, Abkettrand und Anschlagrand) zusammenzunähen.
13.12.2020 - 20:40DROPS Design ha risposto:
Liebe Frau Bürger, wenn Sie die Randmaschen krausrechts zusammennähen, dann folgen Sie dieses Video - wenn Sie das Abkettrand/Anschlagsrand auf der Seite wie beim diesen Video und Anschlagsrand mit Abkettrand wie beim diesen Video. Viel Spaß beim stricken!
14.12.2020 - 09:27
![]() Odette De Wit ha scritto:
Odette De Wit ha scritto:
M1 begint toch met naald aan de goede kant? Mijn vierkant ziet er anders uit dan op het plaatje, de kabel is zichtbaar op de verkeerde kant, en is dan in ribbelsteek met daaromheen tricotsteek. Ziet er totaal anders uit dan plaatje. Wat doe ik fout?
22.11.2020 - 18:33DROPS Design ha risposto:
Dag Odette,
Ja, M.1 begint inderdaad op de goede kant. Alle telpatronen beginnen altijd op de goede kant, tenzij anders aangegeven. Je breit van onder naar boven en je leest van rechts naar links op de goede kant (en van links naar rechts als je de op de verkeerde kant aan het breien bent.) Alle naalden zijn aangegeven in het telpatroon, dus ook de naalden aan de verkeerde kant.
24.11.2020 - 13:44
![]() MARTINE FRAMMERY ha scritto:
MARTINE FRAMMERY ha scritto:
Ai fait ce modèle. Résultat parfait et je l'utilise comme plaid en hiver. Bien chaud! Je pense refaire ce modèle avec d'autre dimensions comme couverture d'appoint. Merci pour tous ces modèles.
17.11.2020 - 15:18
![]() Marianne ha scritto:
Marianne ha scritto:
Ik wil graag bovenstaande plaid gaan breien, maar ik vin de Nepal wol niet zacht genoeg. Wat zou een goed alternatief kunnen zijn?
08.10.2020 - 15:32DROPS Design ha risposto:
Dag Marianne,
Afhankelijk van wat voor zachtheid je naar op zoek bent, is misschien DROSP Air wel iets. Dit is een heel licht warm en zacht 'blow' garen en valt ook in garencategorie C.
10.10.2020 - 10:27
![]() Pernille ha scritto:
Pernille ha scritto:
Stemmer M.4? Får ikke det til å stemme utifra bildet dere har av teppet her inne.
19.08.2020 - 21:09
![]() Pernille ha scritto:
Pernille ha scritto:
Hvordan gjøe jeg om denne oppskriften til å bli 210x200?
03.08.2020 - 13:45DROPS Design ha risposto:
Hej Pernille, Vi kan ikke skrive opskriften om. Men du skal bruge ca dobbelt så mange ruder og så kan du jo altid justere med kanten. God fornøjelse!
03.08.2020 - 14:32
![]() Kaitlyn ha scritto:
Kaitlyn ha scritto:
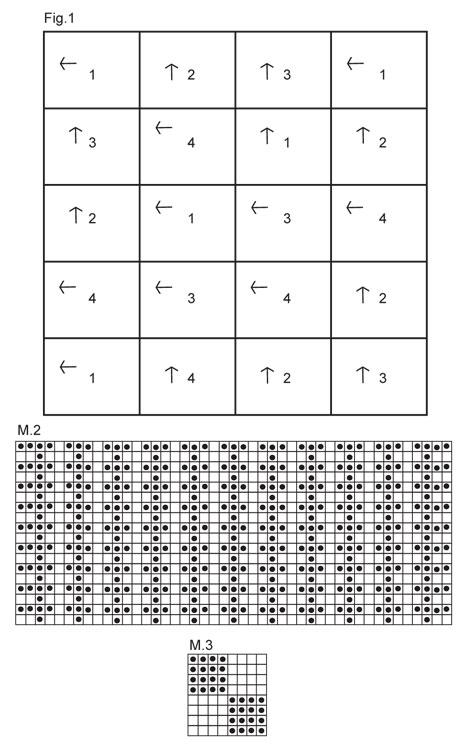
What do you mean by "knitting direction" with the arrows in figure 1? I'm a new knitter, sorry if that's elementary!
26.06.2020 - 16:46DROPS Design ha risposto:
Dear Kaitlyn, when you will sew squares together, they have to be placed as shown in fig;1 with "knitting direction" as shown, ie the bottom of arrow is towards cast on edge and the tip of arrow is towards cast off edge. Happy knitting!
29.06.2020 - 07:19
![]() Guylaine Paradis ha scritto:
Guylaine Paradis ha scritto:
Bonjour, J’aimerais savoir quand je pourrai commander de la laine étant donné que je vis au Québec Canada. Merci
09.05.2020 - 13:56DROPS Design ha risposto:
Bonjour Mme Paradis, vous trouverez ici la liste des magasins DROPS au Canada (contactez Nordic Yarn) ou bien expédiant au Canada. Bon tricot!
11.05.2020 - 09:19
|
||||||||||||||||
Warm Hug#warmhugblanket |
||||||||||||||||
 |
 |
|||||||||||||||
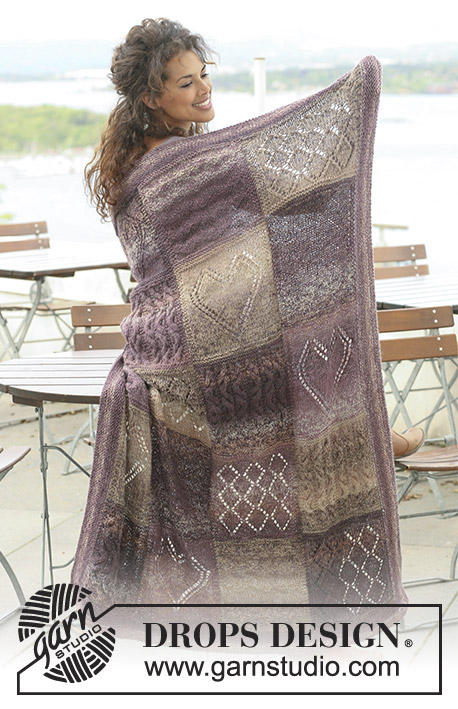
Coperta DROPS realizzata di quadrati lavorati a maglia in strutture diverse in "Nepal".
DROPS 124-3 |
||||||||||||||||
|
MOTIVO: Ved diag M.1 a M.4. Il diag mostra il motivo sul diritto. PUNTO LEGACCIO (avanti e indietro): Lavorare tutti i f a diritto. -------------------------------------------------------- COPERTA: Ogni quadrato si lavora avanti e indietro. Lavorare 5 quadrati di ogni tipo = in totale 20 quadrati. QUADRATO 1: Avviare 38 m con il f 5 ed il filo Nepal. Lavorare 1 f dir sul diritto e 1 f dir sul rovescio. Lavorare poi 1 f dir sul diritto, ALLO STESSO TEMPO, distribuire uniformemente 12 aumenti (non aumentare sulle 2 m ad ogni lato) = 50 m. Lavorare 1 f rov sul rovescio. Dopo 1 motivo di M.1. in altezza, lavorare 1 f dir sul diretto, ALLO STESSO TEMPO, distribuire uniformemente 12 diminuzioni (non diminuire sulle 2 m ad ogni lato) = 38 m. Lavorare 1 f dir sul rovescio e 1 f dir sul diritto. Intrecciare poi a diritto sul rovescio. QUADRATO 2: Avviare 38 m con il f 5 ed il filo Nepal. Lavorare 1 f dir sul diritto e 1 f dir sul rovescio. Lavorare poi 1 f dir sul diritto, ALLO STESSO TEMPO, distribuire uniformemente 7 aumenti (non aumentare sulle 2 m ad ogni lato) = 45 m. Lavorare 1 f rov sul rovescio. Lavorare poi M.2. Continuare così finché il quadrato misura ca 1 cm in meno rispetto al quadrato 1. Lavorare poi 1 f dir sul diritto, ALLO STESSO TEMPO, distribuire uniformemente 7 diminuzioni (non aumentare sulle 2 m ad ogni lato) = 38 m. Lavorare 1 f dir sul rovescio e 1 f dir sul diritto. Intrecciare poi a diritto sul rovescio. QUADRATO 3: Avviare 38 m con il f 5 ed il filo Nepal. Lavorare 1 f dir sul diritto e 1 f dir sul rovescio. Lavorare poi 1 f dir sul diritto e 1 f rov sul rovescio. Lavorare poi M.3 con 1 m PUNTO LEGACCIO - ved spieg sopra - ad ogni lato. Continuare così finché il quadrato misura ca 1 cm in meno rispetto al quadrato 1 (aggiustare per finire con un motivo a metà oppure un motivo intero in altezza). Lavorare 1 f dir sul diritto, 1 f dir sul rovescio e 1 f dir sul diritto. Intrecciare poi a diritto sul rovescio. QUADRATO 4: Avviare 38 m con il f 5 ed il filo Nepal. Lavorare 1 f dir sul diritto e 1 f dir sul rovescio. Lavorare poi 1 f dir sul diritto, ALLO STESSO TEMPO, distribuire uniformemente 18 aumenti (non aumentare sulle 2 m ad ogni lato) = 56 m. Lavorare 1 f rov sul rovescio. Lavorare poi M.4. Continuare così finché il quadrato misura ca 1 cm in meno rispetto al quadrato 1 (aggiustare a 3 f dopo l’ultima treccia). Lavorare poi 1 f dir sul diritto, ALLO STESSO TEMPO, distribuire uniformemente 8 m diminuzioni (non aumentare sulle 2 m ad ogni lato) = 38 m. Lavorare 1 f dir sul rovescio e 1 f dir sul diritto. Intrecciare poi a diritto sul rovescio. CONFEZIONE: Unire i quadrati come indicato in Fig.1. I numeri indicano il tipo di quadrato e la freccia indica la direzione della lavorazione della maglia.Cucire bordo contro bordo nel cappio esterno della maglia per evitare cuciture troppo spesse. BORDO: Si lavorano a punto legaccio, cioè ogni f a diritto. Riprendere le m lungo uno dei lati corti con il f circolare n°5 e il filo Nepal. Riprendere 1 m in ogni m (riprendere anche nelle m nei passaggi tra ogni quadrato). Lavorare avanti e indietro fino a quando il bordo misura ca 4 cm. Intrecciare. Lavorare un bordo identico dall’altro lato corto della coperta. Riprendere le m nella stessa maniera lungo il lato lungo, riprendere le m anche lungo i 8 cm dei bordi dei lati corti. Lavorare avanti e indietro fino a quando il lavoro misura ca 4 cm. Intrecciare. Ripetere nella stessa maniera lungo l’altro lato lungo. |
||||||||||||||||
Spiegazioni del diagramma |
||||||||||||||||
|
||||||||||||||||
 |
||||||||||||||||
 |
||||||||||||||||
Avete terminato questo modello?Allora taggate le vostre foto con #dropspattern #warmhugblanket o inviatele alla #dropsfan gallery. Avete bisogno di aiuto con questo modello?Troverete 14 video tutorial, una sezione per i commenti/domande e molto altro guardando il modello su www.garnstudio.com © 1982-2026 DROPS Design A/S. Ci riserviamo tutti i diritti. Questo documento, compreso tutte le sue sotto-sezioni, è protetto dalle leggi sul copyright. Potete leggere quello che potete fare con i nostri modelli alla fine di ogni modello sul nostro sito. |
||||||||||||||||


Con oltre 40 anni di esperienza nel design di modelli di maglia e uncinetto, DROPS Design offre la più estesa collezione di modelli gratuiti su internet - tradotti in 17 lingue. Ad oggi vi possiamo fornire 324 cataloghi e 12290 modelli - 9561 dei quali sono tradotti in Italiano.
Ci stiamo impegnando molto per darvi il meglio che vi possiamo offrire in termini di maglia e uncinetto, ispirazioni e consigli così come filati di grande qualità ad un prezzo incredibile! Volete utilizzare i nostri modelli per qualcosa d'altro oltre al vostro uso personale? Potete leggere tutto ciò che è consentito nel testo sul Copyright in basso su tutte le pagine dei nostri modelli. Buon lavoro!
Lasciare un commento sul modello DROPS 124-3
Noi saremmo felici di ricevere i tuoi commenti e opinioni su questo modello!
Se vuoi fare una domanda, fai per favore attenzione a selezionare la categoria corretta nella casella qui sotto per velocizzare il processo di risposta. I campi richiesti sono indicati da *.