
Categorie popolari
State cercando un filato?


Commenti / Domande (260)
![]() Luisa ha scritto:
Luisa ha scritto:
Was ist bei Viereck 3 mit 1 M. Krausrippe gemeint? Einfach eine Randmasche kraus rechts beidseitig?
20.10.2025 - 20:57DROPS Design ha risposto:
Liebe Luisa, genau, es ist je 1 Rand-Masche kraus rechts beidseitig gemeint. Die Formulierung "Krausrippe" für einzelne kraus rechte Maschen taucht noch in unseren älteren (aber nach wie vor zeitlos schönen :-)) Anleitungen auf. Viel Spaß beim Stricken!
21.10.2025 - 11:12
![]() Piolot Martine ha scritto:
Piolot Martine ha scritto:
Bonjour je souhaiterais faire ce plaid pourriez me dire comment repartir les augmentations sur chaque carres .... merci pour l'aide apportée
14.10.2025 - 17:26DROPS Design ha risposto:
Bonjour Mme Piolot, utilisez la petite calculatrice que vous trouverez soit juste sous Explications (après les liens vers la laine et les aiguilles) ou bien cliquez sur la petite calculette dans le coin en bas à droite de la fenêtre. Retrouvez également la technique décrite ici. Bon tricot!
15.10.2025 - 09:07
![]() Karine ha scritto:
Karine ha scritto:
Bonjour, J'aimerais faire cette jolie couverture, mais je ne comprends pas comment on peut relever un si grand nombre de mailles pour les bordures. Mon câble le plus long mesure un mètre. Pardon si ma question est naïve, mais je n'ai jamais réalisé d'ouvrage aussi grand. Merci
09.09.2025 - 12:15DROPS Design ha risposto:
Bonjour Karine, c'est une des raisons pour lesquelles on utilise une aiguille circulaire, on a beaucoup plus de place que sur des aiguilles droites; vos mailles seront un peu plus serrées car effectivement plus de longueurs que votre câble mais vous pourrez tricoter simplement en tournant à la fin de chaque rang. Bont ricot!
11.09.2025 - 11:46
![]() Anita S Aase ha scritto:
Anita S Aase ha scritto:
Hva er størrelsen på hver rute?
20.07.2025 - 19:00DROPS Design ha risposto:
Hei Anita. Det er det ikke opplyst om. Men du kan regne det ut fra oppgitt mål på teppet minus kanten (ca 22-23 cm). mvh DROPS Design
31.07.2025 - 13:49
![]() Tineke ha scritto:
Tineke ha scritto:
Vierkant 2 moet 1 cm korter dan vierkant 1.moet vierkant 1 dan in de breedte of lengte gemeten worden want vierkant 1 zit in de breedte in de deken verwerkt.
10.07.2025 - 19:29DROPS Design ha risposto:
Dag Tineke,
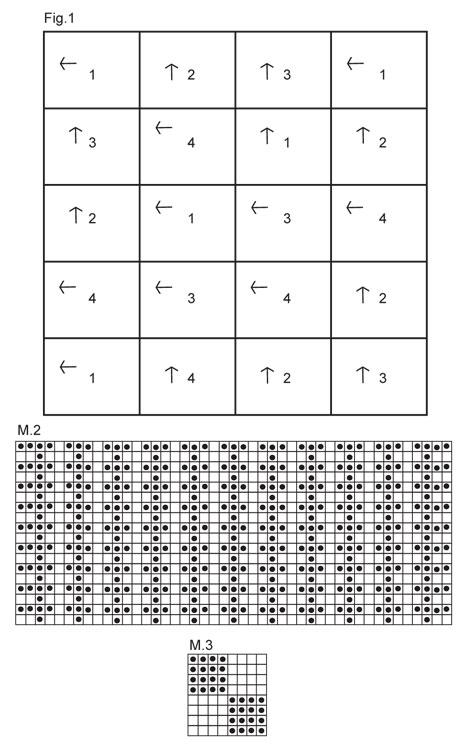
De pijltjes onderaan in het overzicht geven aan in welke richting de vierkanten zijn gebreid. De rand waar de pijl naar toe wijst is de afkantrand.
11.07.2025 - 20:48
![]() Haas ha scritto:
Haas ha scritto:
Sind bei den 4 Mustern die Hin- und Rückreihen gezeichnet oder nur die Hinreihen und die Rückreihen werden gestrickt wie sie erscheinen ?
13.03.2025 - 08:39DROPS Design ha risposto:
Liebe Frau Haas, die Diagramme zeigen alle Reihen, die Hin- sowie die Rückreihen, so lesen Sie bein den Hinreihen rechts nach links und bei den Rückreihen (siehe "auf der Rückseite" unter Zeichenerklärung) von links nach rechts. Viel Spaß beim Stricken!
13.03.2025 - 15:57
![]() Jacqueline Landais ha scritto:
Jacqueline Landais ha scritto:
Pourquoi les carrés 2,3,4 doivent mesurer 1 cm que le carré 1
23.02.2025 - 21:35DROPS Design ha risposto:
Bonjour Mme Landais, tous les carrés doivent avoir la même taille pour qu'ils puissent s'assembler entre eux, ainsi, ils commencent tous et se terminent tous par 38 mailles. Le nombre de mailles du point fantaisie va en revanche pouvoir varier en raison de chaque motif qui va plus ou moins resserrer en largeur. Bon tricot!
24.02.2025 - 09:26
![]() Anke Brion ha scritto:
Anke Brion ha scritto:
Das Muster 1 ist bei mir viel zu lang wenn man davon ausgeht das das Diagramm die Vorderseite zeigt. Was mache ich falsch?
16.02.2025 - 14:27DROPS Design ha risposto:
Liebe Frau Brion, die Diagramme zeigen alle Reihen (die Hin- sowie die Rückreihen) von der Vorderseite gesehen. Hinreihen lesen Sie rechts nach links und Rückreihen lesen Sie links nach rechts. Viel Spaß beim Stricken!
17.02.2025 - 09:46
![]() JANICE ha scritto:
JANICE ha scritto:
Can this blanket be knitted using half Brushed Alpaca and Silk and the other half of the squares knitted in Nepal yarn. If this is possible how much of each yarn type would I need to purchase? Thanks!
09.01.2025 - 22:18DROPS Design ha risposto:
Dear Janice, as both yarns belong to yarn group C you could also work some squares with Brushed Alpaca Silk (as long a you get same tension) to play with textures, but unfortunately we only have the total weight of yarn required for the whole blanket, not for each square; you might get help from your yarn store. Happy knitting!
10.01.2025 - 09:03
![]() Astrid Strijbos ha scritto:
Astrid Strijbos ha scritto:
Is dit ook een patroon voor BEGINNERS?
13.12.2024 - 17:05
|
||||||||||||||||
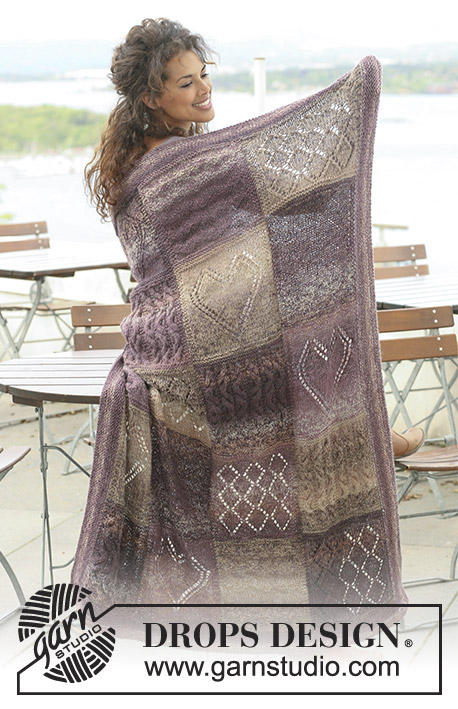
Warm Hug#warmhugblanket |
||||||||||||||||
 |
 |
|||||||||||||||
Coperta DROPS realizzata di quadrati lavorati a maglia in strutture diverse in "Nepal".
DROPS 124-3 |
||||||||||||||||
|
MOTIVO: Ved diag M.1 a M.4. Il diag mostra il motivo sul diritto. PUNTO LEGACCIO (avanti e indietro): Lavorare tutti i f a diritto. -------------------------------------------------------- COPERTA: Ogni quadrato si lavora avanti e indietro. Lavorare 5 quadrati di ogni tipo = in totale 20 quadrati. QUADRATO 1: Avviare 38 m con il f 5 ed il filo Nepal. Lavorare 1 f dir sul diritto e 1 f dir sul rovescio. Lavorare poi 1 f dir sul diritto, ALLO STESSO TEMPO, distribuire uniformemente 12 aumenti (non aumentare sulle 2 m ad ogni lato) = 50 m. Lavorare 1 f rov sul rovescio. Dopo 1 motivo di M.1. in altezza, lavorare 1 f dir sul diretto, ALLO STESSO TEMPO, distribuire uniformemente 12 diminuzioni (non diminuire sulle 2 m ad ogni lato) = 38 m. Lavorare 1 f dir sul rovescio e 1 f dir sul diritto. Intrecciare poi a diritto sul rovescio. QUADRATO 2: Avviare 38 m con il f 5 ed il filo Nepal. Lavorare 1 f dir sul diritto e 1 f dir sul rovescio. Lavorare poi 1 f dir sul diritto, ALLO STESSO TEMPO, distribuire uniformemente 7 aumenti (non aumentare sulle 2 m ad ogni lato) = 45 m. Lavorare 1 f rov sul rovescio. Lavorare poi M.2. Continuare così finché il quadrato misura ca 1 cm in meno rispetto al quadrato 1. Lavorare poi 1 f dir sul diritto, ALLO STESSO TEMPO, distribuire uniformemente 7 diminuzioni (non aumentare sulle 2 m ad ogni lato) = 38 m. Lavorare 1 f dir sul rovescio e 1 f dir sul diritto. Intrecciare poi a diritto sul rovescio. QUADRATO 3: Avviare 38 m con il f 5 ed il filo Nepal. Lavorare 1 f dir sul diritto e 1 f dir sul rovescio. Lavorare poi 1 f dir sul diritto e 1 f rov sul rovescio. Lavorare poi M.3 con 1 m PUNTO LEGACCIO - ved spieg sopra - ad ogni lato. Continuare così finché il quadrato misura ca 1 cm in meno rispetto al quadrato 1 (aggiustare per finire con un motivo a metà oppure un motivo intero in altezza). Lavorare 1 f dir sul diritto, 1 f dir sul rovescio e 1 f dir sul diritto. Intrecciare poi a diritto sul rovescio. QUADRATO 4: Avviare 38 m con il f 5 ed il filo Nepal. Lavorare 1 f dir sul diritto e 1 f dir sul rovescio. Lavorare poi 1 f dir sul diritto, ALLO STESSO TEMPO, distribuire uniformemente 18 aumenti (non aumentare sulle 2 m ad ogni lato) = 56 m. Lavorare 1 f rov sul rovescio. Lavorare poi M.4. Continuare così finché il quadrato misura ca 1 cm in meno rispetto al quadrato 1 (aggiustare a 3 f dopo l’ultima treccia). Lavorare poi 1 f dir sul diritto, ALLO STESSO TEMPO, distribuire uniformemente 8 m diminuzioni (non aumentare sulle 2 m ad ogni lato) = 38 m. Lavorare 1 f dir sul rovescio e 1 f dir sul diritto. Intrecciare poi a diritto sul rovescio. CONFEZIONE: Unire i quadrati come indicato in Fig.1. I numeri indicano il tipo di quadrato e la freccia indica la direzione della lavorazione della maglia.Cucire bordo contro bordo nel cappio esterno della maglia per evitare cuciture troppo spesse. BORDO: Si lavorano a punto legaccio, cioè ogni f a diritto. Riprendere le m lungo uno dei lati corti con il f circolare n°5 e il filo Nepal. Riprendere 1 m in ogni m (riprendere anche nelle m nei passaggi tra ogni quadrato). Lavorare avanti e indietro fino a quando il bordo misura ca 4 cm. Intrecciare. Lavorare un bordo identico dall’altro lato corto della coperta. Riprendere le m nella stessa maniera lungo il lato lungo, riprendere le m anche lungo i 8 cm dei bordi dei lati corti. Lavorare avanti e indietro fino a quando il lavoro misura ca 4 cm. Intrecciare. Ripetere nella stessa maniera lungo l’altro lato lungo. |
||||||||||||||||
Spiegazioni del diagramma |
||||||||||||||||
|
||||||||||||||||
 |
||||||||||||||||
 |
||||||||||||||||
Avete terminato questo modello?Allora taggate le vostre foto con #dropspattern #warmhugblanket o inviatele alla #dropsfan gallery. Avete bisogno di aiuto con questo modello?Troverete 14 video tutorial, una sezione per i commenti/domande e molto altro guardando il modello su www.garnstudio.com © 1982-2026 DROPS Design A/S. Ci riserviamo tutti i diritti. Questo documento, compreso tutte le sue sotto-sezioni, è protetto dalle leggi sul copyright. Potete leggere quello che potete fare con i nostri modelli alla fine di ogni modello sul nostro sito. |
||||||||||||||||


Con oltre 40 anni di esperienza nel design di modelli di maglia e uncinetto, DROPS Design offre la più estesa collezione di modelli gratuiti su internet - tradotti in 17 lingue. Ad oggi vi possiamo fornire 324 cataloghi e 12290 modelli - 9561 dei quali sono tradotti in Italiano.
Ci stiamo impegnando molto per darvi il meglio che vi possiamo offrire in termini di maglia e uncinetto, ispirazioni e consigli così come filati di grande qualità ad un prezzo incredibile! Volete utilizzare i nostri modelli per qualcosa d'altro oltre al vostro uso personale? Potete leggere tutto ciò che è consentito nel testo sul Copyright in basso su tutte le pagine dei nostri modelli. Buon lavoro!
Lasciare un commento sul modello DROPS 124-3
Noi saremmo felici di ricevere i tuoi commenti e opinioni su questo modello!
Se vuoi fare una domanda, fai per favore attenzione a selezionare la categoria corretta nella casella qui sotto per velocizzare il processo di risposta. I campi richiesti sono indicati da *.