
Categorie popolari
State cercando un filato?


Commenti / Domande (260)
![]() Marylene ha scritto:
Marylene ha scritto:
Re bjr donc m1et m4 on les tricote comme elle se présente a l envers ou pas car les motif se présente sur endroit .ses la que je comprend pas désolé.merci de votre contrepression.
15.09.2015 - 15:25DROPS Design ha risposto:
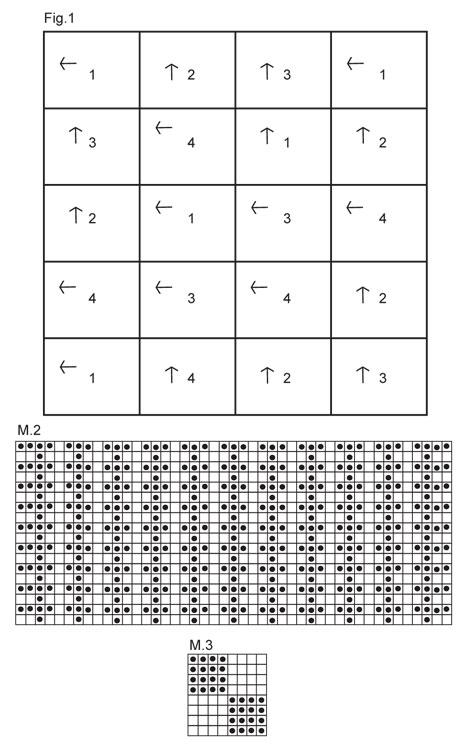
Bonjour Marylene, au 1er rang de M1 par ex, on a (de droite à gauche): 2 cases blanches, 7 avec 1 point noir, 6 blanches, 3 avec 1 point noir, etc... on va tricoter: 2 m end, 7 m env, 6 m end, 3 m env, etc.. Au 2ème rang = sur l'envers, on a: 9 points noirs, 6 blanches, 3 points noirs etc..., on va tricoter: 9 m end, 6 m env, 3 m end, etc.. Bon tricot!
15.09.2015 - 17:28
![]() Marylene ha scritto:
Marylene ha scritto:
Merci bonne journée
15.09.2015 - 10:55
![]() Marylene ha scritto:
Marylene ha scritto:
Je voulais aussi savoir si le diagrammes m1etm4 se montre sur endroit donc on les tricotes comment sur l envers du tricot .merci à vous bonne soirée marylene
14.09.2015 - 20:35DROPS Design ha risposto:
Bonjour Marylene, tous les diagrammes représentent tous les rangs: 1 case = 1 m x 1 rang. Sur l'envers, vous avez une alternance de ronds noirs et de cases blanches, suivez bien la légende de ces symboles, soit le rond noir = 1 m env sur l'end, end sur l'envers et la case blanche = 1 m end sur l'end, env sur l'env. Bon tricot!
15.09.2015 - 10:10
![]() Marylene ha scritto:
Marylene ha scritto:
Merci a vous bon journée
14.09.2015 - 12:14
![]() Marylene ha scritto:
Marylene ha scritto:
Merci a vous bonne journée .
14.09.2015 - 12:11
![]() Marylene ha scritto:
Marylene ha scritto:
Bjr pouvais vous me donner les point exacte ou leurs non pour moi ses plus simple merci a vous j adore cette couverture .
14.09.2015 - 10:05DROPS Design ha risposto:
Bonjour Marylene, chacun des 4 carrés se tricote différemment: suivez bien les indications de chaque carré: nbe de m à monter, augmentations puis diagramme à suivre, hauteur et diminutions. La légende des diagrammes se trouve juste au-dessus d'eux. cliquez ici pour plus d'informations sur les diagrammes. Bon tricot!
14.09.2015 - 10:14
![]() Gundula Harder ha scritto:
Gundula Harder ha scritto:
Bekommen nur die kurzen Seiten einen Rand von 8 cm Krausrippen oder alle vier Seiten? Schon jetzt vielen Dank für das wunderschöne Muster und die Antwort.
29.07.2015 - 09:20DROPS Design ha risposto:
Zuerst wird der Rand an beiden Kurzseiten jeweils 8 cm angestrickt, danach an den Längsseiten jeweils 4 cm, der Rand ist also rundum um die Decke kraus re.
29.07.2015 - 09:49Yvonne McRobbie ha scritto:
Have done my 5th M1 square and thought you would appreciate knowing that rows 44/46/48 have a stitch wrong. This repeat of right hand diamond cable has a white square instead of a black dot on the three wrong side rows. Cheers.
18.07.2015 - 13:33Yvonne McRobbie ha scritto:
I am blown away by the help you provide and the speed of your replies. I now have one of all four squares done and can't wait to put them all together. This is such a beautiful throw. Thank you so much for sharing it. I am loving the wool too. It lovely to knit with. I was a bit anxious as used to NZ quality yarn, but this yarn is every bit as good. Cheers.
07.07.2015 - 11:09Yvonne McRobbie ha scritto:
Thank you for answer re blocking. But have another concern. Square 2 is assembled in same verticle direction ^ as knitted but on the picture of the throw the ridges appear to run crossways < >. Can you tell me the pattern name as maybe I am reading the graph wrong. Mine looks like a fisherman's rib!
07.07.2015 - 08:44DROPS Design ha risposto:
Dear Mrs McRobbie, on the picture you see the blanket sideways, ie the bottom of blanket (= bottom of diag) is on the left side and top of blanket (= top of diagram) is on the right side. Happy knitting!
07.07.2015 - 10:21
|
||||||||||||||||
Warm Hug#warmhugblanket |
||||||||||||||||
 |
 |
|||||||||||||||
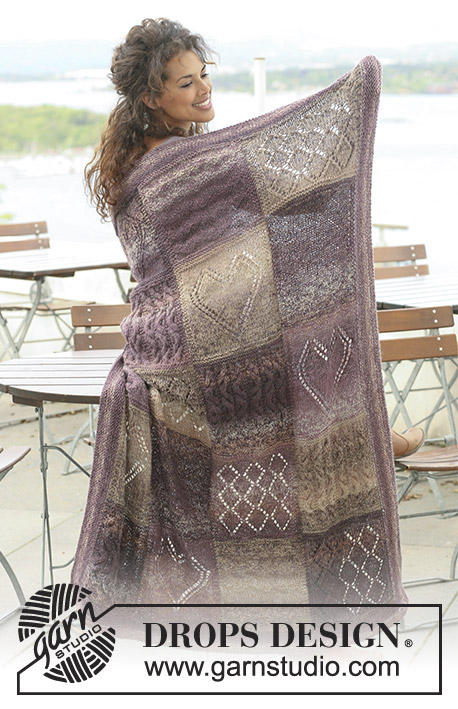
Coperta DROPS realizzata di quadrati lavorati a maglia in strutture diverse in "Nepal".
DROPS 124-3 |
||||||||||||||||
|
MOTIVO: Ved diag M.1 a M.4. Il diag mostra il motivo sul diritto. PUNTO LEGACCIO (avanti e indietro): Lavorare tutti i f a diritto. -------------------------------------------------------- COPERTA: Ogni quadrato si lavora avanti e indietro. Lavorare 5 quadrati di ogni tipo = in totale 20 quadrati. QUADRATO 1: Avviare 38 m con il f 5 ed il filo Nepal. Lavorare 1 f dir sul diritto e 1 f dir sul rovescio. Lavorare poi 1 f dir sul diritto, ALLO STESSO TEMPO, distribuire uniformemente 12 aumenti (non aumentare sulle 2 m ad ogni lato) = 50 m. Lavorare 1 f rov sul rovescio. Dopo 1 motivo di M.1. in altezza, lavorare 1 f dir sul diretto, ALLO STESSO TEMPO, distribuire uniformemente 12 diminuzioni (non diminuire sulle 2 m ad ogni lato) = 38 m. Lavorare 1 f dir sul rovescio e 1 f dir sul diritto. Intrecciare poi a diritto sul rovescio. QUADRATO 2: Avviare 38 m con il f 5 ed il filo Nepal. Lavorare 1 f dir sul diritto e 1 f dir sul rovescio. Lavorare poi 1 f dir sul diritto, ALLO STESSO TEMPO, distribuire uniformemente 7 aumenti (non aumentare sulle 2 m ad ogni lato) = 45 m. Lavorare 1 f rov sul rovescio. Lavorare poi M.2. Continuare così finché il quadrato misura ca 1 cm in meno rispetto al quadrato 1. Lavorare poi 1 f dir sul diritto, ALLO STESSO TEMPO, distribuire uniformemente 7 diminuzioni (non aumentare sulle 2 m ad ogni lato) = 38 m. Lavorare 1 f dir sul rovescio e 1 f dir sul diritto. Intrecciare poi a diritto sul rovescio. QUADRATO 3: Avviare 38 m con il f 5 ed il filo Nepal. Lavorare 1 f dir sul diritto e 1 f dir sul rovescio. Lavorare poi 1 f dir sul diritto e 1 f rov sul rovescio. Lavorare poi M.3 con 1 m PUNTO LEGACCIO - ved spieg sopra - ad ogni lato. Continuare così finché il quadrato misura ca 1 cm in meno rispetto al quadrato 1 (aggiustare per finire con un motivo a metà oppure un motivo intero in altezza). Lavorare 1 f dir sul diritto, 1 f dir sul rovescio e 1 f dir sul diritto. Intrecciare poi a diritto sul rovescio. QUADRATO 4: Avviare 38 m con il f 5 ed il filo Nepal. Lavorare 1 f dir sul diritto e 1 f dir sul rovescio. Lavorare poi 1 f dir sul diritto, ALLO STESSO TEMPO, distribuire uniformemente 18 aumenti (non aumentare sulle 2 m ad ogni lato) = 56 m. Lavorare 1 f rov sul rovescio. Lavorare poi M.4. Continuare così finché il quadrato misura ca 1 cm in meno rispetto al quadrato 1 (aggiustare a 3 f dopo l’ultima treccia). Lavorare poi 1 f dir sul diritto, ALLO STESSO TEMPO, distribuire uniformemente 8 m diminuzioni (non aumentare sulle 2 m ad ogni lato) = 38 m. Lavorare 1 f dir sul rovescio e 1 f dir sul diritto. Intrecciare poi a diritto sul rovescio. CONFEZIONE: Unire i quadrati come indicato in Fig.1. I numeri indicano il tipo di quadrato e la freccia indica la direzione della lavorazione della maglia.Cucire bordo contro bordo nel cappio esterno della maglia per evitare cuciture troppo spesse. BORDO: Si lavorano a punto legaccio, cioè ogni f a diritto. Riprendere le m lungo uno dei lati corti con il f circolare n°5 e il filo Nepal. Riprendere 1 m in ogni m (riprendere anche nelle m nei passaggi tra ogni quadrato). Lavorare avanti e indietro fino a quando il bordo misura ca 4 cm. Intrecciare. Lavorare un bordo identico dall’altro lato corto della coperta. Riprendere le m nella stessa maniera lungo il lato lungo, riprendere le m anche lungo i 8 cm dei bordi dei lati corti. Lavorare avanti e indietro fino a quando il lavoro misura ca 4 cm. Intrecciare. Ripetere nella stessa maniera lungo l’altro lato lungo. |
||||||||||||||||
Spiegazioni del diagramma |
||||||||||||||||
|
||||||||||||||||
 |
||||||||||||||||
 |
||||||||||||||||
Avete terminato questo modello?Allora taggate le vostre foto con #dropspattern #warmhugblanket o inviatele alla #dropsfan gallery. Avete bisogno di aiuto con questo modello?Troverete 14 video tutorial, una sezione per i commenti/domande e molto altro guardando il modello su www.garnstudio.com © 1982-2026 DROPS Design A/S. Ci riserviamo tutti i diritti. Questo documento, compreso tutte le sue sotto-sezioni, è protetto dalle leggi sul copyright. Potete leggere quello che potete fare con i nostri modelli alla fine di ogni modello sul nostro sito. |
||||||||||||||||


Con oltre 40 anni di esperienza nel design di modelli di maglia e uncinetto, DROPS Design offre la più estesa collezione di modelli gratuiti su internet - tradotti in 17 lingue. Ad oggi vi possiamo fornire 324 cataloghi e 12290 modelli - 9561 dei quali sono tradotti in Italiano.
Ci stiamo impegnando molto per darvi il meglio che vi possiamo offrire in termini di maglia e uncinetto, ispirazioni e consigli così come filati di grande qualità ad un prezzo incredibile! Volete utilizzare i nostri modelli per qualcosa d'altro oltre al vostro uso personale? Potete leggere tutto ciò che è consentito nel testo sul Copyright in basso su tutte le pagine dei nostri modelli. Buon lavoro!
Lasciare un commento sul modello DROPS 124-3
Noi saremmo felici di ricevere i tuoi commenti e opinioni su questo modello!
Se vuoi fare una domanda, fai per favore attenzione a selezionare la categoria corretta nella casella qui sotto per velocizzare il processo di risposta. I campi richiesti sono indicati da *.