
Categorie popolari
State cercando un filato?


Commenti / Domande (260)
Elana Myerson ha scritto:
This may be a silly question but when you say the diagram shows the right side of the pattern does this mean that one should knit the knit stitches and purl the purl stitches on the wrong side?Is the cable slash in the pattern supposed to be on the wrong side? Hope you understand my question. Thanks Elana
21.08.2016 - 03:43DROPS Design ha risposto:
Dear Mrs Myerson, in diagrams 1 square = 1 st x 1 row, ie from WS read diagram from the let towards the right following diagram text: white square = stocking st, so that you will P these sts from WS and black dot = reverse stockinette = you will K these sts from WS. Happy knitting!
22.08.2016 - 09:19
![]() Ann-Christin Langva ha scritto:
Ann-Christin Langva ha scritto:
Hvor store skal hver rute være? h?b?
16.05.2016 - 16:30DROPS Design ha risposto:
Hei. Ca 22 x 22 cm. Lykke til!
17.05.2016 - 09:57
![]() Hanna Saikkonen ha scritto:
Hanna Saikkonen ha scritto:
Hei! Mikä olisi paras tapa yhdistää ruudut? Virkaten? Neuloen? Vinkkejä mistä voisi löytyä ehkä jopa videollinen ohje liittämiseen?
24.04.2016 - 21:26DROPS Design ha risposto:
Nämä ruudut ommellaan yhteen. Ohjeen otsikon alta löydät videovalikon, valitse siitä "Ainaoikeinneulotun neuleen saumojen ompeleminen", sieltä näet miten saumat ommellaan.
26.04.2016 - 14:25
![]() Meng-Lee Walberg ha scritto:
Meng-Lee Walberg ha scritto:
Hallo liebe Mitarbeiterinnen von Drops, ich habe am 1.2. bereits einmal angefragt, wie man diese Decke in einem anderen Format .und mit anderer Wolle stricken kann - leider habe ich bis jetzt noch keine Antwort erhalten. Ich freue mich auf Ihre Antwort Meng-Lee Walberg
09.02.2016 - 10:59DROPS Design ha risposto:
Die Antwort vom 3.2. finden Sie unten bei Ihrer ersten Anfrage. Leider können wir Ihnen keine andere Anleitung anbieten, wenn Sie mit dünnerer Wolle stricken möchten; Sie müssen dann selbst Maß nehmen und ausrechnen, wie viele Quadrate Sie für die Decke benötigen.
09.02.2016 - 14:24
![]() Meng-Lee Walberg ha scritto:
Meng-Lee Walberg ha scritto:
Hallo liebe Damen vom Drops Team, ich möchte gerne diese Decke stricken, aber mit dünnerer Wolle. Wie berechne ich die hierfür benötigte Wolle.- Und ich möchte auch gerne ein anderes Maß stricken: 6 Quadrate in der Breite (ca. 1.25mtr) und 8 Quadrate in der Höhe (ca. 2mtr.) Wie muss ich dann die Quadrate platzieren? Vielen Dank im voraus für Ihre Antwort Meng-Lee Walberg
01.02.2016 - 11:59DROPS Design ha risposto:
Leider können wir Ihnen hier keine alternative Anleitung für eine Decke anbieten und auch keinen alternativen Garnverbrauch. Wenn Sie mit dünnerer Wolle stricken wollen, werden die Quadrate ja kleiner, das müssten Sie dann selbst ausmessen und ausrechnen, wie viele Quadrate Sie benötigen und wie Sie sie anordnen möchten.
03.02.2016 - 20:04
![]() Tarja ha scritto:
Tarja ha scritto:
Hups, laskin väärin, eli ohjeessa ei sittenkään mitään vikaa.
27.01.2016 - 23:40
![]() Tarja ha scritto:
Tarja ha scritto:
Mielestäni ohjeen 4. RUUTU kohdassa kehotetaan lisäämään liikaa silmukoita: piirroksen M4 mukaiseen neuleeseen tarvitaan vain 52 silmukkaa. Oikea lisäys olisi 14.
27.01.2016 - 21:56MIRIAM PEREZ-SEOANE ha scritto:
I do not understand in Square 1 when it says After 1 vertical repeat of M.1 K 1 row from RS,.... What does it mean vertical repeat? Thanks so much for your help
05.01.2016 - 00:24DROPS Design ha risposto:
Dear Mrs Perez-Seoanne, 1 vertical repeat of M.1 means when you have worked whole diagram 1 time in height. Happy knitting!
05.01.2016 - 09:21
![]() Miriam Perez-Seoane ha scritto:
Miriam Perez-Seoane ha scritto:
No entiendo cuando en la Aplicación 1 dice Después de 1 repetición vertical a de M.1 tejer... Que es una repetición vertical?
05.01.2016 - 00:19DROPS Design ha risposto:
Hola Miriam. Trabajando los diagramas usamos dos expresiones: repetición en la fila (trabajar el diagrama varias vcs a lo largo de una fila) y repetición en vertical (repetir el diagrama hacia arriba). En un patrón el diagrama se puede trabajar varias vcs en vertical, es decir completar varias vcs el diagrama hacia arriba.
05.01.2016 - 10:28
![]() Marylene ha scritto:
Marylene ha scritto:
Merci a vous ses se que je fessez mais je pensée que c été pas bon merci de me l avoir confirmer grand merci a vous .vous et super .
15.09.2015 - 18:02
|
||||||||||||||||
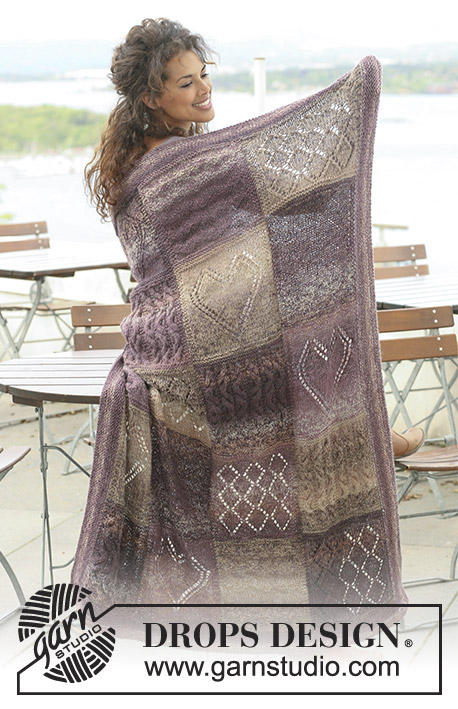
Warm Hug#warmhugblanket |
||||||||||||||||
 |
 |
|||||||||||||||
Coperta DROPS realizzata di quadrati lavorati a maglia in strutture diverse in "Nepal".
DROPS 124-3 |
||||||||||||||||
|
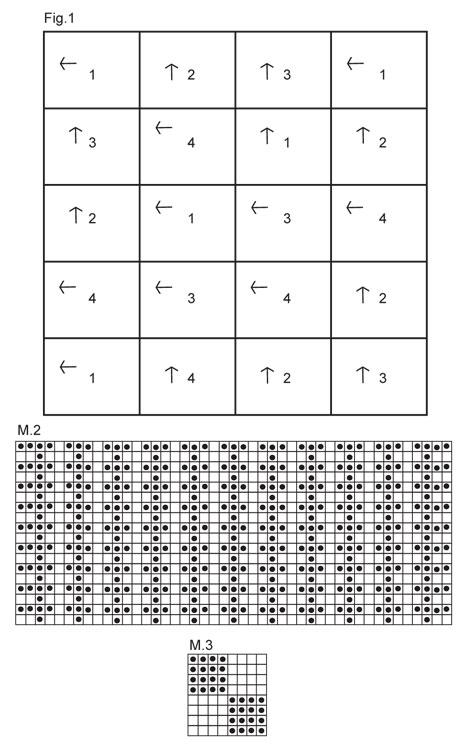
MOTIVO: Ved diag M.1 a M.4. Il diag mostra il motivo sul diritto. PUNTO LEGACCIO (avanti e indietro): Lavorare tutti i f a diritto. -------------------------------------------------------- COPERTA: Ogni quadrato si lavora avanti e indietro. Lavorare 5 quadrati di ogni tipo = in totale 20 quadrati. QUADRATO 1: Avviare 38 m con il f 5 ed il filo Nepal. Lavorare 1 f dir sul diritto e 1 f dir sul rovescio. Lavorare poi 1 f dir sul diritto, ALLO STESSO TEMPO, distribuire uniformemente 12 aumenti (non aumentare sulle 2 m ad ogni lato) = 50 m. Lavorare 1 f rov sul rovescio. Dopo 1 motivo di M.1. in altezza, lavorare 1 f dir sul diretto, ALLO STESSO TEMPO, distribuire uniformemente 12 diminuzioni (non diminuire sulle 2 m ad ogni lato) = 38 m. Lavorare 1 f dir sul rovescio e 1 f dir sul diritto. Intrecciare poi a diritto sul rovescio. QUADRATO 2: Avviare 38 m con il f 5 ed il filo Nepal. Lavorare 1 f dir sul diritto e 1 f dir sul rovescio. Lavorare poi 1 f dir sul diritto, ALLO STESSO TEMPO, distribuire uniformemente 7 aumenti (non aumentare sulle 2 m ad ogni lato) = 45 m. Lavorare 1 f rov sul rovescio. Lavorare poi M.2. Continuare così finché il quadrato misura ca 1 cm in meno rispetto al quadrato 1. Lavorare poi 1 f dir sul diritto, ALLO STESSO TEMPO, distribuire uniformemente 7 diminuzioni (non aumentare sulle 2 m ad ogni lato) = 38 m. Lavorare 1 f dir sul rovescio e 1 f dir sul diritto. Intrecciare poi a diritto sul rovescio. QUADRATO 3: Avviare 38 m con il f 5 ed il filo Nepal. Lavorare 1 f dir sul diritto e 1 f dir sul rovescio. Lavorare poi 1 f dir sul diritto e 1 f rov sul rovescio. Lavorare poi M.3 con 1 m PUNTO LEGACCIO - ved spieg sopra - ad ogni lato. Continuare così finché il quadrato misura ca 1 cm in meno rispetto al quadrato 1 (aggiustare per finire con un motivo a metà oppure un motivo intero in altezza). Lavorare 1 f dir sul diritto, 1 f dir sul rovescio e 1 f dir sul diritto. Intrecciare poi a diritto sul rovescio. QUADRATO 4: Avviare 38 m con il f 5 ed il filo Nepal. Lavorare 1 f dir sul diritto e 1 f dir sul rovescio. Lavorare poi 1 f dir sul diritto, ALLO STESSO TEMPO, distribuire uniformemente 18 aumenti (non aumentare sulle 2 m ad ogni lato) = 56 m. Lavorare 1 f rov sul rovescio. Lavorare poi M.4. Continuare così finché il quadrato misura ca 1 cm in meno rispetto al quadrato 1 (aggiustare a 3 f dopo l’ultima treccia). Lavorare poi 1 f dir sul diritto, ALLO STESSO TEMPO, distribuire uniformemente 8 m diminuzioni (non aumentare sulle 2 m ad ogni lato) = 38 m. Lavorare 1 f dir sul rovescio e 1 f dir sul diritto. Intrecciare poi a diritto sul rovescio. CONFEZIONE: Unire i quadrati come indicato in Fig.1. I numeri indicano il tipo di quadrato e la freccia indica la direzione della lavorazione della maglia.Cucire bordo contro bordo nel cappio esterno della maglia per evitare cuciture troppo spesse. BORDO: Si lavorano a punto legaccio, cioè ogni f a diritto. Riprendere le m lungo uno dei lati corti con il f circolare n°5 e il filo Nepal. Riprendere 1 m in ogni m (riprendere anche nelle m nei passaggi tra ogni quadrato). Lavorare avanti e indietro fino a quando il bordo misura ca 4 cm. Intrecciare. Lavorare un bordo identico dall’altro lato corto della coperta. Riprendere le m nella stessa maniera lungo il lato lungo, riprendere le m anche lungo i 8 cm dei bordi dei lati corti. Lavorare avanti e indietro fino a quando il lavoro misura ca 4 cm. Intrecciare. Ripetere nella stessa maniera lungo l’altro lato lungo. |
||||||||||||||||
Spiegazioni del diagramma |
||||||||||||||||
|
||||||||||||||||
 |
||||||||||||||||
 |
||||||||||||||||
Avete terminato questo modello?Allora taggate le vostre foto con #dropspattern #warmhugblanket o inviatele alla #dropsfan gallery. Avete bisogno di aiuto con questo modello?Troverete 14 video tutorial, una sezione per i commenti/domande e molto altro guardando il modello su www.garnstudio.com © 1982-2026 DROPS Design A/S. Ci riserviamo tutti i diritti. Questo documento, compreso tutte le sue sotto-sezioni, è protetto dalle leggi sul copyright. Potete leggere quello che potete fare con i nostri modelli alla fine di ogni modello sul nostro sito. |
||||||||||||||||


Con oltre 40 anni di esperienza nel design di modelli di maglia e uncinetto, DROPS Design offre la più estesa collezione di modelli gratuiti su internet - tradotti in 17 lingue. Ad oggi vi possiamo fornire 324 cataloghi e 12290 modelli - 9561 dei quali sono tradotti in Italiano.
Ci stiamo impegnando molto per darvi il meglio che vi possiamo offrire in termini di maglia e uncinetto, ispirazioni e consigli così come filati di grande qualità ad un prezzo incredibile! Volete utilizzare i nostri modelli per qualcosa d'altro oltre al vostro uso personale? Potete leggere tutto ciò che è consentito nel testo sul Copyright in basso su tutte le pagine dei nostri modelli. Buon lavoro!
Lasciare un commento sul modello DROPS 124-3
Noi saremmo felici di ricevere i tuoi commenti e opinioni su questo modello!
Se vuoi fare una domanda, fai per favore attenzione a selezionare la categoria corretta nella casella qui sotto per velocizzare il processo di risposta. I campi richiesti sono indicati da *.