
Categorie popolari
State cercando un filato?


Commenti / Domande (260)
![]() Hilde Herland ha scritto:
Hilde Herland ha scritto:
Jeg har strikket ferdig rutene og montert de sammen. Strikker kanten og lurer på om det virkelig skal være 8 cm kant på endene og 4 cm på langsidene? Synes de ser like ut på bildet.
01.07.2018 - 22:07DROPS Design ha risposto:
Hej Hilde, længere nede står det at kanten skal måle 4 cm, og det stemmer bedre med antal riller. God fornøjelse!
02.07.2018 - 15:23
![]() Marijke Cleys ha scritto:
Marijke Cleys ha scritto:
Help! Zelfs als ik M.3 uitteken, komt dit niet mooi uit... Iemand die kan helpen? Ik heb telkens nog 1 steek over. Als je op de foto ziet zou je het patroon 5x naast elkaar moeten zetten, met telkens 1 ribbelsteek (rechte steek) dus tussen elk patroontje. " Ga nu verder in M.3 met 1 ribbelsteek aan iedereen kant tot het vierkant ongeveer..."
27.03.2018 - 22:26DROPS Design ha risposto:
Dag Marijke, Als je 38 steken opzet en je hebt aan beide kanten 1 kantsteek in ribbelsteek, houd je 36 steken over. Dat betekent dus dat je 4,5 patroonherhalingen van M.3 hebt.
02.04.2018 - 14:31
![]() Maria ha scritto:
Maria ha scritto:
Hej! Jag stickar just nu filten Warm Hug: Det står bland era svar här att rutorna ska bli 22x22cm ungefär, men mina blir inte kvadratiska. När jag gör hela M.1 som man ju ska utgå ifrån, blir den 22x26 cm... Den blir alltså lagom bred, men för lång...VAd beror det på? ..eftersom rutorna ska vridas när de monteras bör de väl vara kvadratiska? Eller kan man bara dra ut dem på bredden för att lösa problemet? Tack för hjälpen!
16.03.2018 - 09:05DROPS Design ha risposto:
Hej Maria, du stickar lite för löst i höjden enligt mönstret. Kan du evt sluta mönstret lite tidigare så du får 22x22 cm? Eller så får du testa med ½ nummer mindre på stickan. Lycka till!
16.03.2018 - 15:18
![]() Ineke Bodamer ha scritto:
Ineke Bodamer ha scritto:
Het patroon van deze deken is heel moeilijk te lezen ik ben een ervaren breister en heb het inmiddels al drie keer uitgehaald. jammer, want het resultaat ziet er op de afbeelding erg mooi uit. wat meer uitleg en duidelijkheid is een vereiste voor deze deken ! vriendelijke groet, ineke.
05.03.2018 - 16:32
![]() Ingrid Bohnsack ha scritto:
Ingrid Bohnsack ha scritto:
Drops Decke verschiedene Quadrate, wie nennt man die Muster der einzelnen Quadrate..? Mit freundl Gruß Ingrid
01.03.2018 - 16:11
![]() Ingrid Bohnsack ha scritto:
Ingrid Bohnsack ha scritto:
Wie nennt man die Muster , ich Verstehe leider die Beschreibung nicht so gut Mit freundl Gruß Ingrid
01.03.2018 - 16:07DROPS Design ha risposto:
Liebe Frau Bohnsack, diese Decke ist aus verschiedenes Muster gestrickt, wie in den verschiedenen Diagrams gezeigt. Diagrams lesen Sie von der Ecker an der unteren rechten Seite, von rechts nach links von der Vorderseite und von links nach rechts von der Rückseite. Viel Spaß beim stricken!
01.03.2018 - 16:55
![]() Knitastic ha scritto:
Knitastic ha scritto:
Can you tell me the name of the 4 patterns? I'm new to knitting. I'm having trouble with the directions and picture.
04.11.2017 - 03:10DROPS Design ha risposto:
Dear Knitastic, if you mean the names of each block, there are no particular names for them. M. is a simple cable pattern, M.1 is a moe complicated one. M.2 and M.3 are kinds of structured patterns. Remember, you can find tutorial videos on the site to help you along, and if you get stick with your knitting, you can always ask for help in he store you bought yoir DROPS yarn from. Happy Knitting!
06.11.2017 - 02:32
![]() Schindler ,christine ha scritto:
Schindler ,christine ha scritto:
Müssen Radmaschen extra aufgenommen werden?
24.04.2017 - 09:34DROPS Design ha risposto:
Liebe Frau Schindler, die Randmaschen sind in der Maschenanzahl eingerechnet, dh sie sollen nicht extra aufgenommen werden. Viel Spaß beim stricken!
24.04.2017 - 10:36Marie-Jo Boer ha scritto:
Bonjour, pouvez-vous me dire où je peux trouver les diagrammes M1 et M4? Pas visible pour moi, bizarre. Toutes les explications sont claires mais pas moyens de trouver ces diagrammes. Merci pour votre réponse.
20.04.2017 - 21:04DROPS Design ha risposto:
Bonjour Mme Boer, vous avez 4 diagrammes à la fin des explications, soit dans l'ordre affiché: M.2, M.3, M.1 et M.4. Bon tricot!
21.04.2017 - 08:52
![]() Gabriele Becker ha scritto:
Gabriele Becker ha scritto:
Danke für Ihre Antwort. Die 56 R sind doch für Vorderseite und die Rueckreihen kommen noch hinzu - oder sind Vorder- und Rueckreihen im Diagramm gezeigt? (Im Text sprechen Sie von Vorderseite)
07.02.2017 - 13:07DROPS Design ha risposto:
Liebe Frau Becker, 1 Kästchen = 1 Masche x 1 Reihe, alle Reihen sind im Diagram gezeigt, dh die Hin- sowie die Rückreihen. Viel Spaß beim stricken!
07.02.2017 - 13:25
|
||||||||||||||||
Warm Hug#warmhugblanket |
||||||||||||||||
 |
 |
|||||||||||||||
Coperta DROPS realizzata di quadrati lavorati a maglia in strutture diverse in "Nepal".
DROPS 124-3 |
||||||||||||||||
|
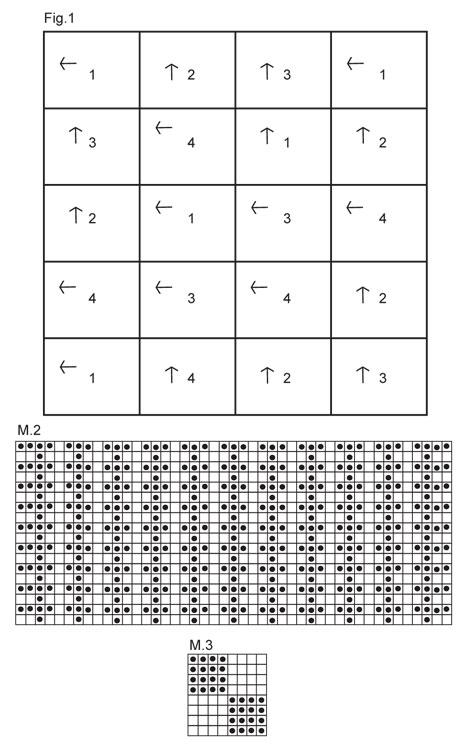
MOTIVO: Ved diag M.1 a M.4. Il diag mostra il motivo sul diritto. PUNTO LEGACCIO (avanti e indietro): Lavorare tutti i f a diritto. -------------------------------------------------------- COPERTA: Ogni quadrato si lavora avanti e indietro. Lavorare 5 quadrati di ogni tipo = in totale 20 quadrati. QUADRATO 1: Avviare 38 m con il f 5 ed il filo Nepal. Lavorare 1 f dir sul diritto e 1 f dir sul rovescio. Lavorare poi 1 f dir sul diritto, ALLO STESSO TEMPO, distribuire uniformemente 12 aumenti (non aumentare sulle 2 m ad ogni lato) = 50 m. Lavorare 1 f rov sul rovescio. Dopo 1 motivo di M.1. in altezza, lavorare 1 f dir sul diretto, ALLO STESSO TEMPO, distribuire uniformemente 12 diminuzioni (non diminuire sulle 2 m ad ogni lato) = 38 m. Lavorare 1 f dir sul rovescio e 1 f dir sul diritto. Intrecciare poi a diritto sul rovescio. QUADRATO 2: Avviare 38 m con il f 5 ed il filo Nepal. Lavorare 1 f dir sul diritto e 1 f dir sul rovescio. Lavorare poi 1 f dir sul diritto, ALLO STESSO TEMPO, distribuire uniformemente 7 aumenti (non aumentare sulle 2 m ad ogni lato) = 45 m. Lavorare 1 f rov sul rovescio. Lavorare poi M.2. Continuare così finché il quadrato misura ca 1 cm in meno rispetto al quadrato 1. Lavorare poi 1 f dir sul diritto, ALLO STESSO TEMPO, distribuire uniformemente 7 diminuzioni (non aumentare sulle 2 m ad ogni lato) = 38 m. Lavorare 1 f dir sul rovescio e 1 f dir sul diritto. Intrecciare poi a diritto sul rovescio. QUADRATO 3: Avviare 38 m con il f 5 ed il filo Nepal. Lavorare 1 f dir sul diritto e 1 f dir sul rovescio. Lavorare poi 1 f dir sul diritto e 1 f rov sul rovescio. Lavorare poi M.3 con 1 m PUNTO LEGACCIO - ved spieg sopra - ad ogni lato. Continuare così finché il quadrato misura ca 1 cm in meno rispetto al quadrato 1 (aggiustare per finire con un motivo a metà oppure un motivo intero in altezza). Lavorare 1 f dir sul diritto, 1 f dir sul rovescio e 1 f dir sul diritto. Intrecciare poi a diritto sul rovescio. QUADRATO 4: Avviare 38 m con il f 5 ed il filo Nepal. Lavorare 1 f dir sul diritto e 1 f dir sul rovescio. Lavorare poi 1 f dir sul diritto, ALLO STESSO TEMPO, distribuire uniformemente 18 aumenti (non aumentare sulle 2 m ad ogni lato) = 56 m. Lavorare 1 f rov sul rovescio. Lavorare poi M.4. Continuare così finché il quadrato misura ca 1 cm in meno rispetto al quadrato 1 (aggiustare a 3 f dopo l’ultima treccia). Lavorare poi 1 f dir sul diritto, ALLO STESSO TEMPO, distribuire uniformemente 8 m diminuzioni (non aumentare sulle 2 m ad ogni lato) = 38 m. Lavorare 1 f dir sul rovescio e 1 f dir sul diritto. Intrecciare poi a diritto sul rovescio. CONFEZIONE: Unire i quadrati come indicato in Fig.1. I numeri indicano il tipo di quadrato e la freccia indica la direzione della lavorazione della maglia.Cucire bordo contro bordo nel cappio esterno della maglia per evitare cuciture troppo spesse. BORDO: Si lavorano a punto legaccio, cioè ogni f a diritto. Riprendere le m lungo uno dei lati corti con il f circolare n°5 e il filo Nepal. Riprendere 1 m in ogni m (riprendere anche nelle m nei passaggi tra ogni quadrato). Lavorare avanti e indietro fino a quando il bordo misura ca 4 cm. Intrecciare. Lavorare un bordo identico dall’altro lato corto della coperta. Riprendere le m nella stessa maniera lungo il lato lungo, riprendere le m anche lungo i 8 cm dei bordi dei lati corti. Lavorare avanti e indietro fino a quando il lavoro misura ca 4 cm. Intrecciare. Ripetere nella stessa maniera lungo l’altro lato lungo. |
||||||||||||||||
Spiegazioni del diagramma |
||||||||||||||||
|
||||||||||||||||
 |
||||||||||||||||
 |
||||||||||||||||
Avete terminato questo modello?Allora taggate le vostre foto con #dropspattern #warmhugblanket o inviatele alla #dropsfan gallery. Avete bisogno di aiuto con questo modello?Troverete 14 video tutorial, una sezione per i commenti/domande e molto altro guardando il modello su www.garnstudio.com © 1982-2026 DROPS Design A/S. Ci riserviamo tutti i diritti. Questo documento, compreso tutte le sue sotto-sezioni, è protetto dalle leggi sul copyright. Potete leggere quello che potete fare con i nostri modelli alla fine di ogni modello sul nostro sito. |
||||||||||||||||


Con oltre 40 anni di esperienza nel design di modelli di maglia e uncinetto, DROPS Design offre la più estesa collezione di modelli gratuiti su internet - tradotti in 17 lingue. Ad oggi vi possiamo fornire 324 cataloghi e 12290 modelli - 9561 dei quali sono tradotti in Italiano.
Ci stiamo impegnando molto per darvi il meglio che vi possiamo offrire in termini di maglia e uncinetto, ispirazioni e consigli così come filati di grande qualità ad un prezzo incredibile! Volete utilizzare i nostri modelli per qualcosa d'altro oltre al vostro uso personale? Potete leggere tutto ciò che è consentito nel testo sul Copyright in basso su tutte le pagine dei nostri modelli. Buon lavoro!
Lasciare un commento sul modello DROPS 124-3
Noi saremmo felici di ricevere i tuoi commenti e opinioni su questo modello!
Se vuoi fare una domanda, fai per favore attenzione a selezionare la categoria corretta nella casella qui sotto per velocizzare il processo di risposta. I campi richiesti sono indicati da *.