
Categorie popolari
State cercando un filato?


Commenti / Domande (260)
![]() Patricia ha scritto:
Patricia ha scritto:
Quelle est la correction de M1? parce sur le motif central, j'ai tout respecté et il y a des différences...
10.01.2019 - 15:17DROPS Design ha risposto:
Bonjour Patricia, quelles différences avez-vous entre le diagramme et votre carré? Avez-vous bien tricoté le diagramme en commençant en bas à droite, de droite à gauche sur l'endroit et de gauche à droite sur l'envers?
10.01.2019 - 15:47
![]() Judith ha scritto:
Judith ha scritto:
I have seen this pattern knitted beautifully in 5 differs colored blocks (I’m counting the white which was also used for all bordering). My question is how much yarn per block (approximately)?
08.11.2018 - 13:12DROPS Design ha risposto:
Dear Judith, we are sorry, we only have the amount of yarn required for the whole blanket, including the edge in garter stitch all around the edges. You can divide the total amount of yarn by the number of squares which should give you an approximative amount - but remember each square may require more or less yarn depending of the pattern worked. Happy knitting!
08.11.2018 - 15:40
![]() Birgit Jørgensen ha scritto:
Birgit Jørgensen ha scritto:
Jeg er ved at strikke warm hug tæppet og er kommet til diagram nr. 3 og harkigget alle kommentarer igennem og jeg syntes ikke, som en tidligere har kommenteret, at mønsteret ligner det man kan se på billedet af tæppet. Min firkant er meget markant i ternene hvilket jeg ikke syntes fremgår af billedet. Gør jeg noget forkert ? Strikker 4 m henholdsvis r og v og på tilbagep ret over r og v over v efter 4 P skubber jeg mønsteret 4 m som på diagrammet.
07.11.2018 - 11:10
![]() Ingrid Beerta ha scritto:
Ingrid Beerta ha scritto:
Hoeveel bolletjes heb ik nodig voor deze deken? Hoeveel bollen is 1100 gram?
02.11.2018 - 18:41DROPS Design ha risposto:
Dag Ingrid
Een bol Nepal weegt 50 gram, dus je hebt 22 bollen nodig.
04.11.2018 - 20:32
![]() Anne ha scritto:
Anne ha scritto:
Bonjour, pour le modele 124-3, puis je utiliser Drops Cotton Merino?
14.10.2018 - 16:04DROPS Design ha risposto:
Bonjour Anne, cette couverture se tricote en DROPS Nepal, c'est-à-dire un fil du groupe C, or DROPS Cotton Merino appartient au groupe B - pour trouver des alternatives, utilisez notre convertisseur - plus d'infos ici. Bon tricot!
15.10.2018 - 10:31
![]() Randi Danielsen ha scritto:
Randi Danielsen ha scritto:
Hei! Er det rett at det i rute 1 skal strikkes 1 pinne rett fra retten og 1 pinne rett fra vrangen? Slik jeg ser det er jo første pinne vrang siden på ruten? Hilsen Randi
04.10.2018 - 11:56
![]() Teija ha scritto:
Teija ha scritto:
Nice patterns! I just finished my blanket.
02.10.2018 - 19:34
![]() Roelie ha scritto:
Roelie ha scritto:
Het is lastig dat de alle even toeren niet in de juiste steken code staat ik heb de helft van het patroon over gezet , als er belangstelling voor is stuur ik het wel door, verder is het wel te doen leuk patroon.
24.09.2018 - 20:08
![]() Fia ha scritto:
Fia ha scritto:
Hej! Det står att man när man stickar kanten ska sticka upp en maska i varje maska. Rutorna är vända åt olika håll. Om man plockar upp en maska i varje maska blir det då samma som en maska för varje varv på vissa rutor. Då blir det olika antal maskor per decimeter av rutan beroende på vilket håll rutan är vänd. Blir inte kanten lite ojämn då?
23.08.2018 - 22:17DROPS Design ha risposto:
Hej Fia, jo det är bra om du stikcar upp samma antal maskor i varje ruta, så blir kanten fin. Lycka till :)
30.08.2018 - 15:03
![]() H. Kopp ha scritto:
H. Kopp ha scritto:
Guten Tag, Verstehe ich das richtig: Die Kanten werden pro Seite einzeln über die Länge längs in Krausrippe gestrickt. Wie werden dann die Kanten in den Ecken gestrickt? Fehlen dann nicht in den Ecken Maschen.
13.08.2018 - 11:21DROPS Design ha risposto:
Liebe Frau Kopp, die Kanten werden die eine nach der anderen gestrickt, dh die Maschen zuerst an beiden kurzen Seiten auffassen, dann die Maschenn an beiden langen Seite (= auch in den Krausrippen den beiden kurzen Kante) auffassen. Viel Spaß beim stricken!
13.08.2018 - 12:46
|
||||||||||||||||
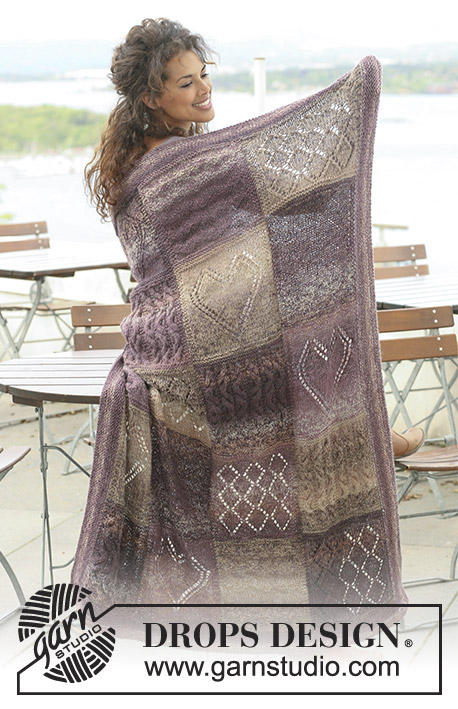
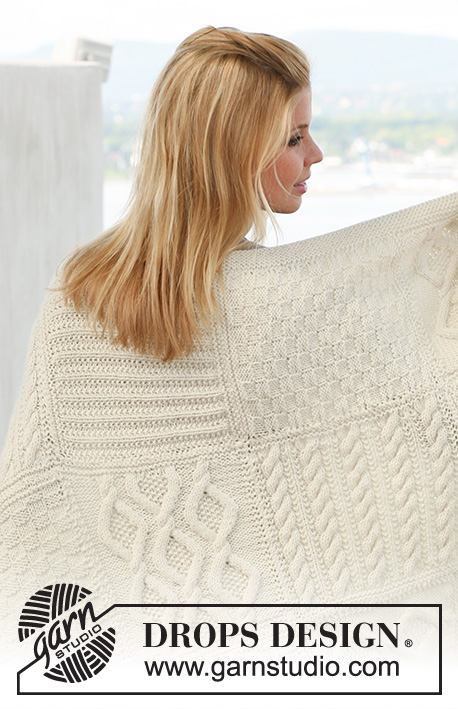
Warm Hug#warmhugblanket |
||||||||||||||||
 |
 |
|||||||||||||||
Coperta DROPS realizzata di quadrati lavorati a maglia in strutture diverse in "Nepal".
DROPS 124-3 |
||||||||||||||||
|
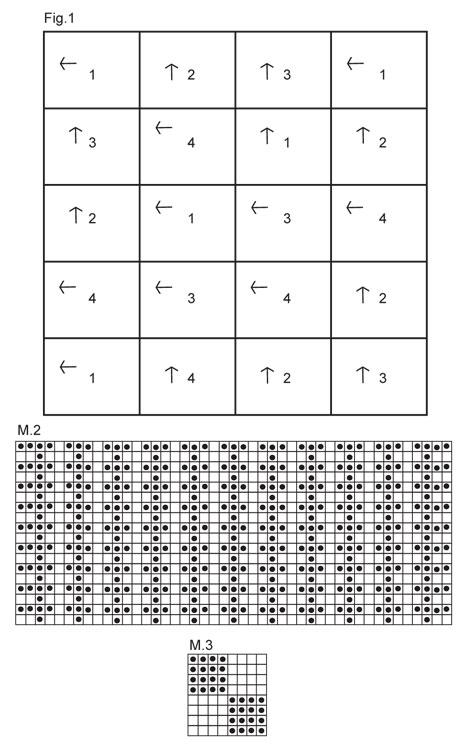
MOTIVO: Ved diag M.1 a M.4. Il diag mostra il motivo sul diritto. PUNTO LEGACCIO (avanti e indietro): Lavorare tutti i f a diritto. -------------------------------------------------------- COPERTA: Ogni quadrato si lavora avanti e indietro. Lavorare 5 quadrati di ogni tipo = in totale 20 quadrati. QUADRATO 1: Avviare 38 m con il f 5 ed il filo Nepal. Lavorare 1 f dir sul diritto e 1 f dir sul rovescio. Lavorare poi 1 f dir sul diritto, ALLO STESSO TEMPO, distribuire uniformemente 12 aumenti (non aumentare sulle 2 m ad ogni lato) = 50 m. Lavorare 1 f rov sul rovescio. Dopo 1 motivo di M.1. in altezza, lavorare 1 f dir sul diretto, ALLO STESSO TEMPO, distribuire uniformemente 12 diminuzioni (non diminuire sulle 2 m ad ogni lato) = 38 m. Lavorare 1 f dir sul rovescio e 1 f dir sul diritto. Intrecciare poi a diritto sul rovescio. QUADRATO 2: Avviare 38 m con il f 5 ed il filo Nepal. Lavorare 1 f dir sul diritto e 1 f dir sul rovescio. Lavorare poi 1 f dir sul diritto, ALLO STESSO TEMPO, distribuire uniformemente 7 aumenti (non aumentare sulle 2 m ad ogni lato) = 45 m. Lavorare 1 f rov sul rovescio. Lavorare poi M.2. Continuare così finché il quadrato misura ca 1 cm in meno rispetto al quadrato 1. Lavorare poi 1 f dir sul diritto, ALLO STESSO TEMPO, distribuire uniformemente 7 diminuzioni (non aumentare sulle 2 m ad ogni lato) = 38 m. Lavorare 1 f dir sul rovescio e 1 f dir sul diritto. Intrecciare poi a diritto sul rovescio. QUADRATO 3: Avviare 38 m con il f 5 ed il filo Nepal. Lavorare 1 f dir sul diritto e 1 f dir sul rovescio. Lavorare poi 1 f dir sul diritto e 1 f rov sul rovescio. Lavorare poi M.3 con 1 m PUNTO LEGACCIO - ved spieg sopra - ad ogni lato. Continuare così finché il quadrato misura ca 1 cm in meno rispetto al quadrato 1 (aggiustare per finire con un motivo a metà oppure un motivo intero in altezza). Lavorare 1 f dir sul diritto, 1 f dir sul rovescio e 1 f dir sul diritto. Intrecciare poi a diritto sul rovescio. QUADRATO 4: Avviare 38 m con il f 5 ed il filo Nepal. Lavorare 1 f dir sul diritto e 1 f dir sul rovescio. Lavorare poi 1 f dir sul diritto, ALLO STESSO TEMPO, distribuire uniformemente 18 aumenti (non aumentare sulle 2 m ad ogni lato) = 56 m. Lavorare 1 f rov sul rovescio. Lavorare poi M.4. Continuare così finché il quadrato misura ca 1 cm in meno rispetto al quadrato 1 (aggiustare a 3 f dopo l’ultima treccia). Lavorare poi 1 f dir sul diritto, ALLO STESSO TEMPO, distribuire uniformemente 8 m diminuzioni (non aumentare sulle 2 m ad ogni lato) = 38 m. Lavorare 1 f dir sul rovescio e 1 f dir sul diritto. Intrecciare poi a diritto sul rovescio. CONFEZIONE: Unire i quadrati come indicato in Fig.1. I numeri indicano il tipo di quadrato e la freccia indica la direzione della lavorazione della maglia.Cucire bordo contro bordo nel cappio esterno della maglia per evitare cuciture troppo spesse. BORDO: Si lavorano a punto legaccio, cioè ogni f a diritto. Riprendere le m lungo uno dei lati corti con il f circolare n°5 e il filo Nepal. Riprendere 1 m in ogni m (riprendere anche nelle m nei passaggi tra ogni quadrato). Lavorare avanti e indietro fino a quando il bordo misura ca 4 cm. Intrecciare. Lavorare un bordo identico dall’altro lato corto della coperta. Riprendere le m nella stessa maniera lungo il lato lungo, riprendere le m anche lungo i 8 cm dei bordi dei lati corti. Lavorare avanti e indietro fino a quando il lavoro misura ca 4 cm. Intrecciare. Ripetere nella stessa maniera lungo l’altro lato lungo. |
||||||||||||||||
Spiegazioni del diagramma |
||||||||||||||||
|
||||||||||||||||
 |
||||||||||||||||
 |
||||||||||||||||
Avete terminato questo modello?Allora taggate le vostre foto con #dropspattern #warmhugblanket o inviatele alla #dropsfan gallery. Avete bisogno di aiuto con questo modello?Troverete 14 video tutorial, una sezione per i commenti/domande e molto altro guardando il modello su www.garnstudio.com © 1982-2026 DROPS Design A/S. Ci riserviamo tutti i diritti. Questo documento, compreso tutte le sue sotto-sezioni, è protetto dalle leggi sul copyright. Potete leggere quello che potete fare con i nostri modelli alla fine di ogni modello sul nostro sito. |
||||||||||||||||


Con oltre 40 anni di esperienza nel design di modelli di maglia e uncinetto, DROPS Design offre la più estesa collezione di modelli gratuiti su internet - tradotti in 17 lingue. Ad oggi vi possiamo fornire 324 cataloghi e 12290 modelli - 9561 dei quali sono tradotti in Italiano.
Ci stiamo impegnando molto per darvi il meglio che vi possiamo offrire in termini di maglia e uncinetto, ispirazioni e consigli così come filati di grande qualità ad un prezzo incredibile! Volete utilizzare i nostri modelli per qualcosa d'altro oltre al vostro uso personale? Potete leggere tutto ciò che è consentito nel testo sul Copyright in basso su tutte le pagine dei nostri modelli. Buon lavoro!
Lasciare un commento sul modello DROPS 124-3
Noi saremmo felici di ricevere i tuoi commenti e opinioni su questo modello!
Se vuoi fare una domanda, fai per favore attenzione a selezionare la categoria corretta nella casella qui sotto per velocizzare il processo di risposta. I campi richiesti sono indicati da *.