
Categorie popolari
State cercando un filato?


Commenti / Domande (40)
![]() Kath Wilmott ha scritto:
Kath Wilmott ha scritto:
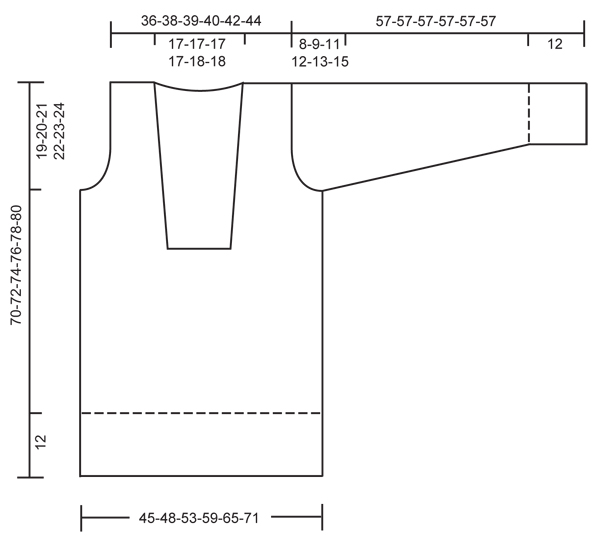
Hi, I am still having a problem with the 'Sleeve Cap'. It is probably because there is no mention of the number of stitches left on the needle after any dec. or inc. I cast off 8sts, then dec. 2sts on each side x 3 times, THIS MAKES THE CAP SIDES UNEVEN. Then 1 stitch, twice, as you say, I have 38 sts left. But then I dec. 2 sts each side, (so 4 sts every row**), until 56cm., now I am left with 6 sts only? This is just not right. ** should this be 2 sts each row, NOT each sIde.
26.10.2019 - 23:34DROPS Design ha risposto:
Hi Kath, You decrease 3 stitches at the beginning of each row on both sides of the sleeve cap - so 6 decreases in total. Then 1 stitch 2 times (so 4 decreases) . When it comes to the 2 stitches on both sides of the cap, you are still only casting off at the beginning of each row, (2 stitches each row). I hope this helps and happy knitting!
28.10.2019 - 07:39
![]() Kath Wilmott ha scritto:
Kath Wilmott ha scritto:
On the Cap Sleeve instructions, it says . . Cast off for sleeve cap at the beg of every row each side: 2 sts 3 times (12 sts ) and 1 st 1-2-4-5-6-9 times, (2sts), then 2 sts each side until piece measures 56 cm. Cast off remaining sts. So, with 62 sts on the needle, cast off 8 sts for sleeve cap = 54 sts, then, minus 12st = 42 sts, then 2sts = 40 sts left. Could you tell me if this is correct? I must admit, I am having trouble with this pattern. Thank you so much.
23.10.2019 - 21:30DROPS Design ha risposto:
Hi Kath, It looks like you are working size M, so as you say you have 54 stitches before starting the cap. Then decrease 2 stitches on each side x 3 = 42 stitches and 1 stitch on each side x 2 = 38 stitches. Happy knitting!
24.10.2019 - 07:22
![]() Kath Wilmott ha scritto:
Kath Wilmott ha scritto:
I am having trouble with this pattern: page 2 ‘Left front piece’ – the part which says: “Cast off for armhole at the beg of every row from the side…..” I seem to be left with 22 sts instead of 18 sts? I have read it again and again, but don't understand where I've gone wrong, Can you help me please?
20.09.2019 - 11:00DROPS Design ha risposto:
Dear Mrs Wilmott, there were 30 sts for front piece, you decrease 1 stitch 4 times for neck and 4 stitches for armhole (8 stitches in total, 4 on front piece, 4 on back piece), then decrease for armhole: 2 stitches 1 time and 1 stitch 2 times = 30-4-4-2-2= 18 stitches remain for shoulder. Happy knitting!
20.09.2019 - 11:33
![]() Sanna ha scritto:
Sanna ha scritto:
Hej! Om jag förstår rätt börjar man med rätstickning efter avmaskningen för halsen, när man stickar fram och tillbaka. Går det att istället sticka slätstickning genom hela arbetet?
11.02.2019 - 20:53DROPS Design ha risposto:
Hej Sanna, du fortsätter i slätstickat, det är bara yttersta kantm som stickas i rätstickning. Lycka till :)
07.05.2019 - 11:45
![]() Anne Marie Lolck ha scritto:
Anne Marie Lolck ha scritto:
Kan jeg udelukkende bruge 2 tråde af Drops Delight Print garn ? Venlig hilsen Anne Marie
12.10.2017 - 15:48DROPS Design ha risposto:
Hej Anne Marie, Ja du kan bruge 2 tråde DROPS Delight istedet for 1 tråd af hver af DROPS Delight og DROPS Alpaca. God fornøjelse!
13.10.2017 - 16:08Monica Fernandez ha scritto:
Hola, me encanta todos los trabajos de esta página. Mi pregunta es : los patrones indican tejer con agujas circulares , se pueden usar dos agujas en vez de circulares ? mantengo las medidas indicadas en el patrón ? . Muchas gracias desde Montevideo ( Uruguay )
28.06.2016 - 20:25DROPS Design ha risposto:
Hola Monica. Las agujas circulares se usan mayormente para tener suficiente espacio para todos los pts en las ag y para trabajar en redondo. En estos casos no se puede sustituir las ag circulares por rectas. Si trabajas con ag rectas y cada parte por separado (por elemplo la espalda y el delantero debes añadir los pts orillo (para la costura) a cada lado de la labor.
05.07.2016 - 10:05
![]() Pat Ellis ha scritto:
Pat Ellis ha scritto:
All's fine till the sleeve cap. HELP. PleSe rewrite and give number of stitches. Wasn't able to write specifics because of length.
21.10.2015 - 03:00DROPS Design ha risposto:
Dear Mrs Ellis, for the sleeve cap, bind off at the beg of every row on each side: 2 sts 3 times, then bind off 2 sts at the beg of every row (both from RS and from WS) 2 sts until sleeve measures 56 cm (number of sts remaining will depend on the number of row you will have to work till sleeve measures 56 cm), then bind off 3 sts 1 time on each side and bind off remaining sts. Happy knitting!
21.10.2015 - 09:44
![]() Rebecca Moore ha scritto:
Rebecca Moore ha scritto:
Hello, I absolutely love your website and patterns! They are the best I have ever seen. I have one question about this pattern (Autumn Sunset): does this have to be knit using two strands of yarn through the whole sweater? I have never tried this technique before, and it sounds difficult. Is there one single yarn I could use instead? Thank you! -Rebecca
09.03.2015 - 13:33DROPS Design ha risposto:
Dear Mrs Moore, thank you very much for your feedback. You can either work 1 strand in each of both qualities together as there were just 1 or change 2 strands group A into 1 strand group C - click here for more informations. Happy knitting!
09.03.2015 - 16:05
![]() Christel Needs Your Help! ha scritto:
Christel Needs Your Help! ha scritto:
Hur räknas storlekarna ? om man tar st M vilka mått ska man ha då ?
12.11.2014 - 17:45DROPS Design ha risposto:
Hej Christel. Nederst paa mönstret finder du en maalskitse med alle maal i cm per störrelse. Du kan sammenligne disse med dine egne maal og vaelge störrelse. God fornöjelse.
13.11.2014 - 15:38
![]() Bouke De Wit ha scritto:
Bouke De Wit ha scritto:
Beste drops,ik heb een vraag over deze trui.ik zie in de beschrijving dat er voor maat s 152 steken zijn na de boord. 76 voor het voorpand. later lees ik bij het achterpand dat er 68 steken zijn. Het lijkt mij dat ook voor het achterpand 76 steken zijn.het kan zijn dat ik iets niet begrijp of misschien een foutje?vriendelijke groeten Bouke
19.10.2014 - 21:25DROPS Design ha risposto:
Hoi Bouke. Je kant 8 st af aan beide zijkanten (4 st aan iedere kant van de markeerders) voor de armsgaten. Dan heb je 68 st voor het achterpand.
20.10.2014 - 14:42
|
|
Autumn Sunset#autumnsunsetsweater |
|
|
|
|
Maglione DROPS lavorato ai ferri in ”Delight” e ”Alpaca” con collo a scialle. Taglie: S-XXXL.
DROPS 122-6 |
|
|
SUGGERIMENTO PER IL NUOVO GOMITOLO: Per rendere ordinate i passaggi di colore in Delight quando si inizia un nuovo gomitolo, è importante utilizzare un gomitolo che inizi con la stessa sfumatura con cui è finito quello precedente. M LEGACCIO (avanti e indietro sui f): Lavorare tutti i f a dir. SUGGERIMENTO PER LE DIMINUZIONI (applicato alla scollatura): Fare tutte le diminuzioni dal diritto del lavoro. Diminuire come segue all’inizio del f: 1 m dir, passare la 1° m a dir, 1 m dir, accavallare la m passata sopra quella appena lavorata. Diminuire come segue alla fine del f: lavorare il f fino a quando rimangono 3 m, 2 m insieme a dir, e 1 m dir. -------------------------------------------------------- CORPO: Lavorato in tondo. Leggere il SUGGERIMENTO PER IL NUOVO GOMITOLO! Avviare 228-240-270-300-330-360 m con i f circolari n° 4 mm con 1 capo di ogni qualità. Lavorare 1 giro a m rasata, e continuare a coste 3 m dir/3 m rov. Quando il lavoro misura 12 cm passare ai f circolari n° 5 mm. Lavorare 1 giro dir, ALLO STESSO TEMPO lavorare insieme a dir ogni 2° e 3° m per tutto il giro = 152-160-180-200-220-240 m. Continuare a m rasata. Inserire un segnapunti all’inizio del giro e 1 segnapunti dopo 76-80-90-100-110-120 m (per indicare i lati). FARE ATTENZIONE ALLA TENSIONE DEL LAVORO! Quando il lavoro misura 37-38-39-40-41-42 cm lavorare il giro successivo come segue: 27-29-34-39-43-48 m dir, 22-22-22-22-24-24 m rov e poi lavorare a dir per il resto del giro. Lavorare il giro successivo come segue: 28-30-35-40-44-49 m dir, intrecciare 20-20-20-20-22-22 m (= per il collo al centro davanti), lavorare a dir le m rimaste sul giro fino alle m intrecciate. Ora continuare avanti e indietro sui f dal centro davanti con 1 m a M LEGACCIO – leggere sopra – a ogni lato verso la scollatura. LEGGERE TUTTA LA SEZIONE SEGUENTE PRIMA DI CONTINUARE! DIMINUZIONI PER IL COLLO: quando il lavoro misura 42-43-44-45-46-47 cm diminuire 1 m a ogni lato del collo – LEGGERE IL SUGGERIMENTI PER LE DIMINUZIONI! Ripetere le diminuzioni ogni 5 cm per un totale di 4 volte. SCALFO: ALLO STESSO TEMPO quando il lavoro misura 51-52-53-54-55-56 cm intrecciare 8 m a ogni lato per lo scalfo (cioè 4 m a ogni lato del segnapunti). Finire ogni parte in modo separato. DAVANTI SINISTRO: Continuare a diminuire per il collo – ALLO STESSO TEMPO intrecciare per lo scalfo all’inizio di ogni f dal lato: 2 m 1-1-2-4-5-6 volte e 1 m 1-2-4-4-5-7 volte. Alla fine di tutte le diminuzioni ci sono 17-18-19-20-21-22 m sulla spalla. Continuare fino a quando il lavoro misura 70-72-74-76-78-80 cm, intrecciare. DAVANTI DESTRO: Come il davanti sinistro, a specchio. DIETRO: = 68-72-82-92-102-112 m. Intrecciare per lo scalfo all’inizio di ogni f a ogni lato come descritto per il davanti = 62-64-66-68-72-74 m. Quando il lavoro misura 68-70-72-74-76-78 cm intrecciare le 24-24-24-24-26-26 m centrali per il collo e finire ogni spalla in modo separato. Diminuire 2 m sulla scollatura sul f successivo = 17-18-19-20-21-22 m rimaste sulla spalla. Intrecciare quando il lavoro misura 70-72-74-76-78-80 cm. MANICA: Lavorata in tondo. Avviare 48-48-54-54-60-60 m con 1 capo di ogni qualità con i f a doppia punta n° 4 mm. Lavorare 1 giro dir e continuare a coste 3 m dir/3 m rov. Quando il lavoro misura 12 cm passare ai f a doppia punta n° 5 mm e continuare a m rasata. Inserire un segnapunti all’inizio del giro = centro sotto la manica. Quando il lavoro misura 14 cm aumentare 1 m a ogni lato del segnapunti, ripetere gli aumenti ogni 8-5-6-4-4,5-3 cm per un totale di 5-7-6-8-7-9 volte = 58-62-66-70-74-78 m. Quando il lavoro misura 49-48-46-45-44-42 cm (meno per le taglie più grandi a causa dell’arrotondamento della manica più lungo e della maggiore ampiezza delle spalle) intrecciare 8 m al centro sotto la manica e finire il lavoro avanti e indietro sui f. Intrecciare per l’arrotondamento della manica all’inizio di ogni f a ogni lato: 2 m 3 volte e 1 m 1-2-4-5-6-9 volte, poi 2 m a ogni lato fino a quando il lavoro misura 56 cm, ora intrecciare 3 m 1 volta a ogni lato. Intrecciare le m rimaste, il lavoro misura circa 57 cm per tutte le taglie. CONFEZIONE: Cucire i margini delle spalle. COLLO A SCIALLE: Il collo è lavorato avanti e indietro sui f circolari dal centro davanti. Riprendere le m con 1 capo di ogni qualità con i f circolari n° 4 mm all’interno della m di vivagno come segue: circa 60-70 m da dove sono state intrecciate le m per il collo al centro davanti e lungo il lato destro del collo, circa 30-33 m lungo la scollatura sul dietro e 60-70 m giù lungo l’altro lato del collo = circa 150-173 m. NOTA: non riprendere le m sulle 20-20-20-20-22-22 m intrecciate al centro davanti. Lavorare 1 f dir dal rovescio del lavoro e ALLO STESSO TEMPO aggiustare il n° di m a 167-173-179-185-191-197 m. Lavorare il f successivo come segue dal diritto del lavoro: 1 m a m legaccio, * 3 m dir, 3 m rov *, ripetere *-* e finire con 3 m a dir e 1 m a m legaccio. Continuare a coste in questo modo – ALLO STESSO TEMPO inserire un segnapunti all’interno di 43 m da ogni lato (= 81-87-93-99-105-111 m tra i segnapunti). Quando il collo misura 3 cm aumentare 1 m in ognuna delle 13-14-15-16-17-18 sezioni a rov (visto dal diritto del lavoro) tra i segnapunti lavorando 2 m rov nella m centrale = 180-187-194-201-208-215 m. Quando il collo misura 5-5-5-6-6-6 cm aumentare 1 m in ognuna delle 14-15-16-17-18-19 sezioni a dir (visto dal diritto del lavoro) tra i segnapunti lavorando 2 m dir nella m centrale = 194-202-210-218-226-234 m. Continuare con dir su dir e rov su rov fino a quando il collo misura circa 6-6-6-7-7-7 cm (aggiustarlo in modo che il f successivo sia dal diritto del lavoro). Lavorare le prime 25 m come prima, ora trasferirle su un fermamaglie, lavorare il f fino a quando rimangono 25 m e trasferirle su un fermamaglie. Continuare come prima sulle m rimaste, ALLO STESSO TEMPO trasferire 3 m alla fine di ogni f sui fermamaglie per un totale di 6 volte a ogni lato (= per un totale di 43 m su ogni fermamaglie). Il collo ora è largo 12-12-12-13-13-13 cm al centro dietro. Sul f successivo (= dal rovescio del lavoro) lavorare tutte le m dal fermamaglie sul lato destro sui f di lavoro (per evitare buchi riprendere 1 m ad ogni trasferimento delle m sul fermamaglie – quindi ogni 3 m – e lavorarla insieme alla m successiva). Sul f successivo lavorare tutte le sul fermamaglie sul lato sinistro sui f di lavoro nello stesso modo = 194-202-210-218-226-234 m. Lavorare il f successivo dal rovescio del lavoro come segue: lavorare dir su dir e rov su rov fino a quando rimangono 24 m, ora avviare 4 nuove m per l’asola, continuare fino a quando rimangono 15 m, avviare 4 nuove m per l’asola, continuare fino a quando rimangono 6 m, avviare 4 nuove m per l’asola, lavorare le m rimaste. Sul f successivo intrecciare tutte le m con dir su dir e rov su rov – intrecciare le 4 m di ogni asola a dir. ULTERIORE CONFEZIONE: Mettere le 2 parti del collo una sull’altra con la parte con le asole in alto. Cucire il collo alle 20-20-20-20-22-22 m intrecciate al centro davanti – mettere il f a m legaccio sul collo sul f a m legaccio sull’apertura e cucire in modo ordinato. Attaccare le maniche e attaccare i bottoni sul collo in modo che combacino con le asole. |
|
 |
|
Avete terminato questo modello?Allora taggate le vostre foto con #dropspattern #autumnsunsetsweater o inviatele alla #dropsfan gallery. Avete bisogno di aiuto con questo modello?Troverete 23 video tutorial, una sezione per i commenti/domande e molto altro guardando il modello su www.garnstudio.com © 1982-2026 DROPS Design A/S. Ci riserviamo tutti i diritti. Questo documento, compreso tutte le sue sotto-sezioni, è protetto dalle leggi sul copyright. Potete leggere quello che potete fare con i nostri modelli alla fine di ogni modello sul nostro sito. |


Con oltre 40 anni di esperienza nel design di modelli di maglia e uncinetto, DROPS Design offre la più estesa collezione di modelli gratuiti su internet - tradotti in 17 lingue. Ad oggi vi possiamo fornire 324 cataloghi e 12290 modelli - 9561 dei quali sono tradotti in Italiano.
Ci stiamo impegnando molto per darvi il meglio che vi possiamo offrire in termini di maglia e uncinetto, ispirazioni e consigli così come filati di grande qualità ad un prezzo incredibile! Volete utilizzare i nostri modelli per qualcosa d'altro oltre al vostro uso personale? Potete leggere tutto ciò che è consentito nel testo sul Copyright in basso su tutte le pagine dei nostri modelli. Buon lavoro!
Lasciare un commento sul modello DROPS 122-6
Noi saremmo felici di ricevere i tuoi commenti e opinioni su questo modello!
Se vuoi fare una domanda, fai per favore attenzione a selezionare la categoria corretta nella casella qui sotto per velocizzare il processo di risposta. I campi richiesti sono indicati da *.