
Categorie popolari
State cercando un filato?


Commenti / Domande (40)
![]() Cath Bat ha scritto:
Cath Bat ha scritto:
Modèle 122- 6 Col châle. J'ai relevé 150 mailles et dois tricoter 1 rang end sur envers. En même temps il faut ajuster le nbre de mailles à 167 173 179 etc... Je ne comprends pas. Faut- il ajouter 29 mailles pour la taille L ? Pourquoi ne pas indiquer le nbre exact de mailles à relever dès le début ? Merci.
05.09.2025 - 18:55DROPS Design ha risposto:
Bonjour Mme Bat, le nombre de mailles que vous allez relever peut dépendre de différents facteurs, mais pour le col, vous devez ensuite ajuster le nombre de mailles à 179, si vous en avez relevé 150, alors vous allez effectivement augmenter 29 mailles au tout premier rang, utilisez la caculette en bas de page si besoin. Bon tricot!
08.09.2025 - 10:02
![]() Beatriz Sánchez ha scritto:
Beatriz Sánchez ha scritto:
Referente a este modelo la sisa me gustaría hacerla más ancha, para que no me quede ajustada. ¿Tengo que coger una talla más de la manga o cómo podría hacer la modificación? Haré el jersey de talla L, ¿puedo hacer las mangas con la talla XL? Y la última pregunta, ¿el ancho se mide con la medida del pecho dividiéndola en dos partes iguales? Gracias.
04.11.2023 - 22:49
![]() Sherry ha scritto:
Sherry ha scritto:
Thank you for your reply. I assume after casting off the 8 Stitches at underarm I continue in back and forth stocking stitch until the top and THEN decrease to form the cap of the sleeve? I was always taught the cap of the sleeve started at the underarm and went to the shoulder, but I gather this pattern is different.
26.01.2023 - 05:11DROPS Design ha risposto:
Dear Sherry, you first cast off (not decrease) 8 sts mid under sleeve, then continue back and forth on needle from mid under sleeve casting off at the beginning of each row on each side (= both from RS and WS) for the sleeve cap: 2 sts 3 times (= 2 sts at the beg of next 6 rows), etc.. so that you cast off the same number of sts on each side of the sleeve. So this pattern is not different. Happy knitting!
26.01.2023 - 10:18
![]() Sherry ha scritto:
Sherry ha scritto:
It says to continue until sleeve measures 22”, which is less than 3” from start of underarm decrease (19 1/4”.) With all of the decreases ( including the initial 8) this only adds up to 9 rows, which is nowhere near the 7 1/2” to fit into the body of the sweater.
24.01.2023 - 18:27DROPS Design ha risposto:
Dear Sherry, sleeve should be 22½'' in total minus 19 1/4" when you start sleeve cap - ie a total of 3,25" = ca 8 cm. Hope it can help. Happy knitting!
25.01.2023 - 11:40
![]() Sherry ha scritto:
Sherry ha scritto:
Hi Drops Design… Thank you for your prompt reply. At the underarm of the sleeve I had 58 stitches and 19 1/4” in length, as per the pattern. I bound off 8 stitches ( all in 1 row- now 50 stitches) under the arm, then 2 stitches at the beginning of the row 3 times ( 6 rows and now 44 stitches, and 1 stitch once both sides(2 rows-42 stitches).
24.01.2023 - 18:25DROPS Design ha risposto:
Dear Sherry, the total length of sleeve cap for size S should be 8 cm (see chart) and all the cast off stitches should be sewn along the whole armhole, should you have increased then cast off as in the pattern, then the sleeve should fit nicely around armhole. Happy knitting!
25.01.2023 - 11:37
![]() Sherry ha scritto:
Sherry ha scritto:
I am making this sweater in size small and the body piece from the underarm to the shoulder is 7 1/2” , however when I knit the sleeve the length from the underarm to the shoulder is only 3 inches. Is there a correction for the sleeve cap, as 3” is far too small. Thank you and I look forward to your reply.
22.01.2023 - 05:05DROPS Design ha risposto:
Hi Sherry, The sleeve cap and top of sleeve should fit into the armhole (so be bigger than your 3 inches). Have you followed all the increases correctly and worked the sleeve cap back and forth to finish? Happy knitting!
22.01.2023 - 08:16
![]() Eva-Helena Hall ha scritto:
Eva-Helena Hall ha scritto:
Hej ! På denna beskrivning står det att man ska lägga upp maskor från båda garnsorterna samtidigt, då undrar jag varför man tipsar att byta nystan så att färgerna stämmer vid bytet av nystan?????? Eva-Helena
07.01.2022 - 12:51
![]() Janet Ter Meer ha scritto:
Janet Ter Meer ha scritto:
Bij het afslanken voor de mouw staat aan het begin van elke naald. Is dat dan elke heen en teruggaande naald of alleen elke heengaande naald. Dit laatste heb ik namelijk gedaan maar dit lijkt mij niet juist.
10.12.2019 - 21:22DROPS Design ha risposto:
Dag Janet,
Je kant voor de mouw af aan het begin van elke naald, dus zowel op de heengaande als de teruggaande naald.
12.12.2019 - 09:01
![]() Kath Wilmott ha scritto:
Kath Wilmott ha scritto:
I hope this is the last question I have to ask, but on the collar instructions, it says "work all sts from stitch holder and every 3 sts work this together with next st." Does this mean knit 2 together on every three sts, which will mean decreasing 6 sts on each stitch holder totalling 12 sts. So why then does it say I should have 202 sts left? because, I had 202 stitches before I started the decreases, therefore, I should have 190 sts left.??
26.11.2019 - 22:16DROPS Design ha risposto:
Dear Mrs Willmott, when you worked the short rows, you left 3 sts unworked at the end of each row. When working all stitches back, you might have a small gap every third stitch due to the short rows. To avoid these gaps, pick up the thread before the next stitch and put it twisted on needle and work these both stitch (= thread picked up + next stitch) together; this will happen every 3rd stitch = this won't change your number of stitches, you should still have 202 sts at the end of this row. Happy knitting!
27.11.2019 - 07:55
![]() Kath Wilmott ha scritto:
Kath Wilmott ha scritto:
Sorry, me again! Are you sure you mean dec. '3' stitches because the pattern says '2' stitches 3 times? Also you say 'then 1 stitch 2 times (4 decreaes) ? Surely 1 x 2 is 2, not 4?
28.10.2019 - 17:37DROPS Design ha risposto:
Hi Kath, Each decrease is at both ends of the row - each time you start a new row you cast off; so decrease 1 two times means 1 at each end x 2, so 4 stitches decreased. Hope this helps.
29.10.2019 - 07:15
|
|
Autumn Sunset#autumnsunsetsweater |
|
|
|
|
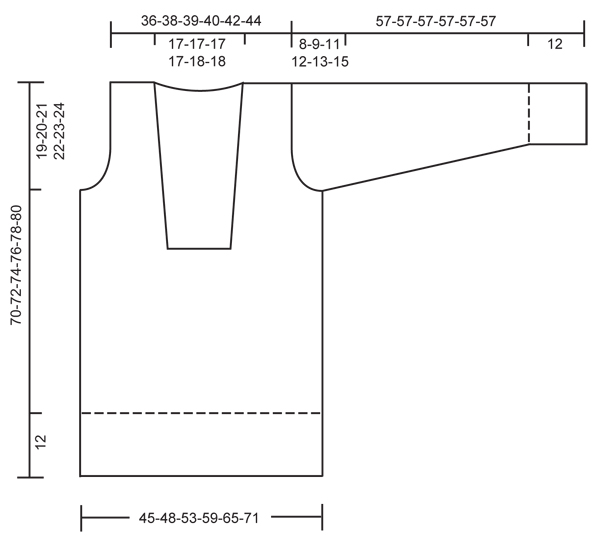
Maglione DROPS lavorato ai ferri in ”Delight” e ”Alpaca” con collo a scialle. Taglie: S-XXXL.
DROPS 122-6 |
|
|
SUGGERIMENTO PER IL NUOVO GOMITOLO: Per rendere ordinate i passaggi di colore in Delight quando si inizia un nuovo gomitolo, è importante utilizzare un gomitolo che inizi con la stessa sfumatura con cui è finito quello precedente. M LEGACCIO (avanti e indietro sui f): Lavorare tutti i f a dir. SUGGERIMENTO PER LE DIMINUZIONI (applicato alla scollatura): Fare tutte le diminuzioni dal diritto del lavoro. Diminuire come segue all’inizio del f: 1 m dir, passare la 1° m a dir, 1 m dir, accavallare la m passata sopra quella appena lavorata. Diminuire come segue alla fine del f: lavorare il f fino a quando rimangono 3 m, 2 m insieme a dir, e 1 m dir. -------------------------------------------------------- CORPO: Lavorato in tondo. Leggere il SUGGERIMENTO PER IL NUOVO GOMITOLO! Avviare 228-240-270-300-330-360 m con i f circolari n° 4 mm con 1 capo di ogni qualità. Lavorare 1 giro a m rasata, e continuare a coste 3 m dir/3 m rov. Quando il lavoro misura 12 cm passare ai f circolari n° 5 mm. Lavorare 1 giro dir, ALLO STESSO TEMPO lavorare insieme a dir ogni 2° e 3° m per tutto il giro = 152-160-180-200-220-240 m. Continuare a m rasata. Inserire un segnapunti all’inizio del giro e 1 segnapunti dopo 76-80-90-100-110-120 m (per indicare i lati). FARE ATTENZIONE ALLA TENSIONE DEL LAVORO! Quando il lavoro misura 37-38-39-40-41-42 cm lavorare il giro successivo come segue: 27-29-34-39-43-48 m dir, 22-22-22-22-24-24 m rov e poi lavorare a dir per il resto del giro. Lavorare il giro successivo come segue: 28-30-35-40-44-49 m dir, intrecciare 20-20-20-20-22-22 m (= per il collo al centro davanti), lavorare a dir le m rimaste sul giro fino alle m intrecciate. Ora continuare avanti e indietro sui f dal centro davanti con 1 m a M LEGACCIO – leggere sopra – a ogni lato verso la scollatura. LEGGERE TUTTA LA SEZIONE SEGUENTE PRIMA DI CONTINUARE! DIMINUZIONI PER IL COLLO: quando il lavoro misura 42-43-44-45-46-47 cm diminuire 1 m a ogni lato del collo – LEGGERE IL SUGGERIMENTI PER LE DIMINUZIONI! Ripetere le diminuzioni ogni 5 cm per un totale di 4 volte. SCALFO: ALLO STESSO TEMPO quando il lavoro misura 51-52-53-54-55-56 cm intrecciare 8 m a ogni lato per lo scalfo (cioè 4 m a ogni lato del segnapunti). Finire ogni parte in modo separato. DAVANTI SINISTRO: Continuare a diminuire per il collo – ALLO STESSO TEMPO intrecciare per lo scalfo all’inizio di ogni f dal lato: 2 m 1-1-2-4-5-6 volte e 1 m 1-2-4-4-5-7 volte. Alla fine di tutte le diminuzioni ci sono 17-18-19-20-21-22 m sulla spalla. Continuare fino a quando il lavoro misura 70-72-74-76-78-80 cm, intrecciare. DAVANTI DESTRO: Come il davanti sinistro, a specchio. DIETRO: = 68-72-82-92-102-112 m. Intrecciare per lo scalfo all’inizio di ogni f a ogni lato come descritto per il davanti = 62-64-66-68-72-74 m. Quando il lavoro misura 68-70-72-74-76-78 cm intrecciare le 24-24-24-24-26-26 m centrali per il collo e finire ogni spalla in modo separato. Diminuire 2 m sulla scollatura sul f successivo = 17-18-19-20-21-22 m rimaste sulla spalla. Intrecciare quando il lavoro misura 70-72-74-76-78-80 cm. MANICA: Lavorata in tondo. Avviare 48-48-54-54-60-60 m con 1 capo di ogni qualità con i f a doppia punta n° 4 mm. Lavorare 1 giro dir e continuare a coste 3 m dir/3 m rov. Quando il lavoro misura 12 cm passare ai f a doppia punta n° 5 mm e continuare a m rasata. Inserire un segnapunti all’inizio del giro = centro sotto la manica. Quando il lavoro misura 14 cm aumentare 1 m a ogni lato del segnapunti, ripetere gli aumenti ogni 8-5-6-4-4,5-3 cm per un totale di 5-7-6-8-7-9 volte = 58-62-66-70-74-78 m. Quando il lavoro misura 49-48-46-45-44-42 cm (meno per le taglie più grandi a causa dell’arrotondamento della manica più lungo e della maggiore ampiezza delle spalle) intrecciare 8 m al centro sotto la manica e finire il lavoro avanti e indietro sui f. Intrecciare per l’arrotondamento della manica all’inizio di ogni f a ogni lato: 2 m 3 volte e 1 m 1-2-4-5-6-9 volte, poi 2 m a ogni lato fino a quando il lavoro misura 56 cm, ora intrecciare 3 m 1 volta a ogni lato. Intrecciare le m rimaste, il lavoro misura circa 57 cm per tutte le taglie. CONFEZIONE: Cucire i margini delle spalle. COLLO A SCIALLE: Il collo è lavorato avanti e indietro sui f circolari dal centro davanti. Riprendere le m con 1 capo di ogni qualità con i f circolari n° 4 mm all’interno della m di vivagno come segue: circa 60-70 m da dove sono state intrecciate le m per il collo al centro davanti e lungo il lato destro del collo, circa 30-33 m lungo la scollatura sul dietro e 60-70 m giù lungo l’altro lato del collo = circa 150-173 m. NOTA: non riprendere le m sulle 20-20-20-20-22-22 m intrecciate al centro davanti. Lavorare 1 f dir dal rovescio del lavoro e ALLO STESSO TEMPO aggiustare il n° di m a 167-173-179-185-191-197 m. Lavorare il f successivo come segue dal diritto del lavoro: 1 m a m legaccio, * 3 m dir, 3 m rov *, ripetere *-* e finire con 3 m a dir e 1 m a m legaccio. Continuare a coste in questo modo – ALLO STESSO TEMPO inserire un segnapunti all’interno di 43 m da ogni lato (= 81-87-93-99-105-111 m tra i segnapunti). Quando il collo misura 3 cm aumentare 1 m in ognuna delle 13-14-15-16-17-18 sezioni a rov (visto dal diritto del lavoro) tra i segnapunti lavorando 2 m rov nella m centrale = 180-187-194-201-208-215 m. Quando il collo misura 5-5-5-6-6-6 cm aumentare 1 m in ognuna delle 14-15-16-17-18-19 sezioni a dir (visto dal diritto del lavoro) tra i segnapunti lavorando 2 m dir nella m centrale = 194-202-210-218-226-234 m. Continuare con dir su dir e rov su rov fino a quando il collo misura circa 6-6-6-7-7-7 cm (aggiustarlo in modo che il f successivo sia dal diritto del lavoro). Lavorare le prime 25 m come prima, ora trasferirle su un fermamaglie, lavorare il f fino a quando rimangono 25 m e trasferirle su un fermamaglie. Continuare come prima sulle m rimaste, ALLO STESSO TEMPO trasferire 3 m alla fine di ogni f sui fermamaglie per un totale di 6 volte a ogni lato (= per un totale di 43 m su ogni fermamaglie). Il collo ora è largo 12-12-12-13-13-13 cm al centro dietro. Sul f successivo (= dal rovescio del lavoro) lavorare tutte le m dal fermamaglie sul lato destro sui f di lavoro (per evitare buchi riprendere 1 m ad ogni trasferimento delle m sul fermamaglie – quindi ogni 3 m – e lavorarla insieme alla m successiva). Sul f successivo lavorare tutte le sul fermamaglie sul lato sinistro sui f di lavoro nello stesso modo = 194-202-210-218-226-234 m. Lavorare il f successivo dal rovescio del lavoro come segue: lavorare dir su dir e rov su rov fino a quando rimangono 24 m, ora avviare 4 nuove m per l’asola, continuare fino a quando rimangono 15 m, avviare 4 nuove m per l’asola, continuare fino a quando rimangono 6 m, avviare 4 nuove m per l’asola, lavorare le m rimaste. Sul f successivo intrecciare tutte le m con dir su dir e rov su rov – intrecciare le 4 m di ogni asola a dir. ULTERIORE CONFEZIONE: Mettere le 2 parti del collo una sull’altra con la parte con le asole in alto. Cucire il collo alle 20-20-20-20-22-22 m intrecciate al centro davanti – mettere il f a m legaccio sul collo sul f a m legaccio sull’apertura e cucire in modo ordinato. Attaccare le maniche e attaccare i bottoni sul collo in modo che combacino con le asole. |
|
 |
|
Avete terminato questo modello?Allora taggate le vostre foto con #dropspattern #autumnsunsetsweater o inviatele alla #dropsfan gallery. Avete bisogno di aiuto con questo modello?Troverete 23 video tutorial, una sezione per i commenti/domande e molto altro guardando il modello su www.garnstudio.com © 1982-2026 DROPS Design A/S. Ci riserviamo tutti i diritti. Questo documento, compreso tutte le sue sotto-sezioni, è protetto dalle leggi sul copyright. Potete leggere quello che potete fare con i nostri modelli alla fine di ogni modello sul nostro sito. |


Con oltre 40 anni di esperienza nel design di modelli di maglia e uncinetto, DROPS Design offre la più estesa collezione di modelli gratuiti su internet - tradotti in 17 lingue. Ad oggi vi possiamo fornire 324 cataloghi e 12290 modelli - 9561 dei quali sono tradotti in Italiano.
Ci stiamo impegnando molto per darvi il meglio che vi possiamo offrire in termini di maglia e uncinetto, ispirazioni e consigli così come filati di grande qualità ad un prezzo incredibile! Volete utilizzare i nostri modelli per qualcosa d'altro oltre al vostro uso personale? Potete leggere tutto ciò che è consentito nel testo sul Copyright in basso su tutte le pagine dei nostri modelli. Buon lavoro!
Lasciare un commento sul modello DROPS 122-6
Noi saremmo felici di ricevere i tuoi commenti e opinioni su questo modello!
Se vuoi fare una domanda, fai per favore attenzione a selezionare la categoria corretta nella casella qui sotto per velocizzare il processo di risposta. I campi richiesti sono indicati da *.