
Categorie popolari
State cercando un filato?


Commenti / Domande (125)
![]() Ann ha scritto:
Ann ha scritto:
Do you have videos on how to sew the seam for the knitted wrist edge and then the seam for the seed stitch body, both with an invisible seam? (The shoulder seam video you have up is a different stitch). Thanks!
15.05.2016 - 16:24DROPS Design ha risposto:
Dear Ann, seam on upper sleeve/shoulder and under arm can be worked both as a shoulder seam. You can then tighten the yarn a bit more to tighten sts tog and make it less visible. Happy knitting!
17.05.2016 - 10:17
![]() Erika ha scritto:
Erika ha scritto:
So on the right front piece we are binding off the neck stitches on the RS and on the left front piece we bind off on the WS-- doesn't this mean the neck shaping will happen on different rows and not be even?
21.04.2016 - 02:54DROPS Design ha risposto:
Dear Erika, there may be only 1 row difference that will not be visible then. Happy knitting!
21.04.2016 - 09:12
![]() Erika ha scritto:
Erika ha scritto:
On the left front piece when you bind off the first 2 stitches do you do this on the RS or WS? When you put the 11 stitches on to the stitch holder do you knit across those stitches so that the yarn ends up back on the right side of the cable?
19.04.2016 - 04:01DROPS Design ha risposto:
Dear Erika, the 2 sts dec over cable are worked from WS as on right front piece - You can put the 11 sts for neck on a st holder at the beg of a row from WS so that you work them first and don't have to cut the yarn. Happy knitting!
19.04.2016 - 09:07
![]() Hanne Andersen ha scritto:
Hanne Andersen ha scritto:
Når man køber garn til 31kr pr. Nøgle er det slet ikke ok at der er knuder midt i nøglet . Troede man kunne strikke videre. Sidder lige nu i en håbløs kamp på at redde mit strikketøj. Knuden gik op 6 cm under hvor jeg var nået til og trævler op nedefra lige nu . Jeg er så skuffet og ærgerlig
21.02.2016 - 22:38
![]() Abigail ha scritto:
Abigail ha scritto:
If m1 goes 1st on the RS it will be the left front piece though, no? You said the opposite below. Please confirm. I think this pattern needs to be clarified as it is very unclear. Thank you for your help.
18.02.2016 - 13:23DROPS Design ha risposto:
Dear Abigail, the first row in pattern is worked from WS, ie you will start with left front piece and finish with right front piece. On next row from RS, you will first work right front piece and then finish with left front piece (jacket is worked bottom up). Happy knitting!
18.02.2016 - 14:21
![]() Abigail ha scritto:
Abigail ha scritto:
Oh sorry, ignore my last comment. The pattern for the body is k6 m3 m2 m1 k6 on the RS , and k6 m1 m2 m3 on the WS, correct?
18.02.2016 - 12:37DROPS Design ha risposto:
Dear Abigail, from WS (= 1st row after bottom edge and inc evenly) work K6, M.3, M.2, M.1 and K6 - from RS, work K6, M.1, M.2, M.3 and K6. M.3 is worked at beg of row from WS and end of row from RS, M.1 is worked at end of row from WS and beg of row from RS. Happy knitting!
18.02.2016 - 14:11
![]() Abigail ha scritto:
Abigail ha scritto:
So opposite m3 on the WS will be m1 on RS? So EVERY row (WS & RS) is this sequence: K6 m3 m2 m1 k6?
18.02.2016 - 12:17Abigail ha scritto:
When starting the chart rows, it looks like to me: WS: k6, m3, m2, m1, k6 On the next row, RS, should this be: k6, m3, m2, m1, k6 Or, should it be: k6, m1, m2, m3, k6, so that you are matching up the charts m1 and m3 on either side?
17.02.2016 - 18:12DROPS Design ha risposto:
Dear Abigail, from RS you will work, K6, M.1, M.2, M.3 and K6, ie M1 is worked on the right front piece and M3 on the left front piece. Happy knitting!
18.02.2016 - 09:55
![]() Hev ha scritto:
Hev ha scritto:
If the charts show the RS only, how do you know what to do on the WS please? Thank you for your assistance
17.02.2016 - 17:26DROPS Design ha risposto:
Dear Mrs Hev, in diagrams 1 square = 1 st x 1 row. The x symbol= reversed stocking st (= P from RS but K from WS) and the white symbole = stocking st (= K from RS but P from WS), as explained under diagram text. So that M.1 is worked over 10 sts and 4 rows. Happy knitting!
18.02.2016 - 09:53
![]() Hev ha scritto:
Hev ha scritto:
Hi, the instruction "First row in M.1 and M.3 = WS." Is saying m1 and m3 start on the WS, but doesn't the m2 chart start on WS as well? If so, that instruction should probably include m2. Please clarify. Thank you.
17.02.2016 - 12:17DROPS Design ha risposto:
Dear Hev, that's right, 1st row in M.2 will be also worked here from WS. Happy knitting!
17.02.2016 - 17:04
|
|||||||||||||
Little Pixie#littlepixiejacket |
|||||||||||||
 |
 |
||||||||||||
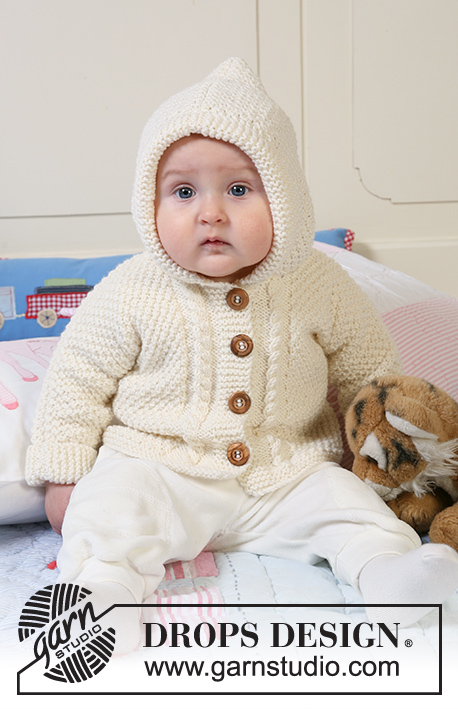
Cardigan per neonati e bambini a grana di riso lavorato in un pezzo unico, con cappuccio, motivo a punto fantasia e trecce in DROPS Merino Extra Fine.
DROPS Baby 19-5 |
|||||||||||||
|
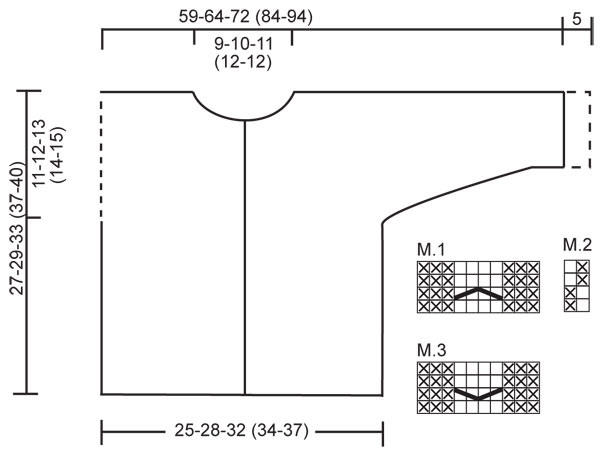
GIACCHINA: PUNTO LEGACCIO (avanti e indietro sul f): Lavorare tutti i f a diritto. MOTIVO: Ved diag da M.1 a M.3. il diag mostra il motivo sul diritto. 1° f di M.1 e M.3 = rov. ASOLE: Realizzare le asole sul bordo davanti destro, lavorando insieme a dir la 2° e 3° m al centro del bordo seguite da 1 gettato. Alla riga successiva, lavorare il gettato a dir. Realizzare le asole quando il lavoro misura: Taglia 1/3 mesi: 4, 10, 16 e 22 cm. Taglia 6/9 mesi: 4, 11, 18 e 24 cm. Taglia 12/18 mesi: 3, 9, 15, 21 e 27 cm. Taglia 2 anni: 3, 10, 17, 24 e 31 cm. Taglia 3/4 anni: 3, 11, 19, 27 e 34 cm. -------------------------------------------------------- -------------------------------------------------------- GIACCHINA: Si lavora avanti e indietro sul f circolare partendo dal centro davanti, così si continua fino allo scalfo della manica. Poi si lavorano separatamente il davanti e il dietro e vengono avviate nuove m. ad entrambi i lati per le maniche. Si confeziona la giacchina unendo le cuciture dello scalfo e della spalla. CORPO: Avviare 117-131-145 (155-169) m (comprese 6 m per il bordo su ogni lato davanti al centro) sui f circolari n 4 con il filato Merino Extra Fine. Lavorare 6 f a PUNTO LEGACCIO – vedere spiegazione sopra (1° f = DIR), poi lavorare 1 f a dir sul diritto del lavoro, ALLO STESSO TEMPO aumentare di 1 m alla 10° e 11° m dal centro davanti, ripetere l’aumento alla fine del f (all’11° e 10° m rimasta sul f) = 121-135-149 (159-173) m. Inserire un segno a 34-38-42 (44-48) m. da ogni lato (= 53-59-65 (71-77) m tra un segno e l’altro sul dietro del lavoro). Ora lavorare il f seguente come descritto di seguito sul rovescio del lavoro: 6 m a punto legaccio (=bordo davanti), M.3 (= 10 m) M.2 per le 89-103-117 (127-141) m successive, M.1 (= 10 m) e 6 m. a punto legaccio (= bordo davanti). Continuare con questo motivo – NON DIMENTICARSI DI REALIZZARE LE ASOLE SUL BORDO DAVANTI DESTRO – vedere spiegazione sopra. RICORDARSI LA TENSIONE DEL LAVORO! Quando il lavoro misura 16-17-20 (23-25) cm dividere il lavoro in corrispondenza dei segni e completare il davanti e il dietro separatamente. DAVANTI DESTRO: = 34-38-42 (44-48) m. Continuare con il motivo precedente, ALLO STESSO TEMPO avviare delle nuove m per la manica alla fine di ogni f verso il lato come segue: 4 m per 2-2-3 (3-3) volte, 8 m per 1-1-1 (1-3) volte, 10 m per 1-1-1 (2-1) volte e 19-22-23 (23-24) m per 1 volta = 79-86-95 (107-118) m – ATTENZIONE: incorporare le m di aumento nel diag M.2 mano a mano. Dopo l’ultimo aumento, continuare come prima ma lavorare 10 m verso il bordo della manica a punto legaccio (= bordo da risvoltare della manica). Quando manca 1 f prima che il lavoro misuri 23-25-28 (32-35) cm – assicurarsi che sia un f sul rovescio del lavoro – diminuire 2 m sulla treccia lavorando 2 m insieme a rov per 2 volte sulle 4 m della treccia. Al f seguente, sul diritto del lavoro, mettere in sospeso 9-11-12 (12-13) m al centro davanti per il collo. Calare per dare la forma dello scollo all’inizio di ogni f al centro davanti: 2 m per 2 volte e 1 m per 2-2-3 (3-3) volte = rimangono 62-67-74 (86-96) m sul f (=spalla + manica). Continuare con il diag M.2 e calare tutte le m quando il lavoro misura 27-29-33 (37-40) cm. DAVANTI SINISTRO: Come il destro, ma speculare. DIETRO: = 53-59-65 (71-77) m. Continuare con il diag M.2 come prima, ALLO STESSO TEMPO avviare delle nuove m ad entrambi i lati alla fine di ogni f come descritto per il davanti = 143-155-171 (197-217) m. Ora proseguire in M.2 con 10 m a punto legaccio ai lati per i bordi delle maniche. Quando il lavoro misura 25-27-31 (35-38) cm, calare le 17-19-21 (23-25) m centrali per il collo e lavorare ogni spalla/manica separatamente. Calare 1 m per lo scollo alla riga successiva = 62-67-74 (86-96) m rimaste sul f. Calare tutte le m quando il lavoro misura 27-29-33 (37-40) cm. Ripetere per l’altro lato. CONFEZIONE: Cucire insieme le spalle, bordo contro bordo, con punti regolari. Cucire gli scalfi. Applicare i bottoni. Risvoltare gli ultimi 5 cm di ogni manica verso il diritto del lavoro, eventualmente fissandole con qualche punto. CAPPUCCIO: Raccogliere dal diritto del lavoro circa 55-75 m (comprese quelle tenute in sospeso sul davanti) sul f circolare n 4 con filato Merino Extra Fine. Lavorare 1 f a dir sul rovescio del lavoro, poi lavorare 1 f a dir sul diritto del lavoro, ALLO STESSO TEMPO aumentare distribuendo uniformemente le m fino ad ottenere 85-89-93 (97-101) m sul f. Continuare seguendo il diag M.2 con 6 m a punto legaccio su ogni lato – ALLO STESSO TEMPO avviare 6 nuove m alla fine dei 2 f successivi per il risvolto = 97-101-105 (109-113) m – lavorare queste 6 m a punto legaccio. Continuare come da M.2 con 12 m a punto legaccio su ogni lato finché il cappuccio non misura 21-23-25 (27-28) cm, poi calare tutte le m. Piegare a metà il cappuccio e cucire insieme i bordi in alto. Piegare a metà il bordo a punto legaccio verso il diritto del lavoro e fissarlo in basso ai due lati. |
|||||||||||||
Spiegazioni del diagramma |
|||||||||||||
|
|||||||||||||
 |
|||||||||||||
Avete terminato questo modello?Allora taggate le vostre foto con #dropspattern #littlepixiejacket o inviatele alla #dropsfan gallery. Avete bisogno di aiuto con questo modello?Troverete 10 video tutorial, una sezione per i commenti/domande e molto altro guardando il modello su www.garnstudio.com © 1982-2026 DROPS Design A/S. Ci riserviamo tutti i diritti. Questo documento, compreso tutte le sue sotto-sezioni, è protetto dalle leggi sul copyright. Potete leggere quello che potete fare con i nostri modelli alla fine di ogni modello sul nostro sito. |
|||||||||||||


Con oltre 40 anni di esperienza nel design di modelli di maglia e uncinetto, DROPS Design offre la più estesa collezione di modelli gratuiti su internet - tradotti in 17 lingue. Ad oggi vi possiamo fornire 324 cataloghi e 12290 modelli - 9561 dei quali sono tradotti in Italiano.
Ci stiamo impegnando molto per darvi il meglio che vi possiamo offrire in termini di maglia e uncinetto, ispirazioni e consigli così come filati di grande qualità ad un prezzo incredibile! Volete utilizzare i nostri modelli per qualcosa d'altro oltre al vostro uso personale? Potete leggere tutto ciò che è consentito nel testo sul Copyright in basso su tutte le pagine dei nostri modelli. Buon lavoro!
Lasciare un commento sul modello DROPS Baby 19-5
Noi saremmo felici di ricevere i tuoi commenti e opinioni su questo modello!
Se vuoi fare una domanda, fai per favore attenzione a selezionare la categoria corretta nella casella qui sotto per velocizzare il processo di risposta. I campi richiesti sono indicati da *.