
Categorie popolari
State cercando un filato?


Commenti / Domande (208)
![]() Ana Oliveira ha scritto:
Ana Oliveira ha scritto:
Bom dia, é possível adaptar a capa para ombros para uma camisola? Como poderia fazer? Obrigada
19.01.2026 - 07:49DROPS Design ha risposto:
Bom dia, A única forma de poder adaptar esta capa seria levantar malhas à volta do rebordo inferior para prolongar o encaixe, depois, separar esse encaixe em costas, frente e mangas e continuar como se fosse um modelo de pulôver tricotado de cima para baixo, mas implica fazer várias adaptações e cálculos, por sua iniciativa. Bons tricôs!
19.01.2026 - 12:19
![]() Jo ha scritto:
Jo ha scritto:
Ma demande est partie trop vite Aiguilles n° 5 Pouvez vous me donner les dimensions hauteur largeur que je puisse adapter Merci de votre réponse
14.01.2026 - 20:15DROPS Design ha risposto:
Bonjour Jo, nous ne sommes malheureusement pas en mesure de pouvoir adapter chacun de nos modèles à chaque demande, toutefois, le lien de la réponse précédente pourra peut-être vous aider; bon tricot!
15.01.2026 - 10:31
![]() Jo ha scritto:
Jo ha scritto:
Bonsoir Je désire faire le chauffe épaule avec des aiguilles n° ( etsans torsade, tout simple au point mousse. Que me conseillez vous ? Merci
14.01.2026 - 20:12DROPS Design ha risposto:
Bonjour Jo, vous pouvez probablement le faire ainsi, sans les torsades et juste au point mousse (il vous faudra peut-être davantage de laine car le point mousse est plus gourmand), retrouvez par ex. nos modèles de tours de cou au pont mousse, tricotés dans le sens de la longueur ici. Bon tricot!
15.01.2026 - 10:31
![]() Alicia ha scritto:
Alicia ha scritto:
Bonjour , Les rangs raccourcis se tricotent-Ils sur l'endroit et l'envers de l'ouvrage et à chaque torsade tricotée dès que l'on commence celle-ci et en répétant ceci jusqu'à la fin des 10-11 torsades tricotées ? merci de votre réponse
03.11.2025 - 14:00DROPS Design ha risposto:
Bonjour Alicia, les rangs raccourcis commencent sur l'endroit, mais lorsqu'en début de rang sur l'endroit, on ne tricote pas tout le rang, on tourne et on tricote sur l'envers le même nombre de mailles qu'au rang précédent, ces mailles sont à tricoter en suivant les diagrammes. les torsades vont donc se répéter sur le même nombre de rangs entre chaque torsades. Bon tricot!
03.11.2025 - 16:32
![]() Alicia ha scritto:
Alicia ha scritto:
Bonjour, Les rangs raccourcis se font-ils en fin de rang ( pour le bonnet) ou juste après la torsade? Merci de votre réponse
15.10.2025 - 16:10DROPS Design ha risposto:
Bonjour Alicia, en fin du rang, la torsade est au debut du rang. Repetez cela: "tricoter en rangs raccourcis en allers retours en commençant sur l'endroit ainsi : *2 rangs sur toutes les mailles, 2 rangs sur 36-40 mailles, 2 rangs sur 34-38 mailles, 2 rangs sur 31-35 mailles *, répéter de *à* jusqu'à obtenir 10-11 motifs de M1 en hauteur, l'ouvrage mesure alors environ 50-55 cm dans la partie la plus longue (cote torsade). Bon tricot!
16.10.2025 - 09:58
![]() Anna ha scritto:
Anna ha scritto:
What method of shot rows are being used in this pattern?
10.10.2025 - 16:44DROPS Design ha risposto:
Dear Anna, the short rows are indicated in the pattern: *2 rows on all sts, 2 rows on 36-40 sts, 2 rows on 34-38 sts, 2 rows on 31-35 sts* for the hat and * 1 row on all sts, 1 row on 20 sts, turn, work return row on 20 sts, 1 row on all sts, 2 rows on 37-41-45 sts, 2 rows on 33-37-41 sts, 2 rows on 29-33-37 sts, 2 rows on all sts, 2 rows on 37-41-45 sts, 2 rows on 33-37-41 sts, 2 rows on 29-33-37 sts * for the shoulder wrap. You can check how these are worked here Happy knitting!
12.10.2025 - 18:54
![]() Alicia ha scritto:
Alicia ha scritto:
Bonjour, En ce qui concerne les rangs raccourcis pour le bonnet , doit-on ne pas tricoter les mailles en fin de rang ou bien est-ce les mailles suivant la torsade ? Merci de votre réponse
10.10.2025 - 14:03DROPS Design ha risposto:
Bonjour Alicia, la torsade se tricote en début de rang sur l'endroit, on va la tricoter tous les rangs, mêmes aux rangs raccourcis qui se tricotent aussi sur l'endroit, ce sont les mailles côté "pointe" du bonnet que l'on ne va pas tricoter à chaque fois dan les rangs raccourcis. Bon tricot!
15.10.2025 - 07:20
![]() Alicia ha scritto:
Alicia ha scritto:
Bonsoir, J'ai du mal à commencer la torsade ; Dois-je commencer en tricotant 4M endroit et ensuit glisser 4M devant et derrière l'ouvrage (en alternant) et cela tout le long du rang ? D'autre part, 4M tricotées et 4 autres glissées me paraissent peu ; quand je regarde le modèle du bonnet , on dirait que les torsades comptent plus de mailles Merci de votre réponse
08.10.2025 - 20:27
![]() Alicia ha scritto:
Alicia ha scritto:
Bonsoir, J'ai du mal pour commencer la torsade ; Dois-je commencer en tricotant 4M et en glissant les autres mailles en alternant 4M devant ou derrière et cela tout le long de l'ouvrage ? d'autre part , 4M me paraissent peu, quand je regarde le modèle du bonnet, on dirait que les torsades sont plus longues merci de votre réponse
08.10.2025 - 20:24DROPS Design ha risposto:
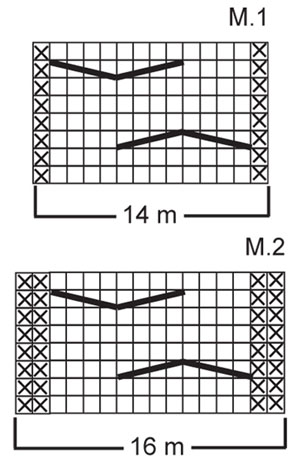
Bonjour Alicia, dans M.1 aussi bien que dans M.2, la 1ère torsade se fait sur les 8 premières mailles endroit: vous placez les 4 premières mailles devant, vous tricotez les 4 m suivantes puis les 4 m de l'aiguille à torsades et les 4 m suivantes à l'endroit = 12 m de torsades. Vous tricotez 3 rangs puis vous tricotez: 4m end, 4 m derrière, 4 m end et les 4 m de l'aiguille à torsades = 12 m de torsades; et vous continuez ainsi. N'hésitez pas à vous entraîner sur un échantillon si besoin. Bon tricot!
09.10.2025 - 08:41
![]() Anna ha scritto:
Anna ha scritto:
What method of short rows are used in this pattern?
08.10.2025 - 19:17
|
|||||||||||||
Chocolate Fudge#chocolatefudgeset |
|||||||||||||
|
|
|||||||||||||
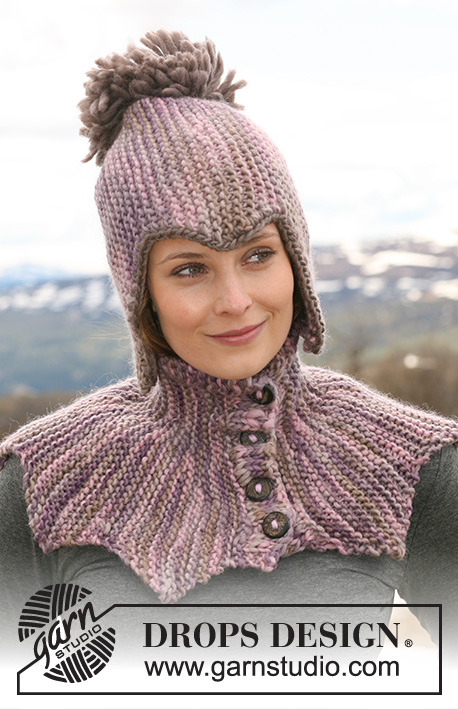
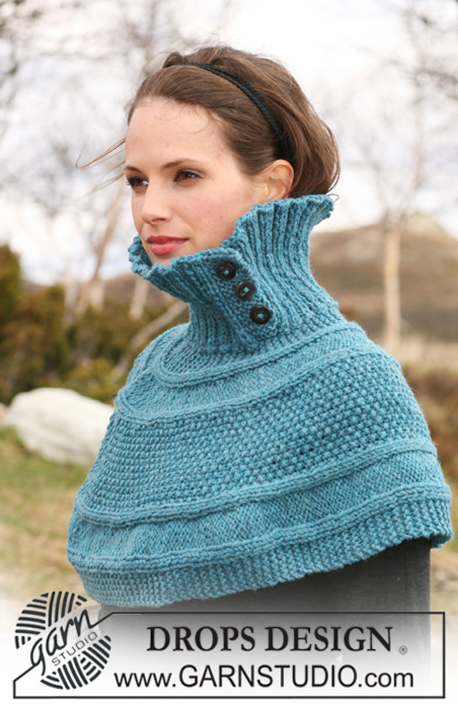
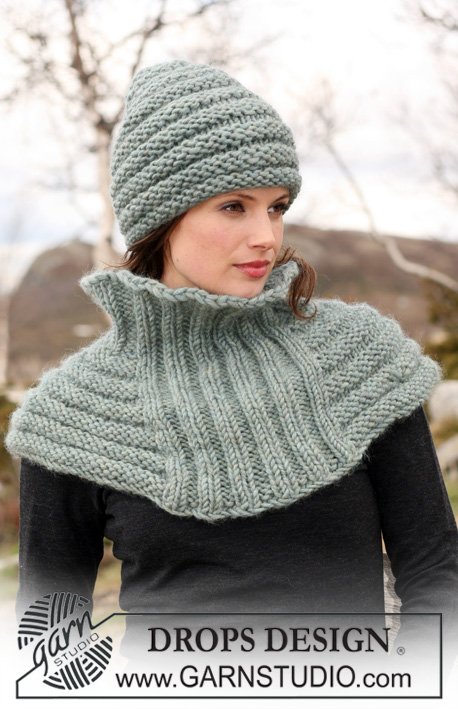
Il set DROPS: Cappello e scaldaspalla lavorato da un lato verso l’altro, con trecce e punto legaccio, in "Snow".
DROPS 114-31 |
|||||||||||||
|
CAPPELLO: -------------------------------------------------------- PUNTO LEGACCIO (avanti e indietro sul f): Lavorare tutti i ferri sul diritto. MOTIVO: Vedere il diagramma M.1. Il diagramma mostra il motivo sul diritto. -------------------------------------------------------- -------------------------------------------------------- CAPPELLO: Si lavora da lato a lato, avanti e indietro. Lavorare le 2 prime m sul diritto del lavoro con 2 fili (perché il bordo sia più rigido) a PUNTO LEGACCIO fino alla fine – vedere le spiegazione sopra! Avviare 38-42 m con il f 7 e il filato Snow. Lavorare in MOTIVO così sul diritto – vedere le spiegazione sopra: 2 m punto legaccio, M.1 (= 14 m), 22-26 m punto legaccio. Continuare così, ALLO STESSO TEMPO, lavorare a ferri accorciati, avanti e indietro sui ferri cominciando sul diritto così: * 2 f sopra tutte le m, 2 f sopra 36-40 m, 2 f sopra 34-38 m, 2 f sopra 31-35 m *, ripetere da *-*. RICORDARSI DELLA TENSIONE DELLA MAGLIA! Continuare così fino a quando il motivo M.1 sia lavorato 10-11 volte in altezza, il lavoro misura ca 50-55 cm nel punto più lungo. Intrecciare senza stringere all’ultimo f dell’ultimo motivo. CONFEZIONE: Cucire l’ultimo giro al 1° giro, bordo contro bordo. Passare un filo nelle maglie in alto del cappello e stringere e fissare il filo. -------------------------------------------------------- SCALDASPALLE: -------------------------------------------------------- PUNTO LEGACCIO (avanti e indietro sul f): Lavorare tutti i ferri sul diritto. MOTIVO: Vedere il diagramma M.2. Il diagramma mostra il motivo sul diritto. ASOLE: Intrecciare per le asole quando il lavoro misura 2 cm in altezza. Intrecciare così sul diritto: Lavorare 7-7-7 m, intrecciare 1 m, * lavorare 8-9-10 m, intrecciare 1 m *, ripetere da *-* in totale 4 volte, terminare con 3 m = 5 asole. Al ferro seguente, avviare 1 m sopra le maglie intrecciate. -------------------------------------------------------- -------------------------------------------------------- SCALDACOLLO: Si lavora da lato a lato, avanti e indietro sui ferri circolari. Avviare 47-51-55 m con i ferri circolari 8 ed il filato Snow. Lavorare a PUNTO LEGACCIO - vedere le spiegazione sopra - ALLO STESSO TEMPO, lavorare le prime 2 m sul diritto con 2 fili fino alla fine. ALLO STESSO TEMPO, quando il lavoro misura 2 cm, intrecciare per le ASOLE sul diritto – vedere le spiegazione sopra! Quando il lavoro misura 4 cm, aumentare così sul rovescio: Lavorare a punto legaccio le 4 prime maglie, poi distribuire 6 aumenti uniformemente sulle 10 m a punto legaccio seguenti, punto legaccio sopra le 17-21-25 m seguenti, distribuire 6 aumenti uniformemente sulle 10 m a punto legaccio seguenti, terminare con punto legaccio = 59-63-67 m. LEGGERE ATTENTAMENTE TUTTO IL SEGUITO PRIMA DI CONTINUARE! Continuare seguendo il motivo e lavorando a ferri accorciati come segue dal diritto del lavoro: 2 m punto legaccio, 4 m rov (dir dal diritto del lavoro), M.2 (= 16 m), 2 m rov (dir dal diritto del lavoro), punto legaccio sulle 15-19-23 m seguenti, M.2 (=16 m), 4 m punto legaccio. ALLO STESSO TEMPO, lavorare a ferri accorciati così sul diritto: * 1 f su tutte le m, 1 f sopra 20 m, girare e lavorare il f seguente sopra 20 m, 1 f sopra tutte le m, 2 f sopra 37-41-45 m, 2 f sopra 33-37-41 m, 2 f sopra 29-33-37 m, 2 f sopra tutte le m, 2 f sopra 37-41-45 m, 2 f sopra 33-37-41 m, 2 f sopra 29-33-37 m *, ripetere da *-*. RICORDARSI DELLA TENSIONE DELLA MAGLIA! Continuare così. Quando il lavoro misura 128-148-168 cm misurato dal bordo in basso (aggiustare dopo una intera ripetizione di M.2) lavorare il f seguente così sul diritto: Lavorare a punto legaccio, ALLO STESSO TEMPO, distribuire 6 diminuzioni uniformemente sopra ognuna delle trecce = 47-51-55 m. Continuare con punto legaccio sopra tutte le m. Intrecciare quando il bordo a punto legaccio misura 4 cm. Attaccare i bottoni. |
|||||||||||||
Spiegazioni del diagramma |
|||||||||||||
|
|||||||||||||
 |
|||||||||||||
Avete terminato questo modello?Allora taggate le vostre foto con #dropspattern #chocolatefudgeset o inviatele alla #dropsfan gallery. Avete bisogno di aiuto con questo modello?Troverete 12 video tutorial, una sezione per i commenti/domande e molto altro guardando il modello su www.garnstudio.com © 1982-2026 DROPS Design A/S. Ci riserviamo tutti i diritti. Questo documento, compreso tutte le sue sotto-sezioni, è protetto dalle leggi sul copyright. Potete leggere quello che potete fare con i nostri modelli alla fine di ogni modello sul nostro sito. |
|||||||||||||


Con oltre 40 anni di esperienza nel design di modelli di maglia e uncinetto, DROPS Design offre la più estesa collezione di modelli gratuiti su internet - tradotti in 17 lingue. Ad oggi vi possiamo fornire 324 cataloghi e 12290 modelli - 9561 dei quali sono tradotti in Italiano.
Ci stiamo impegnando molto per darvi il meglio che vi possiamo offrire in termini di maglia e uncinetto, ispirazioni e consigli così come filati di grande qualità ad un prezzo incredibile! Volete utilizzare i nostri modelli per qualcosa d'altro oltre al vostro uso personale? Potete leggere tutto ciò che è consentito nel testo sul Copyright in basso su tutte le pagine dei nostri modelli. Buon lavoro!
Lasciare un commento sul modello DROPS 114-31
Noi saremmo felici di ricevere i tuoi commenti e opinioni su questo modello!
Se vuoi fare una domanda, fai per favore attenzione a selezionare la categoria corretta nella casella qui sotto per velocizzare il processo di risposta. I campi richiesti sono indicati da *.