
Categorie popolari
State cercando un filato?


Commenti / Domande (101)
![]() Lynn ha scritto:
Lynn ha scritto:
In pattern Elias what is gauge for this pattern using Fabel?
03.10.2025 - 21:13DROPS Design ha risposto:
Dear Lynn, the gauge is indicated next to the recommended needle size: "DROPS circular needle size (80 cm) 3 mm [US 2or3] - or size needed to obtain 24 sts x 48 rows in garter st = 4" x 4". " Happy knitting!
06.10.2025 - 00:03
![]() Degraeve Vera ha scritto:
Degraeve Vera ha scritto:
Waar vind ik de matentabel
31.08.2025 - 14:53DROPS Design ha risposto:
Dag Vera,
Helemaal onderaan de beschrijving van het patroon vind je de maattekening.
04.09.2025 - 22:05
![]() ColetteDundas ha scritto:
ColetteDundas ha scritto:
I have completed bottom piece and now am forming sleeves on back piece. Once complete Is there meant to be an overlap on bottom piece? on mine there is a 7cm overlap on bottom piece. I was going to add a panel on each side of back up to sleeves, unfortunately the fan pieces on edge wud not be on my sides. Look forward to yr reply
25.06.2025 - 15:39DROPS Design ha risposto:
Dear Mrs Dundas, I'm afraid I don't understand your question, but you might get helped from the chart, there will be an overlap on mid front for the buttonbands. Happy knitting!
26.06.2025 - 16:32
![]() Kathy Gallant ha scritto:
Kathy Gallant ha scritto:
When doing increase for sleeves on arm side it says to increase as back. pattern says you should have 132 stitches how can this be. you start with 62 stiches then increase 10 on each side and then 3 on each side 15 times and then 15 on each side. so that is 20+90 +30 +62=202. How do you get 132 stitches?
21.08.2019 - 20:50DROPS Design ha risposto:
Dear Mrs Gallant, on back piece you cast on the new stitches on each side for both sleeves while on each front piece you will increase for sleeve only one one side, ie 10 sts 1 time + 3 sts 15 times + 15 sts 1 time = 10+45+15= 70sts + 62 sts = 132sts. Happy knitting!
22.08.2019 - 09:38
![]() Kathleen Pleasants ha scritto:
Kathleen Pleasants ha scritto:
I am a beginner so apologies if this is a silly question! The instructions for the back say: 'Then cast on new sts for sleeve each side on every other row: 4-3-3-3-2-2 sts 12-15-15-17-17-19 times and 15-15-11-3-14-5 sts 1 time = 244-248-250-252-254-258 sts.' My question is, should it be: 15-15-11-13-14-15 sts 1 time? Thank you.
24.06.2019 - 09:55DROPS Design ha risposto:
Dear Mrs Pleasants, the last cast on will be depending on the size 15 sts in the first, 2nd and last sti, 11 sts in the 3rd size, a4 sts in the 4th size and 14 sts in the 5th size. Happy knitting!
24.06.2019 - 11:01
![]() Françoise Reix ha scritto:
Françoise Reix ha scritto:
Bonjour, j'ai tricotée les 27 cm au point mousse, mais ensuite je ne comprend pas comment on fait les rangs raccourcis. Si vous pouviez m'aiguiller. Merci à vous
27.04.2019 - 12:25DROPS Design ha risposto:
Bonjour Mme Reix, suivez attentivement les explications pas à pas: au rang suivant, tricotez les 20 premières mailles seulement, tournez et tricotez le rang retour, tournez et tricotez les 30 premières mailles seulement, tournez et tricotez le rang retour, continuez comme expliqué jusqu'à ce que vous ayez tricoté 2 rangs sur les 60 premières mailles. Tricotez ensuite 1 rang sur toutes les mailles et tricotez maintenant les rangs raccourcis de l'autre côté: 2 rangs sur les 60 premières mailles, 2 rangs sur les 50 premières mailles et ainsi de suite (n'oubliez pas les marqueurs). Bon tricot!
29.04.2019 - 08:47
![]() Katharina Haber ha scritto:
Katharina Haber ha scritto:
Beim Unterteil sowie Rückenteil wird plötzlich von zwei Markierungsfäden gesprochen. In der anleitung wird nur angegeben, 1 Markierungfaden. Wo also genau gehören die beiden Markierungen hin? Danke für die Hilfe
07.07.2018 - 08:26DROPS Design ha risposto:
Liebe Katharina Haber, diese Markierungsfäden haben Sie, bei den verkürtzten Reihen eingesetzt: nach den 2 Reihen über die 60 M für den 1. Markierer und genauso für den 2. in der Mitte den verküzten Reihen (= nach 60) nach 42-66 cm von 1. Markierr gemessen. Viel Spaß beim stricken!
09.07.2018 - 07:50
![]() Begoña ha scritto:
Begoña ha scritto:
No entiendo cuando dice insertar un mp en el último punto ( para marcar el lado. Me lo podrias explicar. Gracias por todos los patrones. un saludo.
09.01.2018 - 08:00DROPS Design ha risposto:
Hola Begoña, quiere decir que insertamos un marcapuntos en el último punto para saber donde se encuentra el lado y tenerlo como referencia posteriormente para evitar confusiones y errores.
13.01.2018 - 20:38
![]() Trish ha scritto:
Trish ha scritto:
In the instructions for the back piece it says to "cast off when piece measures (for my size) 34 cm from where sts were picked up for back piece, width of sleeve = approx 14 cm". My sleeve width is measuring 25 cm!! Is the 34 cm correct? I have knitted the left front and when the sleeve width measures 14 cm the front piece armpit to top of shoulder measures 24 cm. This looks correct and I am wondering if there was a typo with the numbers for the back piece?
23.08.2017 - 18:10DROPS Design ha risposto:
Dear Mrs Trish, in 2nd size, you are casting on new sts for sleeve when piece measures 13 cm from picked up sts and cast off for shoulder/sleeve when piece measures 34 cm from picked up sts = you should have 21 cm for sleeve towards armhole and 14 cm for sleeve towards sleeve edge - see also measurement chart. Happy knitting!
28.08.2017 - 12:43
![]() Lydia ha scritto:
Lydia ha scritto:
Hallo, ich würde diese Jacke gerne mit 2 verschiedenen Farben des Garnes stricken, immer jeweils 2 Reihen im Wechsel. Ist das machbar? Oder bekomme ich dann Probleme bei den verkürzten Reihen? Bin leider noch relativ unerfahren... Liebe Grüße, Lydia
21.05.2017 - 20:06
|
|
Elaia#elaia |
|
 |
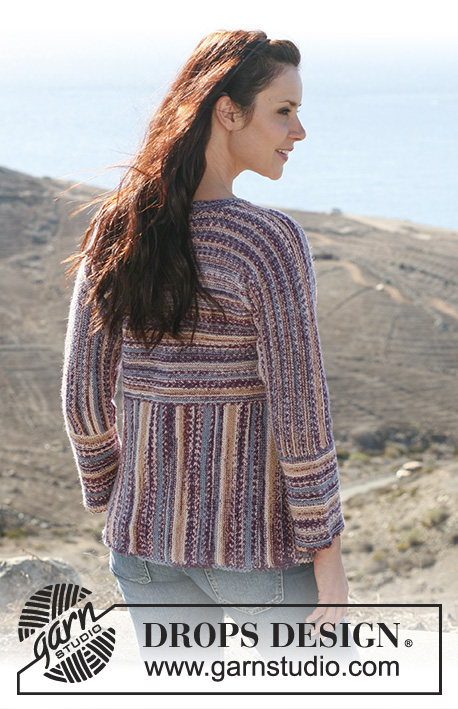 |
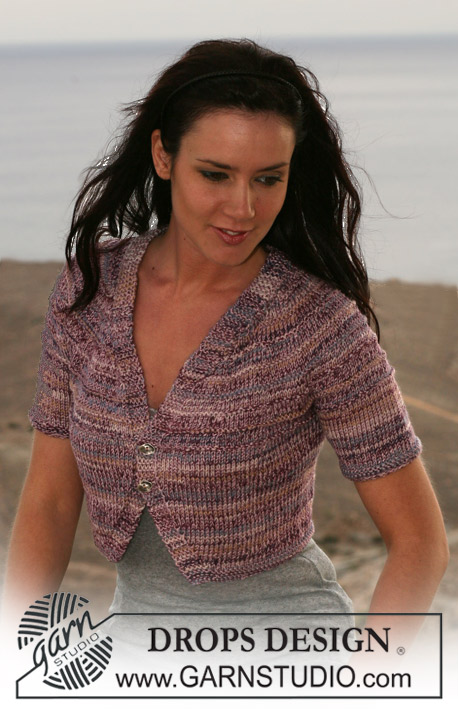
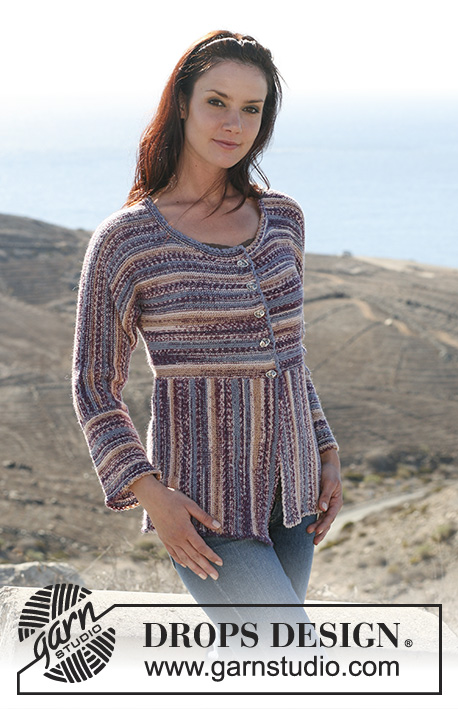
Giacca DROPS lavorata a punto legaccio in verticale ed in orizzontale, in "Fabel". Taglie: dalla S alla XXXL.
DROPS 107-3 |
|
|
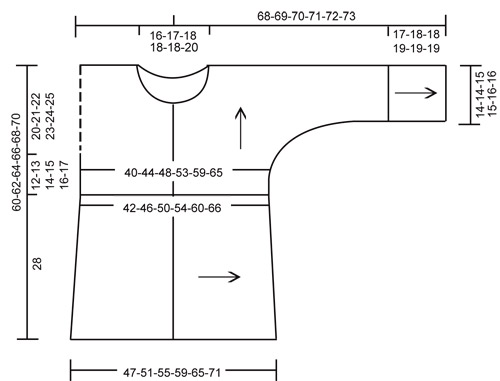
ASOLE: Intrecciare per le asole sul bordo davanti destro. 1 asola = intrecciare la 4° m dal bordo, al ferro seguente, avviare 1 m sopra la maglia intrecciata. Posizionare le asole quando il davanti destro misura (misurato dal bordo dove le maglie sono state riprese (ved foto)): Taglia S: 1, 6, 10, 15 e 19 cm. Taglia M: 1, 6, 11, 16 e 21 cm. Taglia L: 1, 6, 11, 16 e 21 cm. Taglia XL: 1, 5, 10, 14, 19 e 23 cm. Taglia XXL: 1, 5, 10, 14, 19 e 23 cm. Taglia XXXL: 1, 6, 11, 16, 21 e 25 cm. GIACCHINA: Si lavora la giacca in pezzi lavorati in direzioni diversi. Le frecce nello schema qui sotto indicano le direzioni del lavoro ogni volta. La parte bassa della giacca: Si lavora avanti e indietro con i ferri circolari per avere sufficientemente spazio per tutte le maglie. La giacca si lavora interamente a punto legaccio, vuol dire, lavorare tutti i ferri a dir. Avviare 67 m con i ferri circolari 3 e il filato Fabel. Lavorare avanti e indietro su tutte le maglie finché il lavoro non misuri 23-25-27-29-32-35 cm. Ricordarsi la tensione del lavoro! Continuare con i ferri accorciati così: Lavorare 20 m, girare il lavoro e lavorare il ferro seguente. Lavorare 30 m, girare il lavoro e lavorare il ferro seguente. Lavorare 40 m, girare il lavoro e lavorare il ferro seguente. Lavorare 50 m girare il lavoro e lavorare il ferro seguente. Lavorare 60 m, girare il lavoro e lavorare il ferro seguente. Lavorare sopra tutte le m, inserire 1 segnapunti nell’ultima m (indica il lato), girare il lavoro e lavorare il ferro seguente. Lavorare 60 m, girare il lavoro e lavorare il ferro seguente. Lavorare 50 m girare il lavoro e lavorare il ferro seguente. Lavorare 40 m, girare il lavoro e lavorare il ferro seguente. Lavorare 30 m, girare il lavoro e lavorare il ferro seguente. Lavorare 20 m, girare il lavoro e lavorare il ferro seguente. Continuare avanti e indietro su tutte le m. Quando il lavoro misura 42-46-50-54-60-66 cm dal segnapunti, lavorare a ferri accorciati come indicato sui sopra. Continuare poi, avanti e indietro, su tutte le m. Quando il lavoro misura 23-25-27-29-32-35 cm dal 2° segnapunti, intrecciare senza stringere. Il lavoro misura in totale ca 88-96-104-112-124-136 cm lungo un lato e 97-105-113-121-133-145 cm dall’altro lato. DIETRO: Riprendere (sul diritto) 1 m in ogni maglia a punto legaccio del dietro, vuol dire tra i 2 segnapunti. Al ferro seguente, aggiustare il numero di maglie a 96-106-116-128-142-156 m. Lavorare avanti e indietro a punto legaccio, allo stesso tempo, al 1° ferro, avviare 1 nuova maglia ad ogni lato (= m vivagno) = 98-108-118-130-144-158 m. Continuare finché il lavoro non misuri 12-13-14-15-16-17 cm dal bordo dove le maglie sono stata riprese. Avviare 10-10-10-7-7-7 m nuovo ad ogni lato per le maniche. Aumentare poi ad ogni lato ogni 2 ferri: 4-3-3-3-2-2 m 12-15-15-17-17-19 volte e 15-15-11-3-14-5 m 1 volta = 244-248-250-252-254-258 m. Lavorare avanti e indietro sopra tutte le m finché il lavoro non misuri 30-32-34-36-38-40 cm dal bordo dove sono state riprese le maglie. Intrecciare poi le 36-38-40-40-42-46 m centrali per lo scollo. Al f seguente, intrecciare 1 m ad ogni lato verso il lato scollo = rimangono 103-104-104-105-105-105 m per ogni spalla/manica. Quando il lavoro misura 32-34-36-38-40-42 cm dal bordo con le maglie riprese, intrecciare senza stringere. La manica misura ora ca 14-14-15-15-16-16 cm misurato in basso in larghezza. DAVANTI SINISTRO: Sul diritto, riprendere 1 m in ogni m a punto legaccio del davanti sinistro, a partire dal segnapunti al lato verso il centro davanti. Al ferro seguente, aggiustare il numero di maglie a 55-61-65-71-79-86 m. Lavorare poi avanti e indietro. Allo stesso tempo, al 1° ferro, aumentando 1 nuova maglia ad ogni lato (= m vivagno) = 56-62-66-72-80-87 m. Continuare finché il lavoro non misuri 12-13-14-15-16-17 cm dal bordo delle maglie riprese. Avviare ora nuove maglie ai lati per la manica come per il dietro = 129-132-132-133-135-137 m. Continuare finché il lavoro non misuri 20-22-22-24-24-26 cm. Intrecciare ora, in mezzo per lo scollo, 18-18-18-18-20-22 m, poi intrecciare, sempre per lo scollo ogni 2 ferri, 2 m 4-5-5-5-5-5 volte = rimangono 103-104-104-105-105-105 m per la spalla/manica. Continuare finché il lavoro non misuri 32-34-36-38-40-42 cm dal bordo dove sono state riprese le maglie, fare attenzione che la misura del bordo della manica sia identica a quella del dietro. Intrecciare senza stringere. DAVANTI DESTRO: Lavorare come il davanti sinistro, ma al contrario. NOTA! Ricordarsi di intrecciare per le asole – vedere le spiegazioni sopra. CONFEZIONE: Cucire le spalle e il sotto delle maniche, cucire bordo contro bordo per evitare una cucitura spessa. BORDO DEL COLLO: Riprendere (sul diritto) ca 100 a 140 m con i ferri 3 e il filato Fabel. Lavorare 6 f dir prima di intrecciare senza stringere. BORDO DELLE MANICHE: Riprendere 1 m in ogni m a punto legaccio in basso della manica. Al ferro seguente, aggiustare il numero di m a 68-68-72-72-78-78 m. Lavorare poi avanti e indietro su tutte le maglie. Quando il bordo della manica misura 17-18-18-19-19-19 cm (oppure la misura desiderata) intrecciare senza stringere. CONFEZIONE: Cucire i lati, sotto le maniche e i bordi delle maniche nella maglia vivagno. Attaccare i bottoni ca 1 cm dal bordo del davanti sinistro. BORDO ALL’UNCINETTO: Iniziare in mezzo dietro al collo con l’uncinetto 3,5 e il filato Fabel. Lavorare 1 m.b, * 3 cat, saltare ca 1 cm, 1 m.b *, ripetere da *-* intorno a tutto il collo, giù lungo il davanti, lungo tutto il bordo in basso e sù lungo il davanti per finire in mezzo dietro al collo. Terminare con 1 m.bss nella m.b d’inizio giro. Lavorare lo stesso bordo in basso di ogni manica. |
|
 |
|
Avete terminato questo modello?Allora taggate le vostre foto con #dropspattern #elaia o inviatele alla #dropsfan gallery. Avete bisogno di aiuto con questo modello?Troverete 14 video tutorial, una sezione per i commenti/domande e molto altro guardando il modello su www.garnstudio.com © 1982-2026 DROPS Design A/S. Ci riserviamo tutti i diritti. Questo documento, compreso tutte le sue sotto-sezioni, è protetto dalle leggi sul copyright. Potete leggere quello che potete fare con i nostri modelli alla fine di ogni modello sul nostro sito. |
|


Con oltre 40 anni di esperienza nel design di modelli di maglia e uncinetto, DROPS Design offre la più estesa collezione di modelli gratuiti su internet - tradotti in 17 lingue. Ad oggi vi possiamo fornire 324 cataloghi e 12290 modelli - 9561 dei quali sono tradotti in Italiano.
Ci stiamo impegnando molto per darvi il meglio che vi possiamo offrire in termini di maglia e uncinetto, ispirazioni e consigli così come filati di grande qualità ad un prezzo incredibile! Volete utilizzare i nostri modelli per qualcosa d'altro oltre al vostro uso personale? Potete leggere tutto ciò che è consentito nel testo sul Copyright in basso su tutte le pagine dei nostri modelli. Buon lavoro!
Lasciare un commento sul modello DROPS 107-3
Noi saremmo felici di ricevere i tuoi commenti e opinioni su questo modello!
Se vuoi fare una domanda, fai per favore attenzione a selezionare la categoria corretta nella casella qui sotto per velocizzare il processo di risposta. I campi richiesti sono indicati da *.