
Categorie popolari
State cercando un filato?


Commenti / Domande (83)
![]() Juliet ha scritto:
Juliet ha scritto:
I don’t understand how to complete the neck. I have done the first part, picking up sts around neck and rib for 8cm. The next part says pick up sts in first row of rib. Is this on the wrong or right side? It then says join and knit 6 rows, join to what? Thanks for your help
11.11.2024 - 16:28DROPS Design ha risposto:
Dear Juliet, after you have worked the neck edge with rib, you will now work an extra rolled edge, pick up now 1 stitch in each of the stitches on first row of neck edge, from right side and work 6 rounds stocking stitch then cast off. This makes a nice rolling edge at the transition / beginning of neck edge with rib. Happy knitting!
12.11.2024 - 08:53
![]() Anne Mongeon ha scritto:
Anne Mongeon ha scritto:
Bonsoir, après avoir tricoter 20 rangs qui me donnent 7 cm de bordure, je tricote 3 rangs envers et un rang endroit, donc mon prochain rang se doit d’être à l’envers, cela veut dire que je commencerais le diagramme sur un rang envers…. Est-ce que j’ai bien compris….. Merci! Anne
17.08.2024 - 04:43DROPS Design ha risposto:
Bonjour Anne, le 1er de ces 3 rangs se fait sur l'envers, ainsi quand ces 3 rangs sont faits, le rang suivant est à tricoter sur l'endroit. Bon tricot!
19.08.2024 - 07:54
![]() Padmaja ha scritto:
Padmaja ha scritto:
I have knitted 6cm of color and bind off, where to pick up the stitches for folding the collor
07.06.2024 - 19:20
![]() Padmaja Kadaba ha scritto:
Padmaja Kadaba ha scritto:
Thank you for a wonderful pattern. I am almost finished with it. I am stuck at the assembly section. I finished the neck, but unable to follow how to go about the next steps. Do I pick up the next 100 from inside or outside and what does first line mean here?
07.06.2024 - 19:15
![]() Wendy ha scritto:
Wendy ha scritto:
Where do I find out how many balls of wool I need to knit this jumper?
13.05.2024 - 00:40DROPS Design ha risposto:
Hi Wendy, Drops Karisma is sold in 50 g balls, so you would need 11 balls for size 12/14 years, 14 for S/M, etc. Happy knitting!
13.05.2024 - 06:34
![]() Padmaja ha scritto:
Padmaja ha scritto:
How do i distribute the 112 stitches in the first row to form the cable pattern for 12/14.
22.04.2024 - 03:14DROPS Design ha risposto:
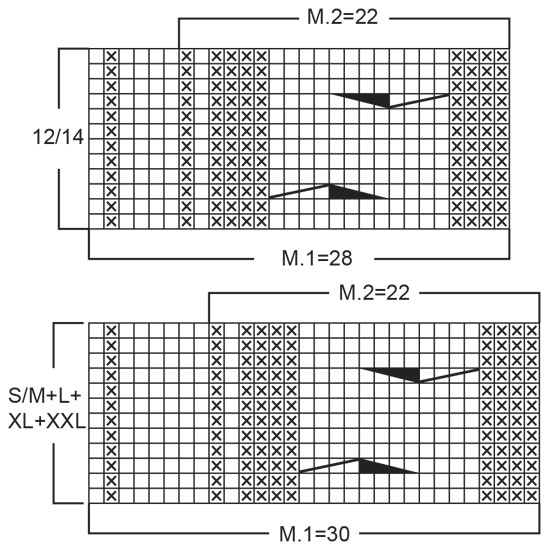
Hi Padmaja, You use the top diagram (M.1 = 28 stitches) for size 12/14. Begin the row with 1 edge stitch (knitted on all rows), 1 stocking stitch, P1, K1, repeat M.1 3 times over the next 84 stitches (working from bottom right to left and upwards and left to right working back from the wrong side), work M.2 (= first 22 stitches in M.1), 1 stocking stitch and 1 edge stitch. This pattern is worked in reverse from the wrong side (starting with 1 edge stitch, 1 stocking stitch, M.2, etc). Hope this helps and happy knitting!
22.04.2024 - 06:43
![]() Elodia Hernandez Leon ha scritto:
Elodia Hernandez Leon ha scritto:
Podría tener un video de tejer el cuello? No entiendo bien la explicación.
06.03.2024 - 16:27DROPS Design ha risposto:
Hola Elodia, no hacemos videos personalizados. Puedes ver la sección "Videos" en la parte superior del patrón para ver todos nuestros videos relevantes para realizar la labor. También puedes escribir aquí si tienes una duda específica a la hora de trabajar el cuello.
10.03.2024 - 20:49
![]() Meghan Maulucci ha scritto:
Meghan Maulucci ha scritto:
When you refer to "Pattern 1" and "Pattern 2" what does this mean?
01.02.2023 - 00:31DROPS Design ha risposto:
Hi Meghan, The diagrams for each pattern (which are labelled M1 and M2) are at the bottom of the page. Happy knitting!
01.02.2023 - 07:09
![]() Maria Cristina Rucci ha scritto:
Maria Cristina Rucci ha scritto:
Sto iniziando questo maglione, sul primo giro del lavoro dite di seguitare sul motivo M1 per 90 m. Lo schema è formato da 28m. Se ripeto 28 per 3, arrivo a 84 m. come faccio per le altre fino a 90? Grazie
26.10.2022 - 08:41DROPS Design ha risposto:
Buonasera Maria Cristina, deve seguire lo schema M.1 relativo alla taglia che sta lavorando: se sta lavorando taglie da adulto, lo schema M.1 è largo 30 maglie e quindi verrà ripetuto 3 volte. Buon lavoro!
26.10.2022 - 19:13
![]() Anna Möllerfors ha scritto:
Anna Möllerfors ha scritto:
Hej! Jag undrar varför jag inte får till det med mönstret stickar storlek XL och då står det att jag ska börja med med 1 kastmaska och sedan sticka 12 m slätstickning m1 över följande 90 maskor och sedan m2 22 maskor och sedan 12m och 1 kantmaska.. Det stämmer inte med bilden! Vad gör jag för fel?
21.02.2022 - 14:06
|
|||||||||||||
Fisherman's Friend |
|||||||||||||
|
|
|||||||||||||
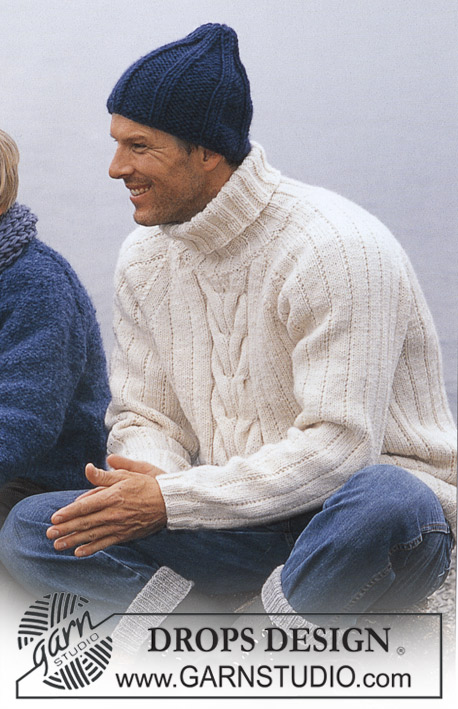
Maglione ai ferri per uomo con trecce, in DROPS Karisma o DROPS Merino Extra Fine.
DROPS 85-11 |
|||||||||||||
|
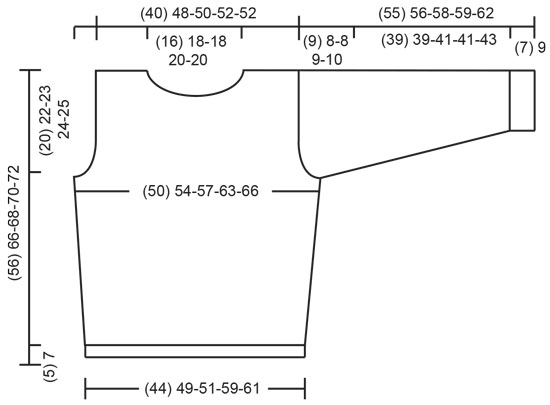
-------------------------------------------------------- COSTE: * 1 maglia diritto, 2 maglie rovescio*, ripetere *-*. MOTIVO: Vedere il diagramma. Il diagramma mostra tutti i ferri del motivo, visti sul diritto del lavoro. Il diagramma in alto è per la taglia 12/14 anni. Il diagramma in basso, per le altre taglie. -------------------------------------------------------- DAVANTI: Avviare 95-104-110-125-131 maglie con i ferri n° 3 e lavorare a coste con 1 maglia vivagno a punto legaccio da ciascun lato. Quando le coste misurano 5-7-7-7-7 cm, passare ai ferri n° 4 e lavorare 1 ferro a rovescio sul rovescio del lavoro, 1 ferro a rovescio sul diritto del lavoro e 1 ferro a rovescio sul rovescio del lavoro; allo stesso tempo, durante il 3° ferro, aumentare 17-16-16-15-15 maglie a intervalli regolari = 112-120-126-140-146 maglie. Lavorare il ferro successivo come segue (sul diritto del lavoro): 1 maglia vivagno a punto legaccio, 1-2-5-12-15 maglie a maglia rasata, 1 maglia rovescio, 1 maglia diritto, diagramma M1 sulle 84-90-90-90-90 maglie successive, diagramma M2 (= 22 maglie), 1-2-5-12-15 maglie a maglia rasata e 1 maglia vivagno a punto legaccio. Proseguire in questo modo. Quando il lavoro misura 10 cm, aumentare 1 maglia da ciascun lato ogni 4-5-5-7-7 cm 6-6-6-5-5 volte in tutto = 124-132-138-150-156 maglie – lavorare le maglie aumentate a maglia rasata. Quando il lavoro misura 36-44-45-46-47 cm, intrecciare per lo scalfo da ciascun lato ogni 2 ferri, come segue: 3 maglie 1 volta, 2 maglie 3-1-1-3-4 volte e 1 maglia 3-3-3-3-4 volte = 100-116-122-126-126 maglie. Proseguire come impostato. Quando il lavoro misura 50-59-61-63-65 cm – aggiustare per finire dopo un ferro 5 o 11 del diagramma – diminuire 4 maglie su ognuna delle 2 trecce centrali, come segue: * 1 maglia diritto, 2 maglie insieme a diritto *, ripetere da *-* in tutto 4 volte (lavorare le rimanenti maglie come prima) = 92-108-114-118-118 maglie. Lavorare 1 ferro seguendo il motivo, poi mettere in attesa su un ferma maglie le 18-22-22-26-26 maglie centrali per lo scollo. Intrecciare ora per lo scollo ogni 2 ferri, come segue: 2 maglie 2 volte e 1 maglia 4 volte = per ogni spalla rimangono 29-35-38-38-38 maglie. Quando il lavoro misura 55-65-67-69-71 cm, diminuire 4 maglie in ogni treccia come indicato per lo scollo = per ogni spalla rimangono 25-31-34-34-34 maglie. Lavorare 1 ferro seguendo il motivo poi intrecciare tutte le maglie. Il lavoro misura circa 56-66-68-70-72 cm. DIETRO: Avviare le maglie e lavorare come indicato per il davanti. Intrecciare per lo scalfo come indicato per il davanti. Quando il lavoro misura 53-63-65-67-69 cm – aggiustare per finire dopo un ferro 5 o 11 del diagramma – diminuire 4 maglie in ognuna delle 2 trecce al centro, come indicato per il davanti. Lavorare 1 ferro seguendo il motivo, poi intrecciare le 30-34-34-38-38 maglie centrali per lo scollo. Diminuire ora 1 maglia per lo scollo ogni 2 ferri 2 volte = per ogni spalla rimangono 29-35-38-38-38 maglie. Quando il lavoro misura 55-65-67-69-71 cm, diminuire 4 maglie sulle trecce di ogni spalla come indicato per il davanti. Lavorare 1 ferro seguendo il motivo; intrecciare le maglie. Il lavoro misura circa 56-66-68-70-72 cm. MANICHE: Avviare 47-50-53-53-56 maglie sui ferri n° 3 e lavorare a coste con 1 maglia vivagno a punto legaccio da ciascun lato. Quando il lavoro misura 7-9-9-9-9 cm, passare ai ferri n° 4. Lavorare 2 ferri a diritto (primo ferro = diritto del lavoro); lavorare poi a maglia rasata fino alla fine del lavoro. Quando il lavoro misura 12-12-12-16-16 cm, aumentare 1 maglia da ciascun lato ogni 2,5-2-2-1,5-1,5 cm in tutto 15-17-18-21-22 volte = 77-84-89-95-100 maglie. Quando la manica misura 46-48-50-50-52 cm, intrecciare per l’arrotondamento della manica da ciascun lato ogni 2 ferri, come segue: 4 maglie 1 volta, 3 maglie 1 volta, 2 maglie 2-3-3-4-4 volte e 1 maglia 5-2-2-3-3 volte, poi intrecciare 2 maglie da ciascun lato finché il lavoro non misura 54-55-57-58-61 cm,; intrecciare poi 3 maglie da ciascun lato 1 volta. Intrecciare le rimanenti maglie; il lavoro misura circa 55-56-58-59-62 cm. CONFEZIONE: Cucire le spalle. Collo con bordo arrotolato: con i ferri a doppia punta, riprendere circa 93-117 maglie (il numero deve essere divisibile per 3) intorno allo scollo; unire in tondo e lavorare a coste per 6-7-7-8-8 cm. Intrecciare lavorando le maglie a coste. Con i ferri a doppia punta, riprendere poi circa 87-106 nuove maglie nel 1° ferro delle coste; unire in tondo e lavorare 6 ferri a maglia rasata (= bordo arrotolato). Intrecciare le maglie in modo morbido – per un risultato migliore, fare 1 maglia gettata dopo circa ogni 8 maglie mentre si chiudono le maglie. Piegare le coste sul rovescio del lavoro e cucire. Montare le maniche. Cucire le maniche e i lati nelle maglie vivagno. |
|||||||||||||
Spiegazioni del diagramma |
|||||||||||||
|
|||||||||||||
 |
|||||||||||||
 |
|||||||||||||
Avete terminato questo modello?Allora taggate le vostre foto con #dropspattern o inviatele alla #dropsfan gallery. Avete bisogno di aiuto con questo modello?Troverete 17 video tutorial, una sezione per i commenti/domande e molto altro guardando il modello su www.garnstudio.com © 1982-2026 DROPS Design A/S. Ci riserviamo tutti i diritti. Questo documento, compreso tutte le sue sotto-sezioni, è protetto dalle leggi sul copyright. Potete leggere quello che potete fare con i nostri modelli alla fine di ogni modello sul nostro sito. |
|||||||||||||


Con oltre 40 anni di esperienza nel design di modelli di maglia e uncinetto, DROPS Design offre la più estesa collezione di modelli gratuiti su internet - tradotti in 17 lingue. Ad oggi vi possiamo fornire 324 cataloghi e 12290 modelli - 9561 dei quali sono tradotti in Italiano.
Ci stiamo impegnando molto per darvi il meglio che vi possiamo offrire in termini di maglia e uncinetto, ispirazioni e consigli così come filati di grande qualità ad un prezzo incredibile! Volete utilizzare i nostri modelli per qualcosa d'altro oltre al vostro uso personale? Potete leggere tutto ciò che è consentito nel testo sul Copyright in basso su tutte le pagine dei nostri modelli. Buon lavoro!
Lasciare un commento sul modello DROPS 85-11
Noi saremmo felici di ricevere i tuoi commenti e opinioni su questo modello!
Se vuoi fare una domanda, fai per favore attenzione a selezionare la categoria corretta nella casella qui sotto per velocizzare il processo di risposta. I campi richiesti sono indicati da *.