
Categorie popolari
State cercando un filato?


Commenti / Domande (53)
![]() DROPS Design ha scritto:
DROPS Design ha scritto:
On this pattern these sts should be cast off / bind off.
12.12.2008 - 00:44
![]() Cathy ha scritto:
Cathy ha scritto:
Sorry to bother you again, but I've been reading the pattern for the border and I understand that the diagonal line through 1 box = a decrease. There are 9 of them in a row, so I looked in my "How to Knit" book and there are 7 different ways to decrease! Could you explain how to do the decreases please? This is the 1st lacy pattern I've done. I usually do intarsia, fair-isle or cabled knitting. Thank you. It's great that you have this option when you need help!
12.12.2008 - 00:38
![]() DROPS Design ha scritto:
DROPS Design ha scritto:
3:e varv: 3 rm, 2 omsl, 2 rm tills, 2 omsl, 2 rm tills, 2 rm 4.e varv: r fram till första omsl som stickas räta och det andra omsl stickas vridet räta, räta m igen till nästa omsl som stickas räta och det andra omsl stickas vridet räta, r varvet ut...
30.04.2008 - 11:28
![]() Marielle ha scritto:
Marielle ha scritto:
Hur skall jag sticka spetsen? De två första varven förstår jag, men sen börjar bekymmret. Skall jag göra två omslag på stickan och sticka en maska, samt två omslag och sticka 1 maska? Hur skall jag göra då på fjärde varvet?
28.04.2008 - 22:21
![]() DROPS Design ha scritto:
DROPS Design ha scritto:
Rk 11 i diagram M1 strikkes således: 12r,1omsl,1r,1omsl,1r,1omsl,1r,1omsl, 2 ret God fornøjelse!
28.01.2008 - 09:00
![]() Inge ha scritto:
Inge ha scritto:
Hvordan strikkes rk 11 i diagram M1. Hvis man strikker 15 r,4 omsl, 2 r - skabes der en kæmpe løkke på rk 12. Man kan også lave 12r,1omsl,1r,1omsl,1r,1omsl,1r,1omsl,2r. Synes meget godt om mønsteret.
25.01.2008 - 19:43
![]() Inge ha scritto:
Inge ha scritto:
Forstår simpelthen ikke hvodan man i praksis udfører række 11 i diagram M1. Hvis jeg strikker 15 r og laver 4 omslag, kommer der på række 12 en kæmpe løkke, men måske er det meningen at man strikker 12r,1omsl,1r,1omsl,1r,1omsl,1r,1omsl, 2 ret ? eller hvordan ?
24.01.2008 - 17:35
![]() Eeva ha scritto:
Eeva ha scritto:
Huomasin virheen jo itse: olin lähtenyt kaventamaan väärästä päästä. Joulukiireissä pää lyö välillä tyhjää ;)
08.12.2006 - 00:32
![]() Eeva ha scritto:
Eeva ha scritto:
Probleema: Olen yrittänyt tehdä pitsireunusta, mutta en saa siitä millään samannäköistä kuin kuvassa. Ohje ei ole vaikea mutta silti... Kun on päätetty 12 silmukkaa niin kummasta päästä aloitetaan kuvio uudestaan, siitä mihin jäätiin vai aloitetaanko puikon toisesta päästä? Vai missä mättää?
07.12.2006 - 23:47
![]() Scandinavian Knitting Design ha scritto:
Scandinavian Knitting Design ha scritto:
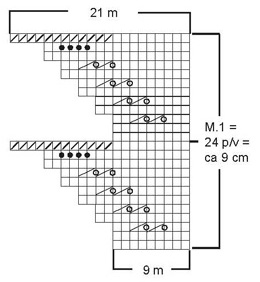
the symbols are translated in the pattern, i.e.: a blank square means knit from right side, knit from wrong side; a dot in the square means make a yarn over needle, on the return row knit the yo; a circle in square means make 2 yarn over needle, on the return row knit the first yo and knit into the back of the second yo; diagonal line in square means cast off 1 st; diagonal line over 2 squares means knit 2 sts together. I hope the above helps. Karen Scandinavian Knitting design
28.06.2006 - 22:28
|
||||||||||||||||
DROPS 94-32 |
||||||||||||||||
|
|
||||||||||||||||
Scialle DROPS in Alpaca e Vivaldi.
DROPS 94-32 |
||||||||||||||||
|
M LEGACCIO: Lavorare tutti i f a dir. BORDO: Vedere M.1. SUGGERIMENTO PER LE MISURAZIONI (applicato al bordo): Misurare il bordo lungo lo scialle per essere sicuri che sia della lunghezza giusta. -------------------------------------------------------- SCIALLE: Lo scialle è lavorato a m legaccio. Il bordo è lavorato separatamente e cucito alla fine. Avviare senza stringere 8 m usando i f n° 6 mm e 1 capo di ogni qualità (filo doppio). Lavorare 6 f a m legaccio. Continuare a m legaccio e aumentare 1 m a ogni lato a f alterni facendo 1 gettato all’interno delle 3 m più esterne. Quando il lavoro misura circa 66 cm – misurarlo disteso – lavorare 2 f a m legaccio senza aumenti (ci sono circa 186 m sul f) e intrecciare senza stringere. BORDO: Avviare 9 m usando entrambi i ferri con 1 capo di ogni qualità (filo doppio). Eliminare 1 ferro e lavorare M.1. Notare che un quadrato bianco nel diagramma = m legaccio. Quando il bordo misura circa 2 m – LEGGERE IL SUGGERIMENTO PER LE MISURAZIONI – intrecciare senza stringere. CONFEZIONE: Mettere lo scialle disteso su un tavolo. Attaccare il bordo con degli spilli, iniziare nella parte alta di entrambi i lati e lavorare in giù verso la punta. Quando rimangono circa 10 cm a entrambi i lati della punta, inserire un filo da imbastitura e imbastire il bordo in modo che combaci attorno alla punta. Cucire il bordo allo scialle con piccoli punti nei fili più esterni delle m più esterne. |
||||||||||||||||
Spiegazioni del diagramma |
||||||||||||||||
|
||||||||||||||||
 |
||||||||||||||||
Avete terminato questo modello?Allora taggate le vostre foto con #dropspattern o inviatele alla #dropsfan gallery. Avete bisogno di aiuto con questo modello?Troverete 15 video tutorial, una sezione per i commenti/domande e molto altro guardando il modello su www.garnstudio.com © 1982-2026 DROPS Design A/S. Ci riserviamo tutti i diritti. Questo documento, compreso tutte le sue sotto-sezioni, è protetto dalle leggi sul copyright. Potete leggere quello che potete fare con i nostri modelli alla fine di ogni modello sul nostro sito. |
||||||||||||||||


Con oltre 40 anni di esperienza nel design di modelli di maglia e uncinetto, DROPS Design offre la più estesa collezione di modelli gratuiti su internet - tradotti in 17 lingue. Ad oggi vi possiamo fornire 324 cataloghi e 12290 modelli - 9561 dei quali sono tradotti in Italiano.
Ci stiamo impegnando molto per darvi il meglio che vi possiamo offrire in termini di maglia e uncinetto, ispirazioni e consigli così come filati di grande qualità ad un prezzo incredibile! Volete utilizzare i nostri modelli per qualcosa d'altro oltre al vostro uso personale? Potete leggere tutto ciò che è consentito nel testo sul Copyright in basso su tutte le pagine dei nostri modelli. Buon lavoro!
Lasciare un commento sul modello DROPS 94-32
Noi saremmo felici di ricevere i tuoi commenti e opinioni su questo modello!
Se vuoi fare una domanda, fai per favore attenzione a selezionare la categoria corretta nella casella qui sotto per velocizzare il processo di risposta. I campi richiesti sono indicati da *.