
Categorie popolari
State cercando un filato?


Commenti / Domande (132)
![]() Marina ha scritto:
Marina ha scritto:
Can someone please give me a hint on how to measure the gauge for the body part. I know how to count 22 rounds but where do I count the 15 stitches in a round swatch? I did a swatch with the pattern and started like I was doing the real thing with 8 stitches and followed the pattern and I now have a square of around 10x10 cm with the 8 parts clearly visible. Please tell me how or where to count the 15 stitches for the gauge. Thanks, Marina
11.08.2013 - 01:33DROPS Design ha risposto:
Dear Marina, the 15 sts should be entirely in st st (with 19 rows height) or in pattern (with 22 ronds height). Happy knitting!
12.08.2013 - 08:33
![]() Hellingrath ha scritto:
Hellingrath ha scritto:
Hallo,habe eine Frage zu den Ärmeln.Werden die beide zusammen gestrickt und werden die hin und her oder rund gestrickt?Habe ja 21 M in einer anderen Farbe gestrickt das reicht doch nicht für einen Ärmel.Besten Dank im voraus.
13.03.2013 - 10:28DROPS Design ha risposto:
Hallo Frau Hellingrath, Sie haben 2 x 21 M, also 42 M plus die 6 zusätzlichen M, also 48 M. Der Ärmel wird in Runden gestrickt, daher wird die Stelle an der Ärmelunterkante markiert (hier werden die Abnahmen vorgenommen).
15.03.2013 - 08:08
![]() Hellingrath ha scritto:
Hellingrath ha scritto:
Hallo, habe eine Frage zur Bestellung der Wolle.Das kann mit der Farbe für Alpaca nicht stimmen Farbe NR 6347 ist lila und man soll Jeansblau bestellen.
05.03.2013 - 06:50DROPS Design ha risposto:
Guten Tag, diese Farbe wurde umbenannt, aber die Farbnummer stimmt.
05.03.2013 - 13:54
![]() Sheila ha scritto:
Sheila ha scritto:
Hurray got it figured out.
19.10.2012 - 16:54
![]() Sheila ha scritto:
Sheila ha scritto:
I love this sweater 94-5 based on a circle. Thought I was reading the diagram right until I started the lace pattern. I end up the last section with K9 NOT K16 like the chart shows.
18.10.2012 - 05:49DROPS Design ha risposto:
Dear Sheila, don't forget that the diagram shows only 1/8 of the sts, you will have to repeat 8 times the diagram all the round, and work every other round in stocking st (not shown). Happy knitting!
14.11.2012 - 16:09
![]() Sheila ha scritto:
Sheila ha scritto:
What am I doing wrong. circular cast on 8 st. YO K1,= 16st Knit 1 row great to Row 21 Yo K1 YO slip 1 K1 psso K18 across rhen R23 pattern and K16 st leaves only K( NOT K16 on last section??? hope this is clear
18.10.2012 - 05:28DROPS Design ha risposto:
Dear Sheila, you start with cast on 8 st, then (yo, K1) 8 times to get 16 sts, that's right, you repeat 8 times the diagram. In this diagram, only every other round is shown, rounds 2,4,6 and all even rounds are worked in stocking sts (except the last 6 rounds in diagram). Round 3 will be : (yo, K2) 8 times, Round 5 (yo, K3) 8 times etc... follow the diagram this way to get the right number of sts for the lace pattern. Happy knitting!
14.11.2012 - 16:08
![]() Heidi ha scritto:
Heidi ha scritto:
Jeg ville også gerne skrikke denne fantsatisk smukke trøje, men jeg kan altså ikke finde ud af, hvordan jeg få strikket stjernen, som jo er udgangspunket i trøjen. Kan nogen hjælpe mig på vej
13.10.2012 - 16:08
![]() Liza ha scritto:
Liza ha scritto:
Er nesten ferdig. Så utrolig fin den blir og veldig morsom å strikke! Takk for oppskriften!
28.08.2012 - 21:00
![]() Sonja Wohlfarth ha scritto:
Sonja Wohlfarth ha scritto:
Ich glaube, nach der Beschreibung für das Armloch felhen Angaben. Wie wird nach der makierungsreihe weitergestrickt? Werden die Stücke seperat hin und zurück gestrickt oder müssen die Maschen wieder aufgenommen werden? Wie komme ich oben dann wieder zusammen? Mfg S. Wohlfarth
28.08.2012 - 19:23
![]() Britta Jeute ha scritto:
Britta Jeute ha scritto:
In der 22.Rd sind nach der 11.M. stehen nur 2 M zum rechtsstricken vorhanden, es sollen aber 3 M rechts gestrickt werden. Wo ist der Fehler? LG B. Jeute
15.06.2012 - 20:38DROPS Design ha risposto:
Beziehen Sie sich auf das Diagramm für Grösse S/M? Dort ist die 3. M diejenige, die in der Vorreihe zusammengestrickt wurde.
18.06.2012 - 21:49
|
|||||||||||||||||||
Stella Marina |
|||||||||||||||||||
 |
 |
||||||||||||||||||
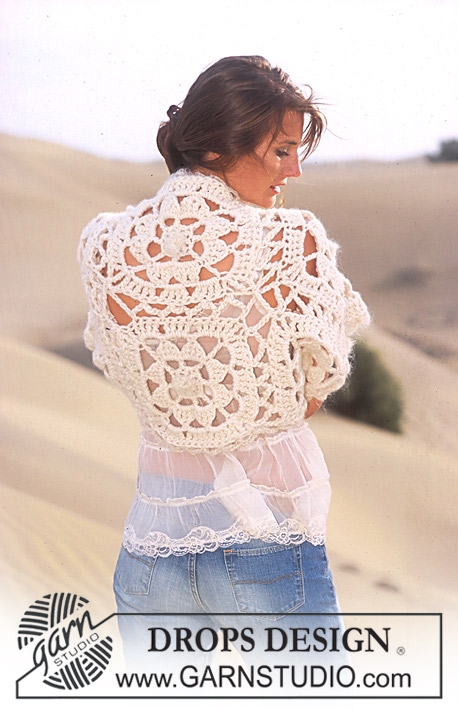
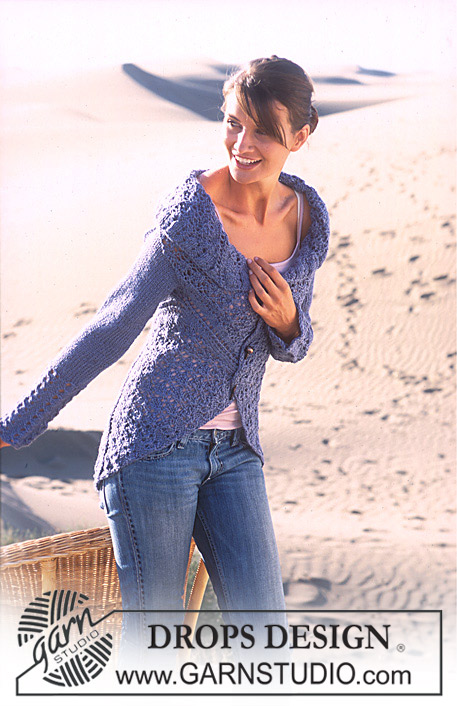
Cardigan DROPS lavorato ai ferri in tondo e con motivo a pizzo in Alpaca e Cotton Viscose. Taglie: S/M - M/L - XL
DROPS 94-5 |
|||||||||||||||||||
|
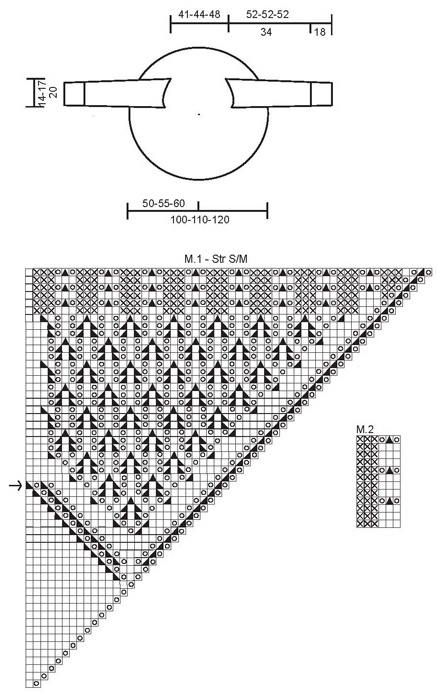
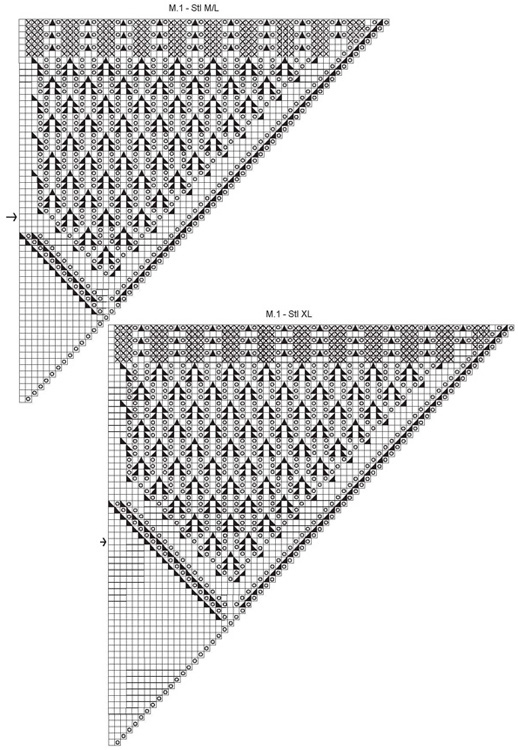
Campione: 15 m. x 22 giri con i f. n° 6 mm con il motivo (davanti e dietro) = 10 x 10 cm e 15 m. x 19 f. a m. rasata (maniche) = 10 x 10 cm con 1 capo di Cotton Viscose e 1 capo di Alpaca. Motivo a pizzo: vedere il diagramma M.1 – c’è un diagramma per ogni taglia. Il diagramma mostra 1/8 del lavoro e solo i giri dispari. I giri 2, 4, 6 e tutti i giri pari sono lavorati a m. rasata fuori dalle coste (= gli ultimi 6 giri del diagramma), cioè lavorare dir. su dir. e rov. su rov. in modo che le coste saranno un totale di 11 giri. M.2 = le coste per le maniche. Davanti e dietro: Il cardigan è lavorato in cerchio dal centro dietro. Avviare 8 m. con 1 capo di Cotton Viscose e 1 capo di Alpaca e distribuirli in modo uniforme su 4 f. a doppia punta. Lavorare il motivo secondo il diagramma M.1 – leggere la spiegazione sopra. Aumentare 8 m. ogni 2 giri secondo il diagramma – passare ai f. circolari più lunghi durante il lavoro. Taglia S/M: Lavorare il giro indicato con una freccia per gli scalfi come segue: fare 1 gettato, lavorare 2 m. insieme a dir., fare un gettato (come mostrano le prime 3 finestre del diagramma). Lavorare 21 m. con un altro colore (questo filo sarà eliminato in seguito e le maniche vengono lavorate da qui in giù). Lavorare 63 m. secondo il diagramma, lavorare le 21 m. successive con un altro colore (= secondo scalfo). Continuare il diagramma come prima. Taglia M/L: Lavorare il giro indicato con una freccia per gli scalfi come segue: fare 1 gettato, lavorare 2 m. insieme a dir., fare un gettato (come mostrano le prime 3 finestre del diagramma). Lavorare 26 m. con un altro colore (questo filo sarà eliminato in seguito e le maniche vengono lavorate da qui in giù). Lavorare 67 m. secondo il diagramma, lavorare le 26 m. successive con un altro colore (= secondo scalfo). Continuare il diagramma come prima. Taglia XL: Lavorare il giro indicato con una freccia per gli scalfi come segue: fare 1 gettato, lavorare 2 m. insieme a dir., fare un gettato (come mostrano le prime 3 finestre del diagramma). Lavorare 30 m. con un altro colore (questo filo sarà eliminato in seguito e le maniche vengono lavorate da qui in giù). Lavorare 72 m. secondo il diagramma, lavorare le 30 m. successive con un altro colore (= secondo scalfo). Continuare il diagramma come prima. L’ultimo giro del diagramma è il giro di chiusura. Ci sono 448-496-544 m. in totale sul giro di chiusura. Il lavoro dovrebbe misurare circa 50-55-60 cm dal centro in fuori (= 100-110-120 cm in diametro). Maniche: riprendere le m. per la maniche dal filo che è stato lavorato con un altro colore. Le maniche vengono lavorate dall’alto in basso. Tagliare questo filo al centro e usare 2 f. per mettere a ogni lato sui f. (poi eliminare il filo) = 21-26-30 m. su ogni f./lato. Mettere tutte le m. sullo stesso f. circolare corto = 42-52-60 m. Riprendere 4 m. in più per la cima della manica- la cima è dove la manica è più vicina all’altra manica – e 2 m. in più sulla parte inferiore (al di sotto) della manica = 48-58-66 m. Iniziare a lavorare da sotto la manica – inserire un segnapunti qui. Lavorare 1 giro a rov. e continuare a m. rasata. Quando la manica misura 4 cm intrecciare 1 m. a ogni lato del segnapunti. Continuare a intrecciare 2 m. ogni 6-4-2,5 cm per un totale di 6-8-12 volte = 36-42-42 m. Quando il lavoro misura 34 cm continuare in M.2. Quando il lavoro misura 52 cm intrecciare senza stringere – ricordarsi di intrecciare sul quarto, ottavo, dodicesimo giro come mostrato nel diagramma (= giro del motivo). NB: Provate il cardigan prima di intrecciare le maniche per assicurarvi che siano della lunghezza giusta. |
|||||||||||||||||||
Spiegazioni del diagramma |
|||||||||||||||||||
|
|||||||||||||||||||
 |
|||||||||||||||||||
 |
|||||||||||||||||||
Avete terminato questo modello?Allora taggate le vostre foto con #dropspattern o inviatele alla #dropsfan gallery. Avete bisogno di aiuto con questo modello?Troverete 16 video tutorial, una sezione per i commenti/domande e molto altro guardando il modello su www.garnstudio.com © 1982-2026 DROPS Design A/S. Ci riserviamo tutti i diritti. Questo documento, compreso tutte le sue sotto-sezioni, è protetto dalle leggi sul copyright. Potete leggere quello che potete fare con i nostri modelli alla fine di ogni modello sul nostro sito. |
|||||||||||||||||||


Con oltre 40 anni di esperienza nel design di modelli di maglia e uncinetto, DROPS Design offre la più estesa collezione di modelli gratuiti su internet - tradotti in 17 lingue. Ad oggi vi possiamo fornire 324 cataloghi e 12290 modelli - 9561 dei quali sono tradotti in Italiano.
Ci stiamo impegnando molto per darvi il meglio che vi possiamo offrire in termini di maglia e uncinetto, ispirazioni e consigli così come filati di grande qualità ad un prezzo incredibile! Volete utilizzare i nostri modelli per qualcosa d'altro oltre al vostro uso personale? Potete leggere tutto ciò che è consentito nel testo sul Copyright in basso su tutte le pagine dei nostri modelli. Buon lavoro!
Lasciare un commento sul modello DROPS 94-5
Noi saremmo felici di ricevere i tuoi commenti e opinioni su questo modello!
Se vuoi fare una domanda, fai per favore attenzione a selezionare la categoria corretta nella casella qui sotto per velocizzare il processo di risposta. I campi richiesti sono indicati da *.