Stella Marina by DROPS Design

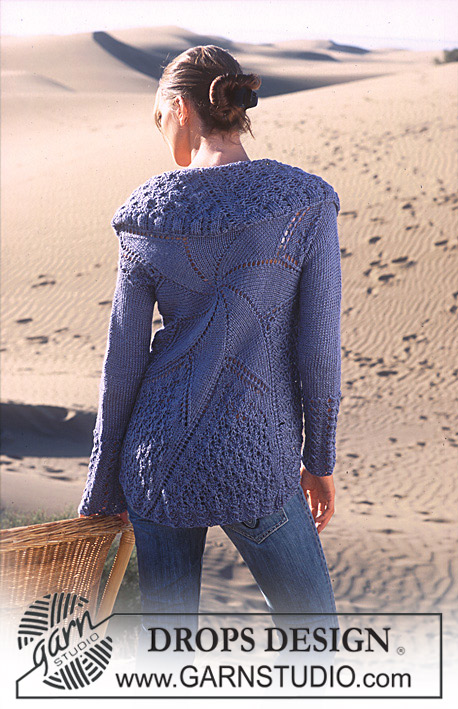
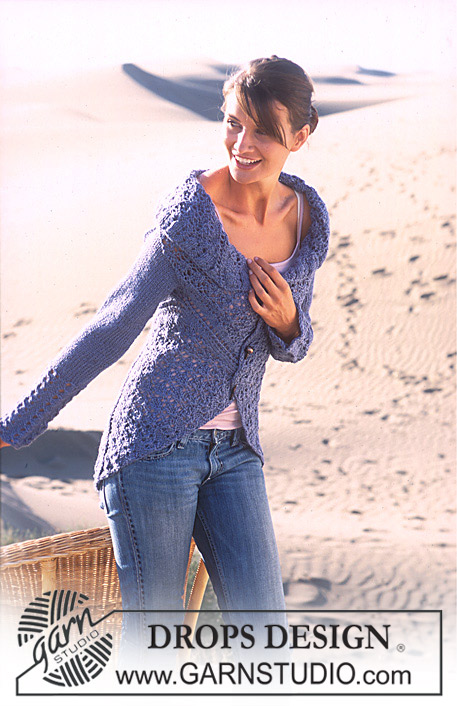
DROPS kabátek vycházející z kruhu jako „umělecké dílo“ z příze „Alpaka“ a z příze „Cotton Viscose“.

DROPS 94-5
Velikost: S/M - M/L -XL
Materiál: DROPS Cotton Viscose firmy Garnstudio
400-450-500 g, barva č. 22, džínově modrá
DROPS Alpaka firmy Garnstudio
250-300-300 g, barva 6347, džínově modrá

DROPS KRÁTKÉ PONOŽKOVÉ JEHLICE a DROPS KRUHOVÉ JEHLICE č. 6 (40, 60, 80 cm) – nebo velikosti potřebné k upletení zkušebního vzorku o rozměrech 15 ok x 22 řad vzorem (přední a zadní díl) a 15 ok x 19 řad lícovým žerzejem (rukávy) dvojitou přízí = 1 vlákno Cotton Viscose + 1 vlákno Alpaka = 10 x 10 cm.

-------------------------------------------------------

Zkušební vzorek – Podívejte se, jak ho měřit a proč
Náhradní příze – Podívejte se, jak změnit přízi
Skupina přízí A až F – Neměňte návod, změňte přízi
Spotřeba příze při použití náhradní příze – Využijte náš převodník

-------------------------------------------------------


100% alpaka
od 102.00 Kč /50g
DROPS Alpaca uni colour DROPS Alpaca uni colour 102.00 Kč /50g
Ganella
Objednat
DROPS Alpaca mix DROPS Alpaca mix 107.00 Kč /50g
Ganella
Objednat
DROPS Cotton Viscose DROPS Cotton Viscose
54% bavlna, 46% viskóza
Výroba ukončena
najít náhradu
needles Jehlice a háčky Objednat

Návod

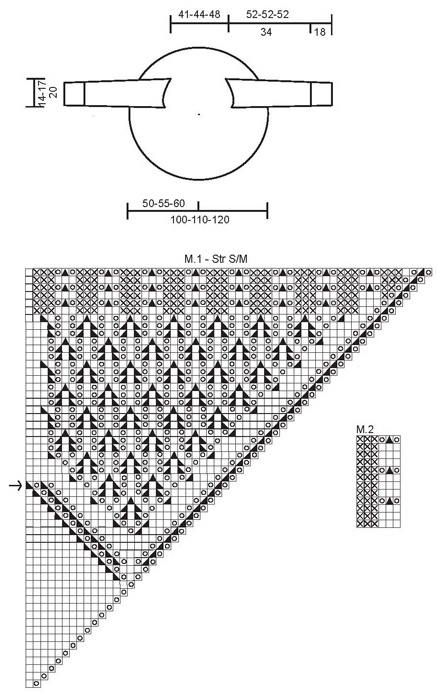
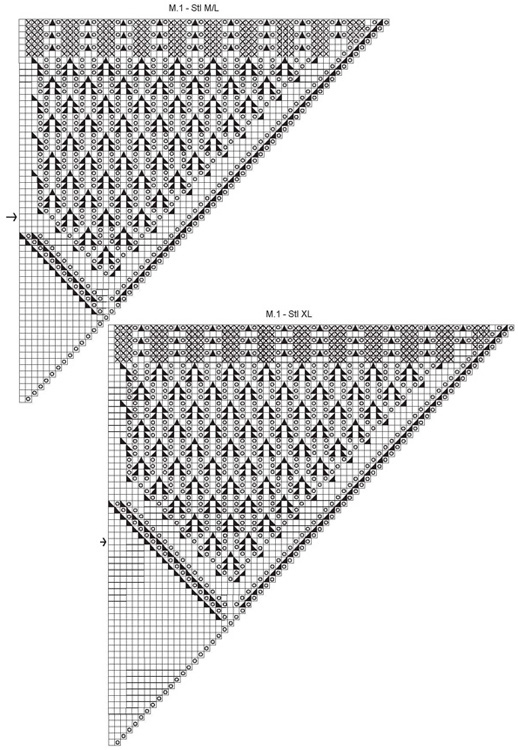
KRAJKOVÝ VZOR:
Viz schéma M. 1 – každá velikost má svoje schéma. Schéma zobrazuje 1/8 dílu a každou druhou řadu. Řady 2, 4, 6 a další sudé řady pleteme kolem patentu lícovým žerzejem (= posledních 6. kruhových řad pleteme podle schématu), dále pleteme hladce nad hladkými oky, obrace nad obrace pletenými oky, patent tak bude mít celkem 11. kruhových řad. M. 2 = patent na rukávech.
----------------------------------------------------------------------

PŘEDNÍ A ZADNÍ DÍL:
Kabátek je pletený v kruhových řadách od středu na zadním díle. Dvojitou přízí = 1 vlákno Cotton Viscose + 1 vlákno Alpaka nahodíme na krátké ponožkové jehlice č. 5 8 ok, oka rozdělíme na 4 jehlice. Pleteme vzorem podle schématu M. 1 – viz popis výše. V každé druhé řadě přidáme dle vzoru 8 ok – v okamžiku, kdy je na ponožkových jehlicích dostatečný počet ok převedeme práci na kruhovou jehlici.

VELIKOST S/M: Průramky tvarujeme od šipky na schématu: 1x nahodíme, 2 oka spleteme hladce, 1x nahodíme (3 první okýnka na schématu). 21 ok upleteme hladce a odložíme na odlišnou přízi (tato příze bude později odstraněna a rukáv budeme plést směrem k zápěstí). 63 ok upleteme podle vzoru, dalších 21 ok upleteme hladce a odložíme na odlišnou přízi (= druhý průramek). Dále pleteme podle vzoru.
VELIKOST M/L: Průramky tvarujeme od šipky na schématu: 1x nahodíme, 2 oka spleteme hladce, 1x nahodíme (první 3 okýnka na schématu). 26 ok upleteme hladce a odložíme na odlišnou přízi (tato příze bude později odstraněna a rukáv budeme plést směrem k zápěstí). 67 ok upleteme podle vzoru, dalších 26 ok upleteme hladce a odložíme na odlišnou přízi (= druhý průramek). Dále pleteme podle vzoru.
VELIKOST XL: Průramky tvarujeme od šipky na schématu: 1x nahodíme, 2 oka spleteme hladce, 1x nahodíme (první 3 okýnka na schématu). 30 ok upleteme hladce a odložíme na odlišnou přízi (tato příze bude později odstraněna a rukáv budeme plést směrem k zápěstí). 72 ok upleteme podle vzoru, dalších 30 ok upleteme hladce a odložíme na odlišnou přízi (= druhý průramek). Dále pleteme podle vzoru.
V poslední kruhové řadě schématu oka uzavřeme. V kruhové řadě uzavíráme celkem 448-496-544 o. Díl měří asi 50-55-60 cm od středu (=100-110-120 cm v průměru).

RUKÁV:
Na jehlici vrátíme odložená oka. Rukáv pleteme v řadách dokola, směrem k zápěstí. Ve středu řady přízi rozstřihneme a na dvě jehlice oka nabereme (následně odlišnou přízi vytáhneme) = 21-26-30 ok na každé jehlici. Všechna oka přesuneme na krátkou kruhovou jehlici = 42-52-60 ok. Nabereme 4. nová oka, oka nabíráme ve vrcholu rukávu, v místě, kde jsou si oba rukávy nejblíže – a 2. nová oka nabereme v podpaží = 48-58-66 ok. Plést začneme v podpaží, toto místo si označíme značkou. Pleteme 1. Kruhovou řadu obrace a dále pleteme lícovým žerzejem. Ve výšce 4 cm uzavřeme z každé strany značky vždy 1 oko. Ujímání opakujeme každých 6-4-2.5 cm celkem 6-8-12 krát = 36-42-42 ok. Ve výšce 34 cm pleteme vzorem M. 2. Ve výšce 52 cm oka volně uzavřeme – uzavíráme po dokončení 4., 8. nebo 12. řady vzoru. POZN. Před uzavřením rukávu kabátek vyzkoušejte.

Schéma

symbols = hladce
symbols = obrace
symbols = 1x nahodit
symbols = 2 oka splést hladce
symbols = 1 oko sejmout hladce, 1 oko hladce, sejmuté přes něho přetáhnout
symbols = 1 oko sejmout hladce, 2 oka splést hladce, sejmuté přes něho přetáhnout
diagram
diagram

Potřebujete poradit s tímto návodem?

Děkujeme, že jste si vybrali návod DROPS Design. Zakládáme si na tom, že dáváme k dispozici návody ověřené a snadno srozumitelné. Všechny návody jsou přeložené z norského originálu a tak si můžete kdykoli srovnat rozměry a počty s původním návodem (DROPS 94-5) .

Máte s návodem potíže? Níže najdete seznam odkazů, které vám pomohou dokončit vaše dílo co nejdříve - nebo se třeba přiučit něco nového.

signature-image signature

Máte s návodem potíže? Níže najdete seznam odkazů, které vám pomohou dokončit vaše dílo co nejdříve - nebo se třeba přiučit něco nového.

Máme takopodrobné rozpisy různých technik a postupů krok za krokem - najdete je zde.

1) Why is the knitting/crochet tension so important?

Knitting tension is what determines the final measurements of your work, and is usually measured per 10 x 10 cm. It is provided like so: number of stitches in width x number of rows in height - eg: 19 stitches x 26 rows = 10 x 10 cm.

The knitting tension is very individual; some people knit/crochet loosely while others work tightly. You adjust the knitting tension with the needle size, which is why the suggested needle size only serve as a guide! You need to adjust this (up or down) to ensure that YOUR knitting tension matches the knitting tension provided in the pattern. If you work with a different knitting tension than provided you will have a different yarn consumption, and your work will have different measurements than what the pattern suggests.

The knitting tension also determines which yarns can replace each other. As long as you achieve the same knitting tension you can replace one yarn with another.

See DROPS lesson: How to measure your tension/gauge

See DROPS video: How to make a gauge tension swatch

nahoru

2) What are the yarn groups?

All our yarns are categorised into yarn groups (from A to F) according to thickness and knitting tension – group A contains the thinnest yarns and group F the thickest. This makes it easier for you to find alternative yarns to our patterns, should you wish to switch yarn. All yarns within the same group have a similar knitting tension and can easily replace each other. However, different yarn qualities have different structures and properties which will give the finished work a unique look and feel.

Click here for an overview of the yarns in each yarn group

nahoru

3) Can I use a different yarn than what the pattern suggests?

The important thing when changing from one yarn to another is that the knitting/crochet tension remains the same. This is so that the measurements of the finished piece will be the same as on the sketch provided. It is easier to achieve the same knitting tension using yarns from the same yarn group. It is also possible to work with multiple strands of a thinner yarn to achieve the knitting tension of a thicker one. Please try our yarn converter. We recommend you to always work a test swatch.

Please NOTE: when changing yarn the garment might have a different look and feel to the garment in the photo, due to individual properties and qualities of each yarn.

See DROPS lesson: Can I use a different yarn than the one mentioned in the pattern?

nahoru

4) How do I use the yarn converter?

At the top of all our patterns you’ll find a link to our yarn converter, which is a helpful tool should you wish to use a different yarn than suggested. By filling in the yarn quality you wish to replace, the amount (in your size) and number of strands, the converter will present good alternative yarns with the same knitting tension. Additionally it will tell you how much you’ll require in the new qualities and whether you’ll need to work with multiple strands. Most skeins are 50g (some are 25g or 100g).

If the pattern is worked with multiple colours, every colour will have to be converted separately. Similarly, if the pattern is worked with several strands of different yarns (for example 1 strand Alpaca and 1 strand Kid-Silk) you will have to find alternatives for each, individually.

Click here to see our yarn converter

nahoru

5) Why do I get the wrong knitting tension with the suggested needle size?

The needle size provided in the pattern serves only as a guide, the important thing is to follow the knitting tension. And since knitting tension is very individual, you will have to adjust the needle size to ensure that YOUR tension is the same as in the pattern – maybe you’ll have to adjust 1, or even 2 needle sizes, up or down to achieve the correct tension. For this, we recommend that you work test swatches.

Should you work with a different knitting tension than the one provided, the measurements of the finished garment might deviate from the measurement sketch.

See DROPS lesson: How to measure your tension/gauge

See DROPS video: How to make a gauge tension swatch

nahoru

6) Why is the pattern worked top-down?

Working a garment top-down provides more flexibility and room for personal adjustment. For example it is easier to try the garment on while working, as well as making adjustments to length of yoke and shoulder caps.

The instructions are carefully explaining every step, in the correct order. Diagrams are adjusted to the knitting direction and are worked as usual.

nahoru

7) Why are the sleeves shorter in larger sizes?

The total width of the garment (from wrist-to-wrist) will be larger in the larger sizes, despite the actual sleeves being shorter. The larger sizes have longer sleeve caps and wider shoulders, so there will be a good fit in all sizes.

nahoru

8) What is a repeat?

Diagrams are often repeated on the round or in height. 1 repeat is the diagram the way it appears in the pattern. If it says to work 5 repeats of A.1 in the round, then you work A.1 a total of 5 times after/next to each other in the round. If it says to work 2 repeats of A.1 vertically/in height you work the entire diagram once, then begin again at the start and work the entire diagram one more time.

nahoru

9) How do I work according to a knitting diagram?

The diagram depicts all rows/rounds, and every stitch seen from the right side. It is read from bottom to top, from right to left. 1 square = 1 stitch.

When working back and forth, every other row is worked from the right side and every other row is worked from the wrong side. When working from the wrong side, the diagram will have to be worked reversed: from left to right, knit stitches are purled, purl stitches are knit etc.

When working in the round every round is worked from the right side and the diagram are worked from right to left on all rounds.

See DROPS lesson: How to read knitting diagrams

nahoru

10) How do I work according to a crochet diagram?

The diagram depicts all rows/rounds, and every stitch seen from the right side. It is worked from bottom to top, from right to left.

When working back and forth every other row is worked from the right side: from right to left and every other row is worked from the wrong side: from left to right.

When working in the round, every row in the diagram are worked from the right side, from right to left.

When working a circular diagram you start in the middle and work your way outwards, counter clockwise, row by row.

The rows usually start with a given number of chain stitches (equivalent to the height of the following stitch), this will either be depicted in the diagram or explained in the pattern.

See DROPS lesson: How to read crochet diagrams

nahoru

11) How do I work several diagrams simultaneously on the same row/round?

Instructions for working several diagrams after each other on the same row/round, will often be written like so: “work A.1, A.2, A.3 a total of 0-0-2-3-4 times". This means you work A.1 once, then A.2 is worked once, and A.3 is repeated (in width) the number of times provided for your size – in this case like so: S = 0 times, M = 0 times, L=2 times, XL= 3 times and XXL = 4 times.

The diagrams are worked as usual: begin with the first row in A.1, then work the first row in A.2 etc.

See DROPS lesson: How to read knitting diagrams

See DROPS lesson: How to read crochet diagrams

nahoru

12) Why does the piece start with more chain stitches than it’s worked with?

Chain stitches are slightly narrower than other stitches and to avoid working the cast-on edge too tight, we simply chain more stitches to begin with. The stitch count will be adjusted on the following row to fit the pattern and measurement sketch.

nahoru

13) Why increase before the rib edge when the piece is worked top-down?

The rib edge is more elastic and will contract slightly compared to, for example, stocking stitch. By increasing before the rib edge, you avoid a visible difference in width between the rib edge and the rest of the body.

nahoru

14) Why increase in the cast-off edge?

It’s very easy to cast off too tightly, and by making yarn overs while casting off (and simultaneously casting these off) you avoid a too tight cast off edge.

See DROPS video: How to bind off with yarn overs (yo)

nahoru

15) How do I increase/decrease on every 3rd and 4th row/round alternately?

To achieve an even increase (or decrease) you can increase on, for example: every 3rd and 4th row alternately, like so: work 2 rows and increase on the 3rd row, work 3 rows and increase on the 4th. Repeat this until the increase is complete.

See DROPS lesson: Increase or decrease 1 st on every 3rd and 4th row alternately

nahoru

16) Why is the pattern slightly different than what I see in the photo?

Pattern repeats can vary slightly in the different sizes, in order to get the correct proportions. If you’re not working the exact same size as the garment in the photo, yours might deviate slightly. This has been carefully developed and adjusted so that the complete impression of the garment is the same in all sizes.

Make sure to follow instructions and diagrams for your size!

nahoru

17) How can I work a jacket in the round instead of back and forth?

Should you prefer to work in the round instead of back and forth, you may of course adjust the pattern. You’ll need to add steeks mid-front (usually 5 stitches), and follow the instructions. When you would normally turn and work from the wrong side, simply work across the steek and continue in the round. At the end you’ll cut the piece open, pick up stitches to work bands, and cover the cut edges.

See DROPS video: How to knit steeks and cut open

nahoru

18) Can I work a jumper back and forth instead of in the round?

Should you prefer to work back and forth instead of in the round, you may of course adjust the pattern so you work the pieces separately and then assemble them at the end. Divide the stitches for the body in 2, add 1 edge stitch in each side (for sewing) and work the front and back pieces separately.

See DROPS lesson: Can I adapt a pattern for circular needles into straight needles?

nahoru

19) Why do you show discontinued yarns in the patterns?

Since different yarns have different qualities and textures we have chosen to keep the original yarn in our patterns. However, you can easily find options among our available qualities by using our yarn converter, or simply pick a yarn from the same yarn group.

It is possible that some retailers still have discontinued yarns in stock, or that someone has a few skeins at home that they would like to find patterns for.

The yarn converter will provide both alternative yarn as well as required amount in the new quality.

nahoru

20) How do I make a women’s size garment into a men’s size one?

If you have found a pattern you like which is available in women’s size it’s not very difficult to convert it to men’s size. The biggest difference will be the length of sleeves and body. Start working on the women size that you think would fit across the chest. The additional length will be worked right before you cast off for the armhole/sleeve cap. If the pattern is worked top-down you can add the length right after the armhole or before the first decrease on sleeve.

Regarding additional yarn amount, this will depend on how much length you add, but it is better with a skein too many than too few.

nahoru

21) How do I prevent a hairy garment from shedding?

All yarns will have excess fibres (from production) that might come off as lint or shedding. Brushed yarns (ie hairier yarns) have more of these loose, excess fibres, causing more shedding.

Shedding also depends on what is worn under or over the garment, and whether this pulls at the yarn fibres. It’s therefore not possible to guarantee that there will be no shedding

Below are some tips on how to get the best result when working with hairier yarns:

1. When the garment is finished (before you wash it) shake it vigorously so the looser hairs come off. NOTE: do NOT use a lint roller, brush or any method that pulls at the yarn.

2. Place the garment in a plastic bag and put it in your freezer - the temperature will cause the fibres to become less attached to each other, and excess fibres will come off easier.

3. Leave in the freezer for a few hours before taking it out and shaking it again.

4. Wash the garment according to the instructions on the yarn label.

nahoru

22) Where on the garment is the length measured?

The measurement sketch/schematic drawing provides information regarding the full length of the garment. If it’s a jumper or a jacket the length is measured from the highest point on the shoulder closest to the neckline, and straight down to the bottom of the garment. It is NOT measured from the tip of shoulder. Similarly, the length of yoke is measured from the highest point on the shoulder and down to where yoke is split into body and sleeves.

On a jacket measures are never taken along bands, unless specifically stated. Always measure inside band stitches when measuring the length.

See DROPS lesson: How to read a schematic drawing

nahoru

23) How do I know how many balls of yarn I need?

The required amount of yarn is provided in grams, eg: 450 g. To calculate how many balls you’ll need you first need to know how many grams are in 1 ball (25g, 50g or 100g). This information is available if you click on the individual yarn quality on our pages. Divide the amount required with the amount of each ball. For example, if each ball is 50g (the most common amount), the calculation will be as follows: 450 / 50 = 9 balls.

nahoru

Pořídili jste si přízi DROPS na tento model? Pak máte taky právo žádat po svém prodejci, u něhož jste nakoupili, pomoc a rady. Seznam DROPS obchodů najdete tady!
Pořád se nemůžete dobrat odpovědi, kterou hledáte? Pak posuňte stránku dolů a napište nám svůj dotaz, naši specialisté se vám pokusí poradit. Obvykle to zvládneme během 5 až 10 pracovních dnů.. Mezitím si můžete pročíst otázky a odpovědi, které k tomuto modelu položili ostatní, nebo navštívit skupinu DROPS Workshop na Facebooku, kde vám může poradit některá spřízněná duše!

Komentáře / Otázky (138)

country flag Kat wrote:

I substituted yarns with C group (Nepal). My initial circle is getting wavy. Does it even out in later rows or does that mean I need thinner sock needles? I tried no. 6 by mistake but got a similar effect with no. 5. The test square for sleeves was around 9.5 cm, so it might also mean that I am knitting too tight. Any suggestions?

21.08.2023 - 10:10

DROPS Design answered:

Dear Kat, make sure to get the correct tension to get the correct finished measurements - read more here. Repeat then the diagram a total of 8 times in the round (on the first round, repeat *YO, K1*, making sure to increase 8 sts on every other round - note that in this diagram, only every other round is drawn, this means every even numbered row must be worked in stocking stitch/in rib (last 6 rows in diagram). Happy knitting!.

21.08.2023 kl. 15:02

country flag Anke Rüger wrote:

Ich benötige die Lauflänge der Wolle Cotton -Merino, da diese nicht mehr im Sortiment ist, finde ich diese Information nicht. Ich möchte das Projekt in Big Merino fertigen. Für Ihre Unterstützung bedanke ich mich im voraus. Liebe Grüße Anke Rüger

03.07.2023 - 06:32

DROPS Design answered:

Liebe Frau Rüger, DROPS Cotton Viscose ist jetzt ausgelaufen, mehr Info finden Sie über dieses Garn hier - hier lesen Sie mehr. Viel Spaß beim stricken!

03.07.2023 kl. 11:09

country flag Laurence wrote:

Bonjour, j'aimerais tricoter ce modèle en sky taille M, pouvez-vous m'indiquer combien si je dois utiliser 1 ou 2 fils et quelle taille d'aiguilles choisir? Merci!

05.10.2022 - 16:33

DROPS Design answered:

Bonjour Laurence, ce modèle peut se tricoter avec 2 fils du groupe A/1 fil du groupe C mais Sky appartient au groupe de fils B. Vous trouverez ici quelques modèles en Sky + Kid-Silk avec 15 m jersey pour 10 cm, mais le nbe de rangs est différent, il vous faudrait alors recalculer le modèle si vous n'avez pas le bon échantillon. Privilégiez un fil du groupe de fils C pour plus de simplicité - retrouvez ici plus d'infos pour faire les calculs des nouvelles quantités. Bon tricot!

06.10.2022 kl. 08:08

country flag Zuzana wrote:

Dobrý deň, nerozumiem ako dosiahnem na rukáv 42 ociek. V návode sa odkladá na rukáv len 21. Ďakujem za pomoc

28.01.2022 - 18:32

DROPS Design answered:

Hi Zuzana, if you could write your question in English, we will try to answer :)

22.04.2022 kl. 11:45

country flag Patty wrote:

Would it be possible to provide chest measurements for each size? I'm not 100% sure if I would need a M/L or an XL. Thank you!

22.08.2021 - 01:44

DROPS Design answered:

Dear Patty, all the relevant measurements are given on the schematic drawing. It would be difficult to give an exact chest measurement, because due to the shape of the sweater it can be closed so, that it allows you slightly adjust the size (you can cross it deeper with more crossing). Happy stitching,

22.08.2021 kl. 02:08

country flag Conny wrote:

Wanneer je de steken voor de mouw hebt gebreid, meerder je dan de steken weer in de volgende naald? Het is me niet duidelijk. Ik heb hier in de vragen gezocht en niets gevonden en ik zie het ook niet in de beschrijving.

23.02.2021 - 12:57

DROPS Design answered:

Dag Conny,

Je breit de steken voor de mouwen in een andere kleur en op de volgende naald brei je de steken weer in de kleur waar je mee breit. Als je de mouwen gaat breien neem je steken op waar je met een andere kleur hebt gebreid en haal je die draad eruit. Je zet dus geen steken op in de volgende naald, maar je breit verder over die andere kleur.

02.03.2021 kl. 09:06

country flag Patty Ricci wrote:

If you wanted to make this with only one type of yarn what would the weight be (in US terms, please)? I can't figure out if it would be worsted or not since one strand is a sport weight and the other one is a DK weight. Thank you!

02.09.2020 - 22:16

DROPS Design answered:

Dear Mrs Ricci, this pattern is here worked with 2 strands yarn group A and they could be replaced with one strand yarn group C - read more about altenatives here ; do not hesitate to contact your DROPS store - even per mail - for any further individual assistance choosing the yarn. Happy knitting!

03.09.2020 kl. 08:56

country flag Geneva wrote:

Is it possible to obtain written instructions for DROPS patterns?

29.04.2019 - 02:44

DROPS Design answered:

Dear Geneva, when our patterns only have diagrams, you have to work following the diagrams as explained in the written pattern - 29.04.2019 kl. 11:01

country flag Céline wrote:

Bonjour . Si j ai bien compris pour les manches on tricote sur un fil d’une autre couleur mais en suivant le diagramme et ensuite on fait le deuxième rang en continuant à suivre le diagramme mais dans la couleur du pull .

08.03.2018 - 16:29

DROPS Design answered:

Bonjour Céline, tout à fait, on utilise cette technique pour ne pas rabattre les mailles, on relèvera ensuite les mailles pour les manches de chaque côté - une vidéo montre cette façon de faire pour un talon de chaussettes, la technique sera la même ici. Bon tricot!

09.03.2018 kl. 08:42

Přidejte komentář k návodu DROPS 94-5

Rádi bychom věděli, co si o tomto modelu myslíte!

Pokud se chcete na něco zeptat, dbejte prosím na to, abyste ve formuláři níže vybrali správnou kategorii - díky tomu se dříve dozvíte, co potřebujete vědět. Povinná pole jsou označena *.

Z galerie #dropsfan

Kruhový svetr...

Barvinek, Czech Republic