
Categorie popolari
State cercando un filato?


Commenti / Domande (35)
![]() TERESA CARMONA MÉNDEZ ha scritto:
TERESA CARMONA MÉNDEZ ha scritto:
Buenos dias, cuando dice el patron "Colocar 4-5-5-5-6-6 puntos en un gancho auxiliar 3 veces después los 5-4-5-6-4-6 puntos restantes." ¿Se refiere a las vueltas acortadas?
09.02.2023 - 07:14DROPS Design ha risposto:
Hola Teresa, sí, se trabaja similar a las vueltas acortadas.
13.02.2023 - 00:40
![]() Susana ha scritto:
Susana ha scritto:
In response to your comment today at 16.01.2023 kl. 10:27. If I am starting to shape the right armhole (right side to left) and I start the row casting off 3 sts, when I finally then start the other row from left to the right side (left armhole) I will inevitably casting off 3 sts on the row above to the other. Therefore, the armholes will start at different times. One below the other. Or am I missing something?
16.01.2023 - 11:24DROPS Design ha risposto:
Dear Susanna, you will cast off 3 sts at the beginning of the next 2 rows (= 3 sts at the beginning of the next row from RS + 3 sts at the beginning of the next row from WS) = 3 sts on each side 1 time, then cast off 2 stitches at the beginning of next 2 rows (= 2 sts from RS + 2 sts at the beg of next row from WS), etc.. The cast off are indeed worked with 1 row difference on each side, but this is not visible afterwards. Happy knitting!
16.01.2023 - 16:25
![]() Susana Araujo ha scritto:
Susana Araujo ha scritto:
Dear drops, have a question about this: “begin to cast off for the armholes on both sides: 3-3-3-4-4-4 stitches 1 time, 2 stitches 1 time and 1 stitch 1-3-4-6-9-12 times”. If we cast off this number of times from both sides WS and RS won't the sleeves inevitable be one row above the other? And therefore one of the armholes slightly higher?
15.01.2023 - 23:53DROPS Design ha risposto:
Dear Mrs Araujo, you should cast off the same number of stitches on each side, ie at the beginning of every row, both from RS and from WS so that the armholes are the same. Happy knitting!
16.01.2023 - 10:27
![]() Susana ha scritto:
Susana ha scritto:
On “Neck” section after “Assembly” when it says “knit up 80 to 100 stitches” is this to be picked-up from the neck randomly or cast on from our yarn?
06.01.2023 - 15:54DROPS Design ha risposto:
Hi Susana! Knit up means to pick up around the neck. Please look at videos and tutorials on how to do it! Happy knitting!
06.01.2023 - 22:36
![]() Susana ha scritto:
Susana ha scritto:
While on the “Neck” after “Front Piece” we have to cast off a number of stitches. Is this done with the stitches that we left on hold? Or on the next row?
06.01.2023 - 15:53DROPS Design ha risposto:
Hi Susana! Cast off stitches on the needle as it says in the pattern. Happy knitting!
06.01.2023 - 22:34
![]() Susana ha scritto:
Susana ha scritto:
Reading the pattern I am trying to see the maths and I can’t still figure it out what happen to some stitches. So, when we are still working the back, almost at the end we have “62 stitches”. Then we shall cast off 26 which would give us a total of 36. Then, on the Neck we cast off 1 stitch therefore, 35 total. And then, when we start working the diagonal shoulder, I will place 17 stitches on hold on a thread. What happen to the remaining 18? Shall they be cast off? This is not indicated
06.01.2023 - 15:53
![]() Susana ha scritto:
Susana ha scritto:
When working on the Diagonal Shoulder: “Place 4-5-5-5-6-6 stitches on the thread 3 times then the remaining 5-4-5-6-4-6 stitches.” Again, what does this mean with 3 times? Shall I place 17 stitches on hold on a thread (assuming that I am doing the smallest size)? Does this have to be done sparely and that is why is written “3 times”?
06.01.2023 - 15:53DROPS Design ha risposto:
Dear Susana, you need to do it separately. Work and place the first 4 stitches, work until the end of the row and then work back, then work and place the next 4 stitches, work until the end of the row and then work back again, then work and place the next 4 stitches, work until the end of the row and then work back. Now you work and place the remaining 5 stitches in the thread. Happy knitting!
07.01.2023 - 18:56
![]() Susana ha scritto:
Susana ha scritto:
On back piece instructions, it is written: “begin to cast off for the armholes on both sides: 3-3-3-4-4-4 stitches 1 time, 2 stitches 1 time and 1 stitch 1-3-4-6-9-12 times”. I am confused to what this means. Shall I cast off X number of stitches X times in a row at different times during the same row? Or is this mean to be cast off one after the other but then that wouldn’t invalidate the X number of times?
06.01.2023 - 15:52DROPS Design ha risposto:
Dear Susana, you need to cast off in different rows, once on each side of the row. So, cast off at the beginning of the row (from both the right and wrong sides). For example, in the smallest size, cast off 3 stitches at the beginning of the next row from the right and wrong sides. Then, cast off 2 stitches at the beginning of the next row from the right and wrong sides. Finally cast off 1 stitch at the beginning of the next row from the right and wrong sides. Happy knitting!
07.01.2023 - 19:01
![]() Susana ha scritto:
Susana ha scritto:
Would this be ok for beginners? I have only finished 1 sweater before, done some scarves and hats. Reading the pattern, the stitches seem simple, only confusion would be with some of the construction.
06.01.2023 - 15:52DROPS Design ha risposto:
Hi Susana! Please look at the videos and step-by-step tutorials at the end of the pattern. These will help you to overcome any questions you might have! Reading pattern might be very confusing but when you start making it everything becomes clear! Happy knitting!
06.01.2023 - 22:32
![]() Susana ha scritto:
Susana ha scritto:
I have a whole paragraph with questions and this comment box does not have enough space. How can I be helped?
06.01.2023 - 11:01DROPS Design ha risposto:
Dear Susana, maybe try to ask one or 2 questions each time using this box - remember to tell us the size you are working on, so that we can check especially this size if needed. Thanks for your comprehension.
06.01.2023 - 11:44
|
|
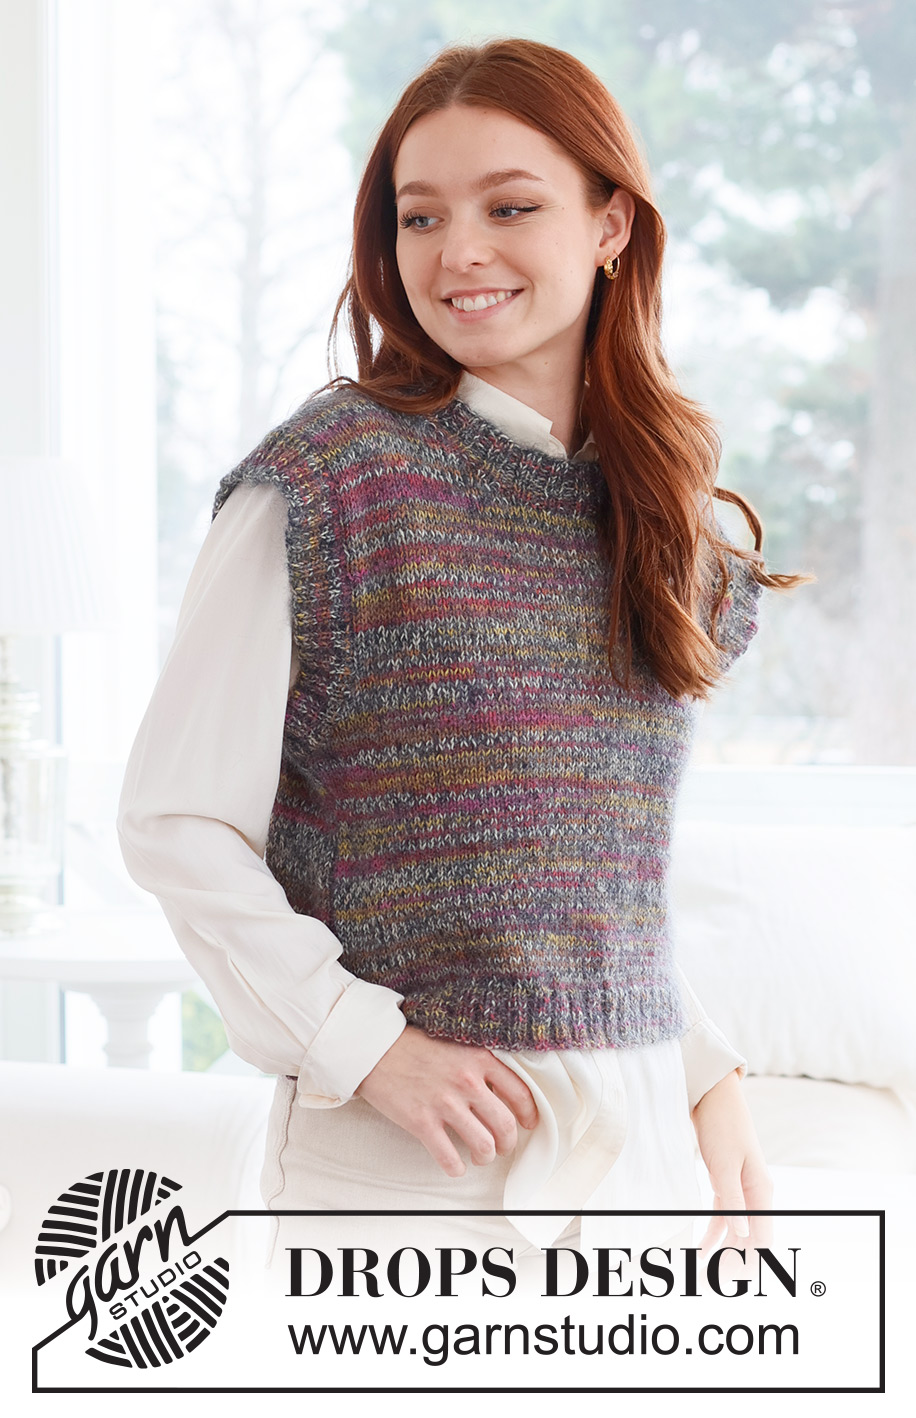
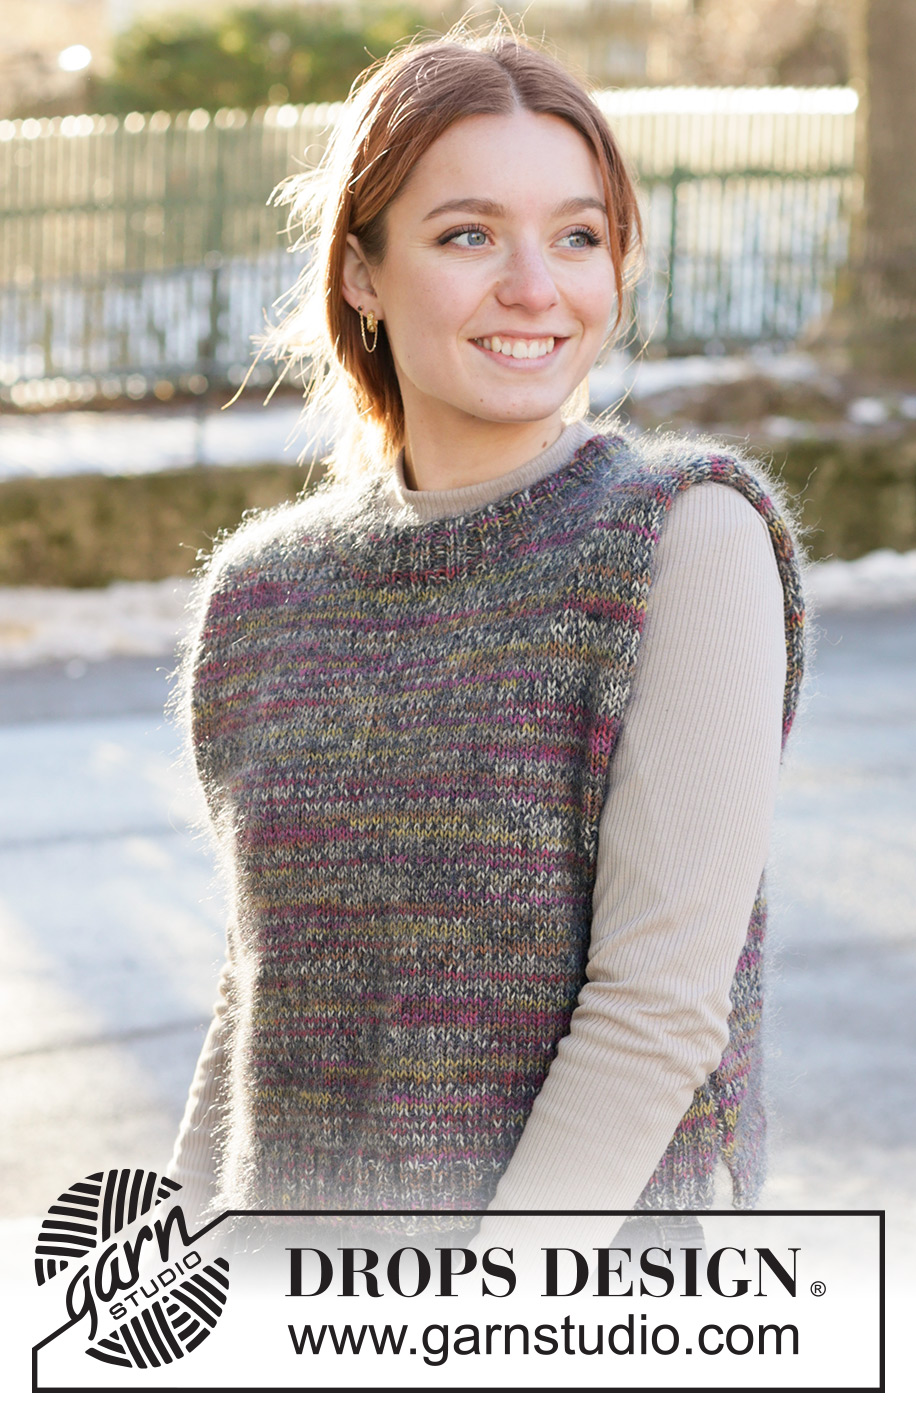
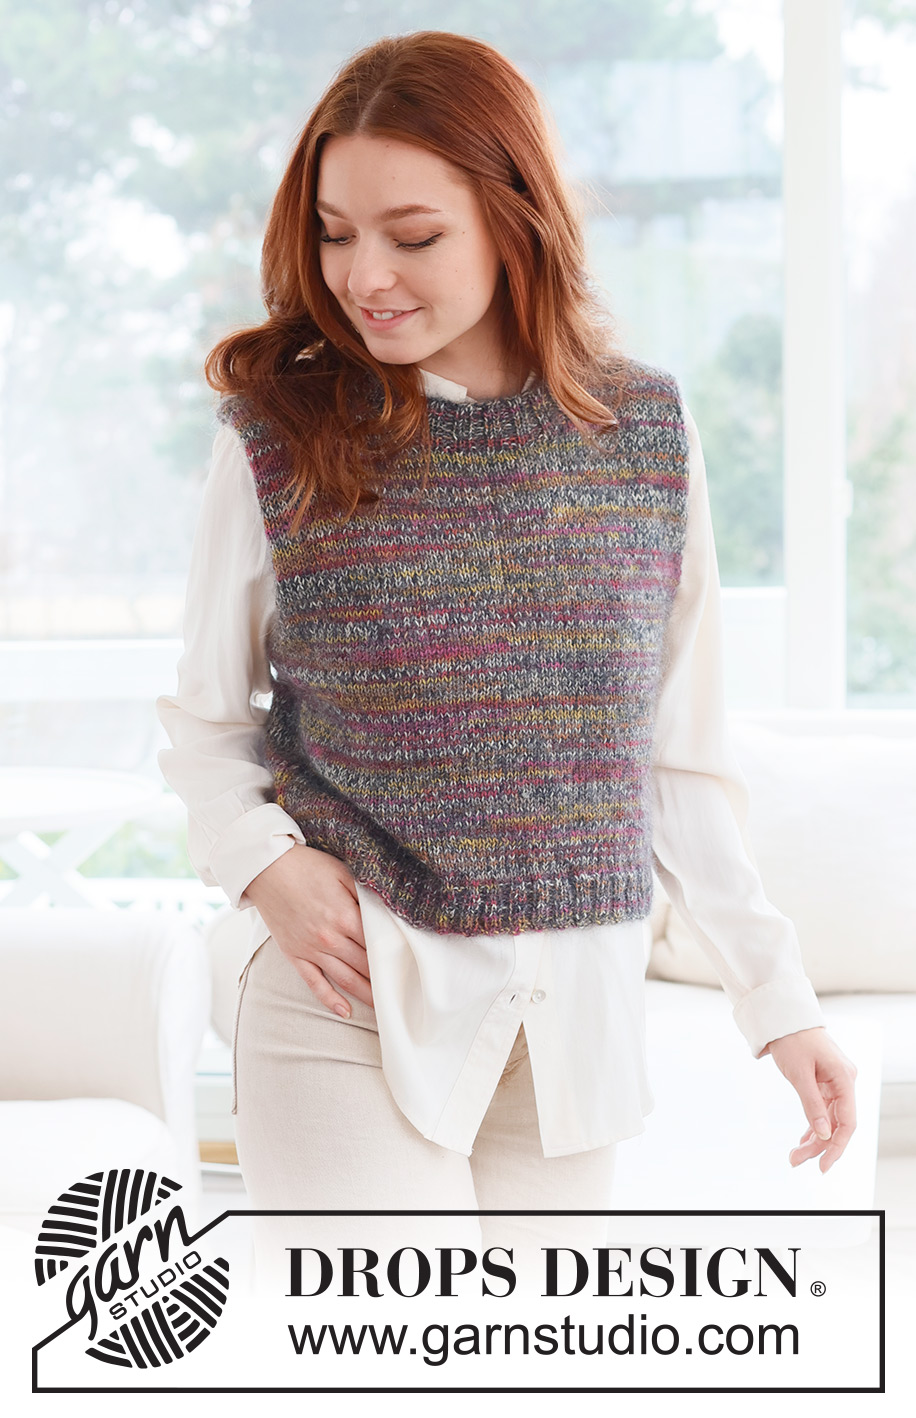
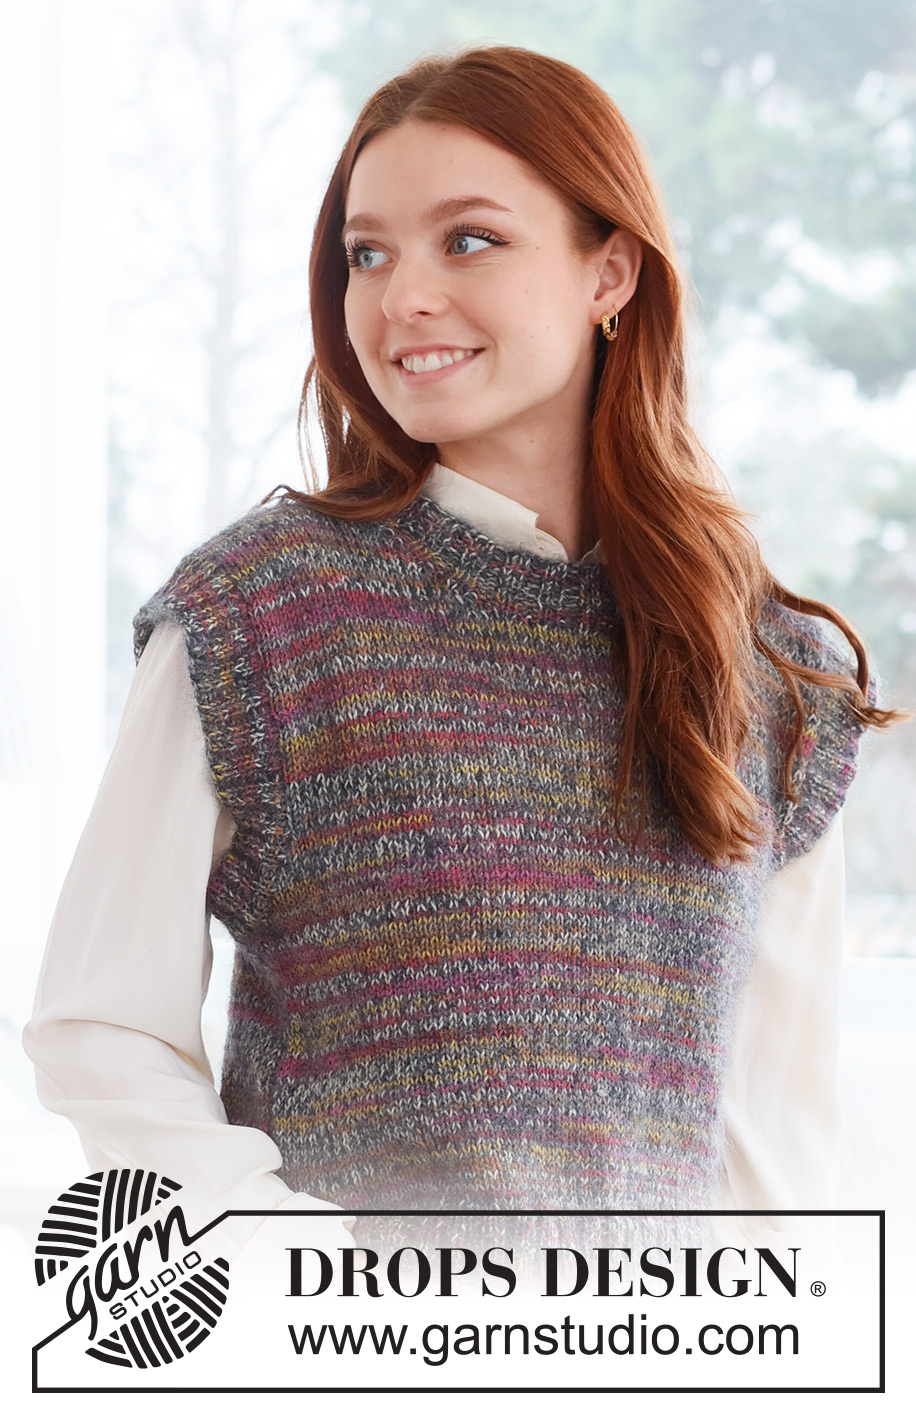
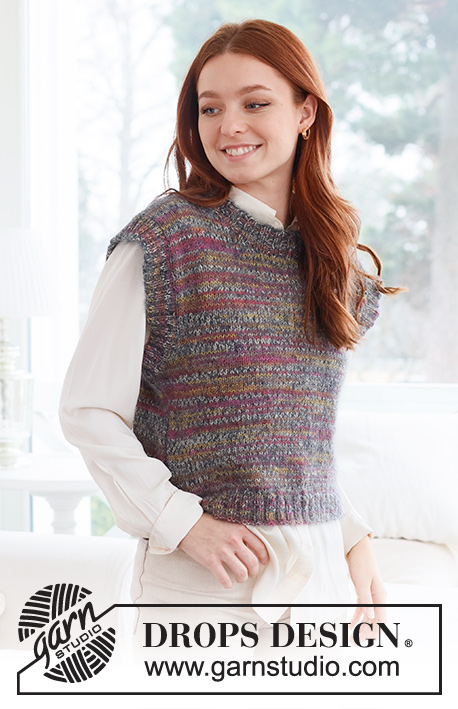
Fairytale#fairytalevest |
|
 |
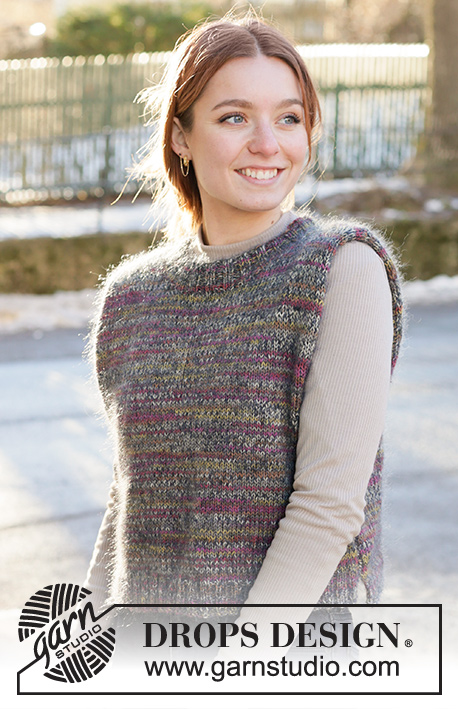 |
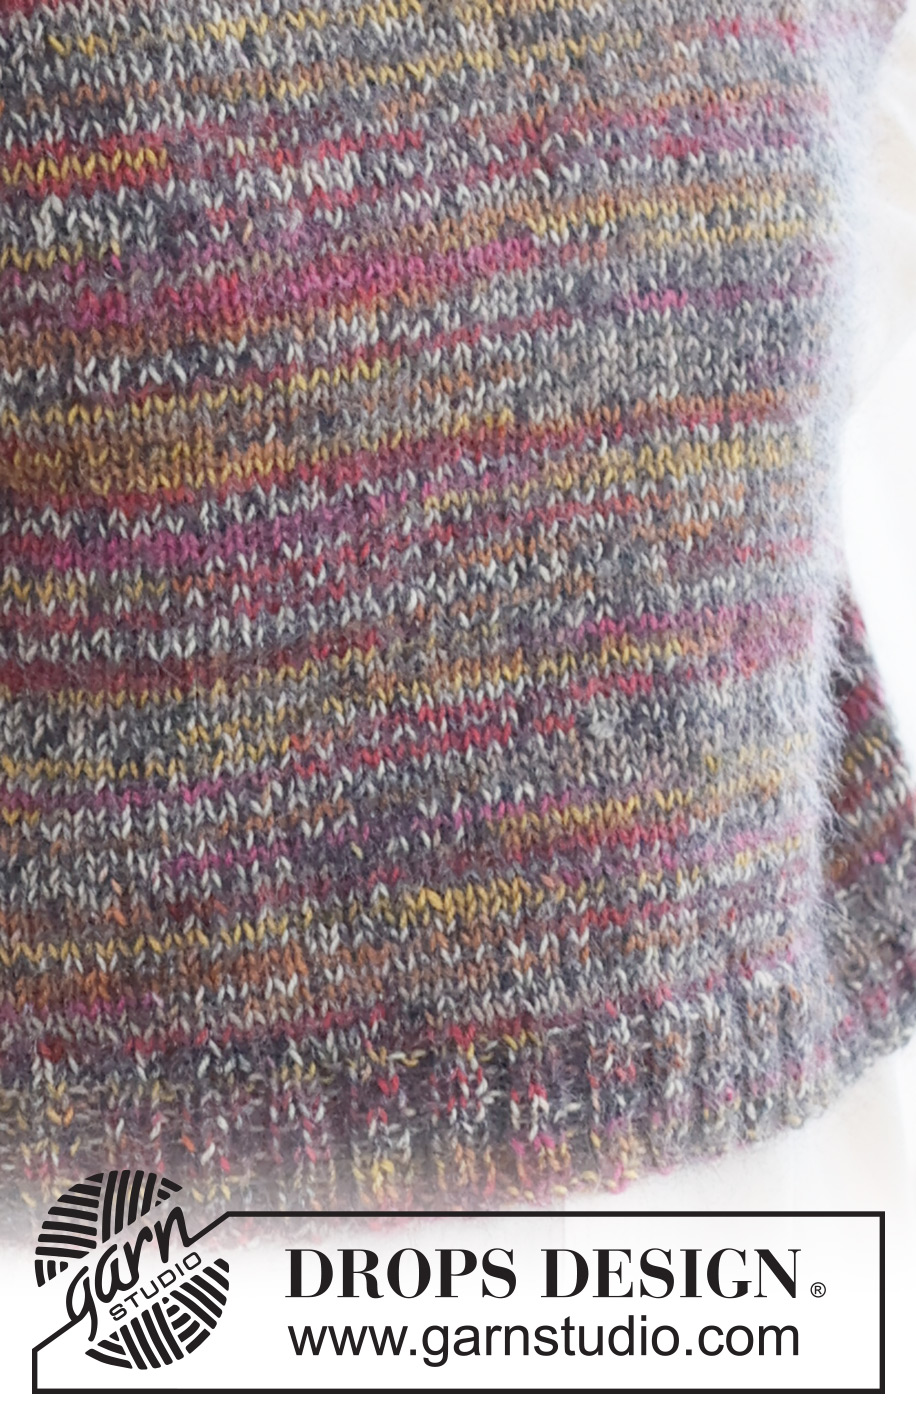
Gilet lavorato ai ferri in 1 capo di DROPS Fabel e 1 capo di Kid-Silk. Lavorato dal basso verso l’alto con diagonali delle spalle. Taglie: S - XXXL.
DROPS 237-42 |
|
|
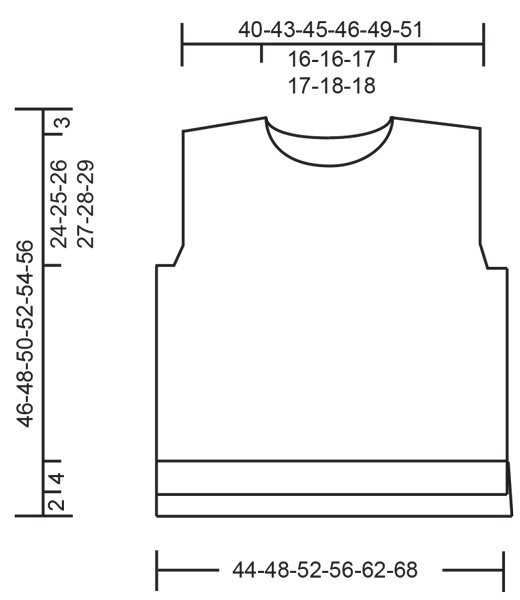
------------------------------------------------------- TECNICHE IMPIEGATE: ------------------------------------------------------- COSTA/MAGLIA LEGACCIO (avanti e indietro): Lavorare tutti i ferri a diritto. 1 costa in altezza = 2 ferri diritto. ------------------------------------------------------- INIZIO DEL LAVORO: ------------------------------------------------------- GILET – BREVE RIASSUNTO DEL LAVORO: Lavorare il davanti e il dietro in modo separato, in piano, dal basso verso l’alto. Il dietro è 2 cm più lungo del davanti. Lavorare i bordi delle maniche e il collo in tondo alla fine. DIETRO: Avviare 88-96-104-112-120-132 maglie con i ferri circolari n° 4 mm e 1 capo di DROPS Fabel e 1 capo di DROPS Kid-Silk (2 capi). Lavorare 1 ferro rovescio dal rovescio del lavoro. Lavorare a coste dal diritto del lavoro come segue: 1 maglia a MAGLIA LEGACCIO – leggere la descrizione sopra, lavorare a coste (2 maglie diritto, 2 maglie rovescio) fino a quando rimangono 3 maglie, 2 maglie diritto e 1 maglia a maglia legaccio. Continuare queste coste per 4 cm. Passare ai ferri circolari n° 5 mm. Continuare a maglia rasata; sul 1° ferro diminuire 14-14-16-16-14-16 maglie in modo uniforme = 74-82-88-96-106-116 maglie. Lavorare fino a quando il lavoro misura 19-20-21-22-23-24 cm. FARE ATTENZIONE ALLA TENSIONE DEL LAVORO! Sul ferro successivo iniziare a intrecciare per gli scalfi a entrambi i lati: 3-3-3-4-4-4 maglie 1 volta, 2 maglie 1 volta e 1 maglia 1-3-4-6-9-12 volte = 62-66-70-72-76-80 maglie. Continuare a lavorare fino a quando il lavoro misura 42-44-46-48-50-52 cm (mancano 4 cm alla fine del lavoro). Sul ferro successivo intrecciare le 26-26-28-28-30-30 maglie centrali per il collo e finire ogni spalla in modo separato. PANORAMICA DELLA SEZIONE SUCCESSIVA: Ora intrecciare le maglie per il collo e mettere le maglie in sospeso per la diagonale della spalla. Leggere COLLO e DIAGONALE DELLA SPALLA prima di continuare. COLLO: Intrecciare 1 maglia all’inizio del ferro successivo dal collo. DIAGONALE DELLA SPALLA: Mettere in sospeso le maglie verso lo scalfo; per evitare di tagliare il filo, prima lavorare le maglie. Mettere 4-5-5-5-6-6 maglie in sospeso 3 volte poi le 5-4-5-6-4-6 maglie rimaste. Ora tutte le maglie sono state intrecciate o messe in sospeso. Riportare le 17-19-20-21-22-24 maglie in sospeso sui ferri circolari n° 5 mm. Lavorare 1 ferro rovescio dal rovescio del lavoro. Per evitare buchi durante i giri, riprendere il filo tra 2 maglie e lavorarlo a rovescio ritorto insieme alla maglia successiva sul ferro sinistro. Intrecciare a diritto, senza stringere, dal diritto del lavoro. Il lavoro misura circa 46-48-50-52-54-56 cm dal bordo di avvio fino al punto più alto sulla spalla. Lavorare l’altra spalla nello stesso modo. DAVANTI: Avviare e lavorare come per il dietro fino a quando il davanti misura 17-18-19-20-21-22 cm. Sul ferro successivo iniziare ad intrecciare le maglie per gli scalfi a entrambi i lati: 3-3-3-4-4-4 maglie 1 volta, 2 maglie 1 volta e 1 maglia 1-3-4-6-9-12 volte = 62-66-70-72-76-80 maglie. Continuare a lavorare fino a quando il lavoro misura 34-36-36-38-38-40 cm (mancano circa 10-10-12-12-14-14 cm alla fine del lavoro). Sul ferro successivo dal diritto del lavoro mettere le 12-12-14-14-16-16 maglie centrali in sospeso per il collo e finire ogni spalla in modo separato. PANORAMICA DELLA SEZIONE SUCCESSIVA: Ora intrecciare le maglie per il collo e mettere le maglie in sospeso per la diagonale della spalla. Leggere COLLO e DIAGONALE DELLA SPALLA prima di continuare. COLLO: Intrecciare dal collo 2 maglie 2 volte e 1 maglia 4 volte. DIAGONALE DELLA SPALLA: ALLO STESSO TEMPO, quando il lavoro misura 41-43-45-47-49-51 cm, mettere in sospeso le maglie verso lo scalfo nello stesso modo del dietro. Quando tutte le maglie sono state intrecciate o messe in sospeso, riportare le 17-19-20-21-22-24 maglie in sospeso sui ferri circolari n° 5 mm. Lavorare 1 ferro rovescio dal rovescio del lavoro nello stesso modo del dietro. Intrecciare a diritto, senza stringere, dal diritto del lavoro. Il lavoro misura circa 44-46-48-50-52-54 cm dal bordo di avvio fino al punto più alto sulla spalla. Lavorare l’altra spalla nello stesso modo. CONFEZIONE: Cucire i margini delle spalle, margine a margine. Cucire i lati, margine a margine, iniziando dagli scalfi e cucendo fino a 1 cm dopo l’inizio delle coste, lasciando uno spacco; il dietro è più lungo del davanti. COLLO: Iniziare dal diritto del lavoro su una spalla, con 1 capo di Fabel e 1 capo di Kid-Silk. Usando i ferri circolari corti n° 4 mm riprendere 80 - 100 maglie (comprese le maglie in sospeso) attorno al collo. Il numero di maglie dev’essere divisibile per 4. Lavorare a coste in tondo (2 maglie diritto, 2 maglie rovescio) per 4 cm. Intrecciare con diritto su diritto e rovescio su rovescio. BORDI DELLE MANICHE: Iniziare dal diritto del lavoro sulla parte inferiore dello scalfo con 1 capo di Fabel e 1 capo di Kid-Silk. Usando i ferri circolari corti n° 4 mm riprendere 112 - 136 maglie attorno allo scalfo (il numero di maglie dev’essere divisibile per 4). Lavorare a coste in tondo (2 maglie diritto, 2 maglie rovescio) per 4 cm. Intrecciare con diritto su diritto e rovescio su rovescio. Lavorare l’altro bordo della manica nello stesso modo. Il bordo può essere piegato a metà verso l’interno per un bordo della manica più stretto ma più spesso. |
|
 |
|
Avete terminato questo modello?Allora taggate le vostre foto con #dropspattern #fairytalevest o inviatele alla #dropsfan gallery. Avete bisogno di aiuto con questo modello?Troverete 25 video tutorial, una sezione per i commenti/domande e molto altro guardando il modello su www.garnstudio.com © 1982-2026 DROPS Design A/S. Ci riserviamo tutti i diritti. Questo documento, compreso tutte le sue sotto-sezioni, è protetto dalle leggi sul copyright. Potete leggere quello che potete fare con i nostri modelli alla fine di ogni modello sul nostro sito. |
|


Con oltre 40 anni di esperienza nel design di modelli di maglia e uncinetto, DROPS Design offre la più estesa collezione di modelli gratuiti su internet - tradotti in 17 lingue. Ad oggi vi possiamo fornire 324 cataloghi e 12290 modelli - 9561 dei quali sono tradotti in Italiano.
Ci stiamo impegnando molto per darvi il meglio che vi possiamo offrire in termini di maglia e uncinetto, ispirazioni e consigli così come filati di grande qualità ad un prezzo incredibile! Volete utilizzare i nostri modelli per qualcosa d'altro oltre al vostro uso personale? Potete leggere tutto ciò che è consentito nel testo sul Copyright in basso su tutte le pagine dei nostri modelli. Buon lavoro!
Lasciare un commento sul modello DROPS 237-42
Noi saremmo felici di ricevere i tuoi commenti e opinioni su questo modello!
Se vuoi fare una domanda, fai per favore attenzione a selezionare la categoria corretta nella casella qui sotto per velocizzare il processo di risposta. I campi richiesti sono indicati da *.