
Categorie popolari
State cercando un filato?


Commenti / Domande (101)
![]() Marit Ovesen ha scritto:
Marit Ovesen ha scritto:
Hei. Jeg strikker i str Xl. Nå er jeg ferdig med alle fellinger og har 240 masker, men pluss di fire merke maskene. Strikket tidligere en i M og det samme skjedde. Kan ikke se att jeg har gjort noe feil. Hvordan gjør jeg det når jeg nå skal dele opp?
18.04.2026 - 22:54DROPS Design ha risposto:
Hei Marit. Du mener kanskje økningene? Oppskriften er oversendt til Design avd. slik at de kan dobbeltsjekke. mvh DROPS Design
20.04.2026 - 13:15
![]() Natalia ha scritto:
Natalia ha scritto:
Me encanta este diseño y me gustaría tejerlo, pero tengo lana merino extra, 60% lana y 40% acrílico (240 metros por 100 gramos). ¿Me podría decir por favor cuántos puntos necesito para empezar para la talla M y qué número de aguja? ¡Muchas gracias!
29.03.2026 - 22:09DROPS Design ha risposto:
Hola Natalia, DROPS Melody es un hilo con una textura muy concreta, para que el hilo sea algo gordo, pero ligero. Sin embargo, el hilo indicado no tiene esta ligereza, por lo que la textura quedará muy pesada y la forma no se mantendrá correctamente. En todo caso, si quieres usar el hilo indicado, tendrías que hacer una muestra, compararla a la de la labor y hacer una regla de 3 para recalcular el patrón o probar con otro número de aguja puedes leer cómo hacerlo aquí.
29.03.2026 - 23:39
![]() Katharina ha scritto:
Katharina ha scritto:
Wird der Pullover ein- oder zweifädig gestrickt?
15.03.2026 - 12:08DROPS Design ha risposto:
Hallo Katharina, der Pullover wird einfädig gestrickt. Viel Spaß beim Stricken!
15.03.2026 - 12:41
![]() Monica ha scritto:
Monica ha scritto:
I videoen ser det ud som om der på vrangsiden ved raglan bliver lavet drejet vrang, før og efter maskemarkøren, men det står ikke i opskriften, ligesom der laves drejet ret fra ret siden. Er det korrekt eller noget ser jeg forkert?
23.02.2026 - 01:08DROPS Design ha risposto:
Hei Monica. Mange av våre videoer er generelle videoer. Så ofte kan det være fint å se videoen som viser en teknikk, men man må følge teksten i den oppskriften man strikker etter (se godt øverst i oppskriften under f.eks RAGLAN, der står det som regel hvordan økningen skal strikkes). mvh DROPS Design
03.03.2026 - 14:12
![]() Grace ha scritto:
Grace ha scritto:
Hi, I'm at the yoke in size L. Once I've increased a total of 12 times, I ended up with 140 stitches. Is this correct? There's no mention of this in the pattern, so I just want to make sure I'm on the right track. Thank you.
14.02.2026 - 03:50DROPS Design ha risposto:
Hi Grace, In your size, after all the increases for raglan you should have 220 stitches: Start with 76 stitches, increase 8 stitches x 12 = 96 increased stitches, then increase 8x4 stitches (on body) + 4 x 4 stitches (on sleeves) = 48 increased stitches. 76 + 96 + 48 = 220 stitches. Hope this helps, Regards, Drops Team.
18.02.2026 - 07:17
![]() Grace ha scritto:
Grace ha scritto:
Hi, I'm at the short rows of the neckline. For the raglan increases, am I supposed to be increasing on the wrong side as well? It's not specified in the pattern, but in the video that's what is shown.
13.02.2026 - 12:49
![]() Britt-marie ha scritto:
Britt-marie ha scritto:
Varför måste jag klippa av tråden som det står i mönstret?
04.02.2026 - 21:16DROPS Design ha risposto:
Hej Britt-Marie, du klipper tråden da du skal starte næste stykke et andet sted :) ... du bestemmer jo selv og du vælger at strikke frem til der hvor du skal starte :)
05.02.2026 - 11:21
![]() Shelley ha scritto:
Shelley ha scritto:
Hello I am knitting the Blueberry Cream sweater in size large the pattern states “Work until the sleeve measures 39-36-35-32-31-28 cm from the division. Knit 1 round where you decrease 15-17-19-19-19-23 stitches” …does this mean that is the only decrease round for the whole sleeve? Meaning 35 cm from division I would decrease evenly 19 stitches on that round only? There are no other decrease rows on the sleeve? Can you please clarify. Thanks, Shelley
02.02.2026 - 17:00DROPS Design ha risposto:
Hi Shelley, Yes, the pattern is for wide sleeves which narrow at the cuff giving the shape you see in the photo and, in your size, this means no decreases until the bottom of the sleeve. This is of course optional and you can decrease as described for the larger sizes if you wish. Regards, Drops Team.
03.02.2026 - 07:25
![]() Stephanie ha scritto:
Stephanie ha scritto:
Hi, ich bin jetzt soweit das alle Raglanmaschen zugenommen wurden und bis zu der korrekten Länge weiter gestrickt werden soll. Allerdings fehlt mir ziemlich viel bis zu der gewünschten Länge (25cm bei Größe L). Nach allen Zunahmen habe ich nur ca. 18cm ab der Doppelhalsblende, heißt ich müsste 7cm ohne Zunahmen weiterstricken. Das kommt mir ziemlich viel vor. Kann es trotzdem korrekt sein? Meine Maschenprobe hat genau gestimmt und ich arbeite mit Drops Melody und 6mm Nadeln.
24.01.2026 - 13:17DROPS Design ha risposto:
Liebe Stephanie, leider hat sich ein Fehler in der Anleitung eingeschlichen - Sie müssen an der vorderen Mitte messen, nicht an der hinteren. Dann sollte es passen - Sie stricken 40 Runden mit Zunahmen, das ergibt laut Maschenprobe 25 cm. Wenn die Maschenprobe bei Ihnen in der Höhe stimmt, sollten Sie die 25 cm dann erreichen. Zumindest sollten es dann nicht mehr 7 cm Unterschied sein. Viel Spaß beim Weiterstricken!
25.01.2026 - 11:44
![]() Gabriela ha scritto:
Gabriela ha scritto:
Hi! I'm working on size L and I'm about to separate the body from the sleeves. I have a total of 220 stitches on my needles but, adding up the stitches I must knit and place (35+43+67+43+32), the total is 240 stitches. What should I do?
24.01.2026 - 05:14DROPS Design ha risposto:
Hi Gabriela, You work 35 stitches, place 43 on a stitch holder, cast on 12 stitches, work 67, place 43 on a stitch holder, cast on 12 and work 32 stitches. Not counting the cast-on stitches, you work 35 + 43, + 67 + 43 + 32 = 220 stitches. Regards, Drops Team.
24.01.2026 - 08:42
|
|
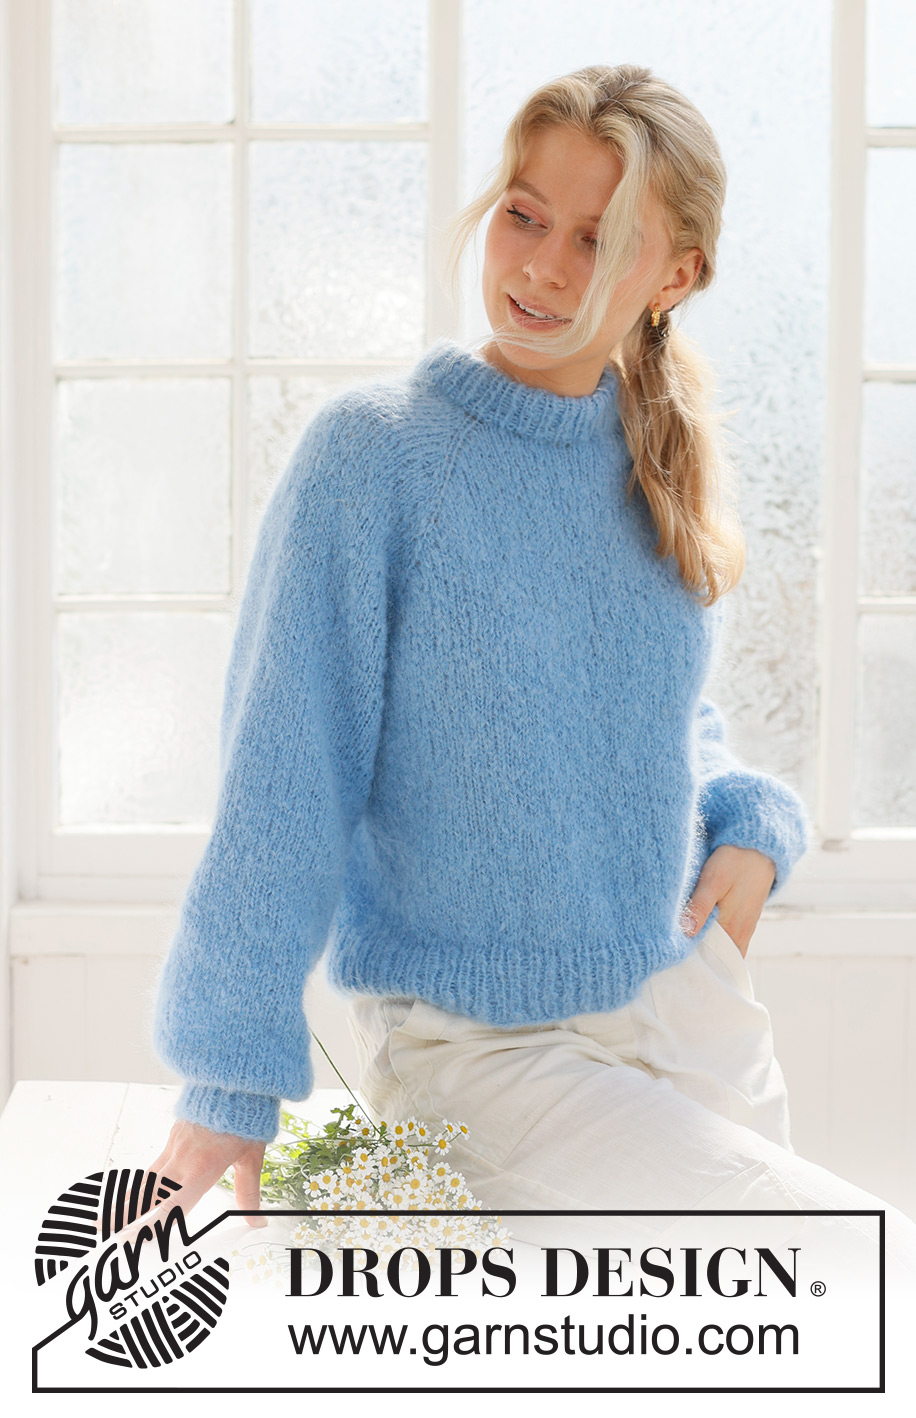
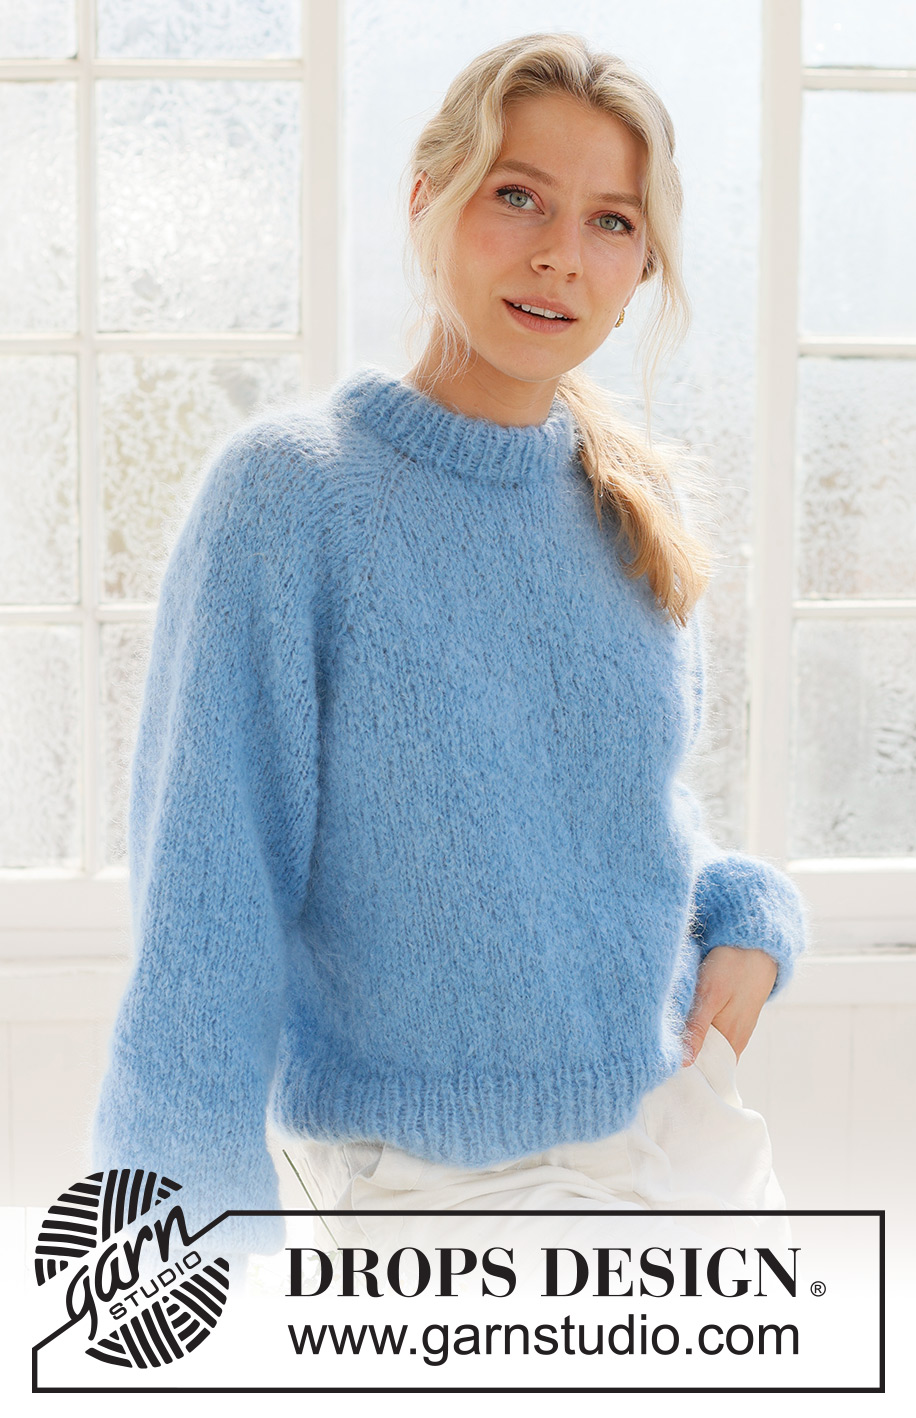
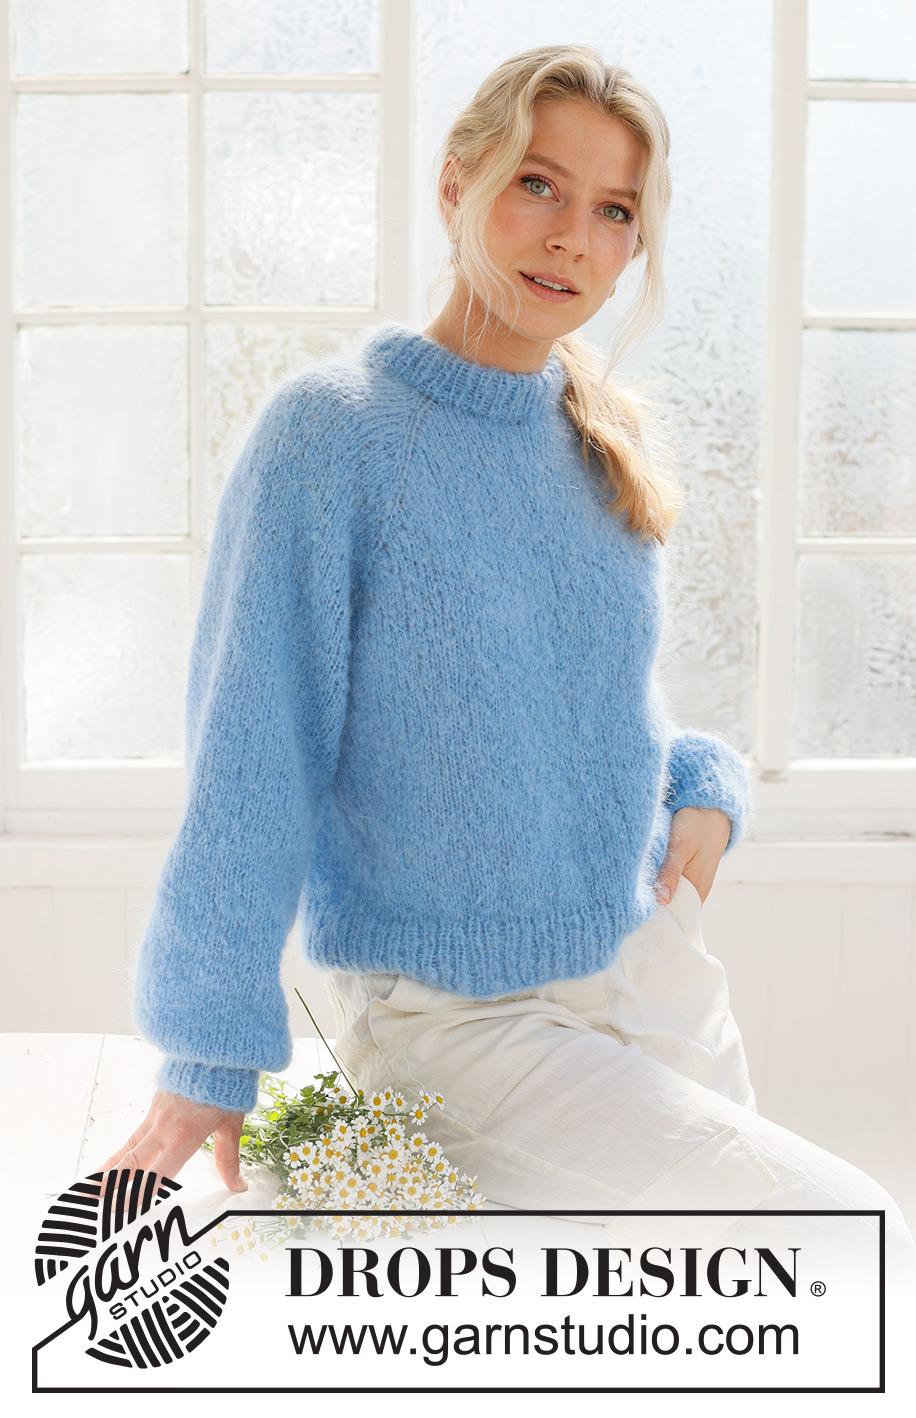
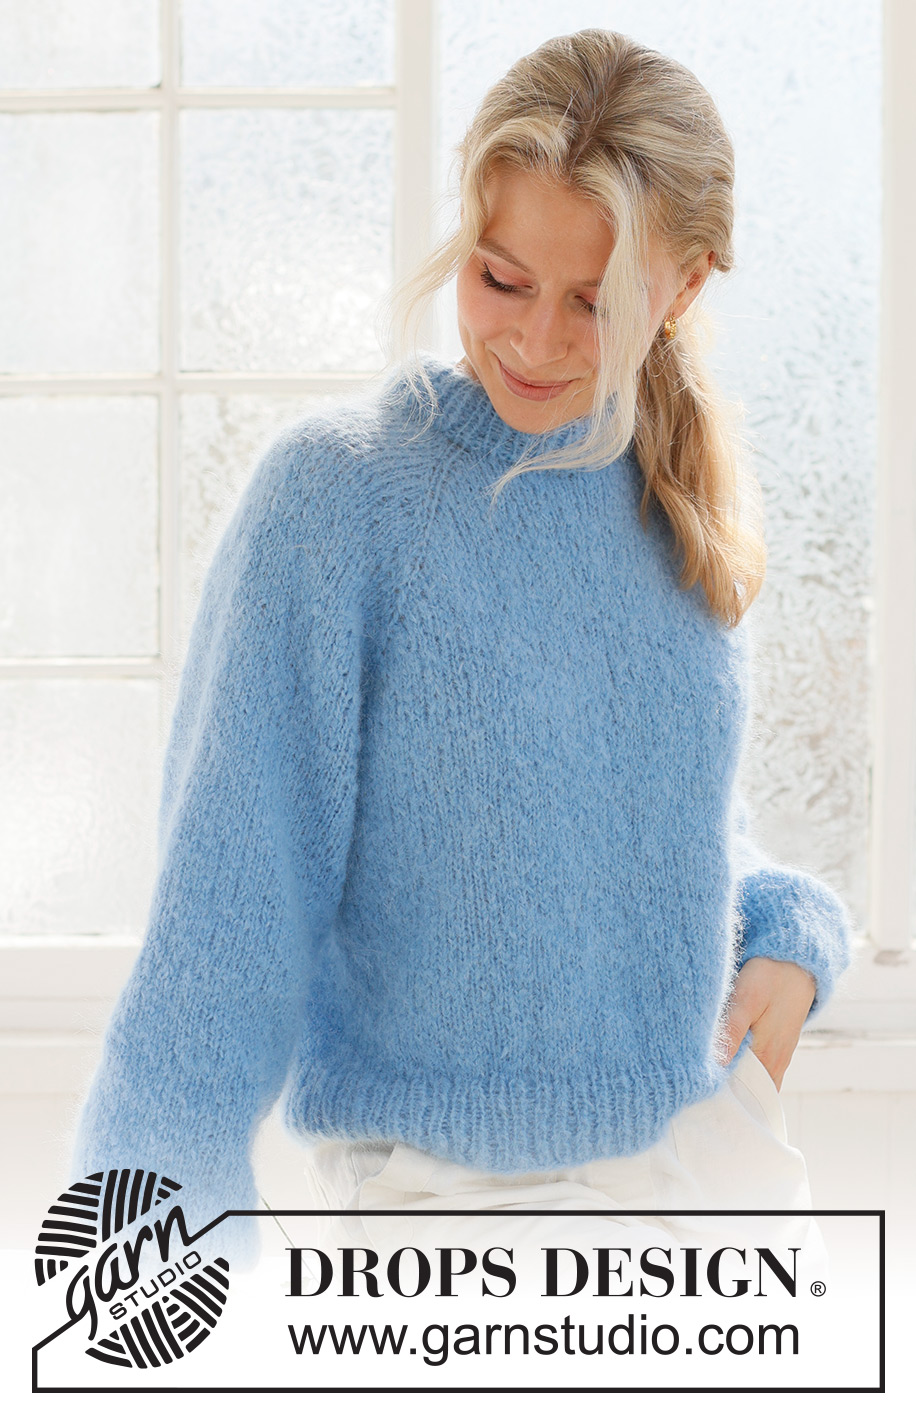
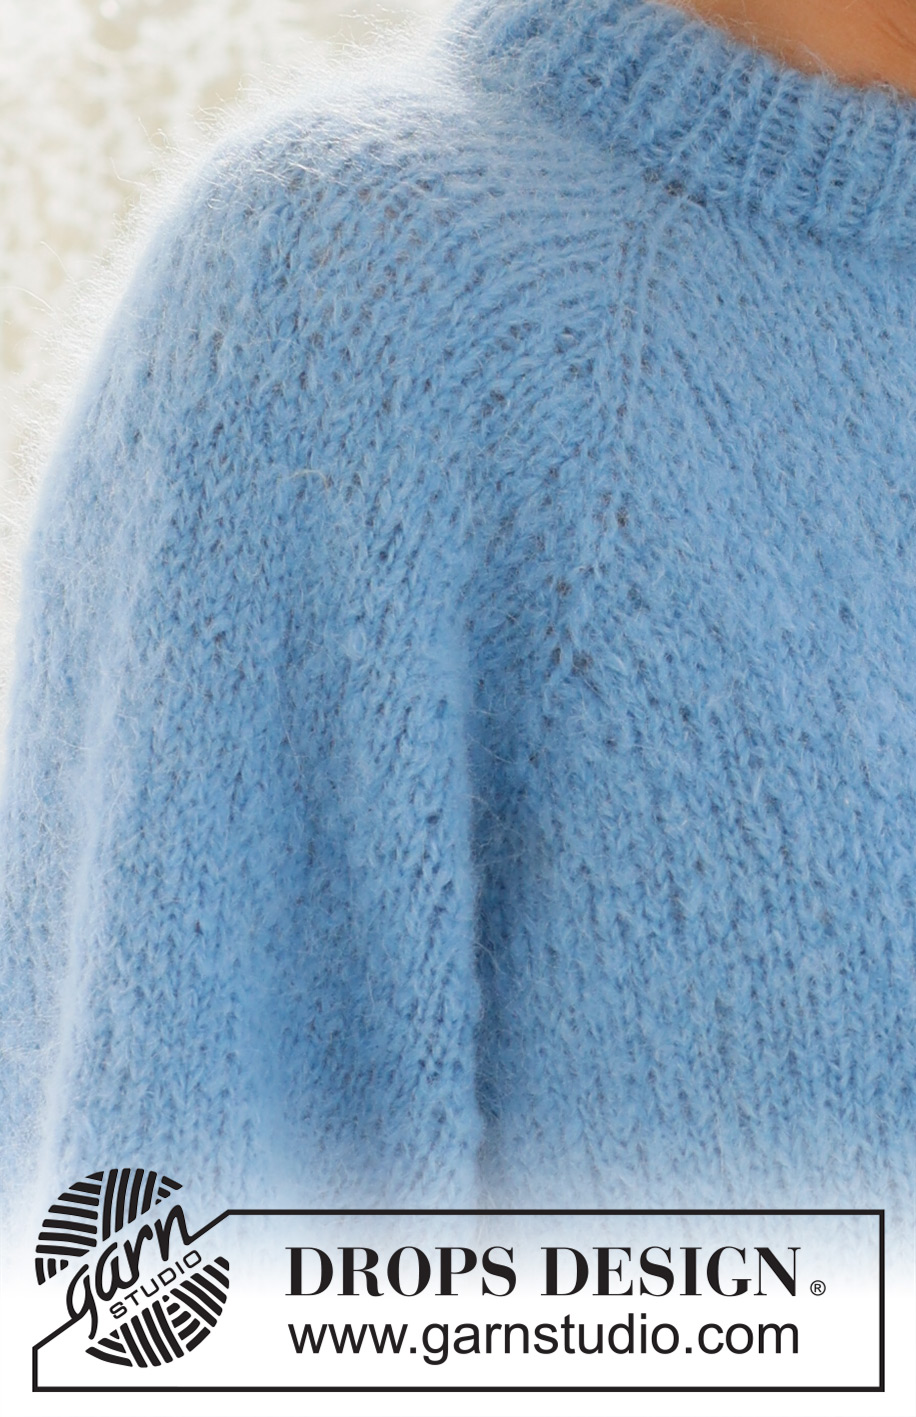
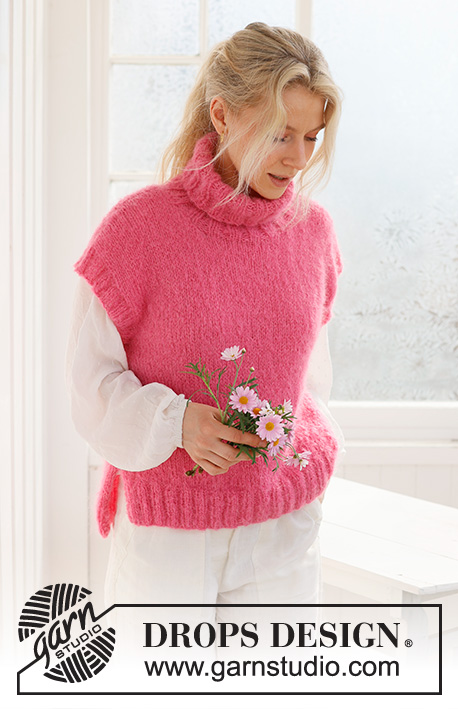
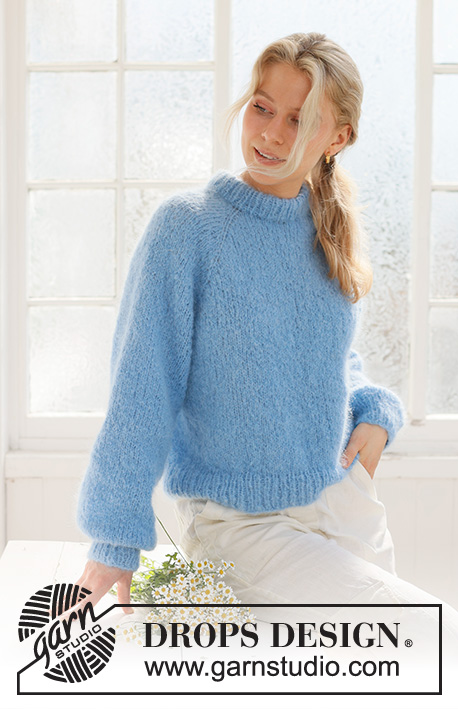
Blueberry Cream Sweater#blueberrycreamsweater |
|
 |
 |
Maglione lavorato ai ferri in DROPS Melody. Lavorato dall’alto in basso, con raglan e collo doppio. Taglie: S - XXXL.
DROPS 231-57 |
|
|
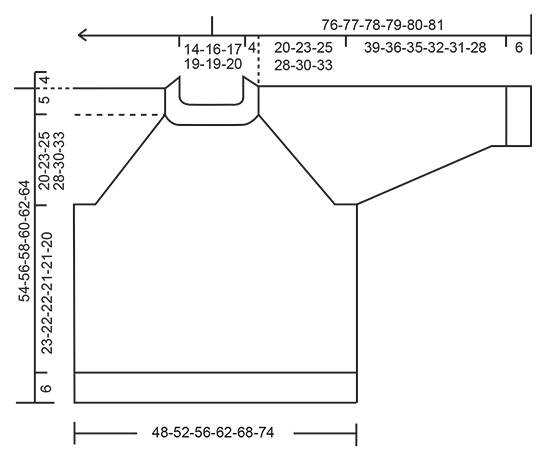
------------------------------------------------------- TECNICHE IMPIEGATE: ------------------------------------------------------- RAGLAN: Aumentare 1 maglia a ogni lato delle maglie con il segnapunti (8 aumenti sul giro). Aumentare 1 maglia facendo 1 gettato, sul giro successivo lavorare i gettati a ritorto per evitare buchi. Poi lavorare le nuove maglie a maglia rasata. SUGGERIMENTO PER LE DIMINUZIONI (applicato alle maniche): Iniziare 3 maglie prima del segnapunti, 2 maglie insieme a diritto, 2 maglie diritto (il segnapunti è al centro di queste 2 maglie), passare 1 maglia a diritto senza lavorarla, 1 maglia diritto, accavallare la maglia passata sopra quella appena lavorata. ------------------------------------------------------- INIZIO DEL LAVORO: ------------------------------------------------------- MAGLIONE – BREVE RIASSUNTO DEL LAVORO: Lavorare il collo e lo sprone in tondo con i ferri circolari, dall’alto in basso. Dividere lo sprone per il corpo e le maniche e continuare in tondo. Lavorare le maniche in tondo con i ferri a doppia punta/ferri circolari corti. COLLO DOPPIO: Avviare 68-72-76-80-80-84 maglie con DROPS Melody, usando i ferri circolari corti n° 4,5 mm e i ferri circolari corti n° 6 mm tenuti insieme. Eliminare un ferro n° 6 mm e continuare con la misura n° 4,5 mm (questo rende il bordo di avvio elastico). Lavorare a coste in tondo (1 maglia diritto, 1 maglia rovescio) per 9 cm. Piegare il collo a metà verso l’interno – lavorare il giro successivo a coste come prima, lavorare le maglie insieme a quelle del bordo di avvio. Passare ai ferri circolari n° 6 mm. Sul giro successivo inserire 4 segnapunti come descritto sotto. Inserire i segnapunti in una maglia diritto che saranno usati per gli aumenti del raglan. Inserire un segnapunti all’inizio del giro = circa centro dietro. Lavorare il giro successivo come segue dal segnapunti: 10-10-12-12-12-14 maglie diritto, 1 gettato, inserire il segnapunti 1 nella maglia successiva, lavorarla a diritto, fare 1 gettato, 15 maglie diritto (manica), 1 gettato, inserire il segnapunti 2 nella maglia successiva, lavorarla a diritto, 1 gettato, 17-19-21-23-23-25 maglie diritto (davanti), 1 gettato, inserire il segnapunti 3 nella maglia successiva, lavorarla a diritto, 1 gettato, 15 maglie diritto (manica), 1 gettato, inserire il segnapunti 4 nella maglia successiva, lavorarla a diritto, 1 gettato, 7-9-9-11-11-11 maglie diritto = 76-80-84-88-88-92 maglie. Lavorare 1 giro diritto, lavorando i gettati a diritto ritorto. Tagliare il filo. SCOLLATURA: Ora lavorare una scollatura a ferri accorciati come segue: Iniziare dal diritto del lavoro, 3 maglie prima del segnapunti 3 (cioè sul lato sinistro del collo davanti, con il capo indossato), lavorare a diritto fino a quando rimangono 3 maglie dopo il segnapunti 2 (= lato destro del collo davanti) – ALLO STESSO TEMPO su questo ferro aumentare per il RAGLAN – leggere la descrizione sopra. Girare, tirare il filo e lavorare a rovescio fino a 7 maglie dopo il segnapunti 3. Girare, tirare il filo e lavorare a diritto fino a 7 maglie dopo il segnapunti 2 – ricordarsi di aumentare per il raglan. Girare, tirare il filo e lavorare a rovescio fino a 3 maglie dopo il segnapunti 3. Tagliare il filo e lavorare lo sprone come descritto sotto. SPRONE: Iniziare all’altezza del segnapunti al centro dietro e lavorare a maglia rasata in tondo su tutte le maglie. ALLO STESSO TEMPO continuare ad aumentare per il raglan ogni 2 giri fino a quando gli aumenti sono stati lavorati per un totale di 8-10-12-14-20-22 volte (compresi gli aumenti sui ferri accorciati). Continuare a maglia rasata e con gli aumenti per il raglan, ma ogni 2° aumento, aumentare solo sul corpo (4 aumenti); cioè aumentare ogni 2 giri sul corpo e ogni 4 giri sulle maniche. Aumentare in questo modo 8-8-8-8-4-4 volte sul corpo (4-4-4-4-2-2 volte sulle maniche). Ora gli aumenti sono stati lavorati per un totale di 16-18-20-22-24-26 volte sul corpo e 12-14-16-18-22-24 volte sulle maniche. Alla fine delll’aumento finale ci sono 180-200-220-240-264-284 maglie. Il lavoro misura circa 20-23-25-28-30-33 cm misurati al centro davanti; continuare a lavorare, se necessario, fino alla lunghezza corretta. Sul giro successivo dividere il lavoro per il corpo e le maniche come segue: Lavorare 29-31-35-37-41-45 maglie come prima (circa ½ dietro), mettere in sospeso le 35-39-43-47-51-55 maglie successive per la manica, avviare 12-12-12-14-14-16 maglie (a lato sotto la manica), lavorare 55-61-67-73-81-87 maglie (davanti), mettere in sospeso le 35-39-43-47-51-55 maglie successive per la manica, avviare 12-12-12-14-14-16 maglie (a lato sotto la manica), lavorare sulle ultime 26-30-32-36-40-42 maglie (circa ½ dietro). Finire il corpo e le maniche in modo separato. Misurare il corpo da qui! CORPO: = 134-146-158-174-190-206 maglie. Lavorare a maglia rasata in tondo per altri 23-22-22-21-21-20 cm. Passare ai ferri circolari n° 4,5 mm. Lavorare a coste (1 maglia diritto, 1 maglia rovescio) per 6 cm. Intrecciare. Il maglione misura circa 54-56-58-60-62-64 cm dalla spalla in giù. MANICHE: Riportare le 35-39-43-47-51-55 maglie a un lato del lavoro sui ferri a doppia punta/ferri circolari n° 6 mm e riprendere 1 maglia in ognuna delle 12-12-12-14-14-16 maglie avviate sotto la manica = 47-51-55-61-65-71 maglie. Inserire un segnapunti al cento delle nuove maglie sotto la manica. Lasciare che il segnapunti segue il lavoro; verrà usato durante le diminuzioni sotto le maniche. Iniziare all’altezza del segnapunti e lavorare a maglia rasata in tondo. TAGLIE XL-XXL-XXXL: Quando la manica misura 4-4-4 cm dalla divisione, diminuire 2 maglie sotto la manica – leggere il SUGGERIMENTO PER LE DIMINUZIONI. Diminuire in questo modo ogni 15-10-10 cm per un totale di 2-3-3 volte (non diminuire per le taglie S, M e L). TUTTE LE TAGLIE: = 47-51-55-57-59-65 maglie. Lavorare fino a quando la manica misura 39-36-35-32-31-28 cm dalla divisione. Lavorare 1 giro diritto in cui diminuire 15-17-19-19-19-23 maglie in modo uniforme = 32-34-36-38-40-42 maglie. Passare ai ferri a doppia punta n° 4,5 mm. Lavorare a coste (1 maglia diritto, 1 maglia rovescio) per 6 cm. Intrecciare. La manica misura circa 45-42-41-38-37-34 cm. Lavorare l’altra manica nello stesso modo. |
|
 |
|
Avete terminato questo modello?Allora taggate le vostre foto con #dropspattern #blueberrycreamsweater o inviatele alla #dropsfan gallery. Avete bisogno di aiuto con questo modello?Troverete 31 video tutorial, una sezione per i commenti/domande e molto altro guardando il modello su www.garnstudio.com © 1982-2026 DROPS Design A/S. Ci riserviamo tutti i diritti. Questo documento, compreso tutte le sue sotto-sezioni, è protetto dalle leggi sul copyright. Potete leggere quello che potete fare con i nostri modelli alla fine di ogni modello sul nostro sito. |
|


Con oltre 40 anni di esperienza nel design di modelli di maglia e uncinetto, DROPS Design offre la più estesa collezione di modelli gratuiti su internet - tradotti in 17 lingue. Ad oggi vi possiamo fornire 324 cataloghi e 12290 modelli - 9561 dei quali sono tradotti in Italiano.
Ci stiamo impegnando molto per darvi il meglio che vi possiamo offrire in termini di maglia e uncinetto, ispirazioni e consigli così come filati di grande qualità ad un prezzo incredibile! Volete utilizzare i nostri modelli per qualcosa d'altro oltre al vostro uso personale? Potete leggere tutto ciò che è consentito nel testo sul Copyright in basso su tutte le pagine dei nostri modelli. Buon lavoro!
Lasciare un commento sul modello DROPS 231-57
Noi saremmo felici di ricevere i tuoi commenti e opinioni su questo modello!
Se vuoi fare una domanda, fai per favore attenzione a selezionare la categoria corretta nella casella qui sotto per velocizzare il processo di risposta. I campi richiesti sono indicati da *.