
Categorie popolari
State cercando un filato?


Commenti / Domande (37)
![]() Lara ha scritto:
Lara ha scritto:
Oups! Ne prenez pas en compte mon 2eme commentaire. Ce que vous avez dit est logique, je viens de comprendre. Simplement au 5ème rang, si je suis vos instructions, je me retrouve à réitérer le carrés de 4 mailles envers exactement au même endroit que le rang 1 et 2 (vu qu'il y a eu les 2 augmentations)
26.01.2026 - 11:14DROPS Design ha risposto:
Bonjour Lara, les carrés de 2 m x 2 rangs en m envers doivent être en quinconce, autrement dit, vous tricotez la 1ère augm comme la dernière maille (= la 4ème) de A.1, la 2ème augm comme l'avant-dernière m de A.1 (= la 3ème) et la 3ème augm (au 5ème rang) comme la 2ème, la 4ème augm comme la 1ère m de A.1 = après ces 4 augmentations, vous avez un nouveau motif après le marqueur (avant le marqueur suivant, tricotez 1 nouveau motif en lisant de droite à gauche). Bon tricot!
27.01.2026 - 08:41
![]() Lara ha scritto:
Lara ha scritto:
Merci pour votre réponse. Donc la maille raglan se fait toujours à l'endroit ? Puis je commence le motif sur la maille jetée ? Le diagramme ne se lit pas toujours de droite à gauche comme se sont des aiguilles circulaires ?
26.01.2026 - 10:44DROPS Design ha risposto:
Bonjour Lara, pour le raglan vous n'avez pas une seule mais 2 mailles qui vont se tricoter tout le temps à l'endroit. Les diagrammes se lisent de droite à gauche tous les tours car toujours sur l'endroit, mais pour savoir comment incorporer les augmentations après les mailles du raglan, vous allez augmenter le motif sur la droite, donc il vous faudra lire de gauche à droite. Bon tricot!
27.01.2026 - 08:36
![]() Lara ha scritto:
Lara ha scritto:
Bonjour, Je suis bloquée au niveau 5 du diagramme. Je viens de finir le rang 4. Comment dois je tricoter la maille après le marqueur et le jeté ? À quel moment commence le diagramme ? Après le marqueur ou après la première maille et la jeté (tricotées à l'endroit ?) Par avance merci pour votre réponse.
26.01.2026 - 02:21DROPS Design ha risposto:
Bonjour Lara, lorsque vous tricotez les augmentations au début du motif (après la maille du raglan), incorporez-les au point fantaisie en lisant le diagramme de gauche à droite pour agrandir le motif sur le côté droit, lorsque vous tricotez les augmentations à la fin du motif (avant la maille du raglan suivantes), incorporez-les au point fantaisie en lisant le diagramme de droite à gauche pour agrandir le motif sur le côté gauche. Bon tricot!
26.01.2026 - 09:23
![]() Maikku ha scritto:
Maikku ha scritto:
Ohjeessa ei mainita, milloin käytetään 40cm pyöröpuikkoa ja milloin 80cm. Eli minkä pituisella kaapelilla työ aloitetaan ja missä kohdissa vaihdetaan toiseen?
19.01.2026 - 16:20DROPS Design ha risposto:
Voit aloittaa työn lyhyemmällä pyöröpuikolla ja vaihtaa työhön pidemmän pyöröpuikon, kun työhön on lisätty tarpeeksi silmukoita. Hihat neulotaan sukkapuikoilla ja lyhyellä pyöröpuikolla.
19.01.2026 - 17:50
![]() Hilary ha scritto:
Hilary ha scritto:
I love the design but not so much the loose sleeves and bottom. Would I beable to reduce the number of stitches further so the rib is tighter on the wrists and the hips? What would you suggest would be a good number? Thanks.
02.01.2026 - 04:06DROPS Design ha risposto:
Hi Hilary, you have to decrease some sts before rib (both on the body and on the sleeves). How many? You should apply trial and error method :) Start with a sleeve, it will be much easier to calculate the number of decreases on the body later on. Happy knitting!
02.01.2026 - 08:33
![]() Carol ha scritto:
Carol ha scritto:
What needle size should I use to do a tension swatch, 5mm or 4.5mm? The Knitting Tension section in the pattern does not specify what size to start with to get the right tension. (I understand about changing needle size to get the right tension, I just need to know what to start with)
15.12.2025 - 14:47DROPS Design ha risposto:
Dear Carol, use larger needle size to check your tension in stocking stitch. Happy knitting!
16.12.2025 - 08:20
![]() Beginner ha scritto:
Beginner ha scritto:
I am confused with markers. Can you specify which marker that I need to make the decrease for the body? I am currently have 6 markers.
26.01.2025 - 06:57DROPS Design ha risposto:
Hi, for decrease on body you need insert 1 marker in the middle of the cast-on stitches under each sleeve (= sides of body). These are the markers that we need for decreasing on body. Happy knitting!
26.01.2025 - 11:52
![]() ALISON ha scritto:
ALISON ha scritto:
Is the Raglan increase (eg row 2) K YO P P K K P P K.... or K YO P K K P P K ie does pattern repeat of A1 include the YO or not? Can't get the raglan line neat.
09.08.2024 - 19:55DROPS Design ha risposto:
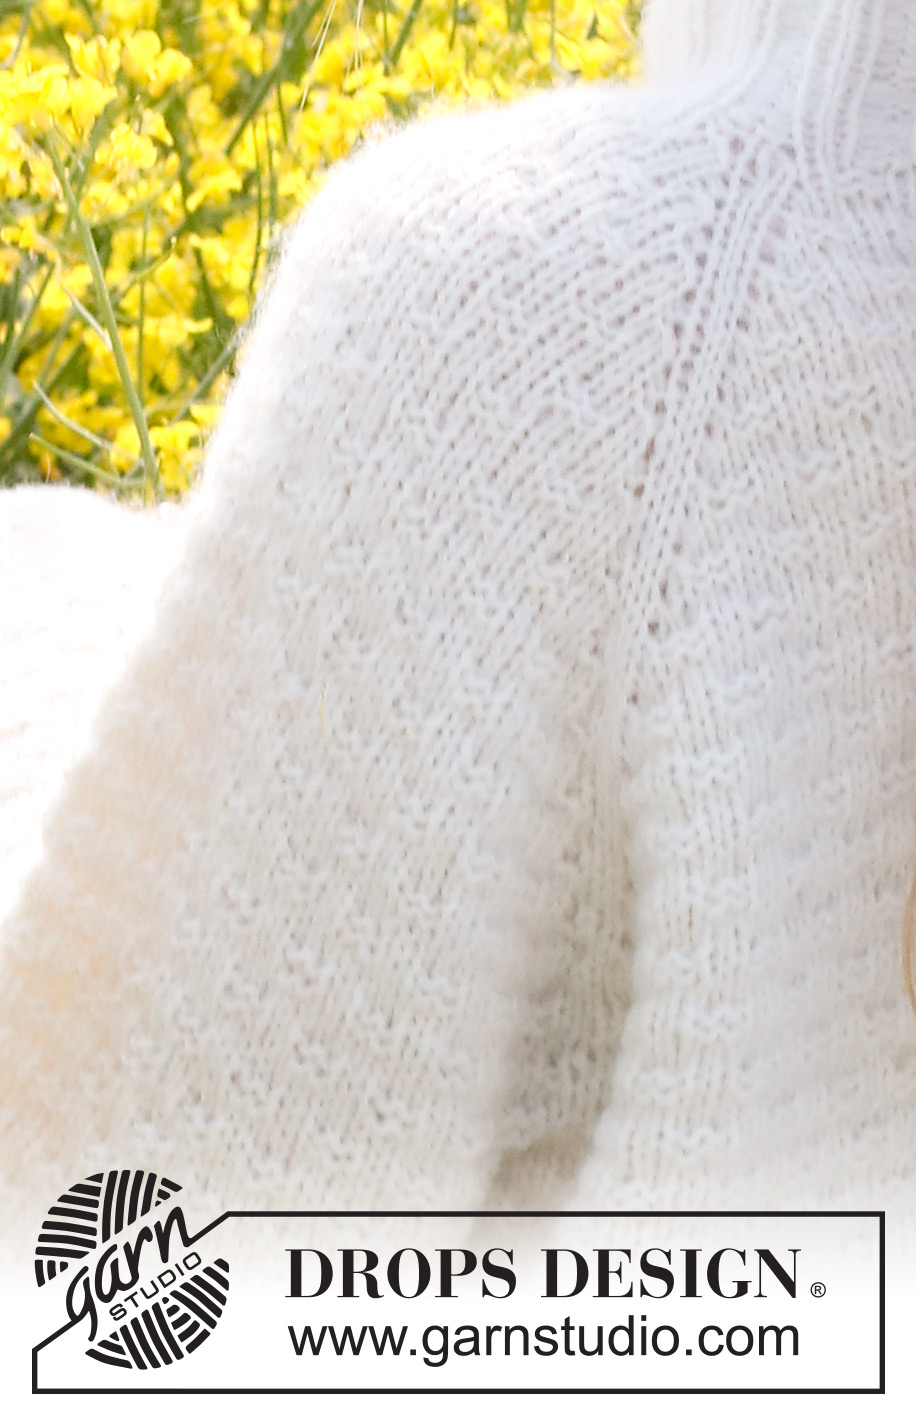
Dear Alison, the increases are right before and right after A.1, and these are worked inside the pattern on the next and following rounds. The pattern is: knit 2, purl 2, which are worked alternately and start at different marks in rounds 1 and 2 and rounds 5 and 6 of the charts. So the increased stitches will be purled or knitted depending on the stitches around it; for example, at the beginning you have knit 1, so the first increase would be knitted. But the next 2 increased stitches at the beginning of the round will be purled. Happy knitting!
11.08.2024 - 13:54
![]() Bian ha scritto:
Bian ha scritto:
Hi Ich verstehe nicht, wie ich die neuen Maschen ins Muster aufnehmen soll. Schon in der 1. Zunahme passt das Muster nicht,oder? Ich stricke ja 1re,2 li,1 re, mit der Zunahme würde sich das Muster verschieben, oder?
15.07.2024 - 19:57DROPS Design ha risposto:
Guten Tag, Sie stricken das begonnene Muster passend übereinander weiter, sodass sich nichts verschiebt, und ergänzen dann die neuen Maschen so, wie es zum Muster passt, also als neuen Mustersatz. Vielleicht markieren Sie sich den ersten und den letzten kompletten Mustersatz, dann sehen Sie leichter, wo ein neuer Mustersatz beginnt. Am Anfang ist der natürlich noch nicht vollständig, sondern erst nach 4 Raglanzunahmen haben Sie wieder 4 Maschen, die Sie für einen neuen kompletten Mustersatz benötigen. Gutes Gelingen!
21.07.2024 - 16:31
![]() Hanna ha scritto:
Hanna ha scritto:
På "Fram och Bakstycke" är min fråga hur många markörer ska jag ha totalt på varvet? Ska jag fortsätta med slätstickning vid markörerna hela tröjan ut? Det ser inte ut så på bilderna...
04.07.2024 - 04:08DROPS Design ha risposto:
Hej Hanna, når du er færdig med raglanudtagningerne på bærestykket, sætter du 1 mærke i hver side (under armen). De 2 masker på hver side af mærket i hver side strikkes i glatstrik. Mønsteret fortsætter du over alle de andre masker på forstykket og bagstykket :)
04.07.2024 - 07:50
|
|||||||
Provence Dream#provencedreamsweater |
|||||||
 |
 |
||||||
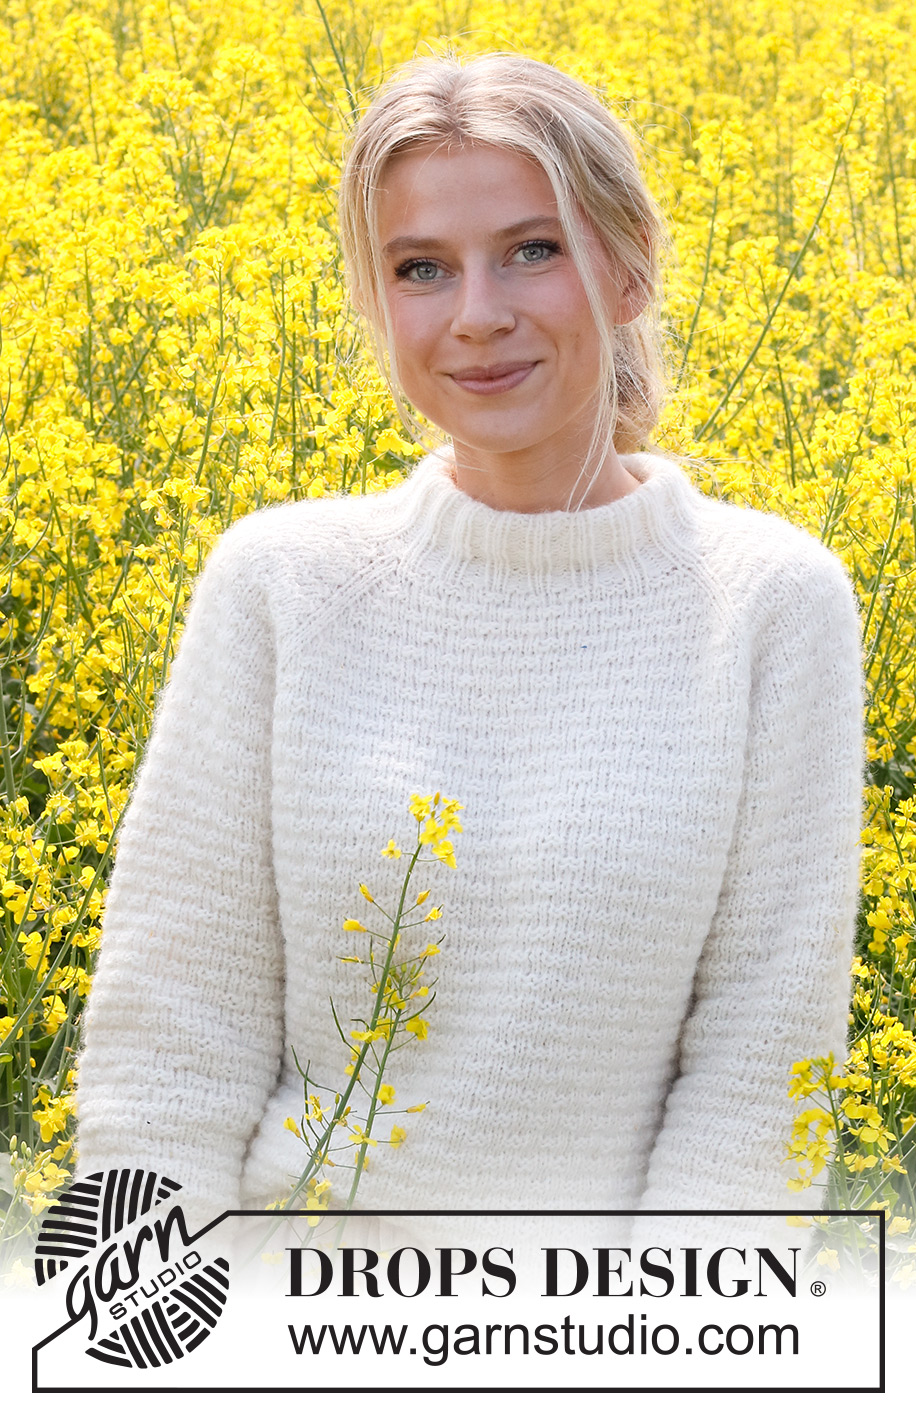
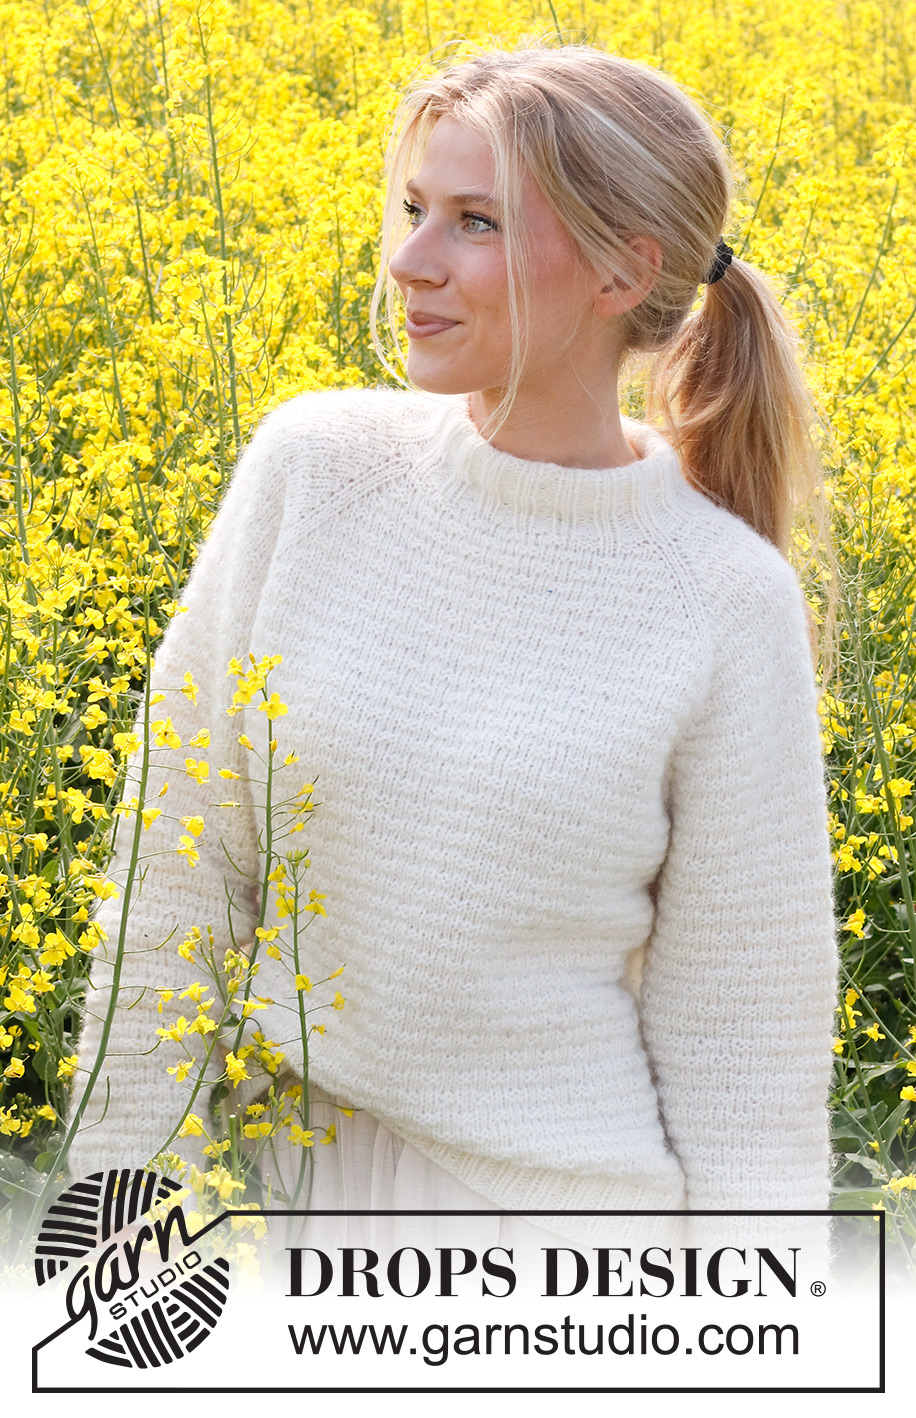
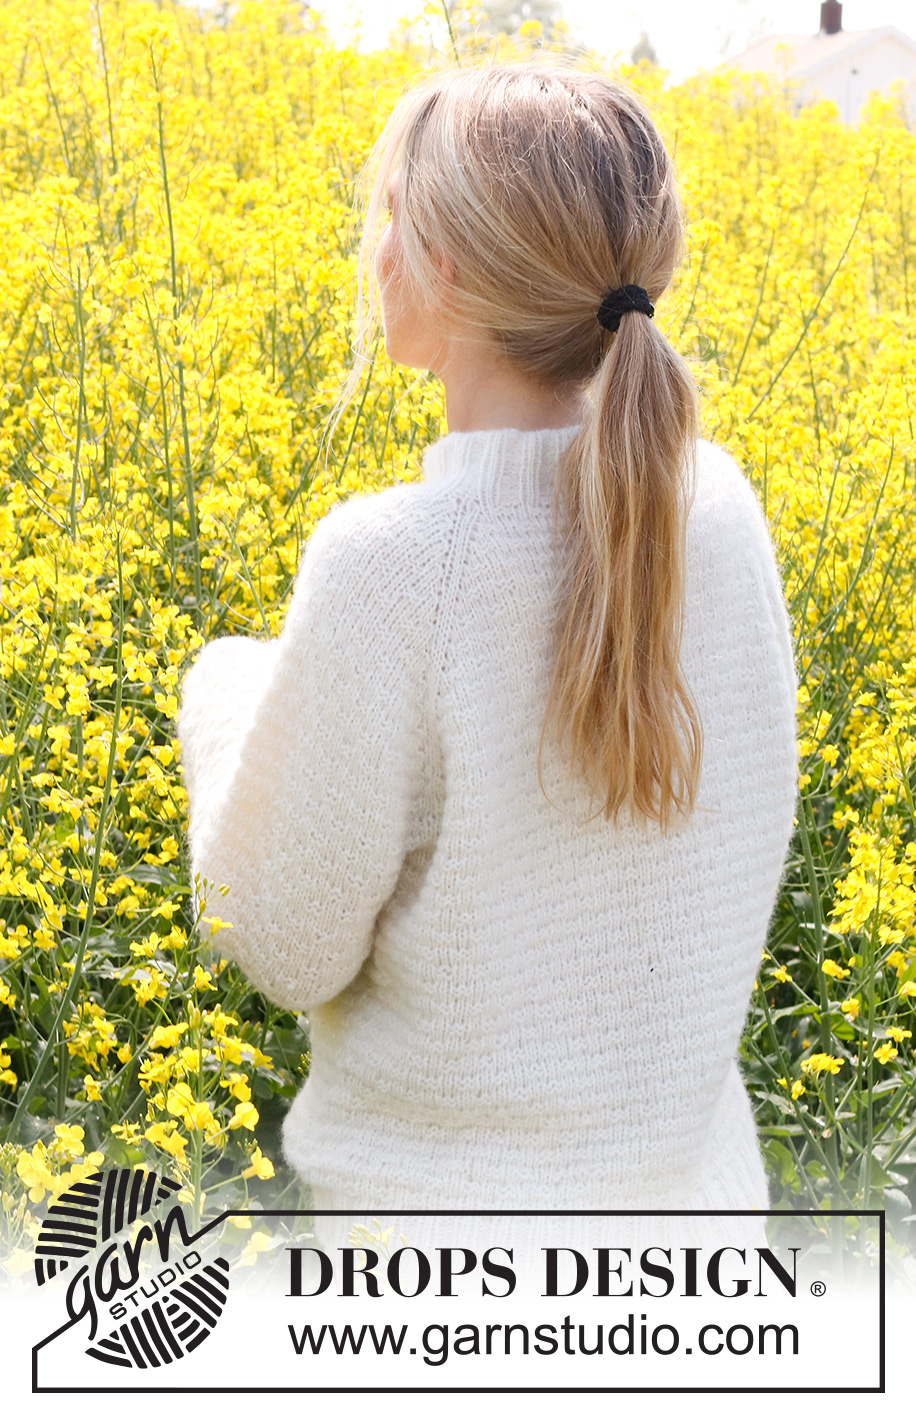
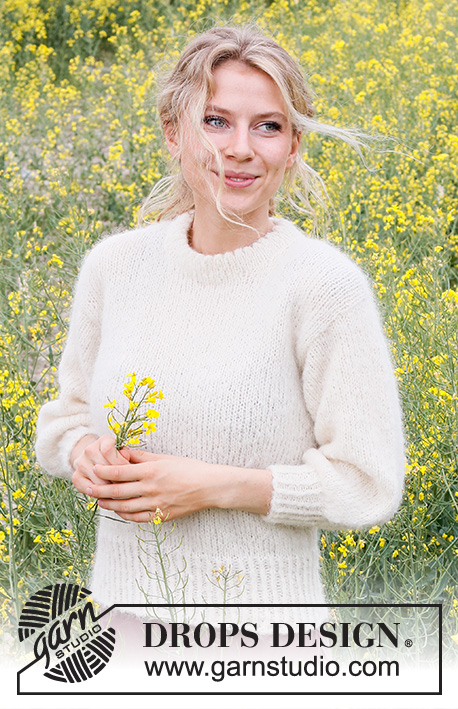
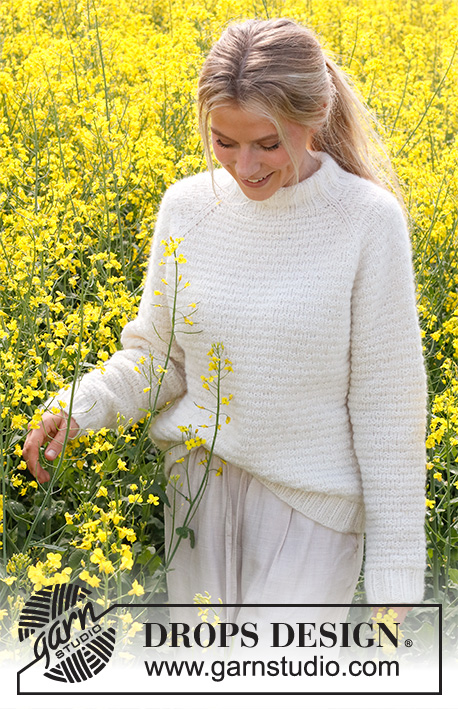
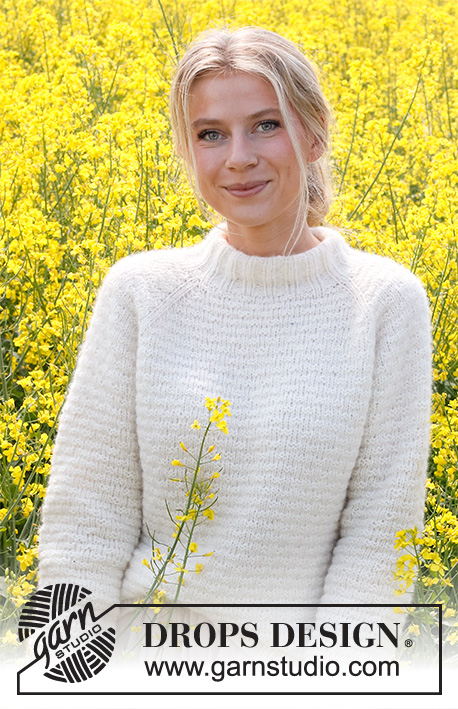
Maglione lavorato ai ferri in DROPS Air. Lavorato dall’alto in basso con raglan, grana di riso e collo doppio. Taglie: S - XXXL.
DROPS 230-15 |
|||||||
|
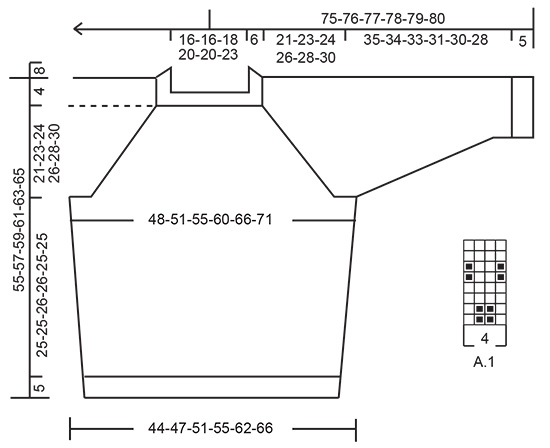
------------------------------------------------------- TECNCIHE IMPIEGATE: ------------------------------------------------------- MOTIVO: Vedere il diagramma A.1. RAGLAN: Aumentare per il raglan a ogni lato delle 2 maglie diritto all’altezza di ogni segnapunti: Lavorare 1 maglia dopo il 1° segnapunti, 1 gettato. Lavorare fino a quando rimane 1 maglia prima del segnapunti successivo, 1 gettato. Aumentare in questo modo all’altezza di ogni segnapunti. Lavorare gli aumenti a diritto ritorto sul giro successivo poi lavorare con il motivo. SUGGERIMENTO PER LE DIMINUZIONI: Diminuire 1 maglia a ogni lato del segnapunti come segue: lavorare fino a quando rimangono 3 maglie prima del segnapunti, 2 maglie insieme a diritto, 2 maglie diritto (il segnapunti è tra queste 2 maglie), passare 1 maglia a diritto senza lavorarla, 1 maglia diritto e accavallare la maglia passata sopra quella appena lavorata. ------------------------------------------------------- INIZIO DEL LAVORO: ------------------------------------------------------- MAGLIONE – BREVE RIASSUNTO DEL LAVORO: Lavorare il collo e lo sprone in tondo con i ferri circolari, dall’alto in basso. Dividere lo sprone per il corpo e le maniche e continuare il corpo in tondo. Lavorare le maniche in tondo, con i ferri circolari corti/ferri a doppia punta, dall’alto in basso. COLLO DOPPIO: Avviare 100-100-110-120-120-130 maglie con i ferri circolari n° 4,5 mm e DROPS Air. Lavorare a coste in tondo (3 maglie diritto, 2 maglie rovescio) per 4 cm. Lavorare il giro successivo e le diminuzioni come segue: * 1 maglia diritto, 2 maglie insieme a diritto, 2 maglie rovescio *, lavorare *-* fino alla fine del giro = 80-80-88-96-96-104 maglie. Continuare le nuove coste (2 maglie diritto, 2 maglie rovescio) fino a quando il collo misura 16 cm. Lavorare 1 giro diritto. SPRONE: Passare ai ferri circolari n° 5 mm. Inserire 1 segnapunti all’inizio del giro. Misurare lo sprone da questo segnapunti! Inserire 4 segnapunti durante la lavorazione come segue: Inserire 1 segnapunti all’inizio del giro, 1 maglia diritto, lavorare 12 maglie con il motivo A.1 (manica), 2 maglie diritto e inserire 1 segnapunti tra queste 2 maglie, lavorare 24-24-28-32-32-36 maglie con il motivo A.1 (davanti), 2 maglie diritto e inserire 1 segnapunti tra queste 2 maglie, lavorare 12 maglie con il motivo A.1 (manica), 2 maglie diritto e inserire 1 segnapunti tra queste 2 maglie, lavorare 24-24-28-32-32-36 maglie con il motivo A.1 (dietro), 1 maglia diritto. LEGGERE LA SEZIONE CONTINUARE PRIMA DI CONTINUARE! Sul giro successivo iniziare ad aumentare per il RAGLAN – leggere la descrizione sopra, e continuare con A.1. FARE ATTENZIONE ALLA TENSIONE DEL LAVORO! Aumentare per il raglan ogni 2 giri per un totale di 21-24-26-28-31-33 volte = 248-272-296-320-344-368 maglie. Continuare il motivo senza ulteriori aumenti fino a quando lo sprone misura 21-23-24-26-28-30 cm dal segnapunti. Ora dividere per il corpo e le maniche come segue: lavorare 4-3-2-2-4-4 maglie (parte del dietro), mettere in sospeso le 48-56-62-66-68-72 maglie successive (manica), avviare 6-6-8-8-8-8 maglie sotto la manica, lavorare 76-80-86-94-104-112 maglie (davanti), mettere in sospeso le 48-56-62-66-68-72 maglie successive (manica), avviare 6-6-8-8-8-8 maglie sotto la manica, lavorare le ultime 72-77-84-92-100-108 maglie (per un totale di 76-80-86-94-104-112 maglie sul dietro). CORPO: = 164-172-188-204-224-240 maglie. Inserire 1 segnapunti al centro delle maglie avviate sotto ogni manica. Continuare in tondo con il motivo A.1. Se il motivo non combacia sotto le maniche, lavorare 2 maglie diritto a ogni lato di ognuno dei segnapunti, le altre maglie devono seguire il motivo sullo sprone. Quando il corpo misura 4 cm, diminuire 1 maglia a ogni lato di entrambi i segnapunti – leggere il SUGGERIMENTO PER LE DIMINUZIONI. Ripetere queste diminuzioni ogni 6-7-6-6-7-5 cm per un totale di 4-3-4-4-3-4 volte = 148-160-172-188-212-224 maglie. Lavorare fino a quando il corpo misura 25-25-26-26-25-25 cm dalla divisione – aggiustarlo per finire con 2 giri a maglia rasata (o fino alla lunghezza desiderata, mancano 5 cm). Passare ai ferri circolari n° 4,5 mm e lavorare a coste (2 maglie diritto, 2 maglie rovescio) per 5 cm. Intrecciare senza stringere con diritto su diritto e rovescio su rovescio. Il lavoro misura circa 55-57-59-61-63-65 cm dalla spalla in giù. MANICHE: Riportare le 48-56-62-66-68-72 maglie in sospeso a un lato del lavoro sui ferri circolari corti/ferri a doppia punta n° 5 mm e riprendere 1 maglia in ognuna delle 6-6-8-8-8-8 maglie avviate sotto la manica = 54-62-70-74-76-80 maglie. Inserire un segnapunti al centro delle 6-6-8-8-8-8 maglie sotto la manica. Iniziare all’altezza del segnapunti e lavorare A.1 in tondo. Se il motivo non combacia sotto la manica, lavorare 2 maglie diritto a ogni lato del segnapunti, le altre maglie devono seguire il motivo sullo sprone. Quando la manica misura 3 cm, diminuire 2 maglie sotto la manica – ricordarsi del SUGGERIMENTO PER LE DIMINUZIONI. Diminuire in questo modo ogni 4-2½-1½-1½-1½-1 cm per un totale di 7-11-15-15-16-18 volte = 40-40-40-44-44-44 maglie. Continuare a lavorare fino a quando la manica misura 35-34-33-31-30-28 cm – aggiustarlo per finire con 2 giri a maglia rasata (o fino alla lunghezza desiderata, mancano circa 5 cm). Passare ai ferri circolari n° 4,5 mm e lavorare a coste (2 maglie diritto, 2 maglie rovescio) per 5 cm. Intrecciare senza stringere con diritto su diritto e rovescio su rovescio. Lavorare l’altra manica nello stesso modo. CONFEZIONE: Piegare il collo a metà verso l’interno e cucire. Per evitare che il collo risulti tirato e si arrotoli verso l’esterno, è importante che la cucitura sia elastica. |
|||||||
Spiegazioni del diagramma |
|||||||
|
|||||||
 |
|||||||
Avete terminato questo modello?Allora taggate le vostre foto con #dropspattern #provencedreamsweater o inviatele alla #dropsfan gallery. Avete bisogno di aiuto con questo modello?Troverete 25 video tutorial, una sezione per i commenti/domande e molto altro guardando il modello su www.garnstudio.com © 1982-2026 DROPS Design A/S. Ci riserviamo tutti i diritti. Questo documento, compreso tutte le sue sotto-sezioni, è protetto dalle leggi sul copyright. Potete leggere quello che potete fare con i nostri modelli alla fine di ogni modello sul nostro sito. |
|||||||


Con oltre 40 anni di esperienza nel design di modelli di maglia e uncinetto, DROPS Design offre la più estesa collezione di modelli gratuiti su internet - tradotti in 17 lingue. Ad oggi vi possiamo fornire 324 cataloghi e 12290 modelli - 9561 dei quali sono tradotti in Italiano.
Ci stiamo impegnando molto per darvi il meglio che vi possiamo offrire in termini di maglia e uncinetto, ispirazioni e consigli così come filati di grande qualità ad un prezzo incredibile! Volete utilizzare i nostri modelli per qualcosa d'altro oltre al vostro uso personale? Potete leggere tutto ciò che è consentito nel testo sul Copyright in basso su tutte le pagine dei nostri modelli. Buon lavoro!
Lasciare un commento sul modello DROPS 230-15
Noi saremmo felici di ricevere i tuoi commenti e opinioni su questo modello!
Se vuoi fare una domanda, fai per favore attenzione a selezionare la categoria corretta nella casella qui sotto per velocizzare il processo di risposta. I campi richiesti sono indicati da *.