
Categorie popolari
State cercando un filato?


Commenti / Domande (41)
![]() ELSA ha scritto:
ELSA ha scritto:
Om jag har ett byst mått på 93 vad ska jag välja för storlek?
22.04.2026 - 20:55DROPS Design ha risposto:
Hej Elsa, storlek L har ett byst mått på 96 cm :)
23.04.2026 - 14:23
![]() Yvonne Obernier ha scritto:
Yvonne Obernier ha scritto:
Vielen Dank für die Antwort, die ich nicht lesen kann. Ich habe die Lösung selbst herausgefunden.
25.03.2026 - 10:24
![]() Yvonne Obernier ha scritto:
Yvonne Obernier ha scritto:
Wie strickt man die 7Maschen in der Passe Muster A2 wieder ab?
24.03.2026 - 21:00DROPS Design ha risposto:
Liebe Frau Obernier, in diesem Video zeigen wir, wie man A.2 strickt, es kann Ihnen sicher helfen. Viel Spaß beim Stricken!
25.03.2026 - 07:31
![]() Yvonne ha scritto:
Yvonne ha scritto:
1. Is this pattern suitable for someone who is not a beginner but definitely not advanced. I just knitted Moon Valley dress, pattern u-776 and that was fine. Is this dress a lot more difficult than that? 2. I wanted something lacy that would be cool to wear on warm days but as this is for Yarn group B will it be a warm dress?
30.01.2026 - 22:42DROPS Design ha risposto:
Hi Yvonne, This dress should be possible for an intermediate knitter. Drops belle from yarn group B is one of our thinner yarns, so should not be too warm. Regards, Drops Team.
03.02.2026 - 07:49
![]() Narcissa ha scritto:
Narcissa ha scritto:
Hi! I’ve reached A.2 row 18 and proceeded to count my stitches which were supposed to be 250, but they’re 243 😥 any advice on what to do? I don’t know where I went wrong and I cannot tell whether I made mistakes by missing stitches on the previous 2 rounds (I didn’t count my stitches for the previous 2 rounds) and now I’m stuck with this. I’d be thankful if you saved me 😩😩
12.12.2024 - 22:37DROPS Design ha risposto:
Dear Narcissa, as you are referring to a middle point in A.2 (without indicating your size) and it's difficult to know where the mistakes may be located you should remake the previous 2 rounds. After frogging the 2 rounds, count that the number of stitches match the number you need. The best tip is to place markers in the piece to indicate each repeat so that, if you miss any stitches, it will be easier to see them (because the repeat will be different). Also, check the black square (from 1 stitch obtain 7 stitches), you may have missed one in one repeat of A.2. Happy knitting!
15.12.2024 - 22:34
![]() Sabrina ha scritto:
Sabrina ha scritto:
Hejsa Jeg er i tvivl om, hvor meget ease kjolen skal have, så hvis jeg har et brystmål på 89, skal jeg så lave en str. M eller L?
07.07.2024 - 23:24DROPS Design ha risposto:
Hei Sabrina. Det kommer an på om du ønsker å ha den tight over brystet eller ikke. Har du en kjole fra før som du liker passformen på, ta mål av den og sammenlign med målene i målskissen til "Swing by Spring " kjolen. mvh DROPS Design
09.07.2024 - 12:57
![]() Yulia ha scritto:
Yulia ha scritto:
Hi, a question on the body section. What does it mean by increase alternately before and after every marker on every 6th round? Is it right if I do 1 row increase before marker (i.e. 8 sts increase) and 1 row increase after marker? Also is the count of every 6th round include the 2 rounds which I have increase of 8 sts each i.e. work in stockinette 4 rounds before the next increase?
03.07.2023 - 15:55DROPS Design ha risposto:
Dear Yulia, correct, the first time you will increase before each marker (increasing 8 sts on the round); then the next time you will increase after each marker (increasing 8 sts on the round) and repeat these, alternately before and after each marker. Increase like this: *Work 1 round with increase, 5 rounds without increase*, and repeat these 6 rounds. Happy knitting!
03.07.2023 - 16:03
![]() Yulia ha scritto:
Yulia ha scritto:
Hi, do you have a video to work on dividing body and sleeve?
29.05.2023 - 16:35DROPS Design ha risposto:
Dear Yulia, sure, in this video we show from time code approx. 06:52 how to divide body and how to cast on new stitches for sleeve - and this lesson shows also from picture 9 how you will divide piece - both are for a raglan, but the same technique will be used with a circular yoke. Happy knitting!
30.05.2023 - 11:14
![]() Yulia ha scritto:
Yulia ha scritto:
Hi, I am working on Yoke section up to the point dividing body and sleeves. After slipping stitches for sleeve, there are numbers of cast on on needle. Which needle does this refer to? The stitch holder for sleeve or needle on body? Thanks.
28.05.2023 - 16:45DROPS Design ha risposto:
Dear Yulia, you cast on stitches for the side under the sleeve, so they are in the needle for the body and used as a placeholder for the location of the sleeves while you work the body. Happy knitting!
28.05.2023 - 18:58
![]() Yulia ha scritto:
Yulia ha scritto:
Hi, on the neck edge: 1. How to switch to circular needle 4 mm from 3 mm? Moving all the stitches all doing another round of K1P1? I tried to move the stitches but having difficulty cause they are thight. 2. Where is the beginning of round mid back to insert 1 marker?
19.05.2023 - 18:12DROPS Design ha risposto:
Dear Yulia, when you start working A.1 in the yoke, which is the next row after the rib, you will start changing the needle size. You will be working with the 3mm needle on your left hand, from which you are working and slipping the stitches and a 4mm needle on your right hand, where you will have the new stitches. The beginning of the round is where you start working the round (which will be the mid back of the piece). That is, when you cast on 100 stitches, the beggining of the round would be the space between stitch 100 and stitch 1. Happy knitting!
21.05.2023 - 19:14
|
||||||||||||||||||||||||||||
Swing by Spring#swingbyspringdress |
||||||||||||||||||||||||||||
 |
 |
|||||||||||||||||||||||||||
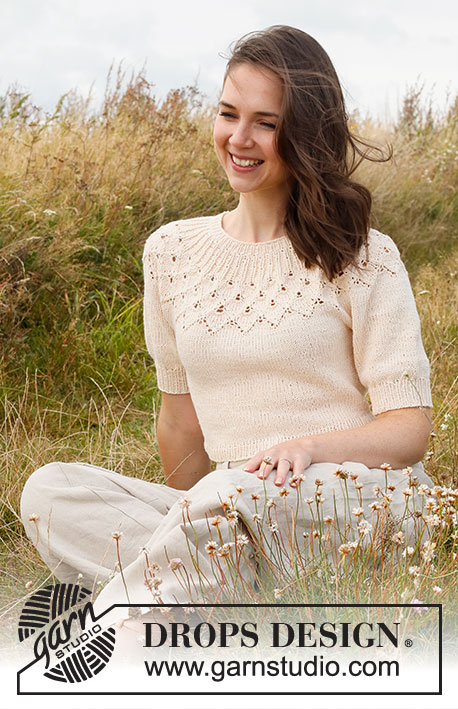
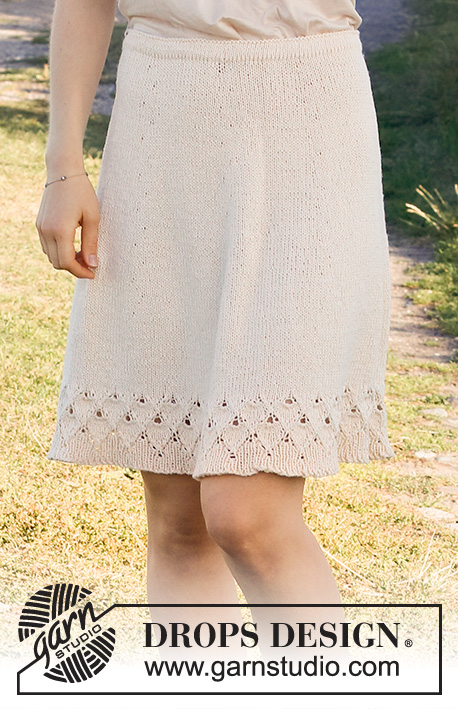
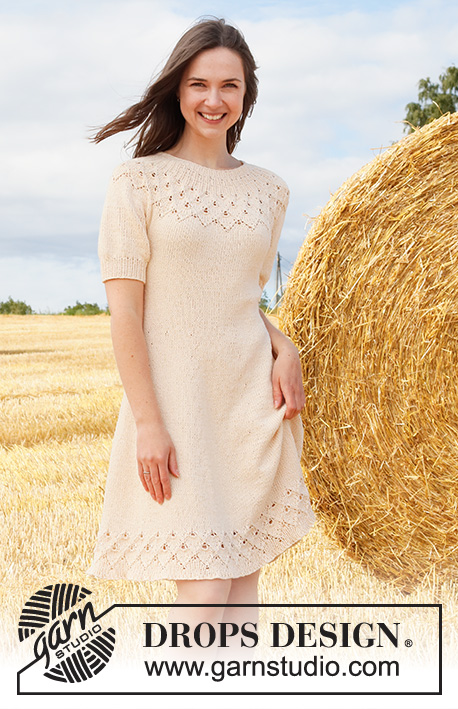
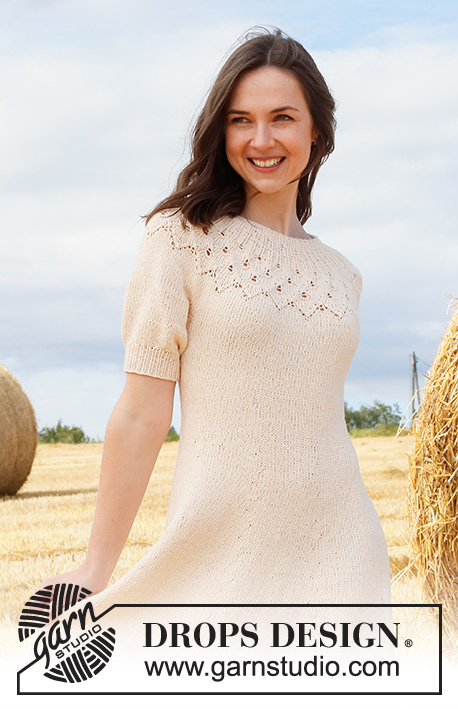
Vestito lavorato ai ferri in DROPS Belle. Lavorato dall'alto in basso con sprone rotondo, motivo traforato, motivo a foglie e maniche corte a palloncino. Taglie: S - XXXL
DROPS 223-2 |
||||||||||||||||||||||||||||
|
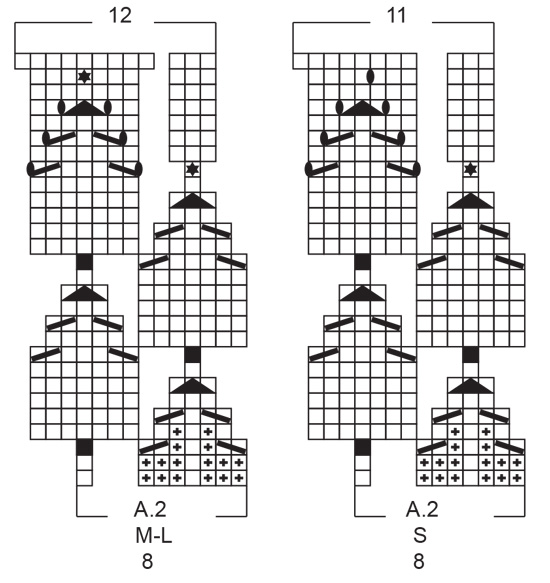
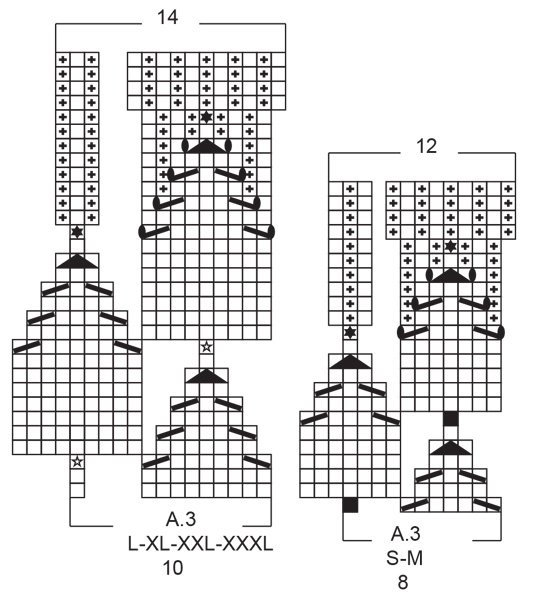
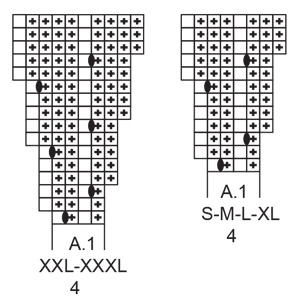
------------------------------------------------------- TECNICHE IMPIEGATE: ------------------------------------------------------- MOTIVO: Vedere i diagrammi A.1 - A.3. Scegliere il diagramma per la vostra taglia. SUGGERIMENTO PER GLI AUMENTI (applicato alla gonna): Aumentare in modo alternato prima e dopo tutti i segnapunti (cioè fare il 1° aumento prima di tutti i segnapunti, fare il secondo aumento dopo tutti i segnapunti etc.). Aumentare 1 maglia prima di tutti i segnapunti come segue: Lavorare fino a quando rimane 1 maglia prima del segnapunti, 1 gettato (= 1 aumento), aumentare in questo modo all'altezza di tutti i segnapunti (= 8 aumenti in totale). Aumentare 1 maglia dopo tutti i segnapunti come segue: Lavorare fino al segnapunti, lavorare 1 maglia dopo il segnapunti, 1 gettato (= 1 aumento), aumentare in questo modo all'altezza di tutti i segnapunti (= 8 aumenti in totale). Sul giro successivo lavorare i gettati a diritto ritorto per evitare buchi. Poi lavorare le nuove maglie a maglia rasata. SUGGERIMENTO PER LE DIMINUZIONI (applicato ai lati del vestito): Diminuire 1 maglia a ogni lato del segnapunti come segue: Lavorare fino a quando rimangono 3 maglie prima del segnapunti, 2 maglie insieme a diritto, 2 maglie diritto (= il segnapunti è al centro di queste maglie), passare 1 maglia a diritto senza lavorarla, 1 maglia diritto, accavallare la maglia passata sopra quella appena lavorata. SUGGERIMENTO PER LA CHIUSURA: Per evitare che il bordo di chiusura sia tirato potete intrecciare con un ferro di una misura più grande. Se il bordo risulta ancora tirato, fare 1 gettato dopo circa 4 maglie durante la chiusura e intrecciare i gettati come maglie normali. ------------------------------------------------------- INIZIO DEL LAVORO: ------------------------------------------------------- VESTITO - BREVE RIASSUNTO DEL LAVORO: Lavorare il bordo del collo e lo sprone in tondo dal centro dietro, dall'alto in basso. Ora dividere lo sprone per il corpo e le maniche. Lavorare il corpo in tondo con i ferri circolari, dall'alto in basso. Lavorare le maniche in tondo con i ferri a doppia punta/ferri circolari corti, dall'alto in basso. BORDO DEL COLLO: Avviare 100-100-104-108-112-120 maglie con i ferri circolari n° 3 mm con Belle. Lavorare 1 giro diritto. Poi lavorare a coste = 1 maglia diritto/1 maglia rovescio. Quando le coste misurano 2-2-3-3-3-3 cm, passare ai ferri circolari n° 4 mm. Inserire 1 segnapunti all'inizio del giro al centro dietro, misurare lo sprone da questo segnapunti! SPRONE: Lavorare A.1 in tondo (= 25-25-26-27-28-30 ripetizioni di 4 maglie). Alla fine di A.1, ci sono 200-200-208-216-280-300 maglie sul ferro. Il lavoro ora misura 4-4-4-4-6-6 cm dal segnapunti. Poi lavorare A.2 in tondo (= 25-25-26-27-28-30 ripetizioni di 8-8-8-8-10-10 maglie). FARE ATTENZIONE ALLA TENSIONE DEL LAVORO! Alla fine di A.2, ci sono 275-300-312-351-392-420 maglie sul ferro. Il lavoro ora misura circa 14-14-14-17-19-19 cm dal segnapunti (cioè 16-16-17-20-22-22 cm dal bordo di avvio). Lavorare a maglia rasata fino a quando il lavoro misura 18-20-21-23-25-27 cm dal segnapunti. Ora dividerlo per il corpo e le maniche. Lavorare il giro successivo come segue: 38-42-44-50-58-63 maglie diritto (= ½ dietro), trasferire le 62-66-68-76-80-84 maglie successive in sospeso per la manica, avviare 8-8-12-12-12-12 nuove maglie sui ferri (= a lato sotto la manica), 75-84-88-99-116-126 maglie diritto (= davanti), trasferire le 62-66-68-76-80-84 maglie successive in sospeso per la manica, avviare 8-8-12-12-12-12 nuove maglie sui ferri (= a lato sotto la manica), lavorare a diritto le ultime 38-42-44-50-58-63 maglie (= ½ dietro). CORPO: = 167-184-200-223-256-276 maglie. Inserire 1 segnapunti al centro delle 8-8-12-12-12-12 nuove maglie avviate sotto ogni manica (= a lato del corpo). Ora ci sono 83-92-100-111-128-138 maglie sul davanti e 84-92-100-112-128-138 maglie sul dietro. Spostare i segnapunti verso l'alto durante il lavoro; verranno usati durante le diminuzioni laterali. Lavorare a maglia rasata in tondo. Quando il lavoro misura 3 cm dalla divisione, diminuire 1 maglia a ogni lato di tutti i segnapunti - leggere il SUGGERIMENTO PER LE DIMINUZIONI (= 4 diminuzioni). Diminuire in questo modo ogni 2 cm 4-4-4-4-5-5 volte in totale = 151-168-184-207-236-256 maglie. Lavorare a maglia rasata in tondo fino a quando il lavoro misura 15-15-16-16-16-16 cm dalla divisione. Sul giro successivo inserire 8 segnapunti nel lavoro come segue: 9-10-11-12-13-16 maglie diritto, inserire 1 segnapunti, * 19-21-23-26-30-32 maglie diritto, inserire 1 segnapunti *, lavorare *-* 7 volte in totale e finire con 9-11-12-13-13-16 maglie diritto. Ora aumentare le maglie per la gonna come segue: Sul giro successivo, aumentare 1 maglia prima di tutti i segnapunti – leggere il SUGGERIMENTO PER GLI AUMENTI! Aumentare in modo alternato prima e dopo ogni segnapunti per tutti gli aumenti ogni 6 giri 15 volte in totale = 271-288-304-327-356-376 maglie. Lavorare a maglia rasata in tondo. Quando il vestito misura 56-57-56-57-58-59 cm dalla divisione (mancano circa 8-8-11-11-11-11 cm, o fino alla lunghezza desiderata), lavorare 1 giro diritto in cui aumentare 1-0-6-3-4-4 maglie in modo uniforme = 272-288-310-330-360-380 maglie. Poi lavorare A.3 in tondo (= 34-36-31-33-36-38 ripetizioni di 8-8-10-10-10-10 maglie). Alla fine di A.3 ci sono 408-432-434-462-504-532 maglie sul ferro. Intrecciare a diritto – leggere il SUGGERIMENTO PER LA CHIUSURA. Il vestito misura circa 86-89-92-95-98-101 cm dalla spalla in giù. MANICA: Riportare le 62-66-68-76-80-84 maglie in sospeso a un lato del lavoro sui ferri a doppia punta/ferri circolari corti n° 4 mm, e riprendere 1 maglia in ognuna delle 8-8-12-12-12-12 nuove maglie avviate a lato sotto la manica = 70-74-80-88-92-96 maglie. Lavorare a maglia rasata in tondo fino a quando la manica misura 12-11-10-8-7-5 cm dalla divisione (mancano circa 5 cm alla fine del lavoro, provare il vestito e lavorare fino alla lunghezza desiderata). Lavorare 1 giro diritto in cui diminuire 16-16-14-14-14-14 maglie in modo uniforme = 54-58-66-74-78-82 maglie. Passare ai ferri a doppia punta n° 3 mm. Lavorare a coste in tondo = 1 maglia diritto/1 maglia rovescio per 5 cm. Intrecciare con diritto su diritto e rovescio su rovescio - ricordarsi del SUGGERIMENTO PER LA CHIUSURA! La manica misura circa 17-16-15-13-12-10 cm dalla divisione. Lavorare l'altra manica nello stesso modo. |
||||||||||||||||||||||||||||
Spiegazioni del diagramma |
||||||||||||||||||||||||||||
|
||||||||||||||||||||||||||||
 |
||||||||||||||||||||||||||||
 |
||||||||||||||||||||||||||||
 |
||||||||||||||||||||||||||||
 |
||||||||||||||||||||||||||||
 |
||||||||||||||||||||||||||||
Avete terminato questo modello?Allora taggate le vostre foto con #dropspattern #swingbyspringdress o inviatele alla #dropsfan gallery. Avete bisogno di aiuto con questo modello?Troverete 34 video tutorial, una sezione per i commenti/domande e molto altro guardando il modello su www.garnstudio.com © 1982-2026 DROPS Design A/S. Ci riserviamo tutti i diritti. Questo documento, compreso tutte le sue sotto-sezioni, è protetto dalle leggi sul copyright. Potete leggere quello che potete fare con i nostri modelli alla fine di ogni modello sul nostro sito. |
||||||||||||||||||||||||||||


Con oltre 40 anni di esperienza nel design di modelli di maglia e uncinetto, DROPS Design offre la più estesa collezione di modelli gratuiti su internet - tradotti in 17 lingue. Ad oggi vi possiamo fornire 324 cataloghi e 12290 modelli - 9561 dei quali sono tradotti in Italiano.
Ci stiamo impegnando molto per darvi il meglio che vi possiamo offrire in termini di maglia e uncinetto, ispirazioni e consigli così come filati di grande qualità ad un prezzo incredibile! Volete utilizzare i nostri modelli per qualcosa d'altro oltre al vostro uso personale? Potete leggere tutto ciò che è consentito nel testo sul Copyright in basso su tutte le pagine dei nostri modelli. Buon lavoro!
Lasciare un commento sul modello DROPS 223-2
Noi saremmo felici di ricevere i tuoi commenti e opinioni su questo modello!
Se vuoi fare una domanda, fai per favore attenzione a selezionare la categoria corretta nella casella qui sotto per velocizzare il processo di risposta. I campi richiesti sono indicati da *.