
Popular categories
Looking for a yarn?


Comments / Questions (30)
![]() Louise wrote:
Louise wrote:
Ik begrijp niet goed hoe ik moet meerderen bij de mouwen. Dit omdat wanneer ik meerder, het telpatroon niet meer klopt. Hoe kan ik meerderen en het telpatroon behouden?
11.12.2022 - 22:23DROPS Design answered:
Dag Louise,
Het telpatroon wordt inderdaad verbroken door het meerderen onder de mouwen, hier is niets aan te doen. Probeer het telpatroon zo ver mogelijk door te laten lopen, indien mogelijk.
12.12.2022 - 20:31
![]() Francoise Lucienne wrote:
Francoise Lucienne wrote:
Bonsoir encore merci a bientot
07.02.2022 - 17:56
![]() Francoise Lucienne wrote:
Francoise Lucienne wrote:
Bonsoir pourquoi on a au début 232 mailles et après 112 merci bonne soirée
06.02.2022 - 19:57DROPS Design answered:
Bonjour Mme Lucienne, vous tricotez d'abord le bas du pull en rond, sur 232 mailles, puis vous rabattez les mailles des emmanchures (4 de chaque côté) et terminez chaque partie séparément soit: 4 mailles rabattues de chaque côté + 112 m pour le devant + 112 m rabattues pour le dos = 4+112+4+112= 232 m. Bon tricot!
07.02.2022 - 11:10
![]() Leen Sels wrote:
Leen Sels wrote:
Welke naalddikte gebruik ik best? Safran geeft volgens het label in tricot op nld3 een verhouding van 24st op 10cm. Ik brei vrij vast en heb nld4 nodig om in tricot deze verhouding te krijgen. Volgens het patroon heb je nld3,5 nodig om met teltekening een verhouding van 23st op 10cm te krijgen. Met nld4 heb ik 30st op 10cm. Met nld5 heb ik 25st op 10cm, maar dit is al vrij los gebreid (doorschijnend en losser dan op de foto) en ik zou nog omhoog moeten gaan naar nld 5,5 of 6. Klopt dit wel?
16.05.2021 - 21:08DROPS Design answered:
Dag Leen Sels,
Ja, de stekenverhouding zoals aangegeven in het patroon klopt. Je hebt 23 steken op 10 cm in de breedte. Met name de breedte is van belang in dit geval bij de stekenverhouding. In deze link vind je meer informatie over de stekenverhouding.
20.05.2021 - 16:52
![]() Petra wrote:
Petra wrote:
Wat betekend sm ik dacht 2 samen breien. Daarna een omslag, ik krijg dan gaatjes klopt dit. Gr Petra
03.04.2021 - 14:32
![]() Myrna Laupland wrote:
Myrna Laupland wrote:
Ribbed Fantasy Should I do the neck ribbing and sew in the sleeves before or after blocking? Thank you
08.11.2020 - 05:31DROPS Design answered:
Dear Mrs Laupland, some knitters always block, some other never - so this look to be just a personnal question. Contact your DROPS store for any further individual assistance. Happy knitting!
09.11.2020 - 10:42
![]() Fata Viden wrote:
Fata Viden wrote:
Kan jag få beskrivning på svenska tack på förhand Mvh //Fata
20.10.2020 - 17:40DROPS Design answered:
Hej. Under bilden kan du ändra språk så att du får mönstret på svenska. Mvh DROPS Design
21.10.2020 - 09:48Carol wrote:
I've finally gotten the courage to pick it up again, but (sorry) I still don't understand how I'm meant to work the front & back separately with new yarn whilst on circular needles. Do I need to work back & forth, front & back separately, on straight needles, keeping half of the work on a stitch holder? I'm getting discouraged. Thanks.
04.12.2017 - 08:39DROPS Design answered:
Dear Carol, that's right, just slip the sts on back piece onto a stitch holder/a thread and work the sts for front piece back and forth on straight (or circular) needle. Happy knitting!
04.12.2017 - 10:38Carol wrote:
Thanks for your reply. When you say: "Cut the yarn and continue front piece separately with 1st st on needle for front piece... " you don't take into account that the first stitch on the needle is actually two bound-off stitches away from the front, so there's a hole. If I can figure out a way to overcome that, do I then have to work it back & forth, not in a circle? Do I need extra needles? Thanks for your speedy reply.
27.11.2017 - 20:52DROPS Design answered:
Dear Carol, you should bind off the last 2 sts on round so that there are 4 sts bound off on each side for armholes (= no st should remain on the side). Then work each piece separately with new yarn. Happy knitting!
28.11.2017 - 08:58Carol wrote:
I'm just at the point where I'm meant to bind off 2 or 4 stitches to begin the armhole, but I end up left with one stitch in the middle of a bound-off section. I have no idea how to proceed with this, and I've never worked in the round before. Can you explain how I proceed? It says I should work the front and back separately, so does that mean I add another ball of yarn and continue in the round? I'm completely confused! Thanks! Carol
26.11.2017 - 11:18DROPS Design answered:
Dear Carol, you bind off for the armholes 2 sts at beg of round (half 1st armhole), 4 sts for 2nd armhole and the last 2 sts on round for 1st armhole (= 2nd half). Cut the yarn and continue front piece separately with 1st st on needle for front piece. Happy knitting!
27.11.2017 - 10:14
|
|||||||
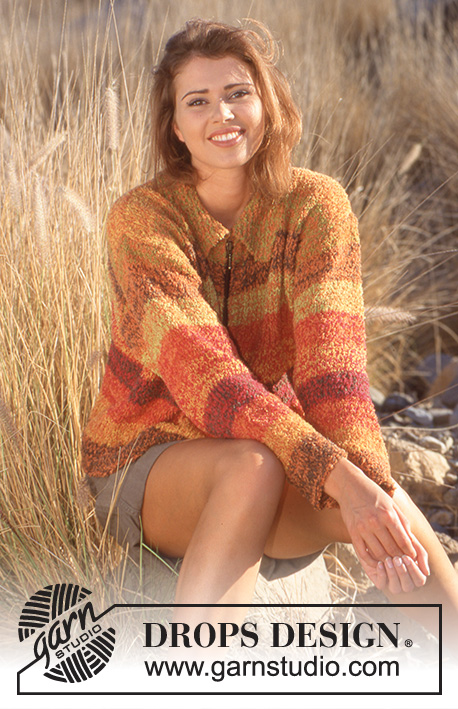
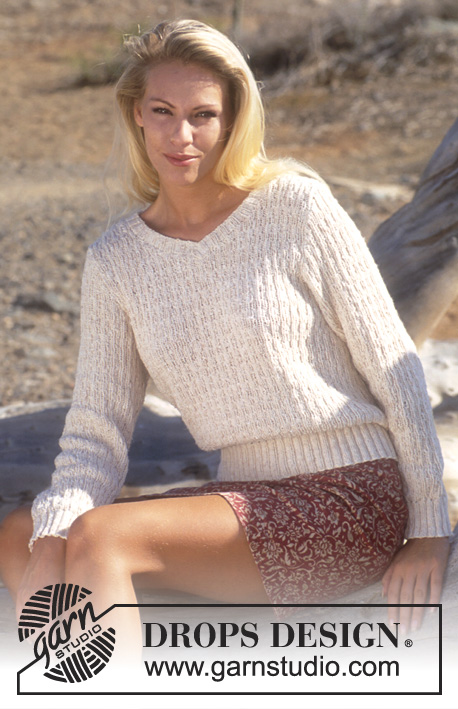
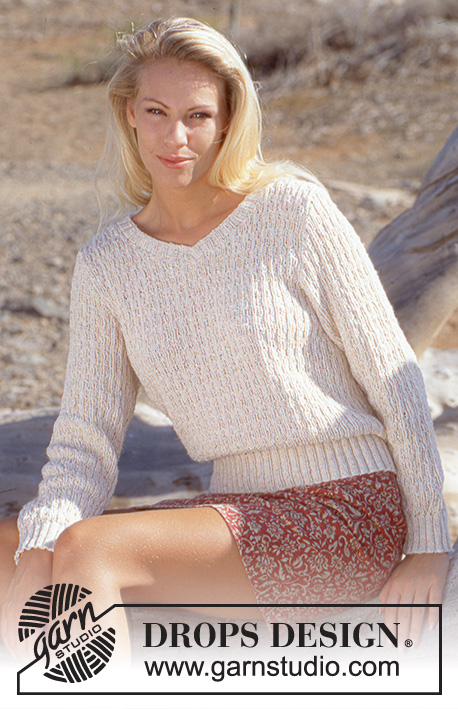
Ribbed Fantasy |
|||||||
 |
 |
||||||
Knitted Sweater in DROPS Safran
DROPS 56-8 |
|||||||
|
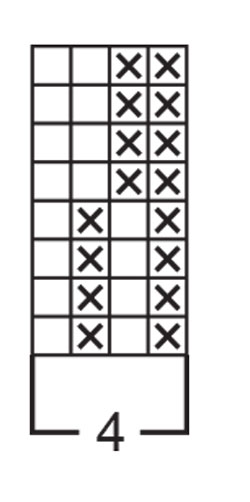
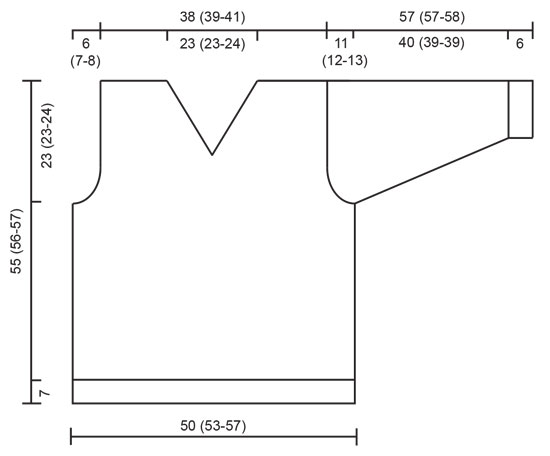
Gauge: 23 sts and 30 rows on larger needles in pattern = 10 x 10 cm Rib: * K 2, P 2*. Repeat * - *. Pattern: See chart (1 chart = 1 repeat). The pattern is shown from the right side. Body: Cast on 232 (244-260) sts on smaller circular needles; join and place a marker at the join. Knit 7 cm rib. Change to larger circular needles and knit the next row as follows: *K 2 tog, yarn over*. Repeat from * - * throughout the row. Then knit Pattern. When the work measures 32 (33-33) cm, knit the next row as follows: Bind off 2 sts for armhole, 112 (118-126) sts for the front, bind off 4 sts for armhole, 112 (118-126) sts for the back, bind off 2 sts for armhole. Knit the rest of each part separately. Front: = 112 (118-126) sts. Shape armholes: bind off at each side every other row: 3 sts 2 times, 2 sts 2 (3-3) times, dec 1 st 2 (2-4) times = 88 (90-94) sts. When the work measures 43 (44-45) cm, divide the front at the center and shape V-neck at each side every other row: bind off 3 sts 1 time, 2 sts 10 times, dec 1 st 2 (3-4) times, then dec 1 st every 4th row 1 time. Work even until the work measures 55 (56-57) cm; bind off all sts. Back: = 112 (118-126) sts. Shape armholes as for the front = 88 (90-94) sts. When the work measures 53 (54-55) cm, bind off the center 46 (48-50) sts for the neck. Then bind off at each neck edge every other row: 2 sts 1 time, dec 1 st 1 time. Bind off all sts when the work measures 55 (56-57) cm. Sleeves: Cast on 60 (64-64) sts on smaller double pointed needles; join and place a marker at the join. Knit rib for 6 cm. Change to larger double pointed needles and knit the next row as follows: *K 2 tog, yo*. Repeat from * - * throughout the row. Then knit Pattern and at the same time inc 1 st each side of marker 21 (20-21) times: Sizes S+L: every 5th row Size M: alternately every 5th and 6th row = 102 (104-106) sts. When the work measures 46 (45-45) cm, bind off 2 sts each side of marker and knit the rest back and forth on needles. Shape sleeve caps on each side every other row: bind off 3 sts 4 (3-3) times, 2 sts 8 (11-13) times, 3 sts 4 (3-3) times, bind off all sts. Assembly: Sew shoulder seams. Pick up approx. 142-162 sts (divisible by 4 sts + 2 sts) around the neck on smaller needles and knit rib back and forth on the needles from the center front for 2.5 cm, bind off all sts. Lay the right part of the neck edge over the left part and sew the ends together. Sew on the sleeves. |
|||||||
Diagram explanations |
|||||||
|
|||||||
 |
|||||||
 |
|||||||
Have you finished this pattern?Tag your pictures with #dropspattern or submit them to the #dropsfan gallery. Do you need help with this pattern?You'll find 18 tutorial videos, a Comments/Questions area and more by visiting the pattern on garnstudio.com. © 1982-2026 DROPS Design A/S. We reserve all rights. This document, including all its sub-sections, has copyrights. Read more about what you can do with our patterns at the bottom of each pattern on our site. |
|||||||


With over 40 years in knitting and crochet design, DROPS Design offers one of the most extensive collections of free patterns on the internet - translated to 17 languages. As of today we count 324 catalogues and 12290 patterns translated into English (UK/cm). 12290
We work hard to bring you the best knitting and crochet have to offer, inspiration and advice as well as great quality yarns at incredible prices! Would you like to use our patterns for other than personal use? You can read what you are allowed to do in the Copyright text at the bottom of all our patterns. Happy crafting!
Post a comment to pattern DROPS 56-8
We would love to hear what you have to say about this pattern!
If you want to leave a question, please make sure you select the correct category in the form below, to speed up the answering process. Required fields are marked *.