
Popular categories
Looking for a yarn?


Comments / Questions (28)
![]() Estrella wrote:
Estrella wrote:
Puede explicarme como se montan los puntos bajo las mangas? Y qué significa que rn la primera vuelta trabajar los 5 puntos nuevos bajo la manga sin trabajar los puntos junto con las hebras.
18.02.2025 - 14:10DROPS Design answered:
Hola Estrella, trabajas los primeros puntos, colocar los siguientes puntos en un gancho auxiliar para la manga. Ahora, montar 5 puntos nuevos en la aguja; estos puntos se corresponden a la parte inferior de la sisa, (=puntos bajo las mangas). Montas igual en la otra manga. En la siguiente vuelta (primera del cuerpo), trabajas en punto inglés sobre todos los puntos. Sin embargo, en estos 5 puntos en cada manga, se trabajan hebras y se deslizan los puntos, pero no se trabajan juntos de derecho la hebra y punto deslizado (porque no hay hebras y puntos deslizados en la vuelta anterior). A partir de la segunda vuelta se trabajan normal.
23.02.2025 - 21:05
![]() Martina Harder wrote:
Martina Harder wrote:
Muss man bei diesem Pulli, beziehungsweise bei der Anleitung den Glitterfaden nehmen oder kann man den Pulli auch ohne Glitterfaden stricken?
23.06.2024 - 09:42DROPS Design answered:
Liebe Frau Harder, Sie können entweder mit oder ohne Glitter stricken, Glitter wird die Maschenprobe nicht ändern, als der Faden dazu zu dünn ist. Viel Spaß beim Stricken!
24.06.2024 - 08:24
![]() Camilla Steiro wrote:
Camilla Steiro wrote:
Det står i oppskriften under HELPATENT helt nederst: "Gjenta 2. og 3. omgang". Er det bare en gang, eller skal resten av genseren strikkes med bare omgangene 2 og 3? Altså skal 1. omgang aldri strikkes igjen?
19.03.2024 - 07:26DROPS Design answered:
Hej Camilla, 1. omgang i patenten strikkes kun en gang :)
19.03.2024 - 15:10
![]() Mel wrote:
Mel wrote:
When you start working the English rib, I gain 24 stitches before I have worked any of the actual increases. Is this correct and if not, how do I prevent this? Thanks.
07.04.2023 - 10:42DROPS Design answered:
Dear Mel, the yarn overs worked in the English rib pattern don't count as new stitches, since they will eventually be worked together with their respective stitches. So, you shouldn't have any real increased stitches before starting to increase on round 3. Happy knitting!
08.04.2023 - 20:50
![]() Claire wrote:
Claire wrote:
Bonjour Par quel fil pourrais je remplacer le fil glitter , je n’aime pas le brillant. Merci d’avance
21.09.2022 - 18:05DROPS Design answered:
Bonjour Claire, vous pouvez simplement le supprimer, Glitter est un fil très fin qui ne change pas la tension du tout. Bon tricot!
22.09.2022 - 09:31
![]() Jeanette Sørensen wrote:
Jeanette Sørensen wrote:
Hej. Jeg strikker str s. Der står at jeg efter indtagning i hals har 48 masker. Så skal jeg tage 8 masker ud på hver 6 omg 2 gange, på hver 8 omg 2 gange og på hver 10 omg 2 gange. Det er 48 nye masker 6*8. Så ender jeg på 96. Er de 144 jeg skulle ende med at have så inklusiv omslag?
18.12.2021 - 08:26DROPS Design answered:
Hei Jeanette. Du starter med 48 masker, så øker du med 16 masker hver gang det er en økeomgang. Du øker 6 ganger (6 ganger x 16 masker = 96 økte masker). Da blir det 48 masker + 96 økte masker = 144 masker. (Omslagene til patentmasken telles ikke som en egne maske, de tilhører patentmasken). mvh DROPS Design
21.12.2021 - 10:24
![]() JoeJ5 wrote:
JoeJ5 wrote:
Bonjour En ce qui concerne les rangs d'augmentation CÔTES ANGLAISES AVEC JETÉS , il est écrit : "Tricoter 3 fois la maille et son jeté" mais dans l'explication et la vidéo la maille et son jeté sont tricotés deux fois ! que dois-je faire. Merci
19.03.2021 - 17:15DROPS Design answered:
Bonjour JoeJ5, dans la même maille vous allez: tricoter cette maille + faire 1 jeté + tricoter à nouveau cette maille, vous aurez 3 mailles sur l'aiguille droite et aurez maintenant augmenté 2 mailles. Bon tricot!
22.03.2021 - 07:13
![]() Janni Kristensen wrote:
Janni Kristensen wrote:
Har set video og flytter som anvist i opskriften
05.03.2021 - 18:12DROPS Design answered:
Hej Janni, da burde det også se ud som i videoen... husker du at du ikke skal tælle omslagene med som masker?
08.03.2021 - 11:43
![]() Janni Kristensen wrote:
Janni Kristensen wrote:
Der står i opskriften der skal blive med med at være 5-5-7-7-9-9 masker mellem mærkerne i mit tilfælde 7. Men når jeg starter på helpatent med omslag får jeg 11 masker grundet omslaget. Hvad pokker gør jeg galt?
28.02.2021 - 21:28DROPS Design answered:
Hej Janni, kan det være fordi du glemmer at flytte mærket? Eller har du set videoen nederst i opskriften?
05.03.2021 - 10:05
![]() May wrote:
May wrote:
...vervolg: Of moet je op deze manier de naalden in patentsteek breien: Naald 3 meerderen // 2 toeren breien // Naald 6 meerderen // 5 toeren breien // Naald 12 meerderen // 7 toeren breien // Naald 8 meerderen // 7 toeren breien // Naald 16 meerderen // 9 toeren breien // Naald 10 meerderen // 9 toeren breien // Naald 20 meerderen // verder breien tot 23 cm (dus weer "beginnen" bij naald 5 toeren breien // Naald 6 meerderen ?? )
09.02.2021 - 12:35DROPS Design answered:
Dag May,
De meerderingen worden gemaakt in een naald waarbij de omslag en averechte steek recht samen worden gebreid, zoals ook bovenaan aangegeven bij de instructies hoe je de meerderingen voor en na de markeerders maakt. Als er staat 'meerder zo iedere 6e' naald, dan wordt daarmee bedoeld dat je om de 6 naalden meerdert. Dit doe je in maat s 2 keer, dus dan zit je op 12 naalden. Vervolgens meerder je om de 10 naalden, ook weer 2 keer in maat S, dus dan komen er 20 naalden bij. Je bent dan in totaal 32 naalden verder. Als je nog niet op 23 cm bent brei je verder tot die hoogte in patentsteek zonder verdere meerderingen.
23.02.2021 - 14:18
|
|
Cheers to Life#cheerstolifesweater |
|
 |
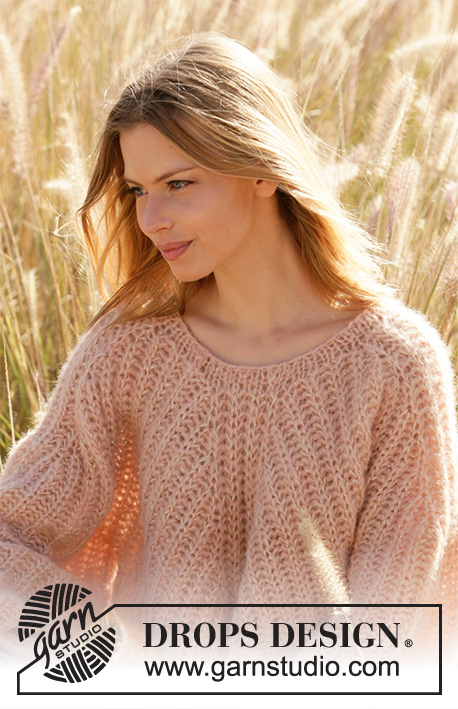 |
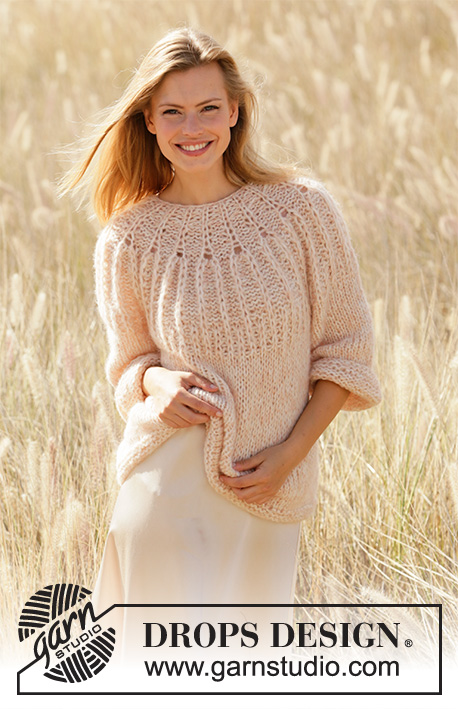
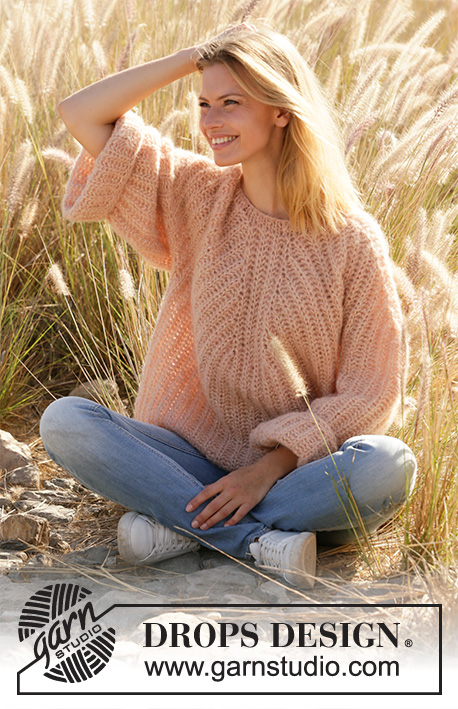
Knitted jumper with round yoke in 2 strands DROPS Brushed Alpaca Silk and 1 strand Glitter. The piece is worked top down in English rib. Sizes S - XXXL.
DROPS 212-28 |
|
|
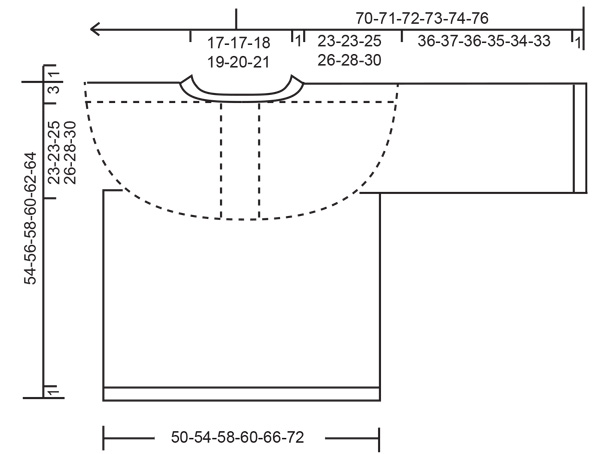
------------------------------------------------------- EXPLANATIONS FOR THE PATTERN: ------------------------------------------------------- DECREASE TIP (evenly spaced): To work out how to decrease evenly, count the total number of stitches on needle (e.g. 55 stitches) and divide by number of decreases to be made (e.g. 7) = 7.85. In this example decrease by knitting approx. each 7th and 8th stitch together. ENGLISH RIB WITH YARN OVERS – in the round: ROUND 1: * Make 1 yarn over, slip 1 stitch as if to purl, knit 1 *, work from *-* to end of round. ROUND 2: * Purl together the yarn over and slipped stitch, make 1 yarn over, slip 1 stitch as if to purl *, work from *-* to end of round. ROUND 3: * Make 1 yarn over, slip 1 stitch as if to purl, knit together the yarn over and slipped stitch *, work from *-* to end of round. Repeat rounds 2 and 3. INCREASE TIP: All increases are worked on a round where yarn overs and slipped stitches are knitted together. INCREASE AS FOLLOWS IN THE STITCHES WITH PURPLE MARKERS: Work 3 stitches in the stitch and yarn over and move the marker as follows: Knit together the yarn over and stitch, move the purple marker to this stitch (i.e. stitch on right needle), but do not slip the stitch and yarn-over off the left needle, make 1 yarn over the right needle and knit together the stitch and yarn over 1 more time = 3 stitches (= 2 stitches increased). The marker sits in the first increased stitch (= knitted stitch). The next time you increase, work in the stitch with the marker. INCREASE AS FOLLOWS IN THE STITCHES WITH GREEN MARKERS: Work 3 stitches in the stitch and yarn over and move the marker as follows: Knit together the yarn over and stitch, but do not slip the stitch and yarn-over off the left needle, make 1 yarn over the right needle and knit together the stitch and yarn over 1 more time and move the green marker to this stitch = 3 stitches (= 2 stitches increased). The marker sits in the last increased stitch (= knitted stitch). The next time you increase, work in the stitch with the marker. On the next round work the 3 stitches into the English rib pattern as follows: Make 1 yarn over, slip 1 stitch as if to purl, purl the yarn over, make 1 yarn over, slip 1 stitch as if to purl. Then continue in English rib. CASTING-OFF TIP: To avoid the cast-off edge being tight you can cast off with a larger size needle. If the edge is still tight, make 1 yarn over after approx. each 4th stitch at the same time as casting off; the yarn overs are cast off as normal stitches. ------------------------------------------------------- START THE PIECE HERE: ------------------------------------------------------- JUMPER – SHORT OVERVIEW OF THE PIECE: The neck and yoke are worked in the round with circular needle from mid-back and top down. Increases are worked for body and sleeves mid-front/back and mid-top of sleeves. The yoke is divided for body and sleeves. The body is continued in the round with circular needle. The sleeves are worked in the round with double pointed needles/short circular needle, top down. NECK: Cast on 55-55-58-60-62-65 stitches with circular needle size 7 mm and 2 strands Brushed Alpaca Silk and 1 strand Glitter. Knit 2 rounds. Knit 1 round and decrease 7-7-10-4-6-9 stitches evenly spaced – read DECREASE TIP = 48-48-48-56-56-56 stitches. Change to circular needle size 8 mm. Insert 1 marker at the beginning of the round (= mid-back); the yoke will be measured from this marker! YOKE: Now insert 8 markers in the piece as follows: Using 2 different coloured markers. Knit 3-3-3-3-5-5, insert 1 purple marker in the next stitch and then knit this stitch, * knit 5-5-3-5-3-3, insert 1 green marker in the next stitch and then knit this stitch, knit 5-5-7-7-9-9, insert 1 purple marker in the next stitch and then knit this stitch *, work from *-* a total of 3 times, knit 5-5-3-5-3-3, insert 1 green marker in the next stitch, knit this stitch and then knit 2-2-4-4-4-4. The 5-5-7-7-9-9 stitches between the green and the purple markers are the stitches mid front, mid back and on top of each sleeve. You will increase in the stitches with markers later. Now continue with ENGLISH RIB WITH YARN OVERS – read description above. On round 3 in the pattern start to increase as follows: Increase 2 stitches in each knitted stitch with markers (= a total of 16 stitches increased) and move the markers each time you increase – read INCREASE TIP! In other words you increase stitches before the green markers and increase after the purple markers. The 5-5-7-7-9-9 stitches between the markers remain the same, the stitches increased are increased on each side of these stitches. REMEMBER THE KNITTING TENSION! Increase like this every 6th round a total of 2-3-5-4-5-7 times, then every 8th round a total of 2-2-2-3-3-2 times and every 10th round a total of 2-2-1-1-1-1 times = 144-160-176-184-200-216 stitches. Continue working until the piece measures 23-23-25-26-28-30 cm from the marker mid-back. Now divide the piece for body and sleeves as follows: Work the first 23-25-27-28-31-34 stitches, place the next 27-31-35-37-39-41 stitches on a thread for the sleeve and cast on 5 stitches under the sleeve, work the next 45-49-53-55-61-67 stitches, place the next 27-31-35-37-39-41 stitches on a thread for the sleeve and cast on 5 stitches under the sleeve, work the last 22-24-26-27-30-33 stitches. BODY: = 100-108-116-120-132-144 stitches. Continue in the round with English rib. On the first round work the 5 new stitches under the sleeve without working the stitches together with yarn overs. When the piece measures 27-29-29-30-30-30 cm from the division, knit 3 rounds over all stitches. Cast off – read CASTING-OFF TIP. SLEEVES: Place the 27-31-35-37-39-41 stitches from the thread on the one side of the piece on double pointed needles/short circular needle size 8 mm and knit up 1 stitch in each of the 5 stitches cast on under the sleeve = 32-36-40-42-44-46 stitches. Continue in the round with English rib as before. On the first round work the 5 new stitches under the sleeve without working the stitches together with yarn overs. When the piece measures 36-37-36-35-34-33 cm from where the sleeve was divided from the body, knit 3 rounds over all stitches. Then cast off. Work the other sleeve in the same way. |
|
 |
|
Have you finished this pattern?Tag your pictures with #dropspattern #cheerstolifesweater or submit them to the #dropsfan gallery. Do you need help with this pattern?You'll find 15 tutorial videos, a Comments/Questions area and more by visiting the pattern on garnstudio.com. © 1982-2026 DROPS Design A/S. We reserve all rights. This document, including all its sub-sections, has copyrights. Read more about what you can do with our patterns at the bottom of each pattern on our site. |
|


With over 40 years in knitting and crochet design, DROPS Design offers one of the most extensive collections of free patterns on the internet - translated to 17 languages. As of today we count 324 catalogues and 12290 patterns translated into English (UK/cm). 12290
We work hard to bring you the best knitting and crochet have to offer, inspiration and advice as well as great quality yarns at incredible prices! Would you like to use our patterns for other than personal use? You can read what you are allowed to do in the Copyright text at the bottom of all our patterns. Happy crafting!
Post a comment to pattern DROPS 212-28
We would love to hear what you have to say about this pattern!
If you want to leave a question, please make sure you select the correct category in the form below, to speed up the answering process. Required fields are marked *.