
Popular categories
Looking for a yarn?


Comments / Questions (19)
![]() Elisabetta wrote:
Elisabetta wrote:
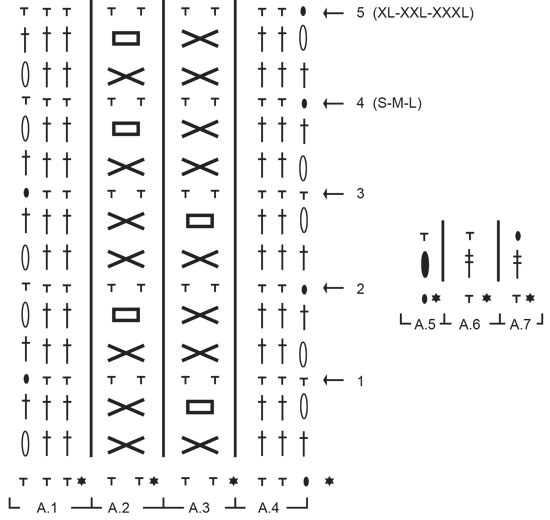
Buongiorno, la X si creano più punti della riga precedente, oltre alla maglia alta e al puff stitch c'è anche una catenella (quindi 3 punti sui 2 del giro precedente), nel punto indicato con il rettangolo le catenelle sono addirittura 2 aumentando ulteriormente i punti. I punti sono di più alla fine di quelli indicati nella riga freccia 1? ho capito bene?
04.12.2025 - 12:43DROPS Design answered:
Buonasera Elisabetta, si lavora tutto in una maglia, non ci sono aumenti. Buon lavoro!
04.12.2025 - 23:06
![]() Elisabetta wrote:
Elisabetta wrote:
Buongiorno, la X si creano più punti della riga precedente, oltre alla maglia alta e al puff stitch c'è anche una catenella (quindi 3 punti sui 2 del giro precedente), nel punto indicato con il rettangolo le catenelle sono addirittura 2 aumentando ulteriormente i punti. I punti sono di più alla fine di quelli indicati nella riga freccia 1? ho capito bene?
24.11.2025 - 11:59DROPS Design answered:
Buonasera Elisabetta, è tutto lavorato in una maglia. Buon lavoro!
04.12.2025 - 23:07
![]() Elisabetta wrote:
Elisabetta wrote:
Buongiorno, la X si creano più punti della riga precedente, oltre alla maglia alta e al puff stitch c'è anche una catenella (quindi 3 punti sui 2 del giro precedente), nel punto indicato con il rettangolo le catenelle sono addirittura 2 aumentando ulteriormente i punti. I punti sono di più alla fine di quelli indicati nella riga freccia 1? ho capito bene?
21.11.2025 - 12:52DROPS Design answered:
Buonasera Elisabetta, tutti quei punti vengono lavorati in una maglia, non ci sono aumenti. Buon lavoro!
04.12.2025 - 23:06
![]() Elisabetta wrote:
Elisabetta wrote:
Buongiorno, la X si creano più punti della riga precedente, oltre alla maglia alta e al puff stitch c'è anche una catenella (quindi 3 punti sui 2 del giro precedente), nel punto indicato con il rettangolo le catenelle sono addirittura 2 aumentando ulteriormente i punti. I punti sono di più alla fine di quelli indicati nella riga freccia 1?
03.11.2025 - 08:57DROPS Design answered:
Buonasera Elisabetta, tutti quei punti vengono lavorati in una maglia, non ci sono aumenti. Buon lavoro!
27.12.2025 - 14:12
![]() Elisabetta wrote:
Elisabetta wrote:
La spiegazione dei punti della riga con X prevede 4 maglie ogni 2 e il totale dei punti sono maggiori della riga freccia 1. Come mai? Forse non ho compreso bene? Chiedo spiegazioni. Grazie
30.10.2025 - 20:33DROPS Design answered:
Buonasera Elisabetta, non ci sono aumenti, il PUFF STITCH si lavora nella maglia saltata. Buon lavoro!
31.10.2025 - 18:25
![]() Elisabetta wrote:
Elisabetta wrote:
Buongiorno, la X si creano più punti della riga precedente creando troppi aumenti rispetto a quelli che dovrebbero esserci nella riga freccia 1?
26.10.2025 - 07:25DROPS Design answered:
Buonasera Elisabetta, nel simbolo X si lavora su una maglia creando il PUFF STITCH, non ci sono aumenti. Buon lavoro!
31.10.2025 - 18:23
![]() Steinunn Benna Hreiðarsdóttir wrote:
Steinunn Benna Hreiðarsdóttir wrote:
Hæ aftur og afsakið las leiðbeiningar ekki nógu vel. En á að gera eins og mér fannst rökrétt🙂 Takk fyrir aðstoð.
30.01.2023 - 22:03
![]() Steinunn Benna Hreiðarsdóttir wrote:
Steinunn Benna Hreiðarsdóttir wrote:
Sæl aftur. Mun ekki pufflykkjur munstrum fjolga mjög mikið?
30.01.2023 - 13:12DROPS Design answered:
Sæl Steinunn Það er engin útaukning í sjálfri pufflykkjunni. Pufflykkjan er hekluð með því að hekla saman nokkrar lykkjur í 1 lykkju – lykkjan blæs út vegan þess að lykkjurnar/uppslættirnir eru dregnir langt út og lykkjan stækkar. Skoðaðu myndböndin sem eru neðst á síðunni í uppskriftinni og þar fylgja útskýringar. Gangi þér vel.
06.02.2023 - 10:48
![]() Steinunn Benna Hreiðarsdóttir wrote:
Steinunn Benna Hreiðarsdóttir wrote:
Vantar útskýringu á munsturteikningu A2 og A3 í 6. umferð? Hvort er í byrjun og svo til loka 3 lykkja?
28.01.2023 - 23:35
![]() Steinunn Benna wrote:
Steinunn Benna wrote:
Sk-057 Hvernig á að nota munsturteikningu? Lesið er til skiptis frá hæ - vinstri Það á að byrja í 2. umferð hægra megin en í útskýringum er sagt að hekla A1 A2 og svo A3 uns 3 l eru eftir. Þá er A2 heklað og svo A3 alla leið er það ekki? Í 6. umferð snýst þetta við þá virðist eiga að hekla krossinn A3 alla leið?
28.01.2023 - 23:29
|
|||||||||||||||||||||||||||||||
Autumn Gold Jacket#autumngoldjacket |
|||||||||||||||||||||||||||||||
 |
 |
||||||||||||||||||||||||||||||
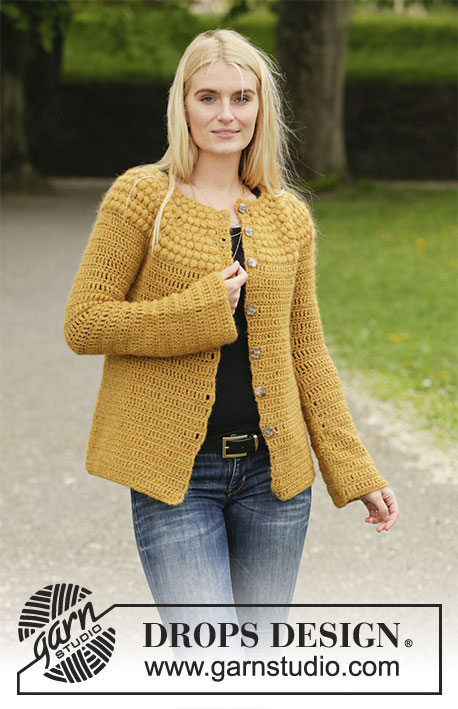
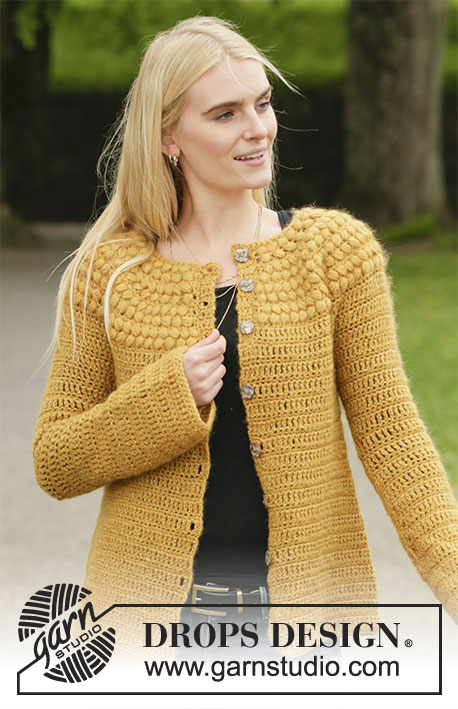
Crocheted jacket in DROPS Sky and DROPS Kid-Silk. The piece is worked with a round yoke, top down and with puff-stitches on the yoke. Sizes S - XXXL.
DROPS 207-20 |
|||||||||||||||||||||||||||||||
|
------------------------------------------------------- EXPLANATIONS FOR THE PATTERN: ------------------------------------------------------- CHAIN STITCH: If you work outermost on the hook the chain stitch will often be too tight; 1 chain stitch should be as long as 1 double crochet/treble crochet/double treble crochet is wide. INCREASE TIP-1 (evenly spaced): To work out how to increase evenly, count the total number of stitches on the row (e.g. 66 stitches) and divide by the number of increases to be made (e.g. 12) = 5.5. In this example, increase by working 2 double crochets in alternately each 5th and 6th stitch from the previous row. PATTERN: See diagrams A.1 to A.7. 1 PUFF-STITCH: Work as follows in the same stitch (important to work in the stitch not around the stitch): * Make 1 yarn over, insert the hook through the stitch, make 1 yarn over and pull it through the stitch; make both yarn overs long (to avoid the puff-stitch being small and compact it is important to pull the yarn overs to approx. 2 cm in length) *, work from *-* a total of 5 times, make a yarn over and pull the strand through all 11 loops on the hook. INCREASE TIP-2 (for sides of body): Increase 1 stitch by working 2 stitches in the same stitch. Increase on each side of the marker thread as follows: Work until there are 4 stitches left before the marker thread, increase 1 stitch in the next stitch, work 6 stitches (marker thread sits in the middle of these 6 stitches), increase 1 stitch in the next stitch (= 2 stitches increased at each marker thread and a total of 4 stitches increased on the row). DECREASE TIP (for each side of sleeve): Decrease on a row of double crochets by working the 2 outermost stitches on the row together as follows: Insert the hook through the next-to-outermost stitch, make 1 yarn over and pull the yarn over through the stitch, insert the hook through the next stitch, make 1 yarn over and pull the yarn over through the stitch, make 1 more yarn over and pull it through all 3 loops on the hook (= 1 stitch decreased). ------------------------------------------------------- START THE PIECE HERE: ------------------------------------------------------- JACKET – SHORT OVERVIEW OF THE PIECE: The yoke is worked back and forth from mid front and top down. The yoke is divided for body and sleeves and the body is continued back and forth in the same way. The sleeves are worked back and forth, top down (this is done so you get the same texture on the sleeves as on the body) YOKE: Work 68-70-74-76-78-80 CHAIN STITCHES – read description above, with hook size 5.5 mm and 1 strand Sky + 1 strand Kid-Silk (= 2 strands). The first row is worked as follows from the wrong side: Work 1 double crochet in the 3rd chain stitch from the hook and then 1 double crochet in each chain stitch to the end of the row = 66-68-72-74-76-78 double crochets on the row. Work 1 row of double crochets from the right side with 1 double crochet in each double crochet and increase at the same time 12 double crochets evenly spaced on the row – read INCREASE TIP-1 = 78-80-84-86-88-90 double crochets. The next row is worked as follows from the wrong side: Work A.1 over the first 3 stitches, A.2 over the next 2 stitches and repeat A.3 until there are 3 stitches left on the row (= 35-36-38-39-40-41 repeats of 2 stitches) and finish with A.4 over the last 3 stitches (= 35-36-38-39-40-41 repeats of 2 stitches). Continue this pattern back and forth. REMEMBER THE CROCHET TENSION! AT THE SAME TIME on each row marked with an arrow in A.4, increase double crochets evenly spaced as described below – remember INCREASE TIP-1: Arrow-1: Increase 36-36-38-40-40-42 double crochets evenly spaced = 114-116-122-126-128-132 stitches (there is now room for 53-54-57-59-60-62 repeats of A.2 in width). Arrow-2: Increase 16-20-24-24-26-30 double crochets evenly spaced = 130-136-146-150-154-162 stitches (there is now room for 61-64-69-71-73-77 repeats of A.2 in width). Arrow-3: Increase 16-20-24-24-26-30 double crochets evenly spaced = 146-156-170-174-180-192 stitches (there is now room for 69-74-81-83-86-92 repeats of A.2 in width). Arrow-4: Increase 16-20-24-22-24-30 double crochets evenly spaced = 162-176-194-196-204-222 stitches (there is now room for 77-84-93-94-98-107 repeats of A.2 in width). Continue working A.1 to A.4 up to and including the row marked for your size; i.e. sizes S-M-L are now finished. Continue in sizes XL-XXL-XXXL and increase on the last row as follows: Arrow-5: NOTE: Do not turn on this row but cut the strand and work the row from the right side so the next row will be from the wrong side – increase 12-24-28 double crochets evenly space = 208-228-250 stitches. When A.1 to A.4 have been completed for your size, the piece measures approx. 14-14-14-17-17-17 cm from the cast-on edge mid front. The next row is worked as follows from the wrong side: Work A.5 over the first stitch, repeat A.6 (= 1 stitch) until there is 1 stitch left on the row and finish with A.7 over the last stitch. Continue this pattern; A.5 to A.7 are repeated in height to finished length. When the piece measures approx. 17-18-20-21-22-24 cm from the cast-on edge mid front – adjust so the next row is a row of double crochets, increase 4-10-12-6-14-12 double crochets evenly spaced = 166-186-206-214-242-262 stitches. Continue working until the piece measures approx. 19-21-23-25-27-29 cm from the cast-on edge mid front – adjust so the next row is a row of double crochets. Now divide the yoke for body and sleeves; i.e. the next row is worked as follows from the right side: Work 1 double crochet in each of the first 26-29-31-33-37-41 stitches (= front piece), work 6-6-6-8-8-8 loose chain stitches (= in side under sleeve), skip the next 34-38-44-44-50-52 stitches (= sleeve), work 1 double crochet in each of the next 46-52-56-60-68-76 stitches (= back piece), work 6-6-6-8-8-8 loose chain stitches (= in side under sleeve), skip the next 34-38-44-44-50-52 stitches (= sleeve) and work 1 double crochet in each of the last 26-29-31-33-37-41 stitches (= front piece). Body and sleeves are finished separately. THE PIECE IS NOW MEASURED FROM HERE! BODY: = 110-122-130-142-158-174 stitches (including the 6-6-6-8-8-8 chain stitches under each sleeve). Insert 1 marker thread 29-32-34-37-41-45 stitches in from each side (= 52-58-62-68-76-84 stitches between the threads on the back piece). Allow the marker threads to follow your work onwards; they will be used when increasing in the sides. Continue back and forth with patterns A.5 to A.7 as before. When the body measures 8 cm from the division, increase 2 stitches in each side – read INCREASE TIP-2. Increase like this every 9 cm a total of 3 times in each side = 122-134-142-154-170-186 stitches. Continue working until the body measures 35 cm from the division but finish after a row of double crochets from the right side. Cut and fasten the strands. The jacket measures approx. 56-58-60-62-64-66 cm from the shoulder down. SLEEVE: The sleeve is worked back and forth from mid under the sleeve (so the texture matches on the body and sleeve). Start from the wrong side, in the middle of the 6-6-6-8-8-8 stitches under the sleeve and work 1 double treble crochet in each of the 3-3-3-4-4-4 stitches from the middle outwards, work 1 double treble crochet in each of the 34-38-44-44-50-52 stitches which were skipped and finish with 1 double treble crochet in each of the last 3-3-3-4-4-4 stitches mid under sleeve = 40-44-50-52-58-60 stitches, turn the piece. Continue back and forth with patterns A.5 to A.7 as before. When the piece measures approx. 3 cm from the division decrease 1 stitch on each side – read DECREASE TIP. Decrease like this every 5-3-2-2-1½-1½ cm a total of 3-4-6-6-8-8 times on each side = 34-36-38-40-42-44 stitches. When the sleeve measures 16-16-16-15-15-15 cm from the division increase 1 stitch on each side by working 2 stitches in the next-to-outermost stitch on each side. Increase like this every 9-9-8-8-6-5½ cm a total of 3-3-3-3-4-4 times on each side = 40-42-44-46-50-52 stitches. Continue working until the sleeve measures 45-44-42-41-39-38 cm from the division but finish after a row of double crochets (you can try the jumper on and continue to desired length). NOTE: Shorter measurements in larger sizes due to wider neck and longer yoke. Cut and fasten the strands. Work the other sleeve in the same way. ASSEMBLY: Sew the seam under the sleeve – sew in the outermost loop of the outermost stitch. Sew the buttons onto the left band. The first button is placed approx. 1½-2 cm down from the neck, then the other 6-6-6-7-7-7 buttons with approx. 6½-7-7½-6½-7-7 cm between each one. The buttons are buttoned between the second and third treble crochet/double treble crochet on the right band. |
|||||||||||||||||||||||||||||||
Diagram explanations |
|||||||||||||||||||||||||||||||
|
|||||||||||||||||||||||||||||||
 |
|||||||||||||||||||||||||||||||
 |
|||||||||||||||||||||||||||||||
Have you finished this pattern?Tag your pictures with #dropspattern #autumngoldjacket or submit them to the #dropsfan gallery. Do you need help with this pattern?You'll find 12 tutorial videos, a Comments/Questions area and more by visiting the pattern on garnstudio.com. © 1982-2026 DROPS Design A/S. We reserve all rights. This document, including all its sub-sections, has copyrights. Read more about what you can do with our patterns at the bottom of each pattern on our site. |
|||||||||||||||||||||||||||||||


With over 40 years in knitting and crochet design, DROPS Design offers one of the most extensive collections of free patterns on the internet - translated to 17 languages. As of today we count 324 catalogues and 12290 patterns translated into English (UK/cm). 12290
We work hard to bring you the best knitting and crochet have to offer, inspiration and advice as well as great quality yarns at incredible prices! Would you like to use our patterns for other than personal use? You can read what you are allowed to do in the Copyright text at the bottom of all our patterns. Happy crafting!
Post a comment to pattern DROPS 207-20
We would love to hear what you have to say about this pattern!
If you want to leave a question, please make sure you select the correct category in the form below, to speed up the answering process. Required fields are marked *.