
Popular categories
Looking for a yarn?


Comments / Questions (33)
![]() Léa K wrote:
Léa K wrote:
Merci pour votre réponse. J’ai finalement recommencé le tricot en faisant pour les fausses côtes anglaises : *maille envers - maille glissée envers - jeté* (au lieu de maille envers - jeté - maille glissée envers) et ça semble fonctionner !
09.12.2019 - 09:58
![]() Léa K wrote:
Léa K wrote:
Bonjour, J'ai un problème qui a déjà été signalé dans ces commentaires : mes fausses côtes anglaises se retrouvent sur l'envers du tricot. J'ai pourtant regardé la vidéo et il me semble que je fais la même chose (bien que je n'utilise pas la méthode continentale)... Avez-vous résolu le problème chez les autres utilisatrices ? Merci !
07.12.2019 - 09:36DROPS Design answered:
Bonjour Léa K, les explications françaises correspondent au modèle original, suivez bien la vidéo et les diagrammes en même temps, et n'hésitez pas à montrer votre ouvrage à votre magasin (même par mail si besoin), il pourra fort probablement vous aider. Bon tricot!
09.12.2019 - 08:15
![]() Arlenproject wrote:
Arlenproject wrote:
Vedo dai tutorial che "coste inglesi" e "false coste inglesi" si lavorano allo stesso modo... che senso ha? la costa inglese che io conoscevo e' lavorata tutta a punto diritto prendendo la seconda maglia sul ferro precedente
21.11.2019 - 19:24
![]() Jourdain wrote:
Jourdain wrote:
Merci pour votre réponse très rapide ! J'ai vu dans les commentaires qu'une autre française a eu le même problème que moi . N'y aurait-il pas un problème de traduction concernant les fausses côtes anglaises ? Ou bien peut-être faut-il commencer le tricot par 2 tours envers pour que les côtes anglaises soient du bon côté ? J'aimerais vraiment comprendre Merci
24.10.2019 - 21:30DROPS Design answered:
Bonjour Mme Jourdain, avez-vous regardé cette vidéo? Elle montre comment tricoter le diagramme A.1a en rond. Vous devez bien commencer par 2 tours endroit = 2 tours jersey, puis tricotez comme le montrent le diagramme et la vidéo. Bon tricot!
25.10.2019 - 09:39
![]() Jourdain wrote:
Jourdain wrote:
Bonjour J'ai commencé le modèle en taille L par deux tours endroit comme demandé puis suivi le diagramme. Je me rends compte que mon ouvrage est sur l'envers et je n'arrive pas à comprendre mon erreur. Pourriez de me dire ce qui ne va pas? Merci
24.10.2019 - 16:37DROPS Design answered:
Bonjour Mme Jourdain, il est malheureusement un peu difficile de cerner le problème ainsi, vérifiez que vous avez bien monté les mailles et tricoté vos 2 tours endroit comme dans cette vidéo, puis continué en rond = toujours sur l'endroit (vous devez avoir 2 tours jersey + 1 tour d'augmentations dans les 3 plus grandes tailles avant A.1a)- n'hésitez pas à envoyer une photo à votre magasin, ils pourront fort probablement repérer l'erreur plus facilement. Bon tricot!
24.10.2019 - 17:15
![]() Lilian wrote:
Lilian wrote:
Jeg vil gerne vide om garnet fælder.
19.09.2019 - 09:19DROPS Design answered:
Hej Lilian, Det fælder ikke men der kan naturligvis være nogle løse fibre. Gå gerne ind på DROPS Air farvekortet og læs om garnets egenskaber :) DROPS Air
19.09.2019 - 09:41
![]() Madame Petitjean wrote:
Madame Petitjean wrote:
Bonjour, Je viens de commencer à tricoter les manches. J'ai repris les 44 mailles laissées en attente, puis relevé les 8 mailles montées. Après plusieurs rangs, je me retrouve avec un gros trou avant les 8 mailles et un autre gros trou après les 8 mailles. Ne devrions nous pas ramasser plus de 8 mailles ? et si non à cette question comment faire pour éviter ces trous ? Je vous remercie
06.02.2019 - 18:08DROPS Design answered:
Bonjour Mme Petitjean, on a monté 8 m au-dessus des manches pour le dos/le devant, on va bien relever 1 m dans chacune de ces 8 m pour la manche. Il est possible que les mailles montées pour le bas du pull aient été un peu trop lâches, pour compenser/éviter les trous, au 1er tour de la manche, vous pouvez relever le fil (comme pour une augmentation) entre les 8 m et celles de la manche (de part et d'autre de ces 8 m) et le tricoter torse avec la maille suivante. Vous pourrez également fermer ces trous avec le fil de la manche au moment de le rentrer. Bon tricot!
07.02.2019 - 09:02
![]() Annelies Rennert wrote:
Annelies Rennert wrote:
Habe 85 MA angeschlagen. Nach der Zunahme hab ich 96 MA. Ok. Nun Weiss ich nicht was mit den 8 MA in der Klammer ist und das 12 x in der Breite stricken.. bis ich am Ende vom Diagramm 192 MA habe muss ich doch nach einigen gestrickten Reihen 2x zunehmen. Wieviel mal, und welche MA Anzahl habe ich bei der ersten Zunahme. BITTE nochmal eine Info. Danke Annelies
06.02.2019 - 17:18DROPS Design answered:
Liebe Annelies, über die 96 Maschen stricken Sie A.1a in der runde (A.1a ist über 8 Maschen gestrickt, Sie wiederholen diese 8 Maschen bis Ende der Runde = Sie haben A.1a 12 Mal in der Runde gestrickt). Bei der 10. Reihe in A.1a nehmen Sie 4 Maschen (siehe 4. Symbol) in jedem A.1a = 144 M. Bei der 24. Reihe in A.1a nehmen Sie 4 M in jedem A.1a = 192 M. Diagram bis zur Ende stricken. Dann werden Sie A.1b stricken und noch mal 2 Zunahmen in jedem Diagram stricken: 288M. Viel Spaß beim stricken!
07.02.2019 - 08:59
![]() Annelies Rennert wrote:
Annelies Rennert wrote:
Noch eine Frage zu dem Pullover. Trage gr. 44/46 wieviel Maschen muss ich nehmen. Glaube 91 sind zu viel oder?. Kann ich mich nach dem Diagramm richten. Wenn ich nur 85 Maschen anschlägt, muss ich auch auf 104 MA kommen. Bitte erklären sie mir die Schritte. Danke A. Rennert
06.02.2019 - 12:05DROPS Design answered:
Liebe Frau Rennert, am besten messen Sie einen ähnlichen Pullover, die Sie haben, und die Massen den in der Maßskizze vergleichen, so finden Sie Ihre Größe. Hier lesen Sie mehr über die Größen. Bei der 5. und 6. Größe fangen Sie mit 85-91 M dann nehmen Sie zu 96-104 M vor A.1a. Viel Spaß beim stricken!
06.02.2019 - 14:04
![]() Annelies Rennert wrote:
Annelies Rennert wrote:
Hallo, eine Frage zu diesem Pullover. Habe mt 91 MA angefangen. Bin jetzt bei 208 MA. Jetzt verstehe ich nicht , (nun A.1b über A.1a stricken. ), lt. Diagramm habe ich doch die erste Zunahme beendet. Muss ich denn bei A.1a nicht bis zur nächsten Zunahme stricken. BITTE UM Hilfe. Danke Annelies
06.02.2019 - 10:47DROPS Design answered:
Liebe Frau Rennert, in der letzte Grösse haben Sie 208 M wenn A.1a fertig ist, jetzt stricken Sie A.1b (= die 16 M in A.1b 13 x in der Breite wiederholen). Nach A.1b haben Sie 312 M (= es sind dann: 16 M + (4 M x 2 ) x 13 Mal in der Breite). Viel Spaß beim stricken!
06.02.2019 - 14:01
|
||||||||||||||||
Fritid#fritidsweater |
||||||||||||||||
 |
 |
|||||||||||||||
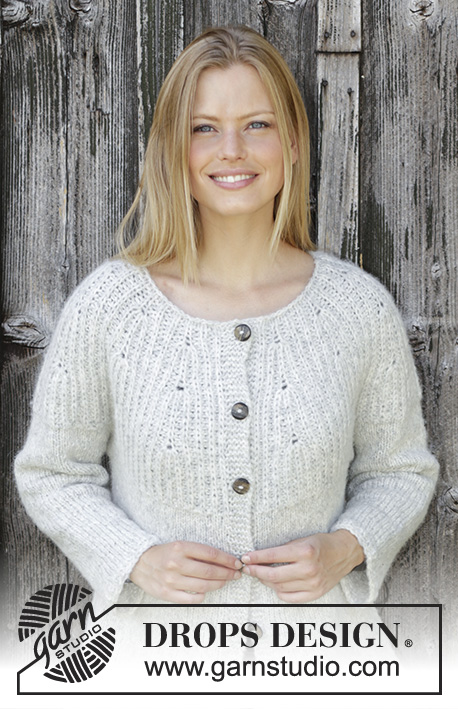
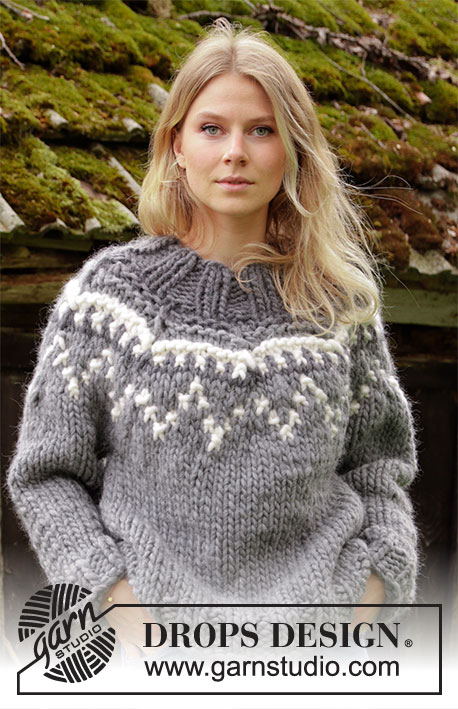
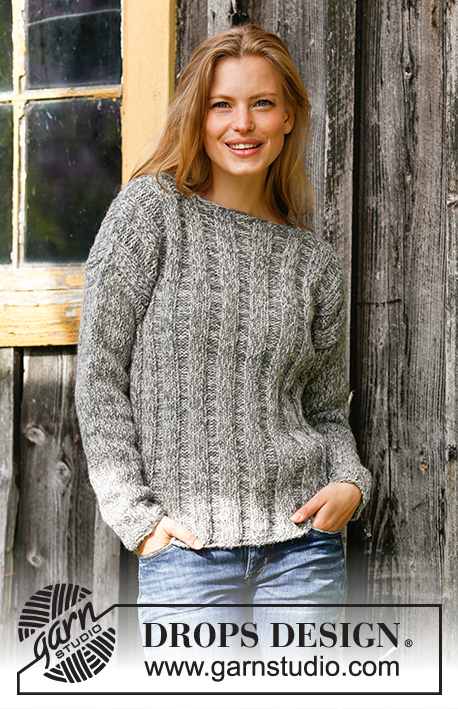
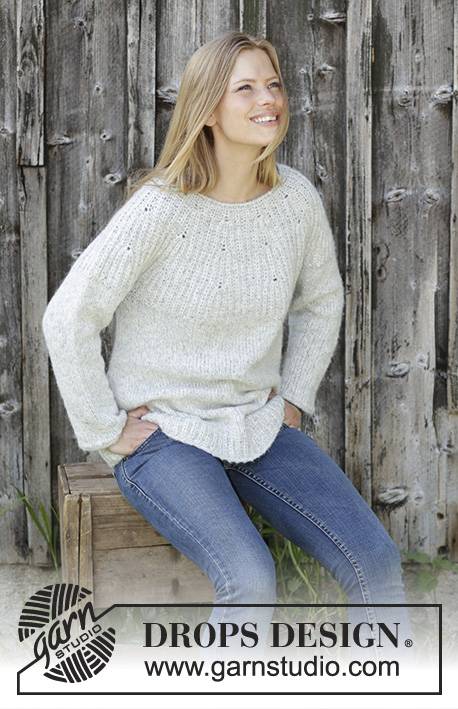
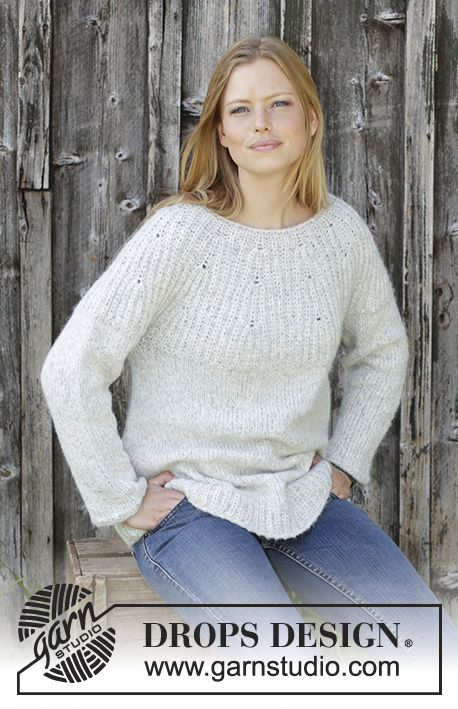
Knitted jumper with round yoke in DROPS Air. The piece is worked top down with false Enlgish rib and A-shape. Sizes S - XXXL.
DROPS 195-31 |
||||||||||||||||
|
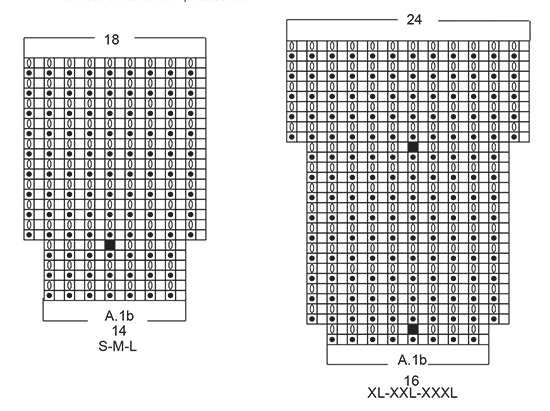
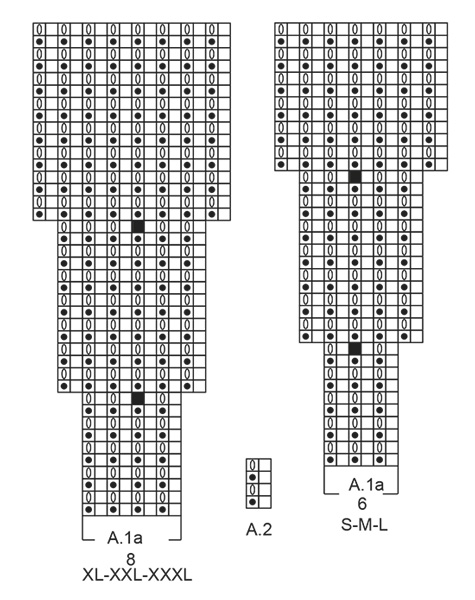
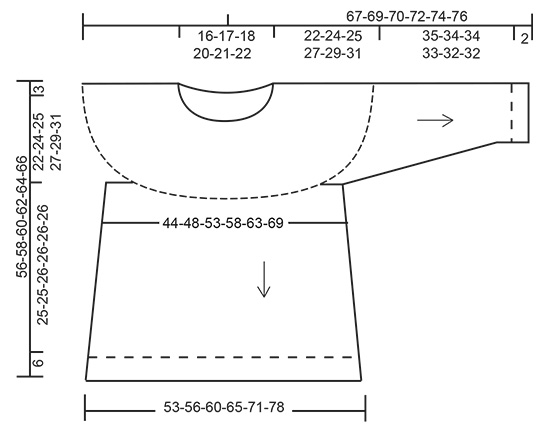
------------------------------------------------------- EXPLANATIONS FOR THE PATTERN: ------------------------------------------------------- PATTERN: See diagrams A.1 and A.2. Choose diagram for your size. The yarn overs in the pattern are not counted as stitches. INCREASE TIP-1 (evenly spaced): To work out how to increase evenly, count the total number of stitches on the needle (e.g. 82 stitches) and divide by the number of increases to be made (e.g. 7) = 11.7. In this example, increase by making 1 yarn over after approx. each 12th stitch. On the next round work the yarn overs twisted to avoid holes. INCREASE TIP-2 (for body): Work until there are 2 stitches left before the marker thread, 1 yarn over (= 1 stitch increased), knit 4 (the marker thread sits in the middle of these 4 stitches), 1 yarn over (= 1 stitch increased). Increase like this at both marker threads (= a total of 4 stitches increased). DECREASE TIP (for sleeves): Work until there are 3 stitches left before the marker thread, knit 2 together, knit 2 (marker thread sits in the middle of these 2 stitches), slip 1 stitch as if to knit, knit 1, pass the slipped stitch over the knitted stitch (= 2 stitches decreased). ------------------------------------------------------- START THE PIECE HERE: ------------------------------------------------------- JUMPER - SHORT OVERVIEW OF THE PIECE: The yoke is worked in the round with circular needle, top down in false English rib. Then the yoke is divided for body and sleeves. The body is continued in the round in stocking stitch with a false English rib edge. The sleeves are worked in the round with double pointed needles in stocking stitch and with a false English rib edge. YOKE: Cast on 66-72-78-82-85-91 stitches with circular needle size 5.5 mm and Air. Knit 2-2-2-4-4-4 rounds, AT THE SAME TIME on round 3 increase 0-0-0-6-11-13 stitches evenly on round – read INCREASE TIP-1 = 66-72-78-88-96-104 stitches. Work A.1a ( 6-6-6-8-8-8 stitches) a total of 11-12-13-11-12-13 times in width. Continue this pattern. REMEMBER THE KNITTING TENSION! Be careful, when increasing in the diagram, that the stitch you increase in is not tightened more than absolutely necessary; there will be a small hole in this stitch. When A.1a has been worked 1 time in height there are 154-168-182-176-192-208 stitches on the needle. Now work A.1b over A.1a. When A.1b has been completed in height there are 198-216-234-264-288-312 stitches on the needle. The piece measures approx. 20-20-20-24-24-24 cm from the cast-on edge. Repeat the last 2 rounds in A.1b until the piece measures 21-23-24-26-28-30 cm from the cast-on edge; adjust so that you finish with a round without yarn overs. Knit all stitches and increase 14-20-30-16-12-16 stitches evenly on round = 212-236-264-280-300-328 stitches. On the next round divide for body and sleeves as follows: Knit 31-34-38-41-45-50 stitches (= half back piece), place the next 44-50-56-58-60-64 stitches on a thread for sleeve and cast on 8-8-8-10-10-10 new stitches under the sleeve, knit 62-68-76-82-90-100 stitches (= front piece), place the next 44-50-56-58-60-64 stitches on a thread for sleeve and cast on 8-8-8-10-10-10 new stitches under the sleeve. Finish with knit 31-34-38-41-45-50 stitches (= half back piece) = 140-152-168-184-200-220 stitches. The yoke measures approx. 22-24-25-27-29-31 cm. BODY: Insert 1 marker thread in the middle of the 8-8-8-10-10-10 new stitches in each side of the piece (= 70-76-84-92-100-110 stitches on both front and back pieces). Continue with stocking stitch. When the piece measures 3 cm from where the body was divided from the sleeves, increase 1 stitch on each side of both marker threads – read INCREASE TIP-2! Increase like this every 3-3-4-4-3-3 cm a total of 7-7-6-6-7-7 times = 168-180-192-208-228-248 stitches. When the piece measures 25-25-26-26-26-26 cm from where the body was divided from the sleeves work an edge as follows: On the next round increase 10 stitches evenly on round = 178-190-202-218-238-258 stitches. Work A.2 (= 2 stitches) over all stitches. When A.2 has been worked for approx. 6 cm cast off with knit. The piece measures approx. 56-58-60-62-64-66 cm from the shoulder down. SLEEVE: Place the 44-50-56-58-60-64 stitches from the thread on the one side of the piece on double pointed needles size 5.5 mm and knit up 1 stitch in each of the 8-8-8-10-10-10 stitches cast on under the sleeve = 52-58-64-68-70-74 stitches. Insert 1 marker thread in the middle of the 8-8-8-10-10-10 new stitches. Work stocking stitch in the round. When the sleeve measures 3 cm from where it was divided from the body, decrease 1 stitch on each side of the marker thread – read DECREASE TIP. Decrease like this every 4-3-2½-2-2-1½ cm a total of 7-9-11-13-13-14 times = 38-40-42-42-44-46 stitches. When the sleeve measures 35-34-34-33-32-32 cm from where it was divided from the body, work A.2 over all stitches. Cast off with knit when A.2 has been worked 1 time in height. Work the other sleeve in the same way. |
||||||||||||||||
Diagram explanations |
||||||||||||||||
|
||||||||||||||||
 |
||||||||||||||||
 |
||||||||||||||||
 |
||||||||||||||||
Have you finished this pattern?Tag your pictures with #dropspattern #fritidsweater or submit them to the #dropsfan gallery. Do you need help with this pattern?You'll find 24 tutorial videos, a Comments/Questions area and more by visiting the pattern on garnstudio.com. © 1982-2026 DROPS Design A/S. We reserve all rights. This document, including all its sub-sections, has copyrights. Read more about what you can do with our patterns at the bottom of each pattern on our site. |
||||||||||||||||


With over 40 years in knitting and crochet design, DROPS Design offers one of the most extensive collections of free patterns on the internet - translated to 17 languages. As of today we count 324 catalogues and 12290 patterns translated into English (UK/cm). 12290
We work hard to bring you the best knitting and crochet have to offer, inspiration and advice as well as great quality yarns at incredible prices! Would you like to use our patterns for other than personal use? You can read what you are allowed to do in the Copyright text at the bottom of all our patterns. Happy crafting!
Post a comment to pattern DROPS 195-31
We would love to hear what you have to say about this pattern!
If you want to leave a question, please make sure you select the correct category in the form below, to speed up the answering process. Required fields are marked *.