Comments / Questions (42)
![]() Ruth wrote:
Ruth wrote:
Lieben Dank für Ihre Nachricht. Die 43 cm Abstand sind laut Ihrer Zeichnung angegeben ;-). Ich arbeite zwischenzeitlich nach meinen eigenen Maßen und habe bei Größe M zwischen den Armausschnitten schon einen Abstand von 52 cm. Ich finde trotzdem, es ist so ein tolles Modell!! Herzliche Grüße!
15.09.2016 - 11:32DROPS Design answered:
Liebe Ruth, die 43 cm in der Zeichnung gilt für 1 Seite von dem Quadrat, aber wenn sie die Armlöcher häkeln, haben Sie dann 24 cm - wie in der Zeichnung (siehe an der rechten Seite).
15.09.2016 - 13:01
![]() Ruth wrote:
Ruth wrote:
Die Armausschnitte werden bei 43 cm (XXL) gesetzt, das scheint mir viel zu eng
12.09.2016 - 19:40DROPS Design answered:
Liebe Ruth, stimmt Ihre Maschenprobe? Sie müssen 24 Stb überspringen und 24 (lockere) Lm häkeln, dh = 48 Maschen für die Armausschnitte = 48 cm.
13.09.2016 - 10:26
![]() Birte wrote:
Birte wrote:
In der Anleitung ist beschrieben, das man nach dem man Muster A1 gehäkelt hat die Arbeit ein Maß von 36x36cm hat. Ich komme weder mit Nadelstärke 7 noch mit Nadelstärke 9 auf diese Maße, ist eher 26x26cm, kann das sein?
15.08.2016 - 18:38DROPS Design answered:
Liebe Birte, ja ich sehe, was Sie meinen. Mit der Maschenprobe kommt das nicht hin. Ich habe eine Anfrage an das Designteam gesendet und bitte Sie noch um etwas Geduld.
17.08.2016 - 14:02
![]() Arma Bakker wrote:
Arma Bakker wrote:
Beste Adeline, ik kwam ook maar aan de 28/28cm, en heb toen de laatste 2 toeren van A1 met dubbele stokjes gehaakt ipv stokjes. En ik snapte eerst ook niet van die 2e toer van A2 .Maar de stokjes die je ziet op de tekening bij A2, zijn de stokjes nog van A1. Je gaat dus verder met de vaste met 3 lossen , die boven de stokjes getekend staan. Snap je het zo beter? Groetjes, Arma
08.08.2016 - 09:55
![]() Adeline wrote:
Adeline wrote:
Beste, Als ik met hknl 7 haak dan geraak ik niet aan de afmetibgen 36×36cm. Ook niet met hknl 10! Ik heel zeer los en niet vast. Ook versta ik niet meer wat ik moet doen als ik eenmaal de vierkant heb gehaakt. Wat bedoelen jullie met 12-15-18-18? Hoe tel ik dit? Want ik kom telkens fout uit. Wat bedoelen jullie met haak 2de toer van telpatroon a2? Met vriendelijke groeten
28.07.2016 - 21:27DROPS Design answered:
Hoi Adeline. Ten eerste, haak altijd een proeflapje en was deze om de stekenverhouding te controleren. Dan klopt je afmetingen. Je haakt A.2 over 12-15-18 OF 18 stk (afhankelijk van welke maat je haakt). Daarna haak je verder vanaf 2e toer A.3a-A.3c zoals beschreven.
29.07.2016 - 11:39
![]() Stefanie wrote:
Stefanie wrote:
Die perfekte Jacke zum einkuscheln
12.07.2016 - 10:44
![]() Elly wrote:
Elly wrote:
Dit is nu precies t vest waar ik al zolang naar op zoek ben. Zou t absoluut geweldig vinden als t in de catalogus kwam. Cross My fingers;)
12.07.2016 - 09:23
![]() Janet Harrington wrote:
Janet Harrington wrote:
Love this pattern, very interesting and pretty. Most becoming.
24.06.2016 - 20:53Ana Lisa wrote:
Me encantaría el patrón de esta prenda!
19.06.2016 - 03:14
![]() Serville wrote:
Serville wrote:
On espère l'explication de ce modèle au plus vite svpl , merciiii
15.06.2016 - 16:25
Stony Ridge#stonyridgecardigan |
|||||||||||||||||||||||||||||||||||||||||||||||||
 |
 |
||||||||||||||||||||||||||||||||||||||||||||||||
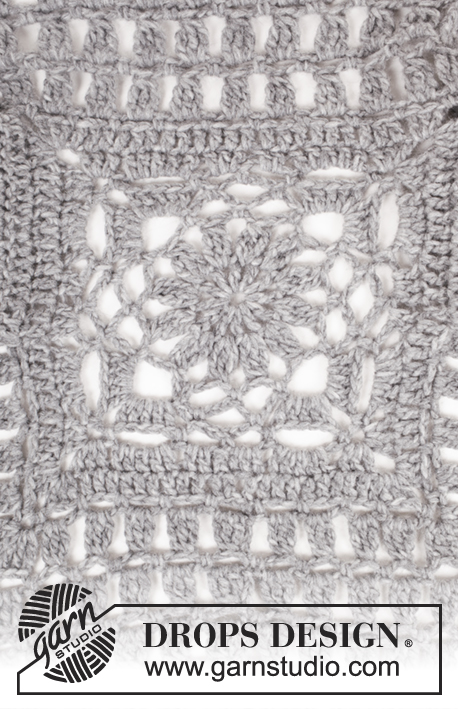
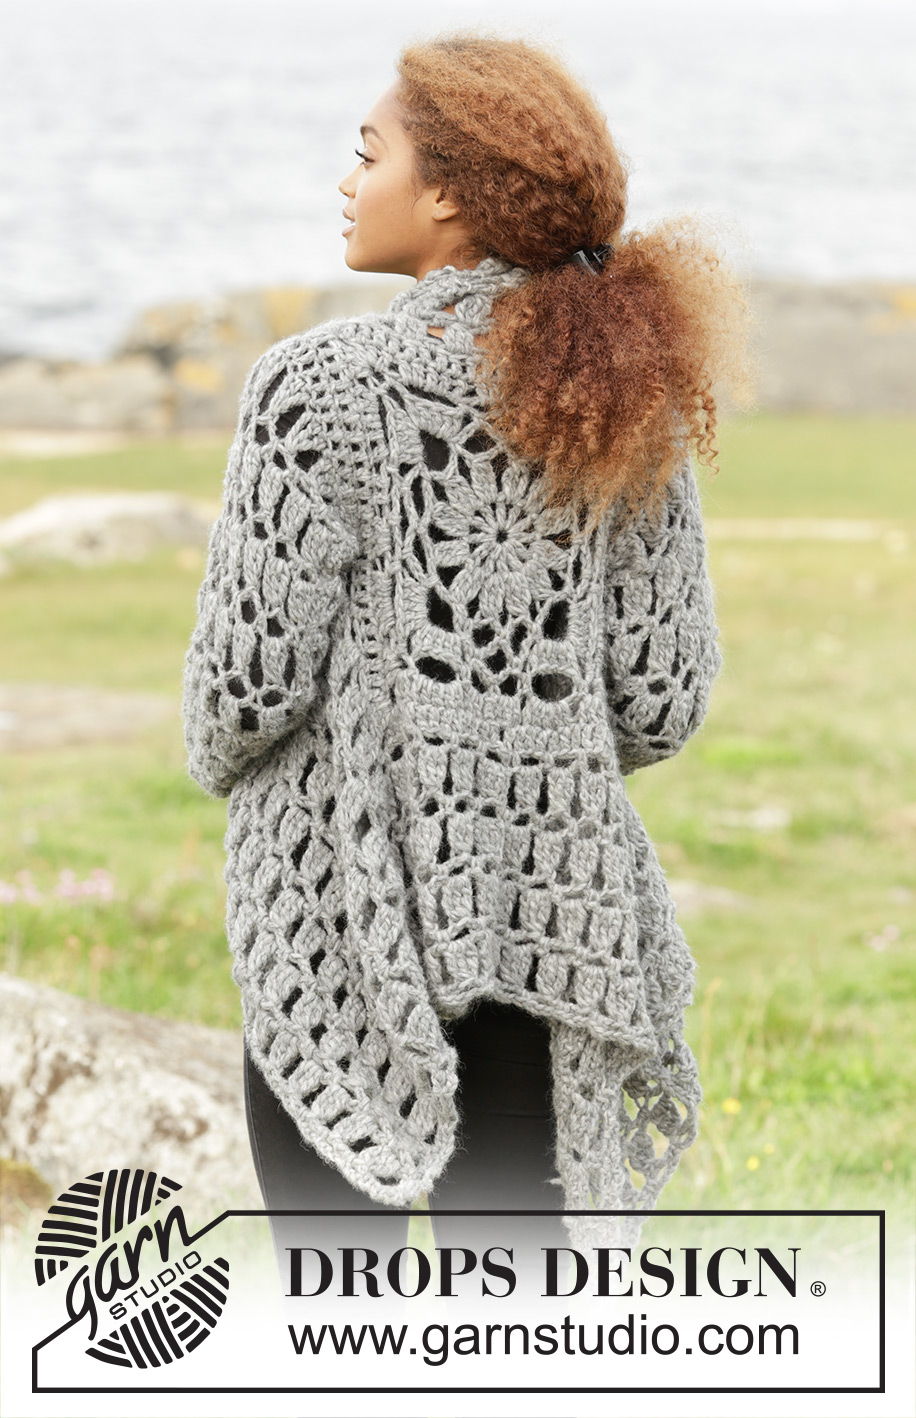
Crochet DROPS jacket worked in a square in 1 thread Cloud or 2 threads Air. Size S-XXXL.
DROPS 173-31 |
|||||||||||||||||||||||||||||||||||||||||||||||||
|
INC TR-GROUP: Work (3 tr, 3 ch, 3 tr) around ch-space in the corner. PATTERN: See diagrams A.1 to A.5. ---------------------------------------------------------- JACKET: Work piece from mid back and outwards as a square. Beg with 1 thread Cloud or 2 threads Air on hook size 7 mm and work pattern according to diagram A.1. REMEMBER THE CROCHET TENSION! When entire diagram A.1 has been worked, piece measures 36 x 36 cm. Size S/M is now finished. Continue the remaining sizes in the round as follows: Size L/XL, XXL and XXXL: Continue with 1-2-2 rounds in total with 1 tr in every tr and work 1 INC TR-GROUP – see explanation above, in each corner. NOTE: Beg round with 3 ch, and finish round with 1 sl st in 3rd ch at beg of round Now continue in all sizes as follows (work 2nd round in diagram A.2): Work 1 ch and 1 sl st in first tr on round, work A.2 over the next 12-15-18-18 tr (= 4-5-6-6 repetitions), work (1 dc, 3 ch, 1 dc) around ch-space in the corner, work 3 ch, skip 3 tr, A.2 over the next 6-9-12-12 tr (= 2-3-4-4 repetitions), 1 dc in space between the next 2 tr, insert a marker in piece and work 18-21-24-24 loose ch for armhole, skip 18-21-24-24 tr, work (1 dc, 3 ch, 1 dc) around ch-space in next corner, work 3 ch, skip 3 tr, work A.2 over the next 27-33-39-39 tr (= 9-11-13-13 repetitions), work (1 dc, 3 ch, 1 dc) around ch-space in the corner, work 18-21-24-24 loose ch for armhole, skip 18-21-24-24 tr, insert a new marker in piece and work A.2 over the next 9-12-15-15 tr (= 3-4-5-5 repetitions), work (1 dc, 3 ch 1 dc) around ch-space in the corner, work 3 ch, skip 3 tr, work A.2 over the next 12-15-18-18 tr (= 4-5-6-6 repetitions), and finish with 1 sl st in first dc on round. Now work pattern in the round as follows (work from 2nd round in diagram A.3a-A.3c): Work A.3a (show how round beg and end), work A.3b around every ch-space until first corner, work A.3c (= 3 dtr, 3 ch, 3 dtr) around ch-space in the corner, continue with A.3b around every ch-space until ch for armhole, work A.3b 6-7-8-8 times around the 18-21-24-24 ch, work A.3c around ch-space in the corner, work A.3b around every ch-space until next corner, work A.3c around ch-space in the corner, work A.3b 6-7-8-8 times around the 18-21-24-24 ch for armhole, work A.3b around every ch-space until next corner, work A.3c around ch-space in the corner, work A.3b around the remaining ch-spaces on round. When A.3a-A.3c have been worked vertically, repeat the last 2 round in diagram until piece measures approx. 70-76-80-82 cm in total (= 35-38-40-41 cm from the middle of A.1 and out in one side) - adjust so that last round worked is a round with ch-spaces and dc. Cut the yarn. FRONT PIECE: Work front pieces back and forth without inc. Insert a marker on last round worked. NOW MEASURE THE PIECE FROM HERE. Beg at star in one corner – see chart, and work from 2nd row in diagram as follows: A.4a, then work A.4b until 1 ch-space remain before the ch-space in the corner, work A.4c. Continue like this back and forth. When A.4a, A.4b and A.4c have been worked vertically, repeat the last 2 rows until front piece measures approx. 23-25-26-27 cm from marker – adjust so that last row is worked as next to last row in A.4a-A.4c. Fasten off. Repeat in opposite side of piece – see star on chart. SLEEVES: Work sleeve back and forth. Beg at marker mid under sleeve and work from WS 18-21-24-24 tr evenly up to shoulder, then work 18-21-24-24 tr around ch-row = 36-42-48-48 tr. Insert a marker here. NOW MEASURE THE PIECE FROM HERE. Then work pattern back and forth from 2nd row (= RS) in diagram A.4 as follows: NOTE: On first row work every dtr in dtr-groups into one tr on previous row. Work A.4a, then work A.4b over the next 30-36-42-42 tr, work A.4c = 12-14-16-16 dtr-groups. When entire diagram A.4a-A.4c has been worked vertically, repeat the last 2 rows in pattern, AT THE SAME TIME dec 1 dtr-group in each side of sleeve by working as shown on the last 4 rows in diagram A.5a at beg of row and A.5b at the end of row = 10-12-14-14 dtr-group. Repeat this dec in each side 0-1-1-1 more time = 10-10-12-12 dtr-groups. When piece measures approx. 50 cm in all sizes, the sleeve is done - adjust to finish after a row that is last row in A.4a-A.4c. Fasten off. Work the other sleeve the same way. ASSEMBLY: Sew underarm seams in outer loops of edge sts. Work an edge around the entire jacket as follows: Beg in one corner on one of the front pieces and work * (1 dc, 3 ch, 1 dc, 3 ch, 1 dc, 3 ch) around ch-space in the corner, work (3 ch, skip approx. 1 cm, 1 dc) until next corner, work 3 ch, *, repeat from *-* around the entire jacket. Finish with 1 sl st in first dc on round. Fasten off. |
|||||||||||||||||||||||||||||||||||||||||||||||||
Diagram explanations |
|||||||||||||||||||||||||||||||||||||||||||||||||
|
|||||||||||||||||||||||||||||||||||||||||||||||||
 |
|||||||||||||||||||||||||||||||||||||||||||||||||
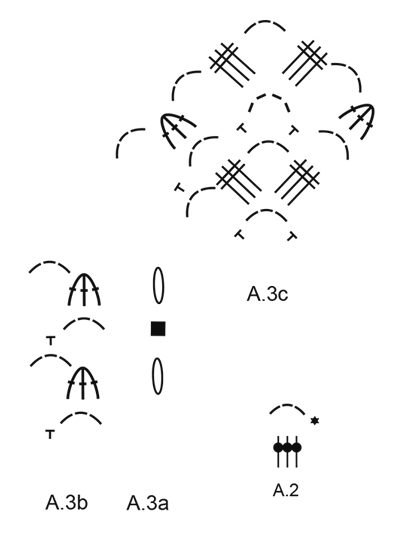 |
|||||||||||||||||||||||||||||||||||||||||||||||||
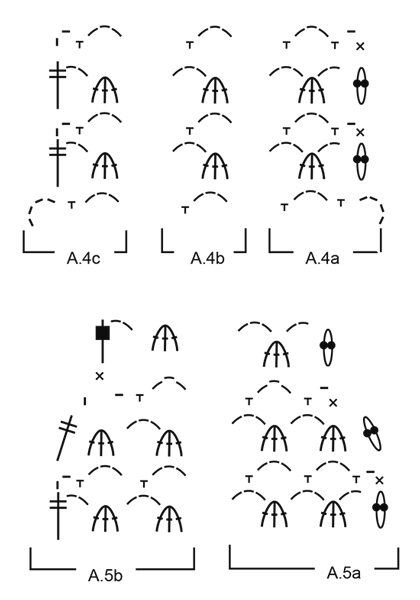 |
|||||||||||||||||||||||||||||||||||||||||||||||||
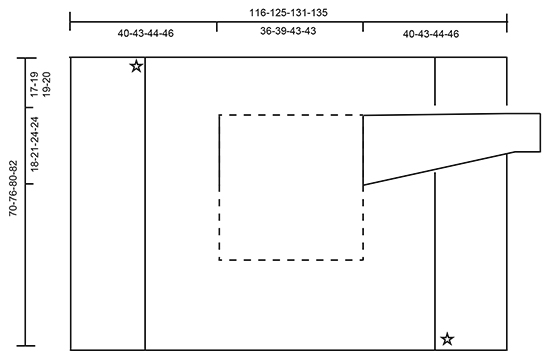 |
|||||||||||||||||||||||||||||||||||||||||||||||||
Have you finished this pattern?Tag your pictures with #dropspattern #stonyridgecardigan or submit them to the #dropsfan gallery. Do you need help with this pattern?You'll find 11 tutorial videos, a Comments/Questions area and more by visiting the pattern on garnstudio.com. © 1982-2026 DROPS Design A/S. We reserve all rights. This document, including all its sub-sections, has copyrights. Read more about what you can do with our patterns at the bottom of each pattern on our site. |
|||||||||||||||||||||||||||||||||||||||||||||||||






Post a comment to pattern DROPS 173-31
We would love to hear what you have to say about this pattern!
If you want to leave a question, please make sure you select the correct category in the form below, to speed up the answering process. Required fields are marked *.