
Popular categories
Looking for a yarn?


Comments / Questions (52)
![]() Huguette wrote:
Huguette wrote:
J'ai terminé ce modèle récemment ainsi que le modèle 176-4. J'ai un problème avec les deux pulls: le devant inférieur "roule"; il y a comme un faux pli dans le tricot. Les deux pulls sont pour offrir; j'espère que vous m'aiderez à régler ce problème ! Merci !
13.12.2017 - 19:38DROPS Design answered:
Bonjour Huguette, vous pouvez simplement laver le pull en suivant bien les consignes de l'étiquette + les généralités ici et le faire sécher à plat aux mesures finales - vous pouvez ajouter quelques épingles (inoxydables) si nécessaire. Votre magasin DROPS pourra très certainement vous donner d'autres astuces. Bon tricot!
14.12.2017 - 08:33
![]() Christine wrote:
Christine wrote:
Hallo, wird die gesamte passe mit der kleinerenNadel 3,5 gestrickt? Gruß Christine
18.09.2017 - 08:13DROPS Design answered:
Liebe Christine, ja, Passe wird mit Nadel 3,5 bis zur Ende gestrickt. Viel Spaß beim stricken!
18.09.2017 - 09:30
![]() Monika wrote:
Monika wrote:
Dobrý deň, rada by som vedela ak po dokončení sedla odstrihnem niť, kde a kedy sa pletie zvýšený priekrčník. Trošku mi to nedáva zmysel. Tvaruje sa ešte počas pletenia alebo sa znovu nebrajú očká zo sedla. Ďakujem
24.07.2017 - 16:26DROPS Design answered:
Dobrý den, Moniko, Oka znovu nabírat nemusíte - máte je stále na jehlici, jde o to, posunout začátek kruhové řady doprostřed zadního dílu, aby bylo možné správně vytvarovat průkrčník. Po dokončení sedla máte pravděpodobně pracovní nit (začátek/konec kruhové řady) na straně, v raglánu, proto je potřeba nit odstřihnout a napojit uprostřed zadního dílu (oka na kruhové jehlici jen přesunete podle potřeby). Hodně zdaru! Hana
24.07.2017 - 22:28
![]() Benedetta wrote:
Benedetta wrote:
Grazie,gentilissime !
27.05.2017 - 17:59
![]() Benedetta wrote:
Benedetta wrote:
Buongiorno, ho finito il lavoro e adesso devo fare l'alzata. Come calcolo il centro dietro, non mi è chiaro da dove cominciare a contate le maglie per cominciare i ferri accorciati.Grazie mille
27.05.2017 - 16:40DROPS Design answered:
Buongiorno Benedetta. Per l'alzata, ha tagliato il filo, e adesso sposta le maglie sui ferri in modo che il giro inizi dalla maglia centrale del dietro. Potrebbe aiutarla cercare di individuare la maglia centrale nella parte del davanti/dietro, quando ha intrecciato le maglie per gli scalfi. Seguendo la m in verticale dovrebbe riuscire a capire dove iniziare con i ferri accorciati. Buon lavoro!
27.05.2017 - 17:11
![]() Blanchette wrote:
Blanchette wrote:
Moi j`ai fais pour mes quatre enfants des pulls. J`ai bien réussi , mais mes quatre enfants disent que sous les manches c`est un peu serré. Qu`est - ce que je n`ai pas fais de correct . Merci pour votre aide c`est très appréciée
09.05.2017 - 13:43DROPS Design answered:
Bonjour Blanchette, pensez à toujours bien vérifier votre tension en hauteur, pour un raglan ou un empiècement arrondi, vous devez avoir le bon nombre de rangs pour 10 cm ou bien ajuster en tricotant des rangs sans diminutions à intervalles réguliers en hauteur. Bon tricot!
09.05.2017 - 16:07
![]() Blanchette wrote:
Blanchette wrote:
Moi je veux savoir ce que vous voulez dire quand vous demandez une augmentation 2 maille au milieu sous la manche du modèle no 170-7 . Car je tricote la manche séparée .Merci
29.04.2017 - 23:56DROPS Design answered:
Bonjour Blanchette, vous augmentez 1 m de chaque côté du marqueur du début du tour ainsi, en commençant quand il reste 1 m avant la fin du tour, faites 1 jeté, tricotez 1 m, glissez le marqueur, tricotez 1 m et faites 1 jeté = vous avez augmenté 2 m au milieu sous la manche. Répétez ces augmentations comme indiqué pour votre taille. Bon tricot!
02.05.2017 - 10:02
![]() Maria wrote:
Maria wrote:
Cenefa Cuando dice comenzar pro el centro de la espalda ¿singnifica que tengo que empezar no por el lateral de la espalda sinodividir los puntos y justo en el medio? no tengo claro como comenzar la cenefa Gracias
09.04.2017 - 11:44DROPS Design answered:
Hola Maria. Es correcto. La elevación en la espalda se comienza a trabajar en el centro de la espalda, que tienes que marcar con 1 marcapuntos. Luego, trabajamos las vueltas acortadas de ida y vuelta a cada lado de este marcapuntos.
09.04.2017 - 20:25
![]() Hanne Madsen wrote:
Hanne Madsen wrote:
Er der ikke et alternativt garn til denne model ?
02.01.2017 - 13:29DROPS Design answered:
Hej Hanne. Jo da. Du kan erstatte med én af disse garner i garngruppe B
09.01.2017 - 15:23
![]() Keidi wrote:
Keidi wrote:
Kuidas saada aru antud mustri osast 1 SM (= 1. SM), * koo mustrit skeemil A.1A (= 8 s), korda skeemi A.1B järgmisel 48-48-64-64-80-96 s (= 3-3-4-4-5-6 kordust 16 s), skeemi A.1C (= 9 s) *, paigalda 1 SM (= 2. SM), koo 16-26-14-26-18-14 s parempidises koes, paigalda 1 SM (= 3. SM), korda * kuni * veel 1 kord, paigalda 1 SM (= 4. SM), Mida tähendab antud kontekstis SM, näiteks 1SM (=4. SM).
11.09.2016 - 12:11DROPS Design answered:
SM on lühend sõnast silmusemärkija. Juhendi aluses on see välja toodud. Head kudumist!
17.11.2016 - 13:51
|
||||||||||||||||
Clara#clarasweater |
||||||||||||||||
|
|
||||||||||||||||
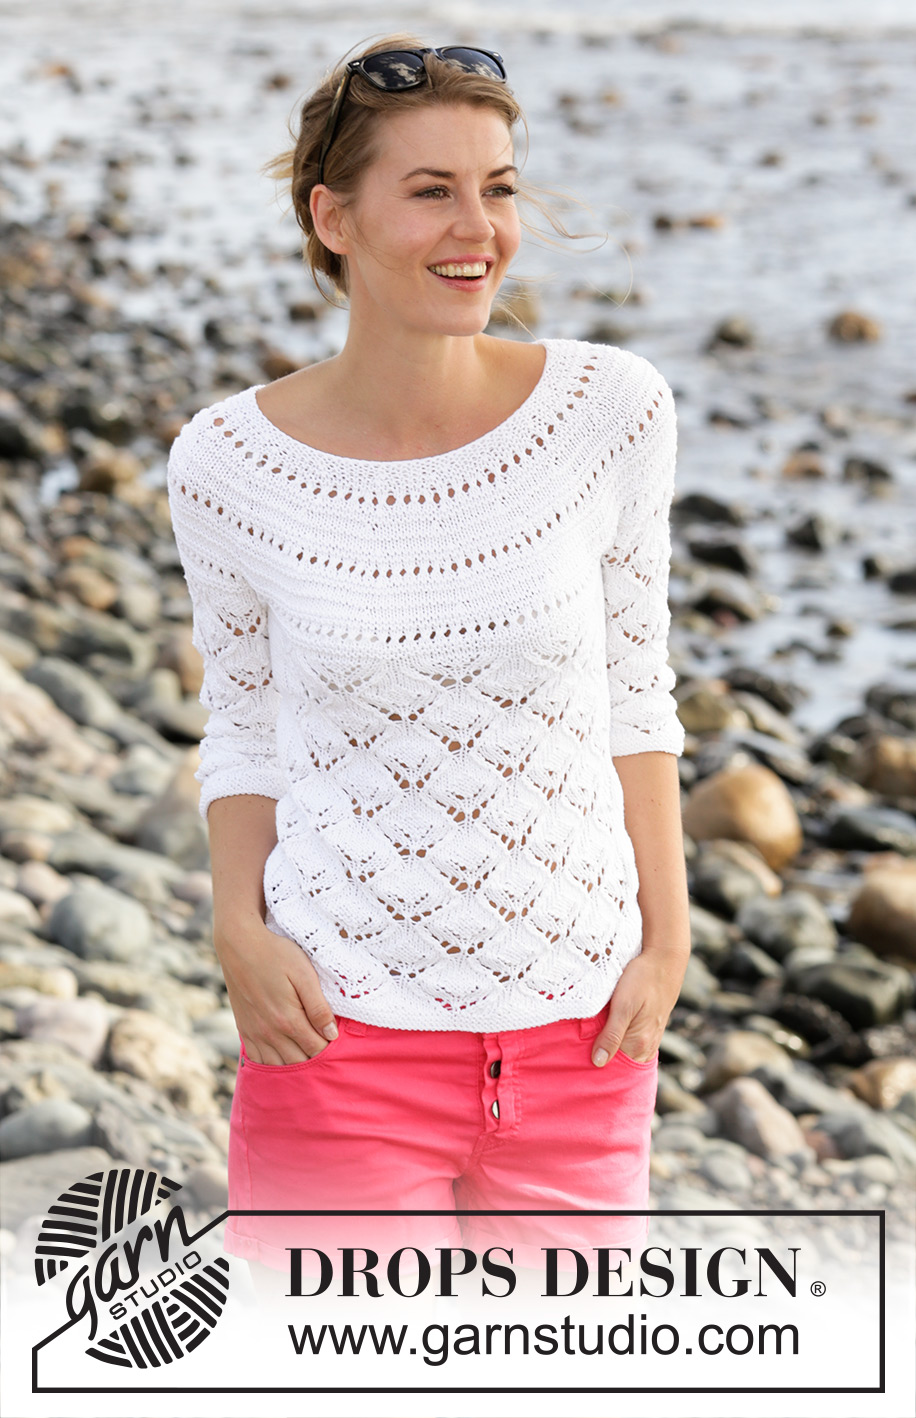
Knitted DROPS jumper with lace pattern, round yoke and ¾ sleeves in ”Cotton Light”. Size: S - XXXL
DROPS 170-7 |
||||||||||||||||
|
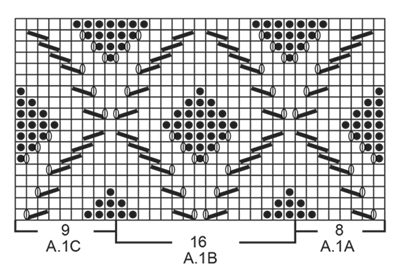
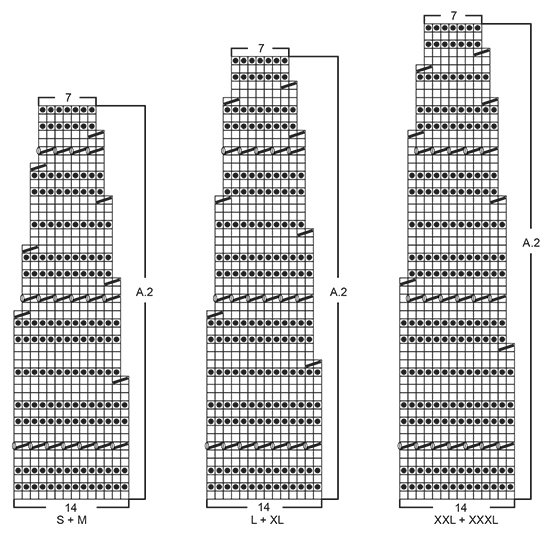
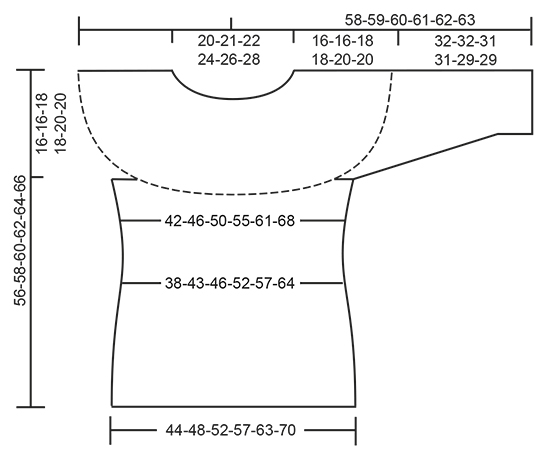
GARTER ST (worked in the round): 1 ridge = 2 rounds. * K 1 round and P 1 round *, repeat from *-*. PATTERN: See diagrams A.1 and A.2. NOTE: Note that on some rounds in A.1 there is pattern on EVERY round. DECREASE TIP-1: To calculate how often dec should be done, use the total no of sts on round (e.g. 184 sts) and divide by no of dec to be done (e.g. 22) = 8.4. I.e. in this example K approx. every 7th and 8th st tog. DECREASE TIP-2 (applies to sides of body): Dec as follows before first and third marker: Beg 2 sts before marker and K 2 tog. Dec as follows after second and fourth marker: Slip 1 st as if to K, K 1, psso. INCREASE TIP (applies to sides of body): Inc as follows before first and third and after second and fourth marker: Make 1 YO. On next round K YO twisted to avoid holes. ---------------------------------------------------------- BODY: Because of pattern in A.1 work piece in the round on circular needle. Cast on 184-202-218-240-264-294 sts on circular needle size 3.5 mm with Cotton Light. Work 3 ridges in GARTER ST - see explanation above. Switch to circular needle size 4 mm and K 1 round while dec 22-20-28-26-34-40 sts evenly - READ DECREASE TIP-1 = 162-182-190-214-230-254 sts. Work next round as follows: Work 8-13-7-13-9-7 sts in stocking st, insert 1 marker (= first marker), * work pattern according to diagram A.1A (= 8 sts), repeat A.1B over the next 48-48-64-64-80-96 sts (= 3-3-4-4-5-6 repetition of 16 sts), work A.1C (= 9 sts) *, insert 1 marker (= second marker), work 16-26-14-26-18-14 sts in stocking st, insert 1 marker (= third marker), repeat from *-* one more time, insert 1 marker (= fourth marker) and finish with 8-13-7-13-9-7 sts in stocking st. Continue pattern like this. REMEMBER THE KNITTING TENSION When piece measures 6 cm, dec before first and third and after second and fourth marker – READ DECREASE TIP-2 (= 4 sts dec). Repeat dec every 3 cm a total of 6 times = 138-158-166-190-206-230 sts. When piece measures 26 cm, inc before first and third and after second and fourth marker – READ INCREASE TIP (= 4 sts inc). Repeat inc every 3-4-4-4-4-5 cm a total of 4 times = 154-174-182-206-222-246 sts. When piece measures 40-42-42-44-44-46 cm, work next round as follows: Cast off 3-3-4-4-5-5 sts for armhole, K 71-81-83-95-101-113 (= back piece), cast off 6-6-8-8-10-10 sts for armhole, K 71-81-83-95-101-113 (= front piece) and cast off the last 3-3-4-4-5-5 sts for armhole. Put piece aside and knit the sleeves. SLEEVE: Because of pattern in A.1 work piece in the round on double pointed needles. Cast on 58-58-58-60-62-64 sts on double pointed needles size 3.5 mm with Cotton Light. Work 3 ridges. Switch to double pointed needles size 4 mm and K 1 round while dec 7 sts evenly = 51-51-51-53-55-57 sts. Work next round as follows: 1-1-1-2-3-4 sts in stocking st, work pattern according to diagram A.1A (= 8 sts), repeat A.1B over the next 32 sts (= 2 repetitions of 16 sts), work A.1C (= 9 sts) and finish with 1-1-1-2-3-4 sts in stocking st. Continue pattern like this. When piece measures 8 cm, inc 1 st on each side of the middle 2 sts mid under sleeve (inc by making 1 YO, on next round K YO twisted to avoid holes). Repeat inc every 5-4-3½-3-2½-2 cm 5-6-7-8-9-10 times in total = 61-63-65-69-73-77 sts. When piece measures 32-32-31-31-29-29 cm (NOTE: Shorter measurements in the larger sizes because of longer yoke) work next round as follows: Cast off 3-3-4-4-5-5 sts, K 55-57-57-61-63-67 and cast off the last 3-3-4-4-5-5 sts. Put piece aside and knit another sleeve. YOKE: Switch to circular needle size 3.5 mm and slip sleeves on to same circular needle as body where armholes were cast off (without working them first) = 252-276-280-312-328-360 sts. Then work pattern in the round according to diagram A.2 (choose diagram for correct size = 17-18-19-21-22-24 repetitions of 14 sts), AT THE SAME TIME dec 14-24-14-18-20-24 sts evenly on first round – READ DECREASE TIP-1 = 238-252-266-294-308-336 sts on needle. When diagram A.2 has been worked, there are 119-126-133-147-154-168 sts on needle and piece measures approx. 56-58-60-62-64-66 cm, cut the yarn. NECK EDGE WITH ELEVATION: Beg from RS mid back and work in garter st back and forth on circular needle size 3.5 as follows: K 7-7-8-9-9-10 sts, turn, tighten yarn and K 14-14-16-18-18-20 sts back. Turn, tighten yarn and K 21-21-24-27-27-30 sts, turn, tighten yarn and K 28-28-32-36-36-40 sts back. Continue back and forth like this and work 7-7-8-9-9-10 sts more on every turn until 56-56-64-72-72-80 sts in total have been worked (= 8 rows in total), turn piece, tighten yarn and K until mid back. K 1 round over all sts while dec 23-24-27-31-34-36 sts evenly = 96-102-106-116-120-132 sts on needle. P 1 round, K 1 round and P 1 round. Then loosely cast off with K. ASSEMBLY: Sew the openings under the sleeves. |
||||||||||||||||
Diagram explanations |
||||||||||||||||
|
||||||||||||||||
 |
||||||||||||||||
 |
||||||||||||||||
 |
||||||||||||||||
Have you finished this pattern?Tag your pictures with #dropspattern #clarasweater or submit them to the #dropsfan gallery. Do you need help with this pattern?You'll find 27 tutorial videos, a Comments/Questions area and more by visiting the pattern on garnstudio.com. © 1982-2026 DROPS Design A/S. We reserve all rights. This document, including all its sub-sections, has copyrights. Read more about what you can do with our patterns at the bottom of each pattern on our site. |
||||||||||||||||


With over 40 years in knitting and crochet design, DROPS Design offers one of the most extensive collections of free patterns on the internet - translated to 17 languages. As of today we count 324 catalogues and 12290 patterns translated into English (UK/cm). 12290
We work hard to bring you the best knitting and crochet have to offer, inspiration and advice as well as great quality yarns at incredible prices! Would you like to use our patterns for other than personal use? You can read what you are allowed to do in the Copyright text at the bottom of all our patterns. Happy crafting!
Post a comment to pattern DROPS 170-7
We would love to hear what you have to say about this pattern!
If you want to leave a question, please make sure you select the correct category in the form below, to speed up the answering process. Required fields are marked *.