
Popular categories
Looking for a yarn?


Comments / Questions (2)
![]() Lorna Merritt wrote:
Lorna Merritt wrote:
I had fun making this pattern it was easy and came out great thank you
18.10.2021 - 15:28
![]() Sb wrote:
Sb wrote:
Once I have created the item using this pattern, can I sell the item?
26.09.2021 - 10:10DROPS Design answered:
Hello Sb, yes you can. The sale of garments based on DROPS patterns is permitted as long as they are sold as single items or per order. Further commercial use of the patterns is not permitted. It has to be clearly stated that the garment is made based on a design from DROPS DESIGN. The use of clothing labels of which DROPS DESIGN forms part is conditioned by the inclusion of the following text: “A DROPS DESIGN made by …..”. Happy crafting!
26.09.2021 - 11:12
|
|||||||||||||||||||||||||
Creepy Candy#creepycandybasket |
|||||||||||||||||||||||||
 |
 |
||||||||||||||||||||||||
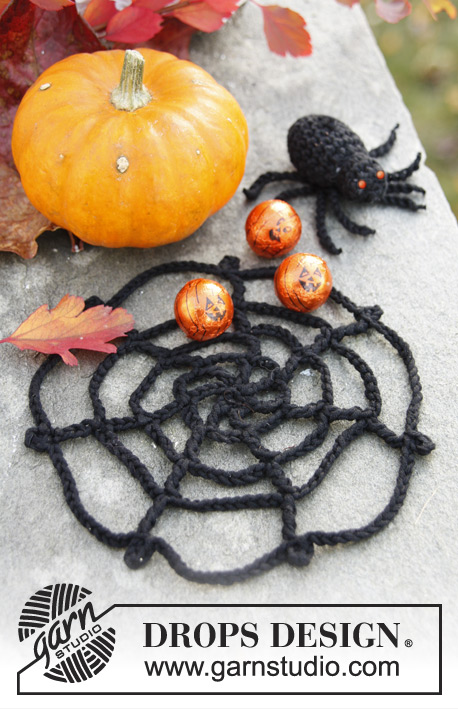
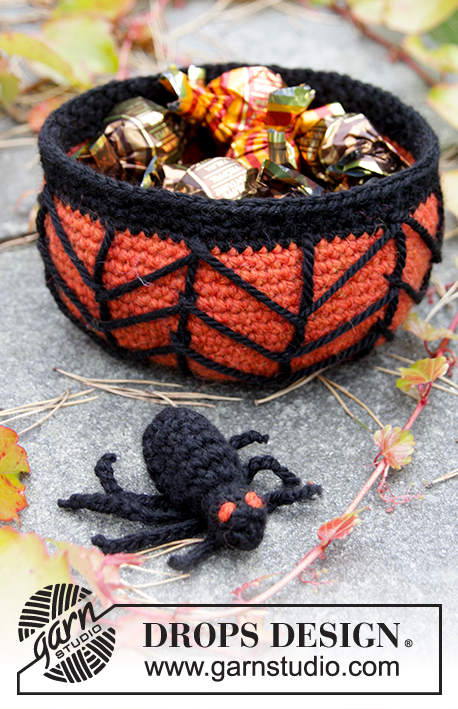
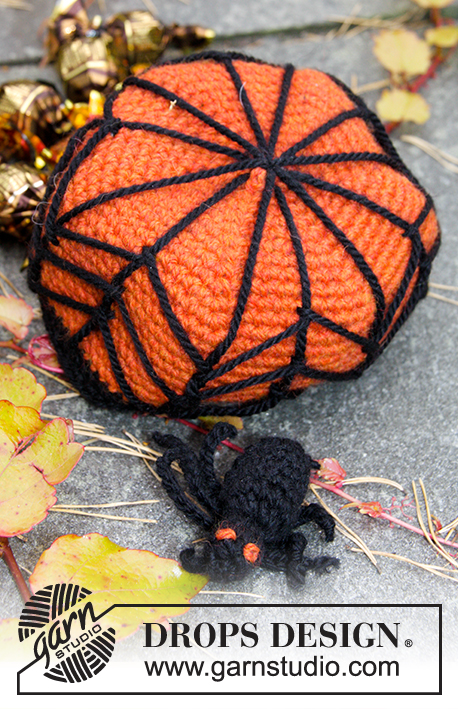
DROPS Halloween: Crochet pumpkin basket with cob web and spider in DROPS Nepal.
DROPS Extra 0-1171 |
|||||||||||||||||||||||||
|
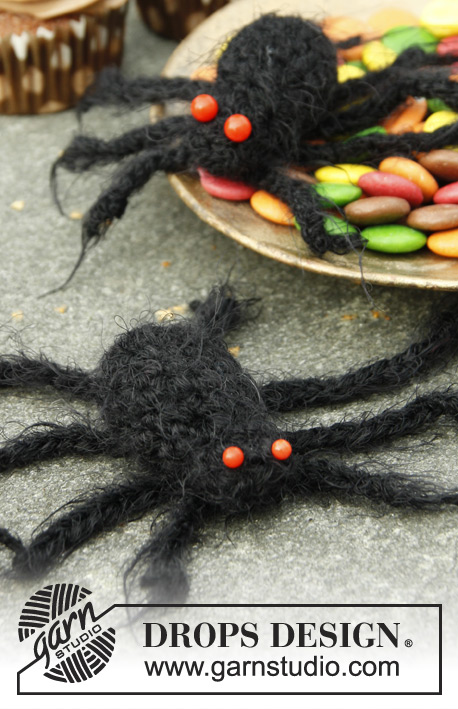
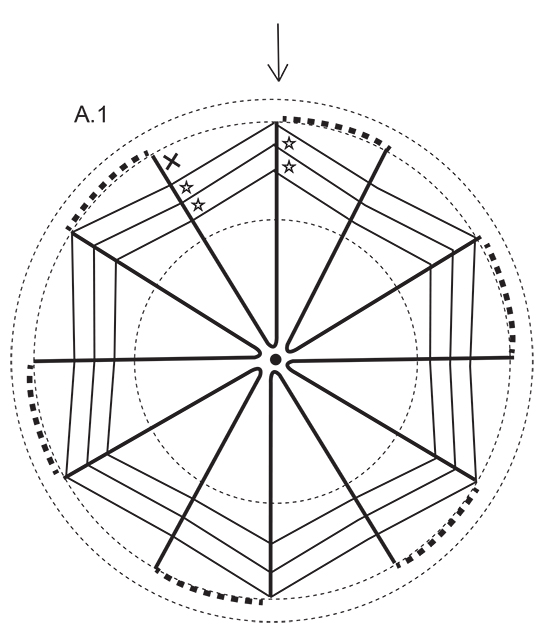
PATTERN: See diagram A.1. Diagram shows basket seen from bottom and out to the sides (side of basket is shown as it was flat). CROCHET INFO: Beg every round with 1 ch and finish round with 1 sl st in first ch from beg of round. WORK 2 DC TOG AS FOLLOWS: Insert hook in first dc and pull yarn through, insert hook in next dc and pull yarn through, make a YO and pull yarn through all 3 loops on hook. ---------------------------------------------------------- BASKET: Worked from bottom up. Work 4 ch on hook size 3 mm with orange and form a ring with 1 sl st in first ch. ROUND 1: READ CROCHET INFO! Work 6 dc in ch-ring. ROUND 2: Work 2 dc in every dc = 12 dc. ROUND 3: Work * 1 dc in first/next dc, 2 dc in next dc *, repeat from *-* the entire round = 18 dc. ROUND 4: Work * 1 dc in each of the first/next 2 dc, 2 dc in next dc *, repeat from *-* the entire round = 24 dc. ROUND 5: Work * 1 dc in each of the first/next 3 dc, 2 dc in next dc *, repeat from *-* the entire round = 30 dc. ROUND 6: Work * 1 dc in each of the first/next 4 dc, 2 dc in next dc *, repeat from *-* the entire round = 36 dc. REMEMBER THE CROCHET TENSION! Continue by working 1 dc more between inc until piece measures approx. 12 cm in diameter (if you want a larger basket continue the same way until desired diameter). NOW MEASURE PIECE FROM HERE! Work 1 dc in every dc until piece measures approx. 4.5 cm (or desired height), switch to black and work 2 round with 1 dc in every dc. Work next round as follows: Work * 2 dc in first/next dc, skip 1 dc *, repeat from *-* the entire round. Fasten off. COB WEB: Sew on cob web with black - see diagram A.1. First sew the vertical lines that go around the middle, then sew evenly, beg in first round with dc in black. Then sew the diagonal lines in 3 rounds. Beg the vertical lines with 1 stitch at the beg of round (- see arrow in diagram), sew 1 stitch in the middle of bottom, sew through edge, baste on the back, sew through edge, sew 1 stitch in the middle of bottom etc. the entire round - NOTE: Make sure that to avoid a tight yarn. Then sew the diagonal lines (= 3 round), sew 1 backstitches around each of the vertical lines in the crossing point to fasten the vertical lines. Fasten yarn after last round. ---------------------------------------------------------- SPIDER: BODY: Beg at the back of body and work forward. Work 4 ch on hook size 3 mm with black and form a ring with 1 sl st in first ch. READ CROCHET INFO! ROUND 1: Work 6 dc in ch-ring. ROUND 2: Work 2 dc in every dc the entire round = 12 dc. ROUNDS 3-6: 1 dc in every dc. REMEMBER THE CROCHET TENSION! ROUND 7: Work all DC TOG 2 by 2 - see explanation above. = 6 dc. HEAD: ROUND 8: Work * 1 dc in first/next dc, 2 dc in next dc *, repeat from *-* the entire round = 9 dc. ROUND 9: Work 1 dc in every dc. ROUND 10: Work 1 dc in first dc, then work all dc tog 2 by 2 = 5 dc. Put some cotton wool in the spider, cut the yarn. Sew on 2 eyes with stitches in orange. Baste it up and down around the opening at the top of head and tighten. Twine a black yarn around the transition between body and head, fasten. LEGS: Work 4 pairs of legs in black (= 8 legs in total). Beg with the longest legs at the back. Work legs tog in the middle so that they are easy to fasten under the spider. The 2 legs at the back: Work 21 ch, cut the yarn. The 2 second to last legs: Work 10 ch, then 1 sl st in the middle ch from previous ch row and 10 ch, cut the yarn. The 2 second foremost legs: Work 9 ch, then 1 sl st in sl st from previous ch row and 9 ch, cut the yarn. The 2 front legs: Work 8 ch, then 1 sl st in sl st from previous ch row and 8 ch, cut the yarn. To avoid fastening the strands in each end of legs, tie a small knot right by the ch row, then cut the yarn directly below the knot. Place all legs under the spider and fasten them on the middle. If you want to hang the spider, make a loop by pulling a yarn through the middle of body and back, let the loop be approx. 6 cm long, tie the 2 strands tog under the body and fasten. |
|||||||||||||||||||||||||
Diagram explanations |
|||||||||||||||||||||||||
|
|||||||||||||||||||||||||
 |
|||||||||||||||||||||||||
Have you finished this pattern?Tag your pictures with #dropspattern #creepycandybasket or submit them to the #dropsfan gallery. Do you need help with this pattern?You'll find 7 tutorial videos, a Comments/Questions area and more by visiting the pattern on garnstudio.com. © 1982-2026 DROPS Design A/S. We reserve all rights. This document, including all its sub-sections, has copyrights. Read more about what you can do with our patterns at the bottom of each pattern on our site. |
|||||||||||||||||||||||||


With over 40 years in knitting and crochet design, DROPS Design offers one of the most extensive collections of free patterns on the internet - translated to 17 languages. As of today we count 324 catalogues and 12290 patterns translated into English (UK/cm). 12290
We work hard to bring you the best knitting and crochet have to offer, inspiration and advice as well as great quality yarns at incredible prices! Would you like to use our patterns for other than personal use? You can read what you are allowed to do in the Copyright text at the bottom of all our patterns. Happy crafting!
Post a comment to pattern DROPS Extra 0-1171
We would love to hear what you have to say about this pattern!
If you want to leave a question, please make sure you select the correct category in the form below, to speed up the answering process. Required fields are marked *.