
Popular categories
Looking for a yarn?


Comments / Questions (156)
![]() Ullabritt Söderberg wrote:
Ullabritt Söderberg wrote:
Angående mönster 161-25 Har stickat vänster/höger fram- och bakstycket samt monterat bakstycket mitt bak. Ska man sedan följa mönstret med HOPSTICKNING??? I så fall hur (från halskant framstycke eller från 3:e markör (höger framstycke)?? Eller gå direkt till HÖGER FRAMSTYCKE (nederkant)?? I så fall Varv 1: (rätsidan). Med vilka maskor ska detta varv stickas? Finns ju bara att tillgå de som sitter på tråd. Väldigt tacksam för svar. Jag kommer inte vidare.
02.06.2015 - 10:36DROPS Design answered:
Hej Ullabritt, Ja nu följer du beskrivningen HOPSTICKNING från höger framst mot höger bakst. Börja med höger framst och följ beskrivningen från varv 1 rätsidan. Lycka till!
10.08.2015 - 14:10
![]() Martine wrote:
Martine wrote:
Modèle 161-25 Ce modèle est vraiment superbe mais j ai du mal à comprendre les explications.Pour le devant gauche/demi-dos il est précise "faire suivre les marqueurs au fur et a mesure" mais où par rapport aux jetés ?car j'ai essayé de commencer l'ouvrage mais je ne parviens pas a le faire,merci de m'apporter plus de précisions car je tiens vraiment a le réaliser. Merci beaucoup pour votre aide
30.05.2015 - 15:08DROPS Design answered:
Bonjour Martine, au rang 2 du domino, vous augmentez 1 m avant le 1er marqueur, puis 1 m de chaque côté de la m avec le 2ème marqueur, et 1 m après le 3ème marqueur. Ainsi, le nombre de mailles avant le 1er marqueur et après le 3ème marqueur augmente, comme celui de chaque côté du 2ème marqueur (au rang 6, on a 6 augm.). Bon tricot!
01.06.2015 - 09:16
![]() Krause, Ilona wrote:
Krause, Ilona wrote:
Sehr geehrtes Team, da ich häufig Kurzgrößen trage, würde ich der Proportionen wegen gern wissen, in wie viel Zentimetern ab Schulternaht gerechnet der vordere Halsausschnitt beginnt. Es sind zwar in der Strickschrift die Reihen entsprechend angebeben, aber zusätzlich Zentimeterangaben in der graphischen Übersicht würden mir eine große Hilfe sein. Vielleicht lässt sich dieser Zusatz bei kommenden Modellen grundsätzlich mit aufnehmen?! Ich danke für Ihre Mühe! Liebe Grüße
29.05.2015 - 08:29DROPS Design answered:
Bei diesem Modell ist der Schnitt sehr speziell, es wird ja oben an der Schulter begonnen und nach unten über das Vorderteil gestrickt, dann wieder quasi um den Armausschnitt nach oben über das Rückenteil wieder bis zur Schulter (so läuft 1 R), daher ist es hier nicht so einfach, den Schnitt anzupassen. Grundsätzlich können Sie aber bei vielen Modellen die Höhe des Halsausschnitts errechnen und anpassen oder die Gesamtlänge etwas kürzen. Dabei gilt: Je komplizierter der Schnitt oder das Muster, desto schwieriger wird das. Ich kann Ihren Vorschlag gerne weiterleiten, vielleicht stößt er beim Design-Team auf fruchtbaren Boden. :-)
30.05.2015 - 13:01
![]() Bea wrote:
Bea wrote:
Behöver hjälp med hur man "fyller" hålen i dominorutorna.
14.05.2015 - 21:15DROPS Design answered:
Hej Bea, hålen skall ikke fylles ifølge opskriten. Se her: NB: Vær obs på at kastene blir løse nok. 3.P: Strikk rett, kastene strikkes ikke vridd rett, de skal lage hull. Det er jo dog en smagssag, så vil man absolut ikke have hul, så strikker man vridd ret på næste p. God fornøjelse!
15.05.2015 - 09:57
![]() Petra H. wrote:
Petra H. wrote:
Hallo,habe das erste Teil gestrickt,kam aber nicht erkennen,was wohin gehört :-( Gibt es eine zusätzliche Skizze? Fange jetzt mit dem Zeiten Teil an,hab aber keine Ahnung,was wohin gehört. Vielen Dank für ihre Antwort! LG aus NRW
11.05.2015 - 21:42DROPS Design answered:
Der erste Teil ist gleichzeitig Vorder- und Rückenteil (linke Seite), es ist der in der Skizze mit 1 bezeichnete Teil. Sie sehen in der Skizze ja die Pfeile, diese zeigen die Strickrichtung an, daran können Sie vielleicht erkennen, wie es zu dem von Ihnen gestrickten Teil passt. 1 ist dabei der ganze obere rechte Teil, bis zur schrägen Linie, die gestrichelte Linie ist eine der Schrägen des Dominoquadrats. Vorder- und Rückenteil werden ja gleichzeitig gestrickt, lesen Sie vielleicht auch einmal die anderen deutschen Fragen und Antworten in der Kommentarliste, vielleicht hilft Ihnen das auch noch weiter. Ansonsten gerne noch einmal fragen. Viele Grüße auch aus NRW :-)
12.05.2015 - 22:13
![]() Barbara wrote:
Barbara wrote:
Hallo, als ich die Jacke sah, wußte ich , die muss ich stricken. Nachdem ich nun schon 5x aufgetrennt habe, bitte ich um Hilfe. Die Beschreibung des DOMINOQUADRATES kann ich absolut nicht so umsetzen, dass das Teil gerade bleibt und die Maschen so zugenommen werden, dass eine schräge Zunahmelinie entsteht. Auch komme ich mit dem Setzen der Marker (wohin?) im Strickprozess nicht klar. Kann mir jemand helfen und das Ganze mal konkreter beschreiben? Vielen Dank schon im Voraus.
28.04.2015 - 14:57DROPS Design answered:
Das Setzen der Markierer ist am Anfang unter "Linkes Vorderteil/Rückenteil" genau beschrieben (1. + 3. Mark. = zwischen den M, 2. Mark. = in der Masche). Die Mark. bleiben immer an dens. Stellen, d.h. die M-Zahl zwischen den Mark. steigt mit den Zunahmen. Die Zun. müssen symmetrisch sein, 2. Mark. = Mitte. Sie nehmen also am 1. Mark. 1 M zu, stricken bis zur M, die mit dem 2. Mark. versehen ist, nehmen rechts und links davon zu, stricken bis zum 3. Mark. und nehmen dort wieder zu (2. R des Dominoquadrats). In der 4. R stricken Sie die Zun. ebenso. In der 6. R nehmen Sie zusätzl. vor der M, die vor der mittleren M kommt, & nach der M, die nach der mittleren M kommt, je 1 M zu.
28.04.2015 - 22:39
![]() Karin Näslund wrote:
Karin Näslund wrote:
Hej, kan någon förklara hur jag stickar ihop höger framstycke nederkant med m från tråden mellan 3:e och 2:a markören?
16.04.2015 - 13:26DROPS Design answered:
Hej Karin, om du följer beskrivningen, var är det så du inte får det till at fungera? På vilket varv? Lycka till!
13.05.2015 - 14:57
![]() Sabine Schendera wrote:
Sabine Schendera wrote:
Hallo, die Jacke muss ich unbedingt stricken! Allerdings vertrage ich keinerlei Wolle/Wollgemische. Welches DROPS Garn kann ich alternativ verwenden? Wobei der wow-Effekt sicher auch dadurch entsteht, dass das Garn "FABEL ocean view" meliert ist. Herzlichen Dank für Ihre Hilfe, Sabine
15.04.2015 - 11:09DROPS Design answered:
Sie können unter "Garnalternativen" im Kopf neben dem Foto schauen, welche anderen Garne für dieses Modell möglich sind. Schaf- und Alpakawollfreie Garne sind die Baumwollgarne Safran und Cotton Viscose, die gibt es aber nur in Uni-Farben. Ein Teil des Effekts entsteht tatsächlich durch den Farbverlauf, aber auch durch die naturfarbenen Streifen (die Jacke wird ja abwechselnd in natur und ocean view gestrickt). Sie könnten einen etwas bunteren Effekt erzielen, wenn Sie als Ersatz für ocean view mehrere ähnliche Farben verwenden, und diese dann im Wechsel verwenden. Beachten Sie, dass Sie die benötigte Garnmenge anhand der Lauflänge berechnen müssen und dass Sie die Maschenprobe einhalten.
17.04.2015 - 10:29Ria Booltink wrote:
Het patroon klopt niet. Met het deel 3 breien kom ik steken te kort om de domino helemaal in te breien. Op het patroon staan er zelfs nog steken onder de domino
11.04.2015 - 18:24
![]() Bea wrote:
Bea wrote:
Har stickat fram till minskningen i hals på vä fram/bakst. Behöver hjälp med hur stycket ska vara: vad är fram och vad är bak? Vart ska halsminskningen på stycket göras? Tacksam för svar. Mvh
10.04.2015 - 22:33DROPS Design answered:
Hej Bea, du bör kunna se och jämföra ditt arbete med mönsterskissen nederst i beskrivningen. Lycka till!
13.05.2015 - 15:08
|
||||||||||||||||
Lady Grey#ladygreyjacket |
||||||||||||||||
 |
 |
|||||||||||||||
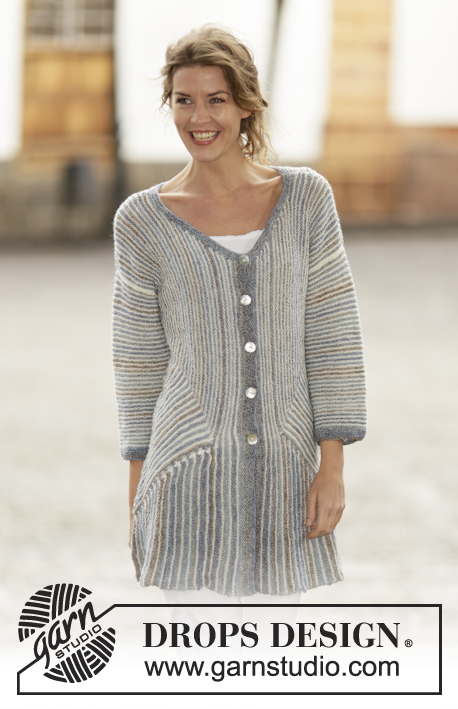
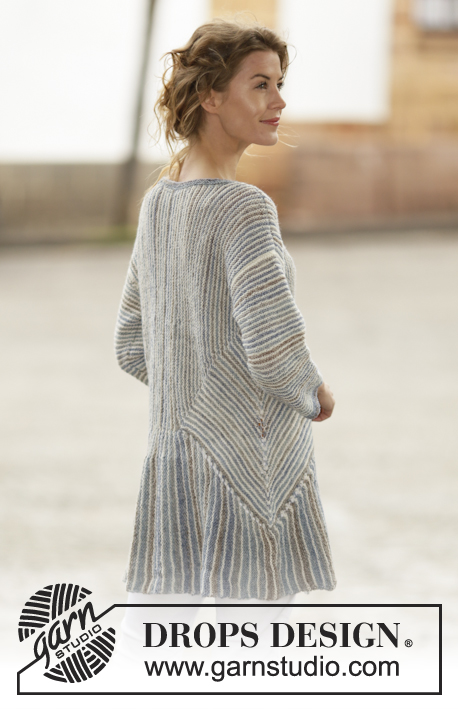
Knitted DROPS jacket in garter st with stripes and domino squares in ”Fabel”. Size: S - XXXL.
DROPS 161-25 |
||||||||||||||||
|
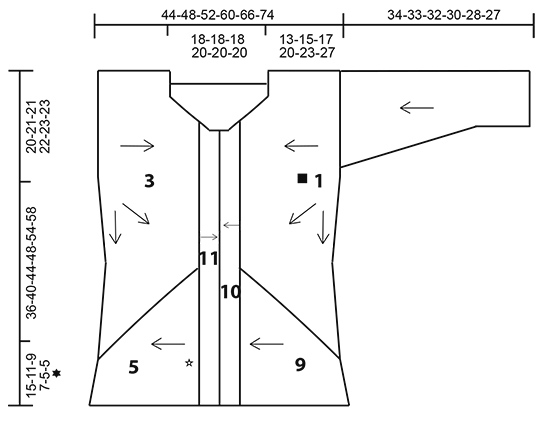
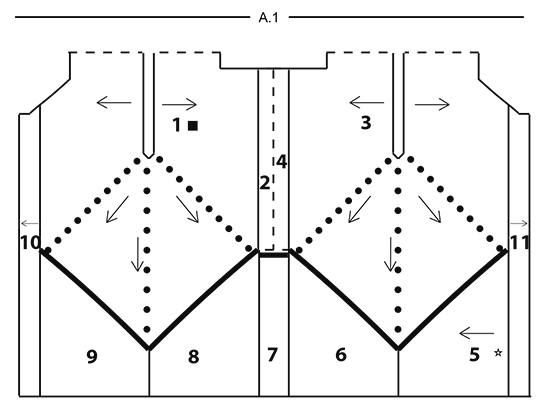
RIDGE/GARTER STITCH (worked back and forth): 1 ridge = knit 2 rows. STRIPES: Work stripes as follows (first row in each stripe = from right side): 1 RIDGE – see description above – with ocean view. 1 ridge with off white. DOMINO SQUARE: ROW 1 AND ALL OTHER ROWS FROM WRONG SIDE: Knit. ROW 2 (= right side): Knit to the stitch with the first marker, 1 yarn over, knit stitch with first marker, knit to stitch with 2nd marker, 1 yarn over, knit stitch with 2nd marker, 1 yarn over, knit to the stitch with the 3rd marker, knit stitch with 3rd marker, 1 yarn over, knit to end of row (= 4 stitches increased). The yarn overs are then knitted to allow holes. ROW 4: Knit and increase as in row 2. ROW 6: Knit to the stitch with the first marker, 1 yarn over, knit the stitch with the first marker, knit to 1 stitch before the stitch with the 2nd marker, 1 yarn over, knit 1, 1 yarn over, knit the stitch with the 2nd marker, 1 yarn over, knit 1, 1 yarn over, knit to the stitch with the 3rd marker, knit the stitch with the 3rd marker, 1 yarn over, knit to end of row (= 6 stitches increased). ROW 8: Knit and increase as for row 2. ROW 10: Knit and increase as for row 2. Repeat rows 1 to 10. BUTTONHOLE: 1 BUTTONHOLE = Knit 2 stitches together and make 1 yarn over. Make 4-4-4-5-5-5 buttonholes on the right band when the band (= part-11) measures 2-2-2-4-4-6 cm. The first hole is worked 7-7-7-8-8-8 cm from the neckline, the others with approx. 8-8-8-9-9-9 cm between them. The 5th-5th-5th-6th-6th-6th buttonhole is worked when working the neckline, make it above the others. ---------------------------------------------------------- JACKET: The jacket is worked as follows (see A.1): Left part (= part-1 and part-2) is worked as one, right part (= part-3 and part-4) is worked as one, then an edge is worked around the whole jacket (= part-5 to part-9). The bands are worked to finish (= part-10 and part-11). The broken lines in A.1 show the seams on the jacket. Then the sleeves are worked separately and sewn onto the jacket. PART-1 (left front piece and back piece): Cast on 87-91-91-95-99-99 stitches with circular needle size 4 mm and off white (= the armhole of the garment. The shoulder seam is sewn later). Work STRIPES – see description above. On row 1 (= right side) insert 3 markers in the piece as follows: Work 42-44-44-46-48-48 stitches, work the next stitch and insert the first marker in that stitch, work 1 stitch and insert the 2nd marker in that stitch (= the side of the jacket and the point of the domino), work 1 stitch and insert the 3rd marker in that stitch, work 42-44-44-46-48-48 stitches. The markers sit in the middle 3 stitches in the piece. The markers are to follow the piece as you work. Continue working DOMINO SQUARE – see description above (first row is worked with off white from wrong side). REMEMBER THE KNITTING TENSION! Work until the piece measures 13-15-17-20-23-27 cm measured at the shortest at the end/beginning of the row. The last row should be from wrong side. Cast off for the neck as follows: ROW 1 (= Right side): Cast off the first 12-12-14-14-16-16 stitches for the neck on the front piece and work domino to the end of the row as before. ROW 2 (= wrong side): Cast off the first 6 stitches for the neck on the back piece and work domino to the end of the row as before. ROW 3: Knit the first 2 stitches twisted together (= 1 stitch decreased for the neck on the front piece), work domino to the end of the row as before. ROW 4: Work domino. Repeat rows 3 and 4 until the piece measures 18-20-22-24-27-29 cm at the shortest – finish with 1 whole stripe with ocean view. Now divide the piece into 4 parts. Work with ocean view from the right side as follows: Knit to and including the stitch with the first marker, place these stitches on 1 thread (= stitches towards mid front – here the band will be worked = part-10), knit to and including the stitch with the 2nd marker, place these stitches on a 2nd thread (= diagonal line on the front piece from mid front to the side, these stitches will be worked together with an edge = part-9), knit to and including the stitch with the 3rd marker, place these stitches on a 3rd thread (= diagonal line on the back piece from the side up to mid back, these stitches will be worked together with an edge = part-8), change to off white and knit to end of the row (= stitches mid back, you will now continue working these stitches back and forth = part-2). There are now stitches on 3 different threads and the remaining stitches are on the needle. Now part-2 is worked back and forth over the stitches on the needle. PART-2 (left mid back): Continue to work stripes (row 1 = wrong side) until the piece measures 22-24-26-30-33-37 cm measured from the cast-on edge and horizontally towards mid back. Finish with 1 whole stripe with ocean view. Cast off loosely with ocean view (this is mid back and here part-2 will later be sewn together with part-4). Lay the piece to one side and work the right part of the jacket as follows: PART-3 (right front piece and back piece): Cast on and work as for part-1 until the piece measures 13-15-17-20-23-27 cm at the shortest. The last row is from the wrong side. Now cast off for the neck as follows: ROW 1 (= right side): Cast off the first 6 stitches for the neck on the back piece and work domino to end of the row as before. ROW 2 (= wrong side): cast off the first 12-12-14-14-16-16 stitches for the neck on the front piece and work domino to end of row as before. ROW 3: Work domino. ROW 4: Knit the first 2 stitches twisted together (= 1 stitch decreased for the neck on the front piece), work domino to end of row as before. Repeat rows 3 and 4 until the piece measures 18-20-22-24-27-29 cm at the shortest – make sure that length and stripes match part-1. Cut the strands. Now divide the piece into 4 parts. Work with off white from the right side as follows: Knit to and including the stitch with the first marker (= stitches mid back, you will continue to work back and forth over these stitches = part-4), change to ocean view, knit to and including the stitch with the 2nd marker, place these stitches on 1 thread (= diagonal line on the back piece from mid back to the side, these stitches will be worked together with an edge = part-6, the marker marks the side of the jacket), knit to and including the stitch with the 3rd marker, place these stitches on a 2nd thread (= diagonal line on the front piece from the side to mid front, these stitches will be worked together with an edge = part-5), knit to end of row and then place these stitches on a 3rd thread (= stitches towards mid front – here you will work a band = part-11). The stitches are now on 3 different threads and the remaining stitches are on the needle. PART-4 (right mid back): Continue working as for part-2. ASSEMBLY: Sew part-2 together with part-4 with ocean view – see the broken line in A.1, in the outermost loop of the outermost stitch. EDGE OF JACKET: The edge at the bottom is started mid front and is worked along the right front piece (part-5), right back piece (part-6) and continued along mid back (part-7), left back piece (part-8) and left front piece (part-9). Cast on 52-54-60-66-72-82 stitches with circular needle size 4 mm and off white. PART-5 (edge on right front piece): The edge is worked together with the stitches between the 3rd and 2nd marker on part-3 (i.e. from mid front and down to the tip of the domino). Work as follows: ROW 1 (= right side): Knit 1, 1 yarn over, knit 2 twisted together, knit 2 twisted together and knit to end of row (= 1 stitch decreased). ROW 2 (= wrong side): Knit until there is 1 stitch left on the needle, place the first/next 2 stitches from the thread back on the needle, knit 3 stitches together. The edge is now worked together with the first/next 2 stitches from part-3. Change to ocean view. ROW 3: Work as for row 1. Work short rows over the edge as follows: ROW 4 (= wrong side): Knit until there are 8 stitches left on the needle, turn the piece. ROW 5 (= right side): Knit. ROW 6 (= wrong side): Knit until there are 2 stitches left on the needle, turn the piece. ROW 7 (= right side): Knit. ROW 8: Work as for row 2. Change to off white. Repeat rows 1-8 until all the stitches from mid front and down to the tip have been worked to the edge. PART-6 (edge on right back piece): The edge is worked to the stitches between the 2nd and first markers on part-3 (i.e. from the tip of the domino and up to mid back). Work as follows with off white: ROW 1 (= right side): Knit 1, 1 yarn over, knit to end of row (= 1 stitch increased). ROW 2 (= wrong side): Knit until there is 1 stitch left on the needle, place the first/next 2 stitches from the thread back on the needle and knit 3 stitches together. The edge is now worked together with the first/next 2 stitches from the right back piece. Change to ocean view. ROW 3: Work as for row 1. Work short rows over the edge as follows: ROW 4 (= wrong side): Knit until there are 8 stitches left on the needle, turn the piece. ROW 5 (= right side): Knit. ROW 6 (= wrong side): Knit until there are 2 stitches left on the needle, turn the piece. ROW 7 (= right side): Knit. ROW 8: Work as for row 2. Change to off white. Repeat rows 1-8 until all the stitches from the tip to mid back have been worked together with the edge. PART-7 (edge mid back): Place 1 marker in the piece. THE PIECE IS NOW MEASURED FROM HERE! Now work short rows back and forth over the stitches from the edge as follows (i.e. they are not worked together with stitches from part-1 or part-3): Continue with stripes as before, adjust colour according to the stripes. Change to ocean view. ROW 1 (= right side): Knit. Knit short rows over the edge as follows: ROW 2 (= wrong side): Knit until there are 8 stitches left on the needle, turn the piece. ROW 3 (= right side): Knit. ROW 4 (= wrong side): Knit until there are 2 stitches left on the needle, turn the piece. ROW 5 (= right side): Knit. ROW 6: Knit. Change to off white. ROWS 7 AND 8: Knit. Repeat rows 1-8 until the piece measures 8-8-8-12-12-16 cm at the shortest, adjust the measurement with part-2 and part-4, they will be sewn together later. PART-8 (edge on left back piece): The edge is worked together with the stitches between the 3rd and 2nd marker on part-1 (i.e. from mid back and down to the tip of the domino). Work as for part-5 until all the stitches from mid back and down to the tip of the domino have been worked together with the edge. PART-9 (edge on the left front piece): The edge is worked together with the stitches between the 2nd and first marker on part-1 (i.e. from the tip of the domino and up to mid front). Work as for part-6 until all the stitches from the tip to mid front have been worked together with the edge. PART-10 (rest of left front piece and left band): Place the stitches from the first thread on part-1 (= left front piece mid front) back on the needle (i.e. there are now stitches from the edge and stitches from the thread on the needle). Insert 1 marker in the piece. THE PIECE IS NOW MEASURED FROM HERE! Work band as follows in the different sizes (the jacket in the picture shows size XL): SIZES S-M-L: Work garter stitch with ocean view until the piece measures 4 cm. Loosely cast off. SIZES XL-XXL-XXXL: Continue with stipes and decrease for the neck (as for part-1) at the beginning of every row from the right side, by knitting the 2 first stitches twisted together. Repeat the decreases until the piece measures 2-2-4 cm. Work garter stitch with ocean view for 4 cm (= band). Loosely cast off. PART-11 (the rest of the right front piece and right band): Insert 1 marker in the piece. THE PIECE IS NOW MEASURED FROM HERE! Work stripes as for part-3. Knit up 52-54-60-66-72-82 stitches along part-5 (= the edge on the right front piece) from the right side with ocean view, work the stitches from the thread mid front on part-3 (= right front piece mid front) back onto the needle. Knit 1 row from the wrong side – read BUTTONHOLE. Knit band as follows in the different sizes: SIZES S-M-L: Work as for part-10. SIZES XL-XXL-XXXL: Work as for part-10, but decrease for the neck at the start of each row from the wrong side. SLEEVE: The piece is worked back and forth in garter stitch and stripes. Cast on 54-54-56-56-58-58 stitches with circular needle size 4 mm and ocean view (including 1 edge stitch in each side of the piece). When the piece measures 6-5-6-8-6-6 cm increase 1 stitch with 1 yarn over inside the 1 edge stitch in each side of the piece. On the next row knit the yarn overs twisted. Increase in this way every 1½-1½-1½-1-1-1 cm a total of 16-18-17-19-20-20 times = 86-90-90-94-98-98 stitches. Work until the piece measures 34-33-32-30-28-27 cm (shorter measurements in larger sizes due to broader shoulder width), adjust so that the last stripe is with off white. Cast off. Work another sleeve. ASSEMBLY: See broken lines in A.1. Sew the shoulder seams. Sew the sleeve seams and sew the sleeves into the armholes. Sew part-7 together with part-2 and part-4 (= 8-8-8-12-12-16 cm horizontal seam). NECKLINE: Pick up 160-180 stitches with circular needle size 4 mm and ocean view. Work 3 ridges back and forth on the needle – remember BUTTONHOLE. Cast off. Sew the buttons onto the left band. |
||||||||||||||||
Diagram explanations |
||||||||||||||||
|
||||||||||||||||
 |
||||||||||||||||
 |
||||||||||||||||
Have you finished this pattern?Tag your pictures with #dropspattern #ladygreyjacket or submit them to the #dropsfan gallery. Do you need help with this pattern?You'll find 20 tutorial videos, a Comments/Questions area and more by visiting the pattern on garnstudio.com. © 1982-2026 DROPS Design A/S. We reserve all rights. This document, including all its sub-sections, has copyrights. Read more about what you can do with our patterns at the bottom of each pattern on our site. |
||||||||||||||||


With over 40 years in knitting and crochet design, DROPS Design offers one of the most extensive collections of free patterns on the internet - translated to 17 languages. As of today we count 324 catalogues and 12290 patterns translated into English (UK/cm). 12290
We work hard to bring you the best knitting and crochet have to offer, inspiration and advice as well as great quality yarns at incredible prices! Would you like to use our patterns for other than personal use? You can read what you are allowed to do in the Copyright text at the bottom of all our patterns. Happy crafting!
Post a comment to pattern DROPS 161-25
We would love to hear what you have to say about this pattern!
If you want to leave a question, please make sure you select the correct category in the form below, to speed up the answering process. Required fields are marked *.