
Popular categories
Looking for a yarn?


Comments / Questions (56)
![]() Vermeersch Mieke wrote:
Vermeersch Mieke wrote:
Beste, Ik ben al 4 keer opnieuw begonnen aan deze sjaal... telkens kom ik niet juist uit op het einde... volgens het patroon moeten de driehoeken op het telpatroon telkens boven elkaar komen, wanneer ik A4 met A5 (3×) en A6 brei, schuift alles op omdat ik in A4telkens 1 steek meerder, bij rij 7 heb ik al 4 steken meer en verschuift het patroon 4 steken... doe ik iets verkeerd of is dit een fout in het patroon? Bedankt alvast voor de hulp.
08.03.2016 - 17:45DROPS Design answered:
Hoi Mieke. Ik denk dat je iets verkeerd doet, het patroon schuift niet op. Probeer markeerders te plaatsen tussen elk patroon (A.4, 5 en 6) zodat je bij elke naald binnen de juiste steken blijft.
09.03.2016 - 09:32
![]() Lisa wrote:
Lisa wrote:
Liebes Drops-Team, ich habe eine Frage zu den Umschlägen. Wie verfahre ich damit in den Rückreihen? Werden sie als eigene Masche gestrickt oder fallen gelassen? Für Hilfe wäre ich dankbar, ich würde dieses schöne Modell gerne nacharbeiten und komme im Moment nicht richtig weiter.
13.01.2016 - 19:46DROPS Design answered:
Die Umschläge stricken Sie immer als Masche ab, damit die Maschenzahl in der R gleich bleibt (durch das Zusammenstricken nehmen Sie ja M ab). Die Umschläge werden unverschränkt abgestrickt, damit sich Löcher ergeben und das Lochmuster bilden. Im Diagramm sind übrigens alle R eingezeichnet, Hin- und Rück-R.
29.01.2016 - 10:16
![]() Sara wrote:
Sara wrote:
Anna Maria credo che si opti per unire due pezzi insieme per avere lo stesso motivo finale in entrambi i lati. Se decidessi di proseguire il lavoro facendo un solo pezzo ti troveresti una chiusura dritta alla fine invece che il motivo a ondine come invece è previsto. Però in effetti, dato che anche io vorrei fare questa sciarpa... Non si possono ridurre i ferri in modo che si possa mimetizzare un po di più questa giuntura ?? Grazie in anticipo !!
13.01.2016 - 18:06DROPS Design answered:
Buongiorno Sara. Vengono suggeriti 4 ferri a legaccio, ma se non incontrano il gusto personale possono essere modificati. Può lavorarne solo due, oppure può unire le due parti dopo l’ultimo ferro dei diagrammi, in modo da rendere un po’ meno visibile, l’unione tra le due parti. Buon lavoro!
15.01.2016 - 13:46
![]() Anna Maria wrote:
Anna Maria wrote:
Sono sempre io che vi disturbo, ma ho pensato una cosa e se evito di fare queste 4 maglie e le unisco cosa succede? non viene chiuso bene il lavoro? Perché mi sono accorta che nella foto proprio al centro si vede chiaramente che c' è questa unione e secondo me è antiestetico. Anche perché sono 4 +4 maglie . grazie ancora!!
13.01.2016 - 17:20DROPS Design answered:
Buongiorno Anna Maria. Vengono suggeriti 4 ferri a legaccio, ma se non incontrano il gusto personale possono essere modificati. Può lavorarne solo due, oppure può unire le due parti dopo l’ultimo ferro dei diagrammi, in modo da rendere un po’ meno visibile, l’unione tra le due parti. Buon lavoro!
15.01.2016 - 13:45
![]() Anna wrote:
Anna wrote:
Grazie per la pronta risposta, adesso farò l'altra parte e poi le unisco come da vs video : da confezione punto maglia? temo che però si veda troppo questa unione o esiste altro modo? grazie!!!
13.01.2016 - 17:05DROPS Design answered:
Buongiorno Anna. Vengono suggeriti 4 ferri a legaccio, ma se non incontrano il gusto personale possono essere modificati. Può lavorarne solo due, oppure può unire le due parti dopo l’ultimo ferro dei diagrammi, in modo da rendere un po’ meno visibile, l’unione tra le due parti. Buon lavoro!
15.01.2016 - 13:45
![]() Liliana Bisognin wrote:
Liliana Bisognin wrote:
Grazie,siete semplicemente favolosi,mi sto appassionando proprio al lavoro a maglia e il merito e' vostro.
12.01.2016 - 22:28
![]() Liliana Bisognin wrote:
Liliana Bisognin wrote:
Salve sono arrivata anch'io al punto dove dice di lavorare 4 ferri,io capisco che devo lavorarli a maglia diritta o mi sbaglio?Grazie
12.01.2016 - 20:00DROPS Design answered:
Buonasera Liliana, abbiamo corretto il testo, i 4 ferri vanno lavorati a diritto. Buon lavoro!
12.01.2016 - 21:11
![]() Anna Maria Maltese wrote:
Anna Maria Maltese wrote:
Salve, sto facendo questa sciarpa non sono molto esperta sul significato di certi termini, mi sono fermata quando mi dice alla fine di Lavorare 4 f su tutte le maglie e trasferire.. cosa si intende dire 4 f...grazie di cuore a chi mi vorrà rispondere. anna
12.01.2016 - 18:15DROPS Design answered:
Buonasera Anna, lavorare 4 f significa lavorare 4 ferri cioè 4 righe, in questo caso vanno lavorate a dir, abbiamo corretto il testo. Ci riscriva pure per qualsiasi problema. Buon lavoro!
12.01.2016 - 19:59
![]() Liliana Bisognin wrote:
Liliana Bisognin wrote:
Salve volevo chiedere,dal diagramma A7 A8 A9 le maglie sul ferro diventano 53? Grazie
09.01.2016 - 23:36DROPS Design answered:
Buonasera Liliana. Sì, dopo aver lavorato i diagrammi da A7 a A9, le maglie diventano 53. Al ferro successivo lavorerà il diagramma A11 7 volte. Buon lavoro!
10.01.2016 - 19:40
![]() Claudia wrote:
Claudia wrote:
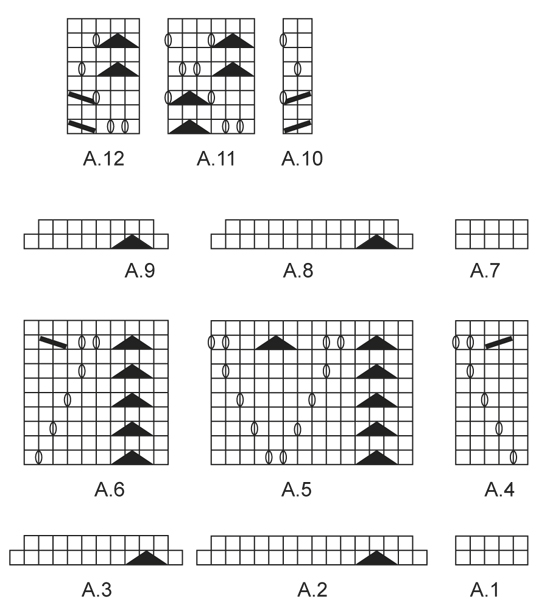
Hallo, liebes Drops-Team, kann es sein, dass im Diagramm A.3 ein Fehler ist und die Abnahme erst nach 2M glatt rechts gestrickt wird? So wäre das Muster nämlich konsistent mit Diagramm A.6. Viele Grüße Claudia
18.07.2015 - 09:37DROPS Design answered:
Ja, ich denke auch, dass die Abnahmen übereinander liegen sollten, das können Sie also so stricken, wie Sie es beschrieben haben. Ich werde es weiterleiten, damit das Diagramm ggf. angepasst wird.
28.07.2015 - 15:55
|
||||||||||||||||
Fleur de Provence#fleurdeprovenceshawl |
||||||||||||||||
 |
 |
|||||||||||||||
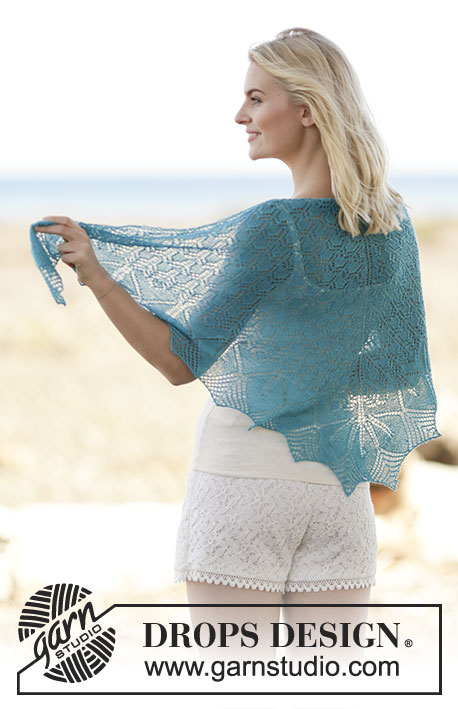
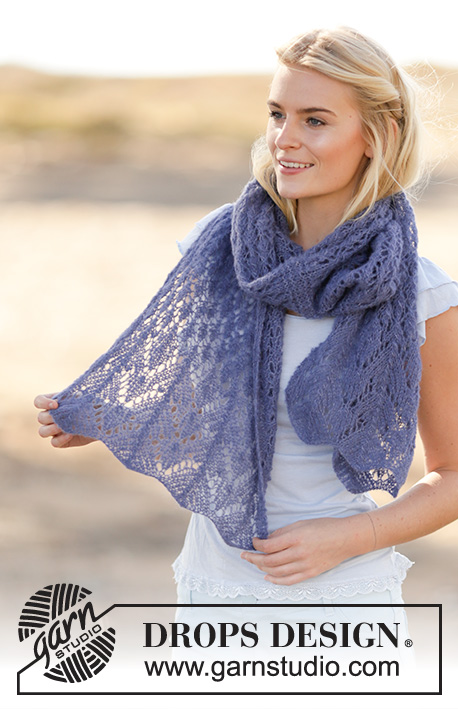
Knitted DROPS stole with lace pattern in ”Brushed Alpaca Silk”.
DROPS 161-7 |
||||||||||||||||
|
GARTER ST (back and forth): K all rows. 1 ridge = 2 rows K. PATTERN: See diagrams A.1-A.12. The diagrams show all rows in pattern seen from RS. ---------------------------------------------------------- STOLE: Worked back and forth in 2 parts that are sewn tog mid back when finished. Loosely cast on 69 sts on needle size 5.5 mm with Brushed Alpaca Silk. Work according to diagram A.1-A.3 as follows (1st row = RS): 2 sts in GARTER ST - see explanation above, A.1 over 5 sts, repeat A.2 until 14 sts remain on row. Work diagram A.3 over 12 sts and 2 sts in garter st (= 8 sts dec on first row) = 61 sts remain on needle. Work diagram 1 time vertically. Then work according to diagram A.4-A.6 as follows from RS: 2 sts in garter st, A.4 over 5 sts, work A.5 until 12 sts remain on row. Work A.6 over 10 sts and 2 sts in garter st. Work A.4-A.6 3 times in total vertically. Then work according to diagram A.7-A.9 as follows from RS: 2 sts in garter st, A.7 over 5 sts, repeat A.8 until 12 sts remain on row. Work A.9 over 10 sts and 2 sts in garter st. Work diagram 1 time vertically. Then work according to diagram A.10-A.12 as follows from RS: 2 sts in garter st, A.10 over 2 sts, repeat A.11 until 7 sts remain on row. Work A.12 over 5 sts and 2 sts in garter st. Work according to diagram A.10-A.12 until piece measures approx 78 cm, adjust after 1 whole repetition vertically. K 4 rows over all sts and slip sts on a stitch holder. Knit another part the same way. ASSEMBLY: Graft/sew the 2 parts together. |
||||||||||||||||
Diagram explanations |
||||||||||||||||
|
||||||||||||||||
 |
||||||||||||||||
Have you finished this pattern?Tag your pictures with #dropspattern #fleurdeprovenceshawl or submit them to the #dropsfan gallery. Do you need help with this pattern?You'll find 16 tutorial videos, a Comments/Questions area and more by visiting the pattern on garnstudio.com. © 1982-2026 DROPS Design A/S. We reserve all rights. This document, including all its sub-sections, has copyrights. Read more about what you can do with our patterns at the bottom of each pattern on our site. |
||||||||||||||||


With over 40 years in knitting and crochet design, DROPS Design offers one of the most extensive collections of free patterns on the internet - translated to 17 languages. As of today we count 324 catalogues and 12290 patterns translated into English (UK/cm). 12290
We work hard to bring you the best knitting and crochet have to offer, inspiration and advice as well as great quality yarns at incredible prices! Would you like to use our patterns for other than personal use? You can read what you are allowed to do in the Copyright text at the bottom of all our patterns. Happy crafting!
Post a comment to pattern DROPS 161-7
We would love to hear what you have to say about this pattern!
If you want to leave a question, please make sure you select the correct category in the form below, to speed up the answering process. Required fields are marked *.