
Popular categories
Looking for a yarn?


Comments / Questions (93)
![]() Lisen wrote:
Lisen wrote:
Kan det være noen mulighet for at det blir laget en video til denne oppskriften, tro?? Da ville jeg bli ordentlig glad!
02.01.2022 - 19:03DROPS Design answered:
Hej Lisen, vi skriver det på ønskelisten :)
13.01.2022 - 11:56
![]() Sylvie Garnier wrote:
Sylvie Garnier wrote:
Bonsoir Madame En lisant de gauche à droite à la fin du 3ème rang je finis A1B avec 3 ml, puis 1 de plus avec A1A soit 4ml. Je ne sais pas quoi en faire avant de tourner mon ouvrage et passer au rang 4 avec ses 3 ml en A1A. Je suis suspendue à votre réponse. Bien cordialement. Sylvie Garnier
30.11.2021 - 21:22DROPS Design answered:
Bonjour Mme Garnier, à la fin du 3ème rang, crochetez A.1A pour terminer autrement dit, après les 3 mailles en l'air de A.1B, crochetez 1 bride (= dernier symbole dans la légende) dans l'arceau du début du rang 2. Bon crochet!
01.12.2021 - 07:47
![]() Wilma Masters wrote:
Wilma Masters wrote:
Goedendag, Geven jullie ook workshops in de buurt van Haarlem bijvoorbeeld. Ik hoor het graag. Hartelijke groet Wilma
24.05.2021 - 17:57DROPS Design answered:
Dag Wilma,
Wij van DROPS geven geen workshops op locatie, maar wellicht is er een winkel of handwerkclub bij je in de buurt die zoiets verzorgd.
25.05.2021 - 19:26
![]() Mariska wrote:
Mariska wrote:
Der drops design could you please explain the whole concept of the the diagram and of the instructions cause i am completely lost should I work from row to row turning or should i repeat the diagram block i really want to understand but i am having difficulties
16.02.2021 - 17:38DROPS Design answered:
Dear Mariska, vest is working from bottom up first in one piece from mid front (back and forth) up to armhole then each piece will be worked separately after dividing for armholes. Finish with a crocheted edge around armholes and body. You will have to read the written pattern and follow diagrams at the same time as explained in the pattern. You will find how to read crochet diagrams here. Happy crocheting!
17.02.2021 - 07:41
![]() Jill Clayton wrote:
Jill Clayton wrote:
Was just wondering how easy it would be to add sleeves to this pattern?
27.04.2020 - 13:59DROPS Design answered:
Dear Mrs Clayton, we are unfortunately unable to adjust every pattern to every single request - you will find our crocheted jackets pattern to inspire you. Happy crocheting!
27.04.2020 - 14:30
![]() Marie-Anna wrote:
Marie-Anna wrote:
Je fais la grandeur M. Au Rg 3, comment dois-je reprendre après les 10 brides, et comment se termine le dos avant les 10 brides ? J`ai besoin d`explications pour cette partie du dos entre les 2 groupes de 10 brides. Merci à l`avance.
25.05.2019 - 17:36DROPS Design answered:
Bonjour Marie-Anna, en M vous crochetez ainsi: A.1A, 2 x A.1B, A.1C, puis 10 ms/brides (= 1 ms/bride dans chacune des 10 ms/brides du rang précédent), puis répétez 5 x A.1B, 1 X A.1C, 1 ms/bride dans chacune des 10 m suivantes, et terminez par 2 x A.1B, 1 x A.1C et 1x A.1D. En fonction du rang, ces 10 mailles se crochèteront soit en ms (= rang 1 et 5) soit en brides (rangs 2, 3 et 4). Bon crochet!
27.05.2019 - 13:18
![]() Marie-Anna wrote:
Marie-Anna wrote:
Je ne comprends pas le Rg 5. Quand je regarde la photo, je vois bien les 4 picots, Je dois passer seulement 1 m entre les picots. Je suis mêlée. Comment faire ce rang ? Merci à l`avance.
23.05.2019 - 06:18DROPS Design answered:
Bonjour Marie-Anna, dans A.1C (et A.1B) vous devez avoir 4 picots (le rang 5 se lit de gauche à droite): 1 ms dans la 1ère bride (= dernière bride du rang 4) (= A.1D), puis crochetez A.1C: 1 ms dans la ms suiv, *1 picot, 1 ms entre la 3ème et la 4ème des 8 brides, 1 picot, 1 ms au milieu du groupe de 8 brides, 1 picot, 1 ms entre la 6ème et la 7ème des 8 brides, 1 picot, 1 ms dans la ms* (= A.1C), puis pour A.1B, répétez de *-* de la partie A.1C et terminez par 1 ms dans la dernière ms du rang (= A.1A). Bon crochet!
23.05.2019 - 09:49
![]() Marie-Anna wrote:
Marie-Anna wrote:
Au rg 1, dois-je commencer à droite ou à gauche ? Merci.
22.05.2019 - 06:41DROPS Design answered:
Bonjour Marie-Anna, les augmentations du bas du dos/devants se font sur les côtés: on augmente 1 m avant le marqueur + 1 m après le marqueur = 2 m augmentées sur chaque côté soit 4 augmentations au total. Bon crochet!
22.05.2019 - 09:23
![]() Marie-Anna wrote:
Marie-Anna wrote:
Très joli, je m`apprête à le confectionner !
22.05.2019 - 06:29
![]() Kerstib wrote:
Kerstib wrote:
Ska det alltså bli en bred kant i sidan av fm resp st? I storlek medium står det 10 fm. Är det 5 på varderasidan av sidan? Skulle gärna se en bild hur sidan ska se ut!
01.05.2019 - 22:38DROPS Design answered:
Hei Kerstin. ja, det stemmer. Det blir en bred kant med staver/fastmasker i hver side, merket sitter midt mellom disse (altså det er 5 staver/fastmasker på hver side av merket). Vi har dessverre ikke noe bilde av dette. Når det hekles fastmasker i A.1A og A.1D hekles det fastmasker i siden, når det hekles staver i A.1A og A.1D hekles staver i siden. God fornøyelse
02.05.2019 - 14:42
|
|||||||||||||
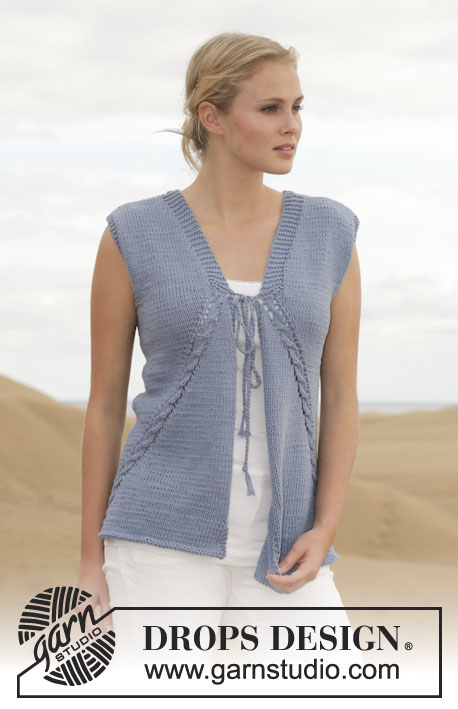
Delphine#delphinevest |
|||||||||||||
|
|
|||||||||||||
Crochet DROPS vest with fan pattern in ”Muskat”. Size: S - XXXL.
DROPS 153-27 |
|||||||||||||
|
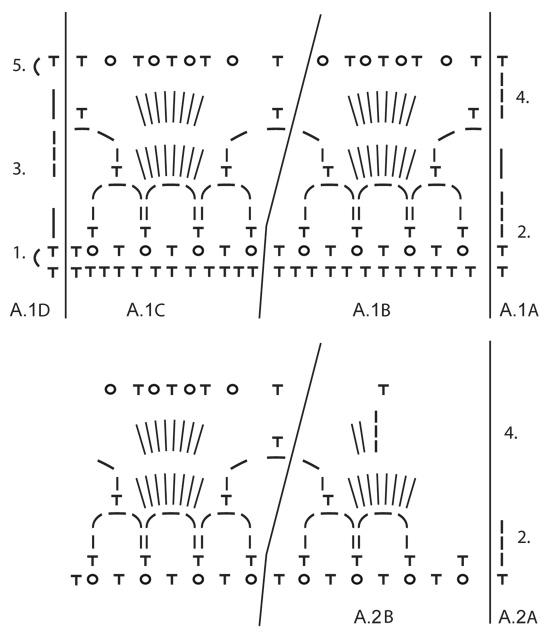
PATTERN: See diagrams A.1 and A.2. In A.1 start to work on the row marked with 1st in the diagram. Repeat rows 2 to 5. In A.2 start to work on the row marked with 2nd in the diagram. SIDE: In the side work tr/dc as shown in diagrams A.1A and A.1D. I.e. Work dc on row 1 and 5 in diagram, work row 2, 3 and 4 with tr. Marker is in the middle of st in each side. -------------------------------------------------------- VEST: Work 155-167-183-199-227-247 LOOSE ch on hook size 4 mm with Muskat. Turn piece. Skip 1st ch, then work 1 dc in every ch the entire row = 154-166-182-198-226-246 dc. Insert 1 marker after 39-42-46-50-57-62 dc in from each side (back piece = 76-82-90-98-112-122 dc). Then work as follows (beg on 1st row in diagram): A.1A, repeat A.1B 2-2-2-2-3-3 times, A.1C, 4-10-18-26-16-26 dc/tr in the SIDE - see explanation above -, repeat A.1B 5-5-5-5-7-7 times, A.1C, 4-10-18-26-16-26 dc/tr in the SIDE – see explanation above, repeat A.1B 2-2-2-2-3-3 times, A.1C and A.1D. Continue to work like this until piece measures approx. 15-15-16-16-17-17 cm. Now inc 1 dc/tr in each side on each side of each marker one time. Inc by working 2 dc/tr in 1 dc/tr on each side of each marker (= 4 dc/tr inc in total). Continue as before with 2 dc/tr more in each side. Continue like this until piece measures approx. 35-36-37-38-39-40 cm, adjust after one whole repetition vertically. Cut the yarn. Now divide the piece and finish each part separately. BACK PIECE: = 3-6-10-14-9-14 dc/tr in each side. Beg by working inside 2-3-7-11-6-11 dc/tr. Work 1-3-3-3-3-3 dc/tr, repeat A.1B 5-5-5-5-7-7 times, A.1C and 1-3-3-3-3-3 dc/tr (2-3-7-11-6-11 dc/tr remain on row), turn piece. Work pattern as before until 0-1-1-1-1-1 dc/tr remain, turn piece. Work pattern as before until 0-1-1-1-1-1 dc/tr remain, turn piece. Work pattern as before until 0-1-1-1-1-1 dc/tr remain, turn piece. Work pattern as before until 0-1-1-1-1-1 dc/tr remain. There are now 1 dc/tr in each side. Continue back and forth with pattern as before and 1 dc/tr in each side. When piece measures approx. 50-52-54-56-58-60 cm (adjust after whole repetition vertically), divide the piece for neck and finish each shoulder separately. RIGHT SHOULDER: Beg in the side. Work over 1 dc/tr in the side, A.1B 1-1-1-1-2-2 times, A.1C and 1 dc/tr. Continue like this until repetition has been worked vertically. Piece measures approx. 54-56-58-60-62-64 cm. LEFT SHOULDER: Work as right but reversed, (i.e. 2 repetitions mid back = neck). RIGHT FRONT PIECE: = 3-6-10-14-9-14 dc/tr in the side.Start mid front and work as follows: A.1A, repeat A.1B 2-2-2-2-3-3 times, A.1C and 1-3-3-3-3-3 dc/tr (2-3-7-11-6-11 dc/tr remain in the side). Turn piece. Work pattern as before. Turn piece. Work pattern as before until 0-1-1-1-1-1 dc/tr remain in the side, turn piece. Work pattern as before, turn piece. Work pattern as before until 0-1-1-1-1-1 dc/tr remain in the side, turn piece. Work pattern as before. There are now 1 dc/tr in the side. Continue back and forth with pattern as before. AT THE SAME TIME when 1 repetition has been worked vertically after piece was divided, dec for neck. Work as follows from RS: A.2 A, A.2 B, A.1B 1-1-1-1-2-2 times, A.1C, A.1D. When all dec for armhole and neck are done, work as follows - from mid front: A.1A, A.1B 1-1-1-1-2-2 times, A.1C and A.1D. Continue like this until piece measures approx. 54-56-58-60-62-64 cm (adjust according to back piece to work the no of repetitions on front piece vertically as on back piece). Fasten off. LEFT FRONT PIECE: Work as right front piece but reversed. ASSEMBLY: Sew the shoulder seams. Sew edge to edge with small stitches to avoid a chunky seam. ARMHOLE EDGE: Work an edge around the armhole as follows: ROUND 1: Beg mid under sleeve. Work 1 ch, then work dc around the armhole, finish with 1 sl st in ch from beg of round. ROUND 2: Work 3 ch, then work 1 tr in every dc the entire round, finish with 1 sl st in 3rd ch from beg of round. Fasten off. Work the same way around the other armhole. EDGE AROUND BODY: Work an edge around the body. Beg at the bottom of right front piece, work up along front piece, around the neck, down along left front piece and along bottom edge. Work as follows: ROUND 1: Work 1 ch, then work dc around the body, finish with 1 sl st in ch from beg of round. ROUND 2: 1 ch, then work 1 dc in every dc, finish with 1 sl st in ch from beg of round. ROUND 3: 1 ch, then work 1 dc in first dc, * 3 ch, then work 1 tr in the first of the 3 ch, skip 2 dc, 1 dc in next dc *, repeat from *-* and finish with 1 sl st in ch from beg of round. Fasten off. ASSEMBLY: Sew 2 buttons on left front piece, the top button directly below neck dec and the other approx. 6 cm from first button. Button between tr in edge on right front piece. |
|||||||||||||
Diagram explanations |
|||||||||||||
|
|||||||||||||
 |
|||||||||||||
 |
|||||||||||||
Have you finished this pattern?Tag your pictures with #dropspattern #delphinevest or submit them to the #dropsfan gallery. Do you need help with this pattern?You'll find 6 tutorial videos, a Comments/Questions area and more by visiting the pattern on garnstudio.com. © 1982-2026 DROPS Design A/S. We reserve all rights. This document, including all its sub-sections, has copyrights. Read more about what you can do with our patterns at the bottom of each pattern on our site. |
|||||||||||||


With over 40 years in knitting and crochet design, DROPS Design offers one of the most extensive collections of free patterns on the internet - translated to 17 languages. As of today we count 324 catalogues and 12290 patterns translated into English (UK/cm). 12290
We work hard to bring you the best knitting and crochet have to offer, inspiration and advice as well as great quality yarns at incredible prices! Would you like to use our patterns for other than personal use? You can read what you are allowed to do in the Copyright text at the bottom of all our patterns. Happy crafting!
Post a comment to pattern DROPS 153-27
We would love to hear what you have to say about this pattern!
If you want to leave a question, please make sure you select the correct category in the form below, to speed up the answering process. Required fields are marked *.