The yarn cost is calculated from the pattern’s smallest size and the yarn’s cheapest product type. Looking for an even better price? You might find it on the DROPS Deals!
-------------------------------------------------------
Alternative Yarn – See how to change yarns here
Yarn Groups A to F – Use the same pattern and change the yarn here
Yarn usage using an alternative yarn – Use our yarn converter here
-------------------------------------------------------
The yarn cost is calculated from the pattern’s smallest size and the yarn’s cheapest product type. Looking for an even better price? You might find it on the DROPS Deals!
= 1 sl st | |
= 1 ch | |
= 1 dc | |
= 1 dtr |
Each of our patterns has specific tutorial videos to help you.
These step-by-step tutorials might also help you:
Why is the knitting/crochet tension so important?
Knitting tension is what determines the final measurements of your work, and is usually measured per 10 x 10 cm. It is provided like so: number of stitches in width x number of rows in height - eg: 19 stitches x 26 rows = 10 x 10 cm.
The knitting tension is very individual; some people knit/crochet loosely while others work tightly. You adjust the knitting tension with the needle size, which is why the suggested needle size is only meant as a guide! You need to adjust this (up or down) to ensure that YOUR knitting tension matches the knitting tension provided in the pattern. If you work with a different knitting tension than provided you will have a different yarn consumption, and your work will have different measurements than what the pattern suggests.
The knitting tension also determines which yarns can replace each other. As long as you achieve the same knitting tension you can replace one yarn with another.
See DROPS lesson: How to measure your tension/gauge
See DROPS video: How to make a gauge tension swatch
How do I know how many balls of yarn I need?
The required amount of yarn is provided in grams, eg: 450 g. To calculate how many balls you’ll need you first need to know how many grams are in 1 ball (25g, 50g or 100g). This information is available if you click on the individual yarn quality on our pages. Divide the amount required with the amount of each ball. For example, if each ball is 50g (the most common amount), the calculation will be as follows: 450 / 50 = 9 balls.
Can I use a different yarn than what the pattern suggests?
The important thing when changing from one yarn to another is that the knitting/crochet tension remains the same. This is so that the measurements of the finished piece will be the same as on the sketch provided. It is easier to achieve the same knitting tension using yarns from the same yarn group. It is also possible to work with multiple strands of a thinner yarn to achieve the knitting tension of a thicker one. Please try our yarn converter. We recommend you to always work a test swatch.
Please NOTE: when changing yarn the garment might have a different look and feel to the garment in the photo, due to individual properties and qualities of each yarn.
See DROPS lesson: Can I use a different yarn than the one mentioned in the pattern?
What are the yarn groups?
All our yarns are categorised into yarn groups (from A to F) according to thickness and knitting tension – group A contains the thinnest yarns and group F the thickest. This makes it easier for you to find alternative yarns to our patterns, should you wish to switch yarn. All yarns within the same group have a similar knitting tension and can easily replace each other. However, different yarn qualities have different structures and properties which will give the finished work a unique look and feel.
How do I use the yarn calculator?
At the top of all our patterns you’ll find a link to our yarn calculator, which is a helpful tool should you wish to use a different yarn than suggested. By filling in the yarn quality you wish to replace, the amount (in your size) and number of strands, the calculator will present good alternative yarns with the same knitting tension. Additionally it will tell you how much you’ll require in the new qualities and whether you’ll need to work with multiple strands. Most skeins are 50g (some are 25g or 100g).
If the pattern is worked with multiple colours, every colour will have to be calculated separately. Similarly, if the pattern is worked with several strands of different yarns (for example 1 strand Alpaca and 1 strand Kid-Silk) you will have to find alternatives for each, individually.
Why do you show discontinued yarns in the patterns?
Since different yarns have different qualities and textures we have chosen to keep the original yarn in our patterns. However, you can easily find options among our available qualities by using our yarn calculator, or simply pick a yarn from the same yarn group.
It is possible that some retailers still have discontinued yarns in stock, or that someone has a few skeins at home that they would like to find patterns for.
The yarn calculator will provide both alternative yarn as well as required amount in the new quality.
What size should I knit?
If you think it's hard to decide what size to make, it can be a good idea to measure a garment you own already and like the size of. Then you can pick the size by comparing those measures with the ones available in the pattern's size chart.
You'll find the size chart at the bottom of the pattern.
See DROPS lesson: How to read size chart
Why do I get the wrong knitting tension with the suggested needle size?
The needle size provided in the pattern serves only as a guide, the important thing is to follow the knitting tension. And since knitting tension is very individual, you will have to adjust the needle size to ensure that YOUR tension is the same as in the pattern – maybe you’ll have to adjust 1, or even 2 needle sizes, up or down to achieve the correct tension. For this, we recommend that you work test swatches.
Should you work with a different knitting tension than the one provided, the measurements of the finished garment might deviate from the measurement sketch.
See DROPS lesson: How to measure your tension/gauge
See DROPS video: How to make a tension/gauge swatch
Why is the pattern worked top-down?
Working a garment top-down provides more flexibility and room for personal adjustment. For example it is easier to try the garment on while working, as well as making adjustments to length of yoke and shoulder caps.
The instructions are carefully explaining every step, in the correct order. Diagrams are adjusted to the knitting direction and are worked as usual.
How do I work according to a knitting diagram?
The diagram depicts all rows/rounds, and every stitch seen from the right side. It is read from bottom to top, from right to left. 1 square = 1 stitch.
When working back and forth, every other row is worked from the right side and every other row is worked from the wrong side. When working from the wrong side, the diagram will have to be worked reversed: from left to right, knit stitches are purled, purl stitches are knit etc.
When working in the round every round is worked from the right side and the diagram are worked from right to left on all rounds.
See DROPS lesson: How to read knitting diagrams
How do I work according to a crochet diagram?
The diagram depicts all rows/rounds, and every stitch seen from the right side. It is worked from bottom to top, from right to left.
When working back and forth every other row is worked from the right side: from right to left and every other row is worked from the wrong side: from left to right.
When working in the round, every row in the diagram are worked from the right side, from right to left.
When working a circular diagram you start in the middle and work your way outwards, counter clockwise, row by row.
The rows usually start with a given number of chain stitches (equivalent to the height of the following stitch), this will either be depicted in the diagram or explained in the pattern.
See DROPS lesson: How to read crochet diagrams
How do I work several diagrams simultaneously on the same row/round?
Instructions for working several diagrams after each other on the same row/round, will often be written like so: “work A.1, A.2, A.3 a total of 0-0-2-3-4 times". This means you work A.1 once, then A.2 is worked once, and A.3 is repeated (in width) the number of times provided for your size – in this case like so: S = 0 times, M = 0 times, L=2 times, XL= 3 times and XXL = 4 times.
The diagrams are worked as usual: begin with the first row in A.1, then work the first row in A.2 etc.
See DROPS lesson: How to read knitting diagrams
See DROPS lesson: How to read crochet diagrams
Why are the sleeves shorter in larger sizes?
The total width of the garment (from wrist-to-wrist) will be larger in the larger sizes, despite the actual sleeves being shorter. The larger sizes have longer sleeve caps and wider shoulders, so there will be a good fit in all sizes.
Where on the garment is the length measured?
The measurement sketch/schematic drawing provides information regarding the full length of the garment. If it’s a jumper or a jacket the length is measured from the highest point on the shoulder closest to the neckline, and straight down to the bottom of the garment. It is NOT measured from the tip of shoulder. Similarly, the length of yoke is measured from the highest point on the shoulder and down to where yoke is split into body and sleeves.
On a jacket measures are never taken along bands, unless specifically stated. Always measure inside band stitches when measuring the length.
See DROPS lesson: How to read a schematic drawing
What is a repeat?
Diagrams are often repeated on the round or in height. 1 repeat is the diagram the way it appears in the pattern. If it says to work 5 repeats of A.1 in the round, then you work A.1 a total of 5 times after/next to each other in the round. If it says to work 2 repeats of A.1 vertically/in height you work the entire diagram once, then begin again at the start and work the entire diagram one more time.
Why does the piece start with more chain stitches than it’s worked with?
Chain stitches are slightly narrower than other stitches and to avoid working the cast-on edge too tight, we simply chain more stitches to begin with. The stitch count will be adjusted on the following row to fit the pattern and measurement sketch.
Why increase before the rib edge when the piece is worked top-down?
The rib edge is more elastic and will contract slightly compared to, for example, stocking stitch. By increasing before the rib edge, you avoid a visible difference in width between the rib edge and the rest of the body.
Why increase in the cast-off edge?
It’s very easy to cast off too tightly, and by making yarn overs while casting off (and simultaneously casting these off) you avoid a too tight cast off edge.
See DROPS video: How to bind off with yarn overs (yo)
How do I increase/decrease on every 3rd and 4th row/round alternately?
To achieve an even increase (or decrease) you can increase on, for example: every 3rd and 4th row alternately, like so: work 2 rows and increase on the 3rd row, work 3 rows and increase on the 4th. Repeat this until the increase is complete.
See DROPS lesson: Increase or decrease 1 st on every 3rd and 4th row alternately
How can I work a jacket in the round instead of back and forth?
Should you prefer to work in the round instead of back and forth, you may of course adjust the pattern. You’ll need to add steeks mid-front (usually 5 stitches), and follow the instructions. When you would normally turn and work from the wrong side, simply work across the steek and continue in the round. At the end you’ll cut the piece open, pick up stitches to work bands, and cover the cut edges.
See DROPS video: How to knit steeks and cut open
Can I work a jumper back and forth instead of in the round?
Should you prefer to work back and forth instead of in the round, you may of course adjust the pattern so you work the pieces separately and then assemble them at the end. Divide the stitches for the body in 2, add 1 edge stitch in each side (for sewing) and work the front and back pieces separately.
See DROPS lesson: Can I adapt a pattern for circular needles into straight needles?
Why is the pattern slightly different than what I see in the photo?
Pattern repeats can vary slightly in the different sizes, in order to get the correct proportions. If you’re not working the exact same size as the garment in the photo, yours might deviate slightly. This has been carefully developed and adjusted so that the complete impression of the garment is the same in all sizes.
Make sure to follow instructions and diagrams for your size!
How do I make a women’s size garment into a men’s size one?
If you have found a pattern you like which is available in women’s size it’s not very difficult to convert it to men’s size. The biggest difference will be the length of sleeves and body. Start working on the women size that you think would fit across the chest. The additional length will be worked right before you cast off for the armhole/sleeve cap. If the pattern is worked top-down you can add the length right after the armhole or before the first decrease on sleeve.
Regarding additional yarn amount, this will depend on how much length you add, but it is better with a skein too many than too few.
How do I prevent a hairy garment from shedding?
All yarns will have excess fibres (from production) that might come off as lint or shedding. Brushed yarns (ie hairier yarns) have more of these loose, excess fibres, causing more shedding.
Shedding also depends on what is worn under or over the garment, and whether this pulls at the yarn fibres. It’s therefore not possible to guarantee that there will be no shedding
Below are some tips on how to get the best result when working with hairier yarns:
1. When the garment is finished (before you wash it) shake it vigorously so the looser hairs come off. NOTE: do NOT use a lint roller, brush or any method that pulls at the yarn.
2. Place the garment in a plastic bag and put it in your freezer - the temperature will cause the fibres to become less attached to each other, and excess fibres will come off easier.
3. Leave in the freezer for a few hours before taking it out and shaking it again.
4. Wash the garment according to the instructions on the yarn label.
Why does my garment pill?
Pilling is a natural process that happens to even the most exclusive of fibers. It's a natural sign of wear and tear that is hard to avoid, and that is most visible in high friction areas of your garment like a sweater's arms and cuffs.
You can make your garment look as new by removing the pilling, using a fabric comb or a pill/lint remover.
Waterfall |
|||||||||||||
|
|||||||||||||
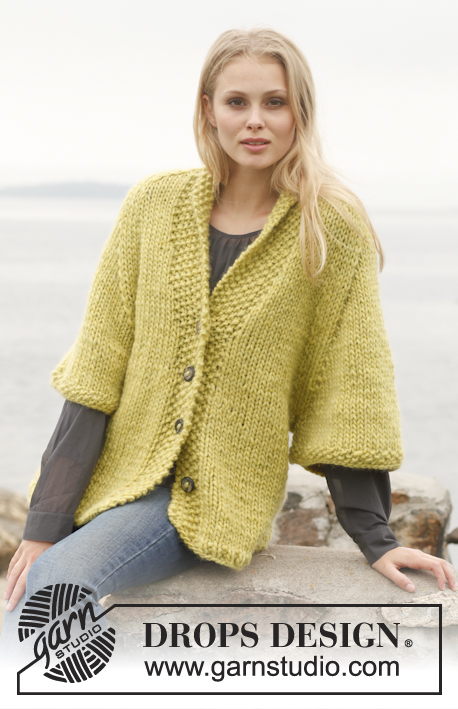
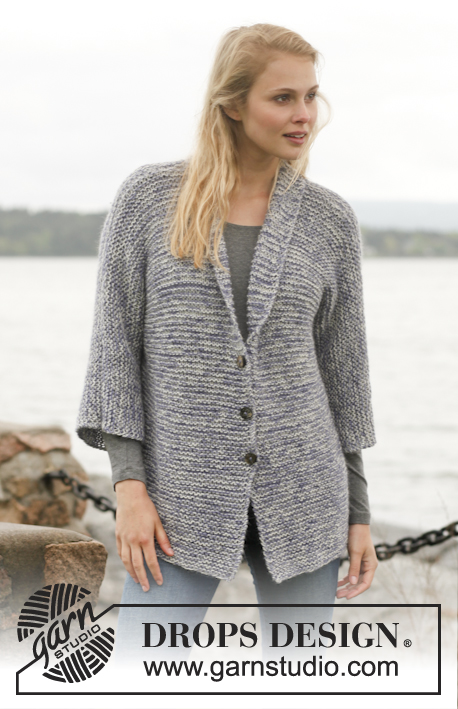
Crochet DROPS jacket with shawl collar in ”Merino Extra Fine”. Size: S - XXXL.
DROPS 149-37 |
|||||||||||||
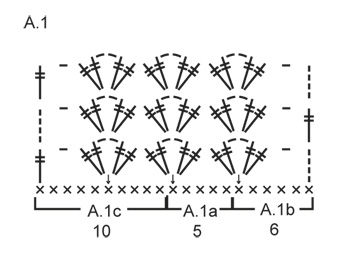
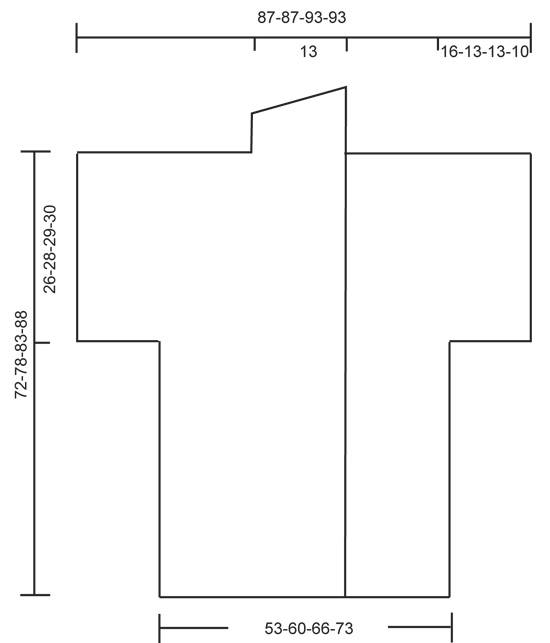
DTR-GROUPS: 1 dtr-group = 2 dtr + 2 ch + 2 dtr. PATTERN: See diagram A.1. ---------------------------------------------------------- BACK PIECE: Worked back and forth. Work 108-120-133-145 ch on hook size 5 mm with Merino Extra Fine. Work first row as follows (= WS): 1 dc in 2nd ch from hook and then 1 dc in each of the next 3 ch, * skip 1 ch, 1 dc in each of the next 4 ch *, repeat from *-* until 3-5-3-5 ch remain, skip 1 ch, 1 dc in each of the next 2-4-2-4 ch = 86-96-106-116 dc. Continue to work as follows: ROW 1 (= RS): Work A.1b 1 time, then work A.1a until 10 dc remain (= 14-16-18-20 times in width) and finish with A.1c 1 time. REMEMBER THE CROCHET TENSION! ROW 2 (= WS): Turn piece and work A.1c 1 time, A.1a (= 14-16-18-20 times in width), A.1b 1 time. ROW 3 (= RS): Turn piece and work A.1b 1 time, A.1a (= 14-16-18-20 times in width), A.1c 1 time. Repeat 2nd and 3rd row until piece measures approx. 46-50-54-58 cm - adjust to finish with 3rd row (= RS). Fasten off. Work 30-25-25-20 loose ch, beg from WS and continue A.1 over back piece as before and finish with 34-29-29-24 loose ch, turn piece. Continue to work as follows: ROW 1 (= RS): In 10th ch from hook work 2 dtr + 2 ch + 2 dtr (= A.1b), work A.1a 4-3-3-2 times in total, skip the last 4 ch, in dtr at beg of back piece work 2 dtr + 2 ch + 2 dtr (= 1 dtr-group), then work A.1a over back piece as before but in last dtr at end of back piece work 2 dtr + 2 ch + 2 dtr, then work over the last 30-25-25-20 ch as follows: Skip the next 4 ch, A.1a 4-3-3-2 times in total and then A.1c 1 time, turn piece. ROW 2 (= WS): Turn piece and work A.1c 1 time, A.1a 24-24-26-26 times and finish with A.1b 1 time. ROW 3 (= RS): Turn piece and work A.1b 1 time, A.1a 24-24-26-26 times and finish with A.1c 1 time. Repeat 2nd and 3rd row until piece measures approx. 70-76-81-86 cm - adjust to finish with 3rd row (= RS). Work 11-11-12-12 dtr-groups, finish with 1 ch and 1 dtr in ch-space on next dtr-group. Fasten off. Skip 2 dtr-groups (= neck). Work 1 sl st in ch-space on next dtr-group, then work 5 ch. Work 11-11-12-12 dtr-groups. Fasten off. RIGHT FRONT PIECE: Worked back and forth. Work 98-104-110-117 ch on hook size 5 mm with Merino Extra Fine. Work 1 dc in 2nd ch from hook and then 1 dc in each of the next 3 ch, * skip 1 ch, 1 dc in each of the next 4 ch *, repeat from *-* until 3-4-5-2 ch remain, skip 1 ch, work 1 dc in each of the next 2-3-4-1 ch = 78-83-88-93 dc. ROW 1 (= RS): 4 ch (= 1 dtr), 1 dtr in each of the next 32 dc (= 33 dtr for band) NOTE: Work band with every other row dtr and triple tr. Then work 1 ch, skip 4 dc, 2 dtr + 2 ch + 2 dtr in next dc, then work A.1a 6-7-8-9 times in total, finish with A.1c 1 time. ROW 2 (= WS): Turn piece and work A.1c 1 time, A.1a 6-7-8-9 times, 2 dtr + 2 ch + 2 dtr in next dtr-group, 1 ch, work 1 triple tr in each of the next 33 dtr. ROW 3 (= RS): 4 ch (= 1 dtr), 1 dtr in each of the next 32 triple tr (= 33 dtr), 1 ch, 2 dtr + 2 ch + 2 dtr in first dtr-group, then work A.1a 6-7-8-9 times in total, finish with A.1c 1 time. Repeat 2nd and 3rd row until piece measures 46-50-54-58 cm. Adjust to finish after 3rd row (= RS). Fasten off. Work 30-25-25-20 loose ch, beg from WS and then work A.1 and triple tr over band as before, turn piece. Continue to work as follows: ROW 1 (= RS): 4 ch (= 1 dtr), 1 dtr in each of the next 32 dtr (= 33 dtr), 1 ch, 2 dtr + 2 ch + 2 dtr in ch-space in next dtr-group, work A.1a until 1 dtr remains on front piece, work 2 dtr + 2 ch + 2 dtr in dtr, then work over the last 30-25-25-20 ch as follows: A.1a 4-3-3-2 times in total and then A.1c 1 time. ROW 2 (= WS): Turn piece and work A.1c 1 time, A.1a 11-11-12-12 times, 2 dtr + 2 ch + 2 dtr in next dtr-group, 1 ch, then 1 triple tr in each of the last 33 dtr. ROW 3 (= RS): 4 ch (= 1 dtr), 1 dtr in each of the next 32 dtr (= 33 dtr), 1 ch, 2 dtr + 2 ch + 2 dtr in first dtr-group, then work A.1a 11-11-12-12 times in total, finish with A.1c 1 time. Repeat 2nd and 3rd row until piece measures 72-78-83-88 cm. Finish with 2nd row. SHAWL COLLAR: When piece measures 72-78-83-88 cm, only work over band sts (= 32 dtr/triple tr). Then work short rows over band sts as follows: ROW 1 (RS): 32 dtr, turn piece. ROW 2 (WS): 11 dc, 5 htr, 5 tr, 11 dtr, turn piece. Repeat these 2 rows until piece measures 10-10-11-11 cm on the most narrow part – adjust to finish with 1st row (RS). LEFT FRONT PIECE: Work as right but reversed. NOTE: When piece measures approx. 46-50-54-58 cm (adjust so that last row is from RS), work next row from WS as follows: 33 triple tr, work dtr-groups as before over front piece and finish with 34-29-29-24 ch, turn piece and beg row as on back piece. Work band sts as on right front piece, finish shawl collar with 1st row (from WS instead of RS). ASSEMBLY: Work collar tog mid back as follows: 1 dc, *1 ch, 1 dc* in next st, repeat *-*. Place front piece on top of back piece and work the shoulders and band sts tog for neckline at the back as follows: * 1 dc through both layers, 3 ch, skip 2 tr *, repeat *-*. Work the sides tog as follows: 1 dc, *3 ch, 1 dc in ch on next row*, repeat *-*. Work tog under sleeves as follows: * 1 dc in next ch with dtr-group, 3 ch*, repeat *-* and end with 1 dc. |
|||||||||||||
Diagram explanations |
|||||||||||||
|
|||||||||||||
Have you made this or any other of our designs? Tag your pictures in social media with #dropsdesign so we can see them! Do you need help with this pattern?You'll find tutorial videos, a Comments/Questions area and more by visiting the pattern on garnstudio.com. © 1982-2024 DROPS Design A/S. We reserve all rights. This document, including all its sub-sections, has copyrights. Read more about what you can do with our patterns at the bottom of each pattern on our site. |
With over 40 years in knitting and crochet design, DROPS Design offers one of the most extensive collections of free patterns on the internet - translated to 17 languages. As of today we count 304 catalogues and 11422 patterns - 11422 of which are translated into English (UK/cm).
We work hard to bring you the best knitting and crochet have to offer, inspiration and advice as well as great quality yarns at incredible prices! Would you like to use our patterns for other than personal use? You can read what you are allowed to do in the Copyright text at the bottom of all our patterns. Happy crafting!
Comments / Questions (85)
Sandra wrote:
Hallo, ich habe das rückenteil fertig. Faden abgeschnitten und mit 25 lm neu angefangen. Jetzt habe ich aber wohl einen Denkfehler. Wo schlage ich im Rückenteil die erste masche wieder an. Wenn ich gleich mit eune D-STB-Gruppe beginnen habe ich doch ein Loch?!?
10.11.2021 - 18:51DROPS Design answered:
Liebe Sandra, nach dem 25 Luftmaschen häkeln Sie die Maschen vom Rückenteil genauso wie zuvor, am Ende dieser Reihe häklen Sie auch 25 Luftmaschen (so sind beide Ärmel gleich), dann häkeln Sie beisdeitig über die "freie" 25 Luftmaschen (es sieht wie ein T aus) und dazwischen genauso wie zuvor. Kann das Ihnen helfen?
11.11.2021 - 08:55Linnea wrote:
S/M. Vid varv 2 på ärmarna står det att man ska göra A.1a 24 ggr, jag får 26 ggrr om jag ska göra klart varvet. Förstår inte hur det går ihop, mönstret är väldigt rörig när man gör det som står med det blir fel. Hur ska man lösa det? Problemet fortsätter vid halsen där 11st grupper, hoppa över 2 st grupper och sen 11 st grupper igen. Om man gör det avslutas varvet innan man kommit till slutet. Är det 2stgrupper för mycket, det är ju 26 st grupper (A.1a) o inte 24
27.04.2021 - 12:16DROPS Design answered:
Hej Linnea, du skal have 4 fm imellem hver gruppe med dst, det vil sige de 4 dst i hver 5.fm. God fornøjelse!
14.05.2021 - 09:47Linnea wrote:
Hej, följdfråga på min tidigare fråga. Fick svar angående bastyckets andra del där det är 30 luftmaskor, imitten virkas A.1 ovh sen 34 luftmaskor. Min fråga är hur A.1 ska tillämpas imitten, jag kan ju inte glra dubbelstolpar när jag inlett med luftmaskor i början och i slutet? Så hur fäster jag luftmaskora i bakstycket jag virkat? Ska jag göra fasta maskor, smygmaskor eller hur ska jag göra? Tacksam för svar:)
08.03.2021 - 10:31DROPS Design answered:
Hei Linnea. Luftmaskeraden festes i arbeidet når du fortsetter med A.1, du hekler en dobbeltstav i dobbeltstaven fra forrige rad (der du klippet av tråden). mvh DROPS design
22.03.2021 - 11:26Linnea wrote:
Hej, jag förstår inte riktigt "andra delen" av bakstycket --> "Virka 30-25-25-20 lösa lm, börja från avigsidan och fortsätt A.1 över bakst som förut och avsluta med 34-29-29-24 lösa lm, vänd arb. Sedan virkas det så här:....... osv) ska man virka 30 luftmaskor på nytt eller sätta ihop med delen som virkats innan? Och hur menas det med att,, fortsätta med A.1 över bakstycket som förut? :)
01.02.2021 - 19:04DROPS Design answered:
Hei Linnea. Klipp tråden fra arbeidet og hekle 30-25-25-30 løse luftmasker, så hekler du disse løse luftmaskene fast i arbeidet (fra vrangen, der du klippet tråden). Hekle A.1 (A.1b+A.1a+A.1c) som før og avslutt raden med 34-29-29-24 løse luftmasker. Du har nå et arbeid med 30-25-25-30 løse luftmasker i den ene siden, A.1 i midten og 34-29-29-24 løse luftmasker i den andre siden. Deretter starter du å hekle etter forklaringen til RAD 1. God Fornøyelse!
08.02.2021 - 11:35Suzana Amato wrote:
Muito bonito, vou tentar fazê-lo.
13.08.2020 - 20:17Marie-Paule wrote:
Bonjour, j'ai fini de crocheter le dos et les devants ainsi que le col. Mais je ne comprends pas comment assembler le col au dos. pourriez vous m'expliquer. Merci
28.11.2019 - 15:22DROPS Design answered:
Bonjour Marie-Paule, assemblez entre eux les 2 cols (devant gauche et devant droit) = les mailles du dernier rang des deux parties du col, puis assemblez le col (le côté le plus court) le long de l'encolure dos en les crochetant ensemble (commencez par le coin du col et crochetez en piquant dans les 2 épaisseurs (col + encolure dos): 1 ms, *1 ml, 1 ms dans la m suivante* tout du long. Bon assemblage!
28.11.2019 - 15:34Renée wrote:
Heb een vraagje over het belang van de “ goede kant”en “verkeerde kant”...ik zie om eerlijk te zijn geen verschil... Mijn rugpand is af en ben bezig aan het rechtervoorpand en vermoedt dat ik bij mijn rugpand steeds aan de “verkeerde kant” heb aangehecht en afgekant...😳Is dat erg??
06.04.2019 - 22:56Gail wrote:
Am I suppose to chain any at the end of a row before I start a new row?
30.03.2019 - 01:33DROPS Design answered:
Dear Gail, when working diagrams A.1b (begin of RS row) and A.1c (begin of WS row), you will find the number of chains to crochet there at the beg of each row. Read more about reading diagrams here. Happy crocheting!
01.04.2019 - 11:51Gail wrote:
I wish that you would make a video for u tube of how to make this.
29.03.2019 - 17:03Gail King wrote:
I love this look and want to make it but I don't understand about the yarn and prices. Please help me understand.
27.03.2019 - 01:54DROPS Design answered:
Hi Gail! Depending on your size (S/M – L/XL - XXL - XXXL) you will need respecively 800-900-1000-1050 g of yarn (DROPS Merino Extra Fine), it means 16-18-20-21 skeins. The yarn cost mentionned in the pattern is calculated from the materials needed to make the pattern in its smallest size. Happy knitting!
27.03.2019 - 07:39