
Popular categories
Looking for a yarn?


Comments / Questions (46)
![]() Teresa Lynn Bonshor wrote:
Teresa Lynn Bonshor wrote:
Hi, this hat colour combination is great,but it does not tell you which individual colours to buy and Grizzly does not seem to be available
15.10.2023 - 12:43DROPS Design answered:
Dear Teresa, that is because there are no individual colours; the color used is a multicolor thread (grizzly) which is now discontinued. You can now make this model with one single colour or by working stripes with your preferred colours. Happy knitting!
15.10.2023 - 23:02
![]() Rigmor Furnes wrote:
Rigmor Furnes wrote:
Hei. Jeg er så skuffet :) jeg har fulgt oppskriften til punkt og prikke, likevel er både capsen og halsen altfor liten. Er det noe hjelp å få? mvh. Rigmor
15.07.2023 - 18:49
![]() Tina wrote:
Tina wrote:
Hi! I am excited to try my hand at this pattern, but disappointed that it seems the color yarn used for the pictures is impossible to find - is this a discontinued color? Does the DROPS line have any good substitutes for gradient color yarn? Thank you!
11.07.2023 - 14:42
![]() Laura Galletto wrote:
Laura Galletto wrote:
Per il cappello esiste un modo per realizzarlo con i ferri, dritti o circolari. Grazie
11.01.2021 - 22:42DROPS Design answered:
Buonasera Laura, questo modello è stato disegnato per essere lavorato all'uncinetto. Ci sono tanti altri modelli di cappelli ai ferri sul nostro sito tra cui può scegliere. Buon lavoro!
13.01.2021 - 20:11
![]() Áurea Martins wrote:
Áurea Martins wrote:
Essa Boina é linda ! Eu fiz e amei . Quando for morar em Portugal , quero comprar essa mesma lã e fazer igualzinha , muito obrigada pelo passo a passo . Até breve .
01.03.2018 - 20:30
![]() Marie-josee Picotte wrote:
Marie-josee Picotte wrote:
J'aimerais savoir si il existe un tutorial sur la confection de cette casquette pour mieux comprendre les explications écrites.
07.03.2016 - 06:22DROPS Design answered:
Bonjour Mme Picotte, une demande de vidéo pour cette casquette a été enregistrée, en attendant, rappelez-vous que vous pouvez vous adresser à votre magasin DROPS pour toute question ou aide individuelle. Bon crochet!
07.03.2016 - 10:40
![]() Marie-Josee Picotte wrote:
Marie-Josee Picotte wrote:
Bonjour, concernant le bonnet. Mais j'ai le même problème moi aussi. Je viens de finir le bonnet et moi non plus il n'a pas l'effet tombant comme sur la photo et il m'arrive en haut des oreilles. On dirait une casquette pour enfant. Alors je vous demande, pour les ajouts, on commence a qu'elle tour et pour la tension avez vous une vidéo qui montre une différence parce que je crois faire la tension adéquate. Merci de votre réponse
25.01.2016 - 15:50DROPS Design answered:
Bonjour Mme Picotte, votre retour a bien été transmis à nos stylistes. Merci d'avance pour votre patience.
02.03.2016 - 10:40
![]() Batoul Fawaz wrote:
Batoul Fawaz wrote:
Hello! Another question, what do you mean about work brim with double yarn over the middle 18 sts? thank u
13.01.2016 - 11:15DROPS Design answered:
Dear Mrs Fawaz, the brim is worked with 2 strands of yarn held tog as just one, over the 18 sts on mid front of hat. Happy crocheting!
13.01.2016 - 17:03
![]() Batoul Fawaz wrote:
Batoul Fawaz wrote:
Hello!! if i want to work this pattern with a crochet hook 5 mm what is the nb of hdb that should i start with thank u
13.01.2016 - 10:21DROPS Design answered:
Dear Mrs Fawaz, this pattern has been written for a tension of 9 tr x 6 rounds = 10 x 10 cm, you will have to adjust yarn/hook, or recalculate the pattern. We are not able to adapt each pattern to each individual request, but you can get help from the store where you bought your yarn. Happy crocheting!
13.01.2016 - 10:23
![]() HERIN Angélique wrote:
HERIN Angélique wrote:
Bonjour, Doit-on faire tous les tours de la casquette dans le brin arrière des mailles ? J'ai fais la casquette mais elle ne donne pas l'effet tombant à l'arrière. La casquette s'arrête juste au dessus des oreilles. J'utilise la laine mentionner et mon échantillon fait bien 10x10 en échantillon avec 9 dB. Merci en avance de votre réponse.
05.12.2015 - 20:03DROPS Design answered:
Bonjour Mme Herin, pensez à bien conserver la même tension également pendant la réalisation de la casquette - vous pouvez ajuster la hauteur si nécessaire en rajoutant quelques tours supplémentaires, mais pour l'effet tombant c'est surtout sur la largeur qu'il faudra aussi bien conserver la même tension. Bon crochet!
07.12.2015 - 10:12
|
|
Boheme#bohemeset |
|
|
|
|
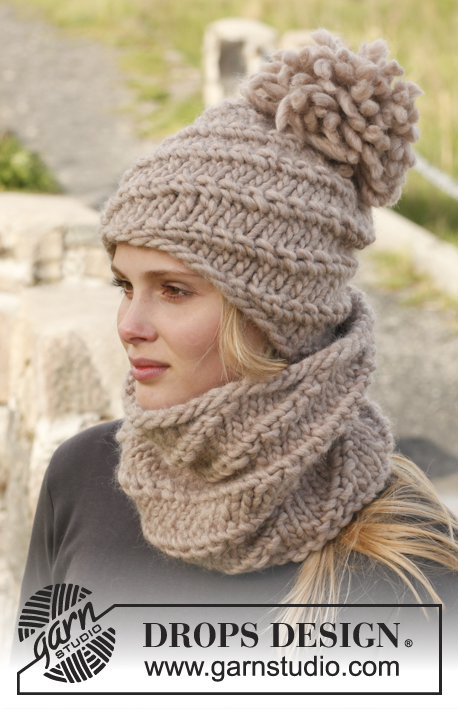
Crochet DROPS neck warmer and cap in ”Snow”.
DROPS 151-34 |
|
|
CROCHET 2 STS TOG: Work first st - but wait with last pull through - work next st and on last pull through, pull thread though all sts on hook. CROCHET INFO: Replace first htr on every round with 2 ch. Finish every round with 1 sl st in 2nd ch from beg of round. ---------------------------------------------------------- NECK WARMER: Work 56 loose ch on hook size 8 mm with Snow and form a ring with 1 sl st in 1st ch. ROUND 1: 3 ch (= 1st tr), work 1 tr in every ch = 56 tr, finish with 1 sl st in 3rd ch. Continue the rounds like this until 5 rounds have been worked. On 6th round, dec 4 sts evenly on round by working every 13th and 14th st tog - see explanation above = 52 tr. Continue with 1 tr in every tr until piece measures 26 cm. Fasten off. ---------------------------------------------------------- CAP: Work 4 ch on hook size 8 mm with Snow and form a ring with 1 sl st in 1st ch. ROUND 1: Work 8 htr in ch-ring. Read CROCHET INFO! ROUND 2: Work 2 htr in every st - but insert hook only through back loop of st - to get texture = 16 htr. ROUND 3: * 1 htr in first st, 2 htr in next st *, repeat from *-* the entire round = 24 htr. ROUND 4: * 1 htr in each of the first 2 sts, 2 htr in next st *, repeat from *-* = 32 htr. ROUND 5: * 1 htr in each of the first 3 sts, 2 htr in next st *, repeat from *-* = 40 htr. ROUND 6: * 1 htr in each of the first 4 sts, 2 htr in next st *, repeat from *-* = 48 htr. ROUND 7: * 1 htr in each of the first 5 sts, 2 htr in next st *, repeat from *-* = 56 htr. ROUND 8: * 1 htr in each of the first 6 sts, 2 htr in next st *, repeat from *-* = 64 htr. ROUND 9-10: 1 htr in every st = 64 htr. ROUND 11: * Work 6 htr, then work the 7th and 8th htr tog - see explanation above *, repeat from *-* = 56 htr. ROUND 12: * Work 5 htr, then work the 6th and 7th htr tog *, repeat from *-* = 48 htr. ROUND 13: * Work 4 htr, then work the 5th and 6th htr tog *, repeat from *-* = 40 htr. ROUND 14-15: 1 dc in every st = 40 dc. Fasten off (this is mid back on cap). BRIM: Work brim with double yarn over the middle 18 sts at the front as follows: ROW 1: Work 1 htr in every st = 18 htr. ROW 2-4: Turn piece, work 2 ch, work the next 2 sts tog, work the rest of row but work the last 2 sts tog = 12 htr after 4th row. ROW 5: Work 1 round with dc around the opening on cap and brim (work 1 dc in every st, now work through both loops of st). STRIPES FOR DECORATION: Insert 1 marker in each side of cap in the 14th round (at the bottom of cap). Work 1 sl st in a st by one marker, make st approx. 1-1.5 cm long, work 1 sl st in 13th round, make st approx. 1-1.5 cm long, work 1 sl st in 12th round - continue like this over the top of cap and down to the other marker. Work 2 more stripes like this over the cap. Fasten off. |
|
Have you finished this pattern?Tag your pictures with #dropspattern #bohemeset or submit them to the #dropsfan gallery. Do you need help with this pattern?You'll find 8 tutorial videos, a Comments/Questions area and more by visiting the pattern on garnstudio.com. © 1982-2026 DROPS Design A/S. We reserve all rights. This document, including all its sub-sections, has copyrights. Read more about what you can do with our patterns at the bottom of each pattern on our site. |


With over 40 years in knitting and crochet design, DROPS Design offers one of the most extensive collections of free patterns on the internet - translated to 17 languages. As of today we count 324 catalogues and 12290 patterns translated into English (UK/cm). 12290
We work hard to bring you the best knitting and crochet have to offer, inspiration and advice as well as great quality yarns at incredible prices! Would you like to use our patterns for other than personal use? You can read what you are allowed to do in the Copyright text at the bottom of all our patterns. Happy crafting!
Post a comment to pattern DROPS 151-34
We would love to hear what you have to say about this pattern!
If you want to leave a question, please make sure you select the correct category in the form below, to speed up the answering process. Required fields are marked *.