
Popular categories
Looking for a yarn?


Comments / Questions (94)
![]() Madeleine wrote:
Madeleine wrote:
Merci beaucoup pour vos explications, j'y suis arrivé.
23.10.2013 - 10:14
![]() Madeleine wrote:
Madeleine wrote:
Bonjour j'ai un petit soucis avec les manches: au niveau reste 47 m tricoté A7a etc je ne trouve pas le bon nombre de maille il m'en reste 2 y aurait-il une erreur ou c'est moi qui ne sait plus tricoter.
22.10.2013 - 16:18DROPS Design answered:
Bonjour Madeleine, quand vous avez 47 m, tricotez ainsi (taille S et M) : 1 m lis au point mousse, 2 m jersey, A.7a (= 4 m), répéter 4 fois A.7b (= 8 m) (sur les 32 m suiv), terminer par A.7c (= 5 m), 2 m jersey et 1 m lis au point mousse = 47 m. Dans A.7, attention à toujours bien avoir le bon nombre de jetés pour compenser les diminutions (le nbe de mailles reste le même). Bon tricot!
22.10.2013 - 18:15
![]() Thérèse Leverrier wrote:
Thérèse Leverrier wrote:
Le diagramme A4 dans A1
08.10.2013 - 16:05DROPS Design answered:
Bonjour Mme Leverrier, dans A.4, au 9ème rang, la dernière m de A4a est tricotée ens à l'end avec la 1ère m de A4b, et la dernière m du dernier rapport A4b se tricote ens à l'end avec la 1ère m de A4c. Chaque diminution est bien compensée par 1 jeté. Bon tricot!
08.10.2013 - 16:34
![]() Thérèse Leverrier wrote:
Thérèse Leverrier wrote:
Le diagramme A4
08.10.2013 - 15:25
![]() Leverrier wrote:
Leverrier wrote:
Bonjour, je pense qu'il y a une erreur dans le neuvième rang, car le trou est en côté du dessin qui se trouve en dessus. salutations. Thérèse.
08.10.2013 - 12:20DROPS Design answered:
Bonjour Mme Leverrier, pouvez-vous nous indiquer de quel diagramme vous parlez afin que nous puissions vérifier. Merci. Bon tricot!
08.10.2013 - 13:19
![]() Lillan wrote:
Lillan wrote:
Den är lätt att sticka, men monteringsinstruktionen är svår att förstå tycker jag.
15.08.2013 - 00:08
![]() Anja wrote:
Anja wrote:
Ein wunderschöner Bolero, einfach und schnell zu strickende Anleitung. Habe eine etwas dickere Wolle genommen, passend zu den Temperaturen momentan in Deutschland.
24.05.2013 - 16:02Natalja wrote:
Alternative ähnliches Modell 101-10
08.03.2013 - 05:22
![]() Stefanec Anna wrote:
Stefanec Anna wrote:
Guten Tag, habe folgende Frage: Wie werden die Vorderteile gestrickt bzw. wo sind sie enthalten?
23.02.2013 - 19:49DROPS Design answered:
Liebe Anna, ein Teil der Vorderteils kommt erst mit dem Rippenmusterrand. Es ist manchmal etwas schwierig, sich die Bolero-Anleitungen theoretisch vorzustellen, aber wenn Sie genau unserer Beschreibung folgen, entsteht das Stück wie abgebildet.
25.02.2013 - 08:56Nina wrote:
Trais romantique. je l'ai aime aussi.
28.01.2013 - 09:39
|
||||||||||||||||
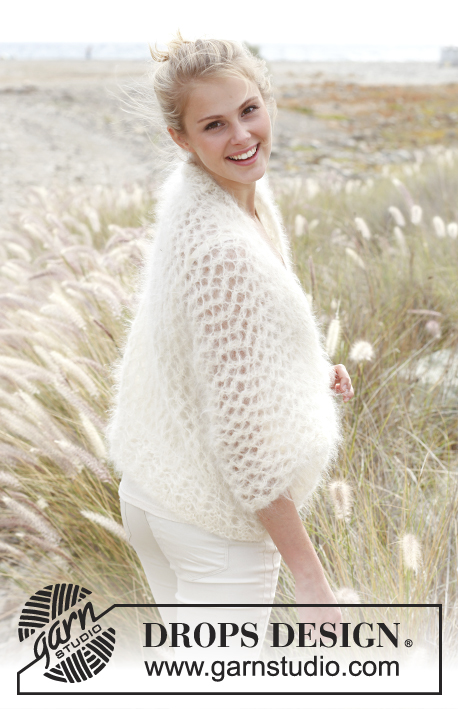
Midnight laces#midnightlacesbolero |
||||||||||||||||
 |
 |
|||||||||||||||
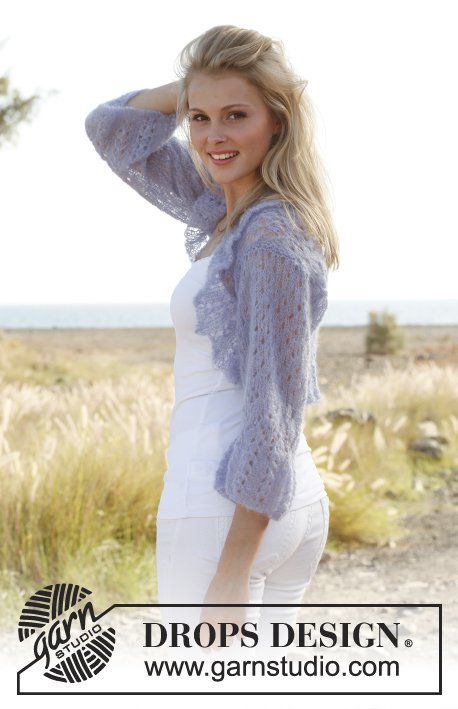
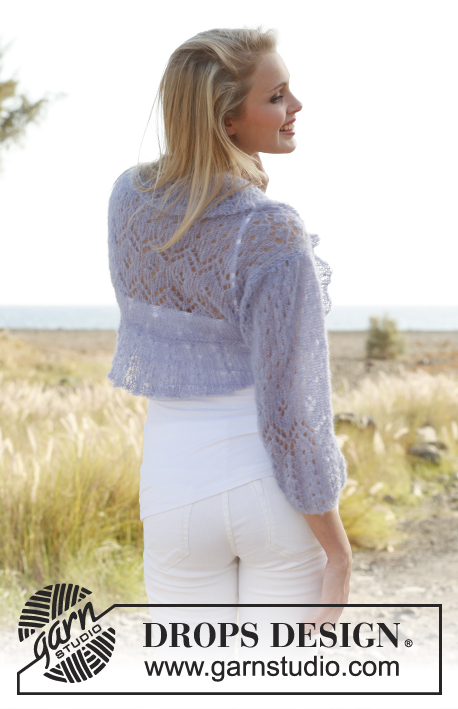
Knitted DROPS bolero with lace pattern in ”Vivaldi”. Size: S - XXXL.
DROPS 148-15 |
||||||||||||||||
|
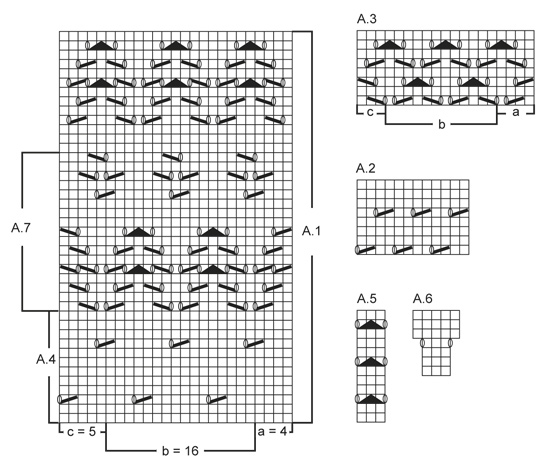
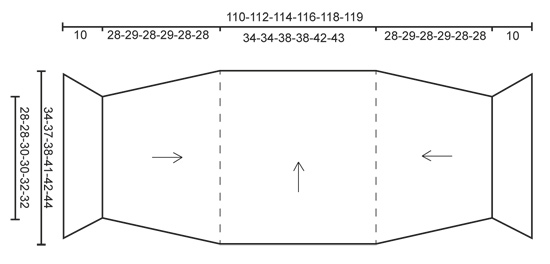
GARTER ST (back and forth on needle): K all rows. 1 ridge = 2 rows K. PATTERN: See diagrams A.1 to A.7. Diagrams show all rows in pattern seen from RS. INCREASE TIP (applies to edge in rib): Inc 1 st by making 1 YO. On next row work YO twisted to avoid holes. ---------------------------------------------------------- BOLERO: The piece is worked in several parts. BACK PIECE: Cast on 57-61-63-63-69-71 sts (incl 1 edge st each side) on 2 circular needles size 5 mm with Vivaldi (to avoid a tight cast-on edge). Pull out one circular needle and work 1 ridge in GARTER ST - see explanation above (1st row = RS). Work next row as follows from RS: 1 edge st in garter st, 3-5-2-2-1-2 sts in stocking st, work A.1a (= 4 sts), repeat A.1b (= 8 sts - diagram shows 2 repetitions) until 9-11-8-8-7-8 sts remain, finish with A.1c (= 5 sts), 3-5-2-2-1-2 sts in stocking st and 1 edge st in garter st. Continue pattern like this. REMEMBER THE KNITTING TENSION! When A.1 has been worked vertically, work 4 rows in stocking st (work edge st in garter st), then work next row as follows from RS: 1 edge st in garter st, 4-6-1-1-4-5 sts in stocking st, work pattern according to A.2 (= 12 sts) until 4-6-1-1-4-5 sts remain, finish with 3-5-0-0-3-4 sts in stocking st and 1 edge st in garter st. Continue pattern like this. When piece measures approx. 24-24-24-25-25-27 cm - adjust so that 3 rows in stocking st have been worked after 1 row with holes, work 2 more rows in stocking st. Then work next row as follows from RS: 1 edge st in garter st, 3-2-0-0-0-1 st in stocking st, work A.3a (= 4 sts), repeat A.3b (= 6 sts - diagram shows 2 repetitions) until 7-6-4-4-4-5 sts remain, finish with A.3c (= 3 sts), 3-2-0-0-0-1 st in stocking st and 1 edge st in garter st. Continue pattern like this until piece measures approx. 34-37-38-41-42-44 cm - adjust so that last row in A.3 remains. K 1 row from WS, then very loosely cast off. SLEEVE: Cast on 58-65-65-72-72-79 sts (incl 1 edge st each side) on 2 circular needles size 5 mm with Vivaldi (to avoid a tight cast-on edge). Pull out one of the needles and P 1 row from WS. Work next row as follows from RS: 1 edge st in garter st, * A.5 (= 3 sts), P 4 *, repeat from *-* and finish with 1 edge st in garter st. Continue pattern like this. When piece measures 8 cm, dec all 4 P sts to 3 P sts by P tog the first 2 sts in every P-section = 50-56-56-62-62-68 sts. When piece measures 10 cm, P 1 row from WS while AT THE SAME TIME dec 3-9-5-11-9-15 sts evenly = 47-47-51-51-53-53 sts remain on needle. Work next row as follows from RS: 1 edge st in garter st, 2-2-0-0-1-1 st in stocking st, work A.7a (= 4 sts), repeat A.7b (= 8 sts) until 8-8-6-6-7-7 sts remain, finish with A.7c (= 5 sts), 2-2-0-0-1-1 st in stocking st and 1 edge st in garter st. Continue pattern like this. When A.7 has been worked vertically, work 5 rows in stocking st, then work pattern according to A.2 until finished measurements. AT THE SAME TIME when piece measures 12 cm, inc 1 st in each side. Repeat inc every 5½-4-4½-3½-3½-3 cm 4-6-5-7-7-8 more times = 57-61-63-67-69-71 sts - NOTE: Work inc sts in stocking st until they can be worked in pattern. When piece measures 38-39-38-39-38-38 cm, K 1 row from WS before very loosely casting off with K from RS. Insert 1 marker at the top in each side on sleeve. Knit another sleeve. ASSEMBLY: Sew 1 sleeve in each side on back piece – it is important to sew so that the edge is elastic and nice and even as the seam is both visible and very high up on sleeve (it is important that the garments is agile). Sew in front loop of sts in garter st on back piece and inside cast-off edge on sleeve – see our technique video – assembly – mattress stitches - on our home page. Fold the entire piece double in the middle so that the long sides of bolero is towards each other. Sew sleeve seams inside 1 edge st until markers (or desired length), repeat on the other sleeve. EDGE IN RIB: Pick up from RS approx. 100 to 140 sts around the entire opening of bolero on circular needle size 5 mm. Then work in the round on circular needle. P 1 round, then K 1 round while AT THE SAME TIME adjusting no of sts to 168-174-180-180-186-186 (divisible by 6). Work next round as follows: * A.5 (= 3 sts), P 3 *, repeat from *-* the entire round. Continue pattern like this. When edge measures 3 cm, inc all 3 P sts to 4 P sts - READ INCREASE TIP = 196-203-210-210-217-217 sts. When edge measures 6-6-7-7-8-8 cm – adjust so that after 1 round with holes in A.5, A.6 is worked instead of A.5 (P the other sts as before). 252-261-270-270-279-279 sts. When A.6 has been worked, there are 252-261-270-270-279-279 sts on needle. Loosely cast off with K over K and P over P. Fasten off. |
||||||||||||||||
Diagram explanations |
||||||||||||||||
|
||||||||||||||||
 |
||||||||||||||||
 |
||||||||||||||||
Have you finished this pattern?Tag your pictures with #dropspattern #midnightlacesbolero or submit them to the #dropsfan gallery. Do you need help with this pattern?You'll find 15 tutorial videos, a Comments/Questions area and more by visiting the pattern on garnstudio.com. © 1982-2026 DROPS Design A/S. We reserve all rights. This document, including all its sub-sections, has copyrights. Read more about what you can do with our patterns at the bottom of each pattern on our site. |
||||||||||||||||


With over 40 years in knitting and crochet design, DROPS Design offers one of the most extensive collections of free patterns on the internet - translated to 17 languages. As of today we count 324 catalogues and 12290 patterns translated into English (UK/cm). 12290
We work hard to bring you the best knitting and crochet have to offer, inspiration and advice as well as great quality yarns at incredible prices! Would you like to use our patterns for other than personal use? You can read what you are allowed to do in the Copyright text at the bottom of all our patterns. Happy crafting!
Post a comment to pattern DROPS 148-15
We would love to hear what you have to say about this pattern!
If you want to leave a question, please make sure you select the correct category in the form below, to speed up the answering process. Required fields are marked *.