
Popular categories
Looking for a yarn?


Comments / Questions (84)
![]() Cilla wrote:
Cilla wrote:
Tillslut så föll poletten ner och jag är igång med stickningen - men skulle önska en bättre beskrivning.
09.04.2014 - 15:59
![]() Rut wrote:
Rut wrote:
Andra varvet= A1 + 3 m., man vänder alltså inte på samma ställe!
06.04.2014 - 15:04
![]() Cilla wrote:
Cilla wrote:
Nu har jag försökt sticka första biten säkert 4 gånger. Jag följer mönstret och där står att jag ska sticka de 8 maskorna enligt mönster A1 och sedan vända och sticka tillbaka och ta rad nr 2. När jag stickar rad 2 så hamnar jag på samma vändningställe och det blir bara ett stort "hål" så resten av maskorna 84 förblir ostickade.
05.04.2014 - 23:24
![]() Judith wrote:
Judith wrote:
Ik heb even een proefstukje gedaan en denk wel dat ik er uit kom. maar; twijfel over het volgende; brei je na de 2x92 weer vanaf het begin; dus 3-6-9 met de verkorte toer, of ga je van 92-89-86 etc?
21.02.2014 - 14:33DROPS Design answered:
Hoi Judith. Als je de verkorte toeren hebt herhaald en de 2 nld over alle st hebt gebreid (92 st), dan begin je weer opnieuw, dus: * 1 nld over de eerste 8 st (= A.1), keer en brei de teruggaande nld, 1 nld over A.1 en 3 st, enzovoort. Dit herhaal je tot het werk ongeveer 205 cm meet langs de buitenrand (of ongeveer 8 herhalingen van de verkorte toeren.)
24.02.2014 - 13:21
![]() Susanna wrote:
Susanna wrote:
Hola! Entiendo que el procedimiento es realizar una vuelta corta, una vuelta entera, una vuelta corta +3, una vuelta entera, una vuekta corta +6, una vuelta entera... Y así hasta que la "vuelta corta" llegue al final de los 92 puntos? Por otro lado, siguiendo el dibujo del diagrama, entiendo que hay que añadir puntos y cerrarlos luego ara crear el dibujo de cada punta del chal? Gracias,
17.02.2014 - 11:07DROPS Design answered:
Hoa Susana! Tu pregunta estaba en el apartado de comentarios. Asegúrate otra vez de marcar la casilla "questions" para que te podamos responder antes. Se trabaja A.1 y se vuelve sobre estos 8 pts. Se trabaja A.1 + 3 pts y se vuelve sobre estos 11 pts...etc así hasta haber tejido 2 hileras sobre los 92 pts.
21.02.2014 - 21:02
![]() Rikke Suurland wrote:
Rikke Suurland wrote:
Jeg forsøger at starte på sjalet, men kan ikke gennemskue hvor vendingerne som er omtalt i opskriften er? Skal der vendes lige efter mønsteret eller strikker man de resterende 84 med hver gang?
13.02.2014 - 17:07DROPS Design answered:
Hei Rikke, nej du har 92 m på p. De förste 8 av disse ska vara i mönster A.1 og resterende m i retstrik. 1.p retten strikkes över 8 m, dvs alle m i A.1, vend og strik 2.p i A.1 (alle p fra vrangen i A.1 er vrang). 3.p: strik A.1 + 3 m, dvs 3.p i A.1 og så 3 m ret, vend og strik 3 m ret og så vrang ut p. 5.p: Strik 5.p i A.1, så 6 m ret, vend og strik 6 m ret og så vrang ut p. Fortsett slik å strik 3 m mer i riller för hver gang fra retten för du vender.
13.02.2014 - 21:38
![]() Bourgois wrote:
Bourgois wrote:
Bonjour, je ne comprends pas bien la dernière étape: passer un fil dans les mailles de l'intérieur et serrer(mailles du milieu??)...ça a quel effet sur le tricot? Merci
15.12.2013 - 18:03DROPS Design answered:
Bonjour Mme Bourgois, resserrer les mailles au niveau du haut du châle va vous permettre d'obtenir un bord plus droit et plus net entre les mailles montées et les mailles rabattues (fin des rangs raccourcis). Bon tricot !
16.12.2013 - 09:08
![]() Adeline wrote:
Adeline wrote:
Bonjour ! j'ai tricoté 4*2 = 8 rangs raccourcis. Est ce que mon châle est fini ou bien il faut que je continue jusque 8*2 = 16 rangs raccourcis ? Merci !
30.11.2013 - 22:52DROPS Design answered:
Bonjour Adeline, vous devez tricotez environ 8 fois au total les rangs raccourcis (les rangs raccourcis se tricotent sur les mailles de A1 + 3 m en plus tous les 2 rangs soit environ 29 x 2 rangs raccourcis = jusqu'à ce que toutes les 92 mailles aient été tricotées) jusqu'à ce que le châle forme presque un demi-cercle. Bon tricot!
01.12.2013 - 20:46
![]() Estelle wrote:
Estelle wrote:
Bonjour ma maman souhaite faire ce châle mais ne comprends pas trop les explications, j'essaye donc de les comprendre. Pour démarrer, voici ce que je comprends, mais est-ce bien cela: Tricoter les 8 premières mailles en suivant le point fantaisie du diagramme puis les 84 mailles restantes en point mousse, tourner et tricoter le rang en point mousse puis sur le 3ème rang attaquer les rangs raccourcis. Merci d'avance Estelle
18.11.2013 - 14:52DROPS Design answered:
Bonjour Estelle, pour créer la forme du châle, on tricote plus de rangs sur les mailles extérieures que sur celles de l'intérieur, ainsi, on tricote 2 rangs sur 8 m (A1), puis 2 rangs sur A1 + 3m, puis 2 rangs sur A1 + 6 m et ainsi de suite en tricotant toujours 3 m de plus à chaque nouveau rang raccourcis jusqu'à ce que vous ayez tricoté 2 rangs sur toutes les mailles, puis reprenez la série complète depuis le début. Bon tricot!
18.11.2013 - 14:57
![]() Sandra wrote:
Sandra wrote:
Ben begonnen met patroon verkorte toeren en dan 2 toeren over alle steken,klopt dit want heb nu 7 kant patronen gebreid en maar 8 toeren over alle steken? Hoor graag van u en alvast bedankt.
27.10.2013 - 18:38DROPS Design answered:
Hoi Sandra. Het patroon is correct. Je breit voor het keren steeds 3 st meer per keer en eindigt met 1 nld heen en 1 nld terug over alle st. Als je deze werkwijze volgt dan wordt het model juist.
28.10.2013 - 19:05
|
|||||||||||||
Marianna#mariannashawl |
|||||||||||||
 |
 |
||||||||||||
Knitted DROPS shawl with short rows in "Verdi".
DROPS 140-3 |
|||||||||||||
|
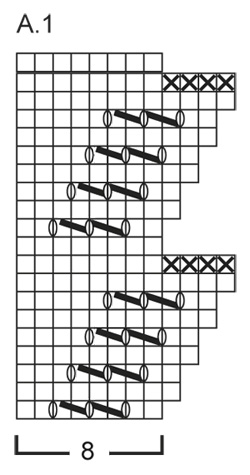
PATTERN: See diagram A.1. Diagram shows all rows in pattern from RS. GARTER ST (back and forth on needle): K all rows. 1 ridge = 2 rows K. KNITTING TIP: When turning mid piece, slip first st. Tighten thread and continue as before. This is done to avoid holes in the transitions. -------------------------------------------------------- SHAWL: Worked back and forth on circular needle. Cast on 92 sts on circular needle size 7 mm with Verdi. Work as follows – from RS: A.1 over the first 8 sts, then work in GARTER ST over the other sts - see explanation above. AT THE SAME TIME work short rows as follows - read KNITTING TIP. NOTE! Sts in A.1 are always counted as 8 sts: * 1 row over the first 8 sts (= A.1), turn and work back, 1 row over A.1 + 3 sts, turn and work back, 1 row over A.1 + 6 sts, turn and work back, 1 row over A.1 + 9 sts, turn and work back. Continue with short rows by working 3 sts more on every turn until 2 rows have been worked over all sts *, repeat from *-* until piece measures approx. 205 cm around the outer edge of the half circle (approx. 8 repetitions with short rows have been worked). Cast off. Tighten tog in the middle by pulling a thread through the inner sts and tighten tog. |
|||||||||||||
Diagram explanations |
|||||||||||||
|
|||||||||||||
 |
|||||||||||||
Have you finished this pattern?Tag your pictures with #dropspattern #mariannashawl or submit them to the #dropsfan gallery. Do you need help with this pattern?You'll find 7 tutorial videos, a Comments/Questions area and more by visiting the pattern on garnstudio.com. © 1982-2026 DROPS Design A/S. We reserve all rights. This document, including all its sub-sections, has copyrights. Read more about what you can do with our patterns at the bottom of each pattern on our site. |
|||||||||||||


With over 40 years in knitting and crochet design, DROPS Design offers one of the most extensive collections of free patterns on the internet - translated to 17 languages. As of today we count 324 catalogues and 12290 patterns translated into English (UK/cm). 12290
We work hard to bring you the best knitting and crochet have to offer, inspiration and advice as well as great quality yarns at incredible prices! Would you like to use our patterns for other than personal use? You can read what you are allowed to do in the Copyright text at the bottom of all our patterns. Happy crafting!
Post a comment to pattern DROPS 140-3
We would love to hear what you have to say about this pattern!
If you want to leave a question, please make sure you select the correct category in the form below, to speed up the answering process. Required fields are marked *.