
Popular categories
Looking for a yarn?


Comments / Questions (88)
![]() Maria Fredsvinge wrote:
Maria Fredsvinge wrote:
Hej! Vilken modell har denna kofta? Är det tex pingvinärm? Kan man göra den utan ärmar el blir passformen konstig då?
17.09.2023 - 14:55
![]() Mimma wrote:
Mimma wrote:
Io vorrei avere il video su come fare il punto , perché con lo schema non mi riesce. La ringrazio in anticipo
12.04.2022 - 19:24DROPS Design answered:
Buonasera Mimma, non abbiamo un video per quel punto in particolare, ma si ricordi di leggere i diagrammi dal basso verso l'alto, da destra verso sinistra. Buon lavoro!
16.04.2022 - 19:28
![]() Mimma wrote:
Mimma wrote:
Si potrebbe avere il video, perché nn sono molto pratica ma se vedo come si fa riesco a farlo. Grazie
06.03.2022 - 11:46DROPS Design answered:
Buongiorno Mimma, il video del modello intero non è disponibile: ci sono tanti video con le diverse tecniche e se dovesse avere dubbi durante la lavorazione può scriverci qui. Buon lavoro!
06.03.2022 - 13:57
![]() Sabine wrote:
Sabine wrote:
Kann es sein, dass der Mustersatz M1 C nicht stimmt. Müsste er nicht wie M1A aus drei Maschen bestehen?
30.09.2021 - 09:20DROPS Design answered:
Liebe Sabine, so stimmt das Diagram, schauen Sie dieses Video, dieselben Diagramme werden gestrickt (hier wird nur -das B Teil einmal in der Breite gestrickt). Viel Spaß beim stricken!
30.09.2021 - 10:06
![]() Francesca wrote:
Francesca wrote:
Buongiorno, ho lavorato il davanti sinistro ma non riesco a lavorare il destro perché non capisco come fare al contrario ( cioè da sinistra a destra) i ferri accorciati. Dovrei lavorare a rovescio? Ma come è possibile farlo? Grazie per il prezioso aiuto
27.07.2021 - 08:04DROPS Design answered:
Buongiorno Marika, il davanti destro si lavora come il sinistro, ma i ferri accorciati iniziano sul rovescio del lavoro e il segnapunti per lo scalfo dev'essere inserito sul lato sinistro del lavoro. Buon lavoro!
29.07.2021 - 09:52
![]() Riepshoff wrote:
Riepshoff wrote:
Hallo Bei den Vorderteilen wird ja keine Halsschräge gestrickt. Es wird am Hals ja gerade hochgestrickt, verstehe ich nicht, wenn da auch noch Bündchen rankommen, ist das Strickstück viel zu sehr am Hals!! Mit freundlichen Grüßen J. Riepshoff
16.04.2021 - 14:48DROPS Design answered:
Liebe Frau Riepshoff, Sie arbeiten zu Beginn verkürzte Reihen, dadurch erhalten die Vorderteile eine Schrägung. Zudem ergibt sich der Schnitt später beim Tragen. Viel Spaß beim Stricken!
18.04.2021 - 22:27
![]() Danka Falconer-Bannon wrote:
Danka Falconer-Bannon wrote:
Hello Please could you explain what you mean, in this pattern (139/7), by ' in every P-section (seen from RS) ' throughout the pattern. Many thanks and kind regards Danka
06.03.2021 - 15:08DROPS Design answered:
Dear Danka, the piece is started with a rib, in which you have knit stitches (2) and purl stitches (4) repeated. The 4 purl stitch is a "purl section), these 4 will be decreased to 3 P stitches, etc. Happy knitting!
07.03.2021 - 21:49
![]() Jutta wrote:
Jutta wrote:
Hallo,ich habe das rechte Vorderteil 10x wieder aufgemacht. Wenn ich die verkürzten Reihen von der linken Seite anfange, stimmt das Muster überhaupt nicht mehr überein in den Reihen. das linke Teil sieht gut aus vom Muster her und das rechte dann ganz anders. Wäre viel besser , man würde in der Anleitung das rechte genau beschreiben und das linke soll spiegelverkehrt sein. Denn das linke ist einfach. Bitte die verkürzten R von links erklären
26.05.2018 - 12:13DROPS Design answered:
Liebe Jutta, Sie stricken die erste Reihe von der Rückseite: 1 RdM, M.1C, M.1B x 1-4 Mal (= 1+4+ 6-24 = 10-29 M), wenden und die erste Reihe im Diagram über diese 10-29 M (starten Sie mit M.1B und enden Sie mit M.1C, 1 RdM), bei der nächsten Rückreihe stricken Sie 6 Maschen mehr (= 1 x M1B), wenden und die 2. Hinreihe wie im Diagram stricken. So weiterstricken, dh bei der Rückreihe noch 6 M mehr stricken (M.1B x 1 Mal) und bei der letzten (= 4. Rückreihe), alle Maschen stricken dann wird die nächste Hinreihe über alle Maschen so gestrickt: 1 RdM, M.1A, M.1B x 4-7 Mal, M.1C, 1 RdM. Viel Spaß beim stricken!
28.05.2018 - 09:08
![]() Jutta wrote:
Jutta wrote:
Hallo,ich habe das rechte Vorderteil 10x wieder aufgemacht. Wenn ich die verkürzten Reihen von der linken Seite anfange, stimmt das Muster überhaupt nicht mehr überein in den Reihen. das linke Teil sieht gut aus vom Muster her und das rechte dann ganz anders. Wäre viel besser , man würde in der Anleitung das rechte genau beschreiben und das linke soll spiegelverkehrt sein. Denn das linke ist einfach. Bitte die verkürzten R von links erklären
26.05.2018 - 12:05
![]() Jutta wrote:
Jutta wrote:
Hallo, bei den verkürzten Reihen ist die letzte Masche von M1B ein Umschlag. Wie stricke ich den denn in der Rückreihe? Habe ja den Faden dann bzw. Umschlag auf der linken Nadel und keine Masche mehr dahinter oder davor. Oder lässt man beim drehen der Reihe den Umschlag weg?
22.05.2018 - 16:48DROPS Design answered:
Liebe Jutta, Sie können die nächste Masche nach dem Umschlag noch stricken und dann bei der nächsten verkürzte Reihe 1 M weniger stricken. Viel Spaß beim stricken!
23.05.2018 - 07:47
|
||||||||||||||||
Melanie#melaniejacket |
||||||||||||||||
 |
 |
|||||||||||||||
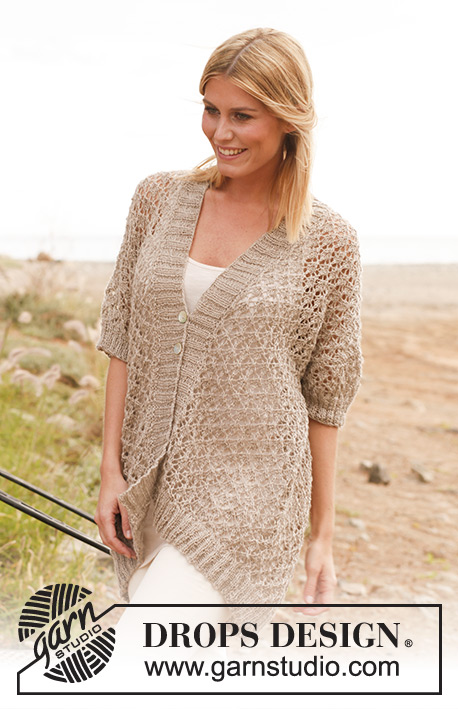
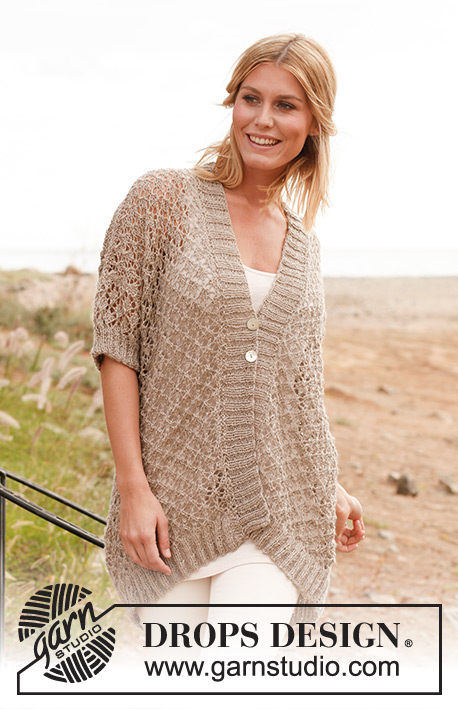
Knitted DROPS jacket with lace pattern in “Lin” and "Belle".
DROPS 139-7 |
||||||||||||||||
|
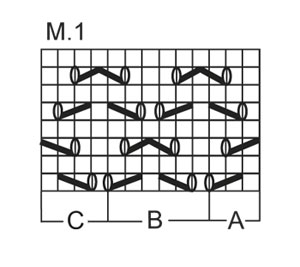
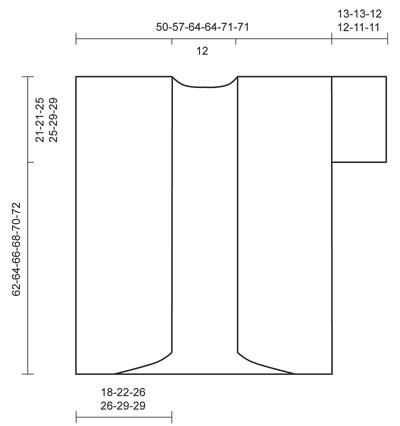
GARTER ST (back and forth on needle): K all rows. NOTE: All edge sts are worked in garter st. PATTERN: See diagrams M.1, M.1A = 3 sts, M.1B = 6 sts and M.1C = 4 sts. Diagrams show the pattern from RS. DECREASE TIP: Dec 1 st by working 2 sts tog. BUTTON HOLES: Cast off for 2 button holes on right band, approx. 33-34-35-36-37-38 cm and approx. 38-39-40-41-42-43 cm from the top of shoulder. 1 BUTTON HOLE = cast off 2 sts and cast on 2 new sts on next row over these sts. -------------------------------------------------------- BACK PIECE: Worked back and forth on needle. Cast on 172-196-220-220-244-244 sts (incl 1 edge st in each side) on circular needle size 4 mm with Lin or Belle. Then work rib as follows (1st row = RS): 1 edge sts in garter st - See explanation above, * K 2, P 4 *, repeat from *-*, finish with K 2 and 1 edge st in garter st = 28-32-36-36-40-40 P-sections (seen from RS). When piece measures 3-3-3-4-4-4 cm, dec 1 st in every P-section (seen from RS) - Read DECREASE TIP = 144-164-184-184-204-204 sts. Continue in rib with K 2/P 3 with 1 edge st in each side. When piece measures 5-5-5-6-6-6 cm, dec 1 more st in every P-section (seen from RS) = 116-132-148-148-164-164 sts. Continue in rib with K 2/P 2 with 1 edge st in each side. When piece measures 6-6-6-7-7-7 cm, dec 29-33-37-37-41-41 sts evenly on last row from WS = 87-99-111-111-123-123 sts. On next row from RS switch to circular needle size 5 mm and work as follows: 1 edge st, work diagram M.1A 1 time (= 3 sts), then diagram M.1B a total of 13-15-17-17-19-19 times and finally diagram M.1C 1 time (= 4 sts), finish with 1 edge st. Continue diagram M.1 with 1 edge st in each side until piece measures 41-43-41-43-41-43 cm. REMEMBER THE KNITTING TENSION! Now insert a marker in each side of piece (= armhole starts here). Continue to work until piece measures 60-62-64-66-68-70 cm. Then work in garter st over all sts until finished measurements - AT THE SAME TIME on 1st row from RS cast off the middle 17 sts for neck and finish each shoulder separately. Cast off 2 sts on next row from neck = 33-39-45-45-51-51 sts remain on shoulder. Loosely cast off all sts when piece measures 62-64-66-68-70-72 cm. LEFT FRONT PIECE: Worked back and forth on needle. Cast on 62-74-86-86-98-98 sts (incl 1 edge st in each side) on circular needle size 4 mm. Then work rib as follows (1st row = RS): 1 edge st, * P 4, K 2 *, repeat from *-*, finish with 1 edge st towards mid front = 10-12-14-14-16-16 P-sections (seen from RS). When piece measures 3-3-3-4-4-4 cm, dec 1 st in every P-section (seen from RS) = 52-62-72-72-82-82 sts. Continue in rib with K 2/P 3 with 1 edge st in each side. When piece measures 5-5-5-6-6-6 cm, dec 1 more st in every P-section (seen from RS) = 42-50-58-58-66-66 sts. Continue in rib with K 2/P 2 with 1 edge st in each side. When piece measures 6-6-6-7-7-7 cm, dec 9-11-13-13-15-15 sts evenly on last row from WS = 33-39-45-45-51-51 sts. On next row from RS switch to circular needle size 5 mm and work short rows for diagonal front edge as follows: 1 edge st, work diagram M.1A 1 time (= 3 sts), diagram M.1B a total of 1-2-3-3-4-4 times (= 6-12-18-18-24-24 sts) = 10-16-22-22-28-28 sts on needle, turn piece, tighten thread and work back. Work next row from RS as follows: 1 edge st, work diagram M.1A 1 time, diagram M.1B a total of 2-3-4-4-5-5 times = 16-22-28-28-34-34 sts on needle, turn piece, tighten thread and work back. Work next row from RS as follows: 1 edge st, work diagram M.1A 1 time, diagram M.1B a total of 3-4-5-5-6-6 times = 22-28-34-34-40-40 sts on needle, turn piece, tighten thread and work back. On next row from RS work all sts as follows: 1 edge st, work diagram M.1A 1 time, diagram M.1B a total of 4-5-6-6-7-7 times, then work diagram M.1C 1 time, finish with 1 edge st = 33-39-45-45-51-51 sts. Continue diagram M.1 with 1 edge st in each side until piece measures 41-43-41-43-41-43 cm. Now insert a marker in the right side of piece seen from RS (armhole starts here). Continue to work until piece measures 60-62-64-66-68-70 cm. Now work in garter st over all sts until finished measurements. Loosely cast off all sts when piece measures 62-64-66-68-70-72 cm. RIGHT FRONT PIECE: Work as left front piece but reversed. ASSEMBLY: Sew the shoulder seams. SLEEVE: Worked back and forth on needle. Knit up from RS on circular needle size 5 mm approx. 80 to 100 sts between markers along one armhole. K next row from WS - AT THE SAME TIME adjust no of sts to 75-75-87-87-99-99 (incl 1 edge st in each side). On next row from RS work as follows: 1 edge st, work diagram M.1A 1 time (= 3 sts), then diagram M.1B a total of 11-11-13-13-15-15 times, work diagram M.1C 1 time (= 4 sts), finish with 1 edge st. Continue to work diagram M.1 with 1 edge st in each side until piece measures approx. 9-9-8-8-7-7 cm (shorter measurements in the larger sizes because of broader shoulder width). On next row from RS switch to circular needle size 4 mm and dec 1 st on row - while AT THE SAME TIME working rib (K 2, P 2) with 1 edge st in each side = 74-74-86-86-98-98 sts. When sleeve measures 13-13-12-12-11-11 cm, loosely cast off sts with K over K and P over P. Knit another sleeve the same way. ASSEMBLY: Sew sleeve and side seams in one inside 1 edge st. RIGHT BAND: Worked back and forth on needle. Knit up from RS on circular needle size 4 mm approx. 110 to 130 sts along the entire right front piece, at the end of row cast on 15 new sts for collar at the back. K next row from WS - AT THE SAME TIME adjust no of sts along right front piece to 112-116-120-124-128-132 (do not inc/dec over the collar sts at the back) = 127-131-135-139-143-147 sts in total. Then work rib from RS as follows: * K 2, P 2 *, repeat from *-*, finish with K 2 and 1 edge st in garter st (= 31-32-33-34-35-36 P-sections). Continue in rib until band measures 3 cm, then inc from RS 1 P st in the last 12-12-14-14-16-16 P-sections (= inc around the neck) = 139-143-149-153-159-163 sts. When band measures 5-5-5-6-6-6 cm, cast off for button holes - see explanation above. Continue with K over K and P over P until band measures 6-6-6-7-7-7 cm, loosely cast off all sts with K over K and P over P. LEFT BAND: Cast on 15 sts on circular needle size 4 mm for collar at the back, then knit up sts along left front band as on right band. Work as right band but reversed and without button holes. ASSEMBLY: Sew collar tog mid back inside 1 edge st (with WS against WS), and sew collar to neck line at the back of neck. Sew the buttons on to the left band. |
||||||||||||||||
Diagram explanations |
||||||||||||||||
|
||||||||||||||||
 |
||||||||||||||||
 |
||||||||||||||||
Have you finished this pattern?Tag your pictures with #dropspattern #melaniejacket or submit them to the #dropsfan gallery. Do you need help with this pattern?You'll find 9 tutorial videos, a Comments/Questions area and more by visiting the pattern on garnstudio.com. © 1982-2026 DROPS Design A/S. We reserve all rights. This document, including all its sub-sections, has copyrights. Read more about what you can do with our patterns at the bottom of each pattern on our site. |
||||||||||||||||


With over 40 years in knitting and crochet design, DROPS Design offers one of the most extensive collections of free patterns on the internet - translated to 17 languages. As of today we count 324 catalogues and 12290 patterns translated into English (UK/cm). 12290
We work hard to bring you the best knitting and crochet have to offer, inspiration and advice as well as great quality yarns at incredible prices! Would you like to use our patterns for other than personal use? You can read what you are allowed to do in the Copyright text at the bottom of all our patterns. Happy crafting!
Post a comment to pattern DROPS 139-7
We would love to hear what you have to say about this pattern!
If you want to leave a question, please make sure you select the correct category in the form below, to speed up the answering process. Required fields are marked *.