
Popular categories
Looking for a yarn?


Comments / Questions (88)
![]() Ellen Margrethe Hansen wrote:
Ellen Margrethe Hansen wrote:
Venstre forstykke. - når jeg har strikket rib kanten og har skiftet til pind nr. 5 : har jeg ikke strikket M.1A (1 ret - 2 ret sammen - slå om) - - derefter - - Har jeg strikket M.2B total (1 ret - slå om - 1 ret løst af , 1 ret og løft løs maske over - slå om) Hvordan kommer jeg videre derfra. Kan jeg får en udførlig vejledning. - TAK - Mvh. Ellen Margrethe Hansen
25.03.2026 - 15:38DROPS Design answered:
Hej Ellen Margrethe, du vender arbejdet og strikker de samme diagrammer over samme masker. Hvilken størrelse strikker du, så kan vi forklare bedre :)
09.04.2026 - 10:14
![]() Dorion Johanne wrote:
Dorion Johanne wrote:
Dans les explications de ce patron vous parlez de faire une diminution dans chaque section envers (vu sur l'endroit), quels sont ces sections? Merci !
28.10.2025 - 19:51DROPS Design answered:
Bonjour Mme Dorion, on parle ici des sections en mailes envers des côtes, autrement dit, vous tricotez d'abord en côtes 2 m end, 4 m env puis vous diminuez 1 m envers dans toutes les "sections" 4 m envers, il vous reste ainsi des côtes 2 m end, 3 m env. Bon tricot!
30.10.2025 - 18:26
![]() Petra Kevin wrote:
Petra Kevin wrote:
Wie wird das Muster des rechten Vorderteils spiegelverkehrt gestrickt?
15.06.2025 - 21:09DROPS Design answered:
Liebe Frau Kevin, die verkürzten Reihen beginnen mit einer Rückreihe, aber bei den Hinreihen stricken Sie immer noch genauso wie beim linken Vorderteil, dh mit M.1A beginnen, M.1B wiederholen und mit M.1 enden. Viel Spaß beim Stricken!
16.06.2025 - 09:22
![]() Rossella wrote:
Rossella wrote:
Salve, si può lavorare con i ferri dritti? La lavorazione cambia?
26.03.2025 - 14:59DROPS Design answered:
Buonasera Rossella, questo modello è lavorato in piano, per cui può utilizzare i ferri dritti. Buon lavoro!
27.03.2025 - 22:20
![]() Birgitte Skjold Bøjsen Rasmussen wrote:
Birgitte Skjold Bøjsen Rasmussen wrote:
Når jeg har lavede 1 mønster pind m1a en gang, m1b 19 gange og m1c en gang og der står at jeg skal fortsætte med m1, skal m1b da stadigvæk gentages 19 gange?
20.06.2024 - 20:14DROPS Design answered:
Hej Birgitte, ja det stemmer, A mod den ene side, B -19 gange, C mod den anden side :)
25.06.2024 - 13:17
![]() Kerstin wrote:
Kerstin wrote:
Hela längden på plagget är 64 cm men då räcker den inte under rumpan, som på bilden. Finns det en kort och en lång modell? Hur lång är modellen på bilden?
28.05.2024 - 11:15DROPS Design answered:
Hei Kerstin. Modellen står litt sånn på "skrå" med armene bak og da vil plagge henge litt mer bak / bli litt lengre bak på bildet. Derfor er det viktig å se på målene på målskisse når man skal velge størrelse, da disse målene er de fakstiske målene på plagget. Usikker på hvor høy modellen på bildet, men har målt på en kollega som bruker str. S og da ville plagget gå rett under rompe (hun er ca 160 cm høy), men vi er jo alle forskjellige. Noen er korte i ryggen, men andre lange i ryggen. Fins ingen kort eller lang modell av denne jakken. mvh DROPS Design
03.06.2024 - 07:35
![]() Kathy Collier wrote:
Kathy Collier wrote:
Re the right front... Do I start on the WS and purl 28 stitches, then turn and work those in pattern?
06.05.2024 - 10:04DROPS Design answered:
Dear Mrs Collier, correct, the short rows will start on WS so that right front piece will be mirrored. Happy knitting!
06.05.2024 - 13:37
![]() Kathy Collier wrote:
Kathy Collier wrote:
I'm about to start the right front piece, but I have a problem. How, exactly, do I reverse the pattern? Thank you
06.05.2024 - 09:59DROPS Design answered:
Dear Kathy, you knit the piece, like the mirror image of the left front piece. The lace pattern itself is simmetric, you can knit it as per the diagram, however, the shaping (increases, decreases, cast on stitches, cast off, etc.), should be at the opposite site. Happy Knitting!
06.05.2024 - 10:06
![]() Brit Geyer wrote:
Brit Geyer wrote:
Warum werden im Rückenteil die Maschenzahlen von 172 auf 87 abgenommen? Warum nicht gleich mit 87 beginnen? Danke
29.03.2024 - 22:46DROPS Design answered:
Liebe Frau Geyer, man braucht mehr Maschen um das Bündchen mit dem kleineren Nadeln als Lochmuster mit den grösseren Nadel zu stricken, deshalb braucht man am Anfang mehr Maschen und dann wird man vor dem Lochmuster abnehmen, um die richtige Breite zu haben. Viel Spaß beim stricken!
02.04.2024 - 14:23
![]() Brit Geyer wrote:
Brit Geyer wrote:
Warum werden im Rückenteil die Maschenzahlen von 172 auf 87 abgenommen? Warum nicht gleich mit 87 beginnen? Danke
29.03.2024 - 22:45
|
||||||||||||||||
Melanie#melaniejacket |
||||||||||||||||
 |
 |
|||||||||||||||
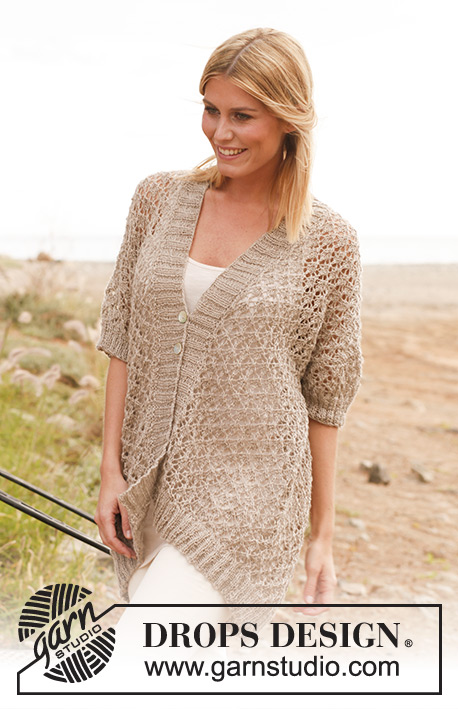
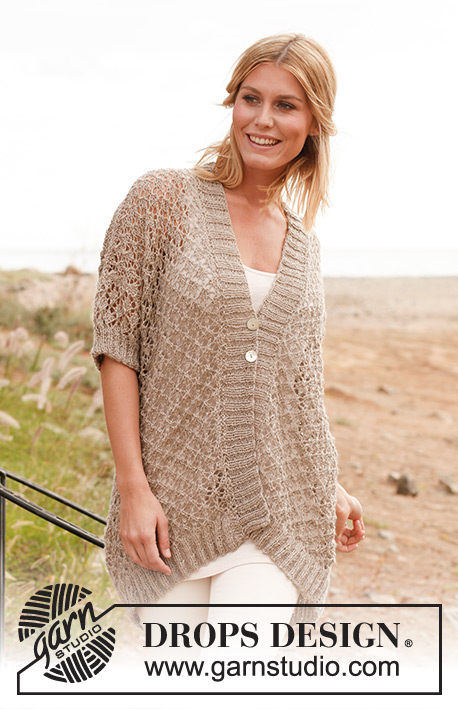
Knitted DROPS jacket with lace pattern in “Lin” and "Belle".
DROPS 139-7 |
||||||||||||||||
|
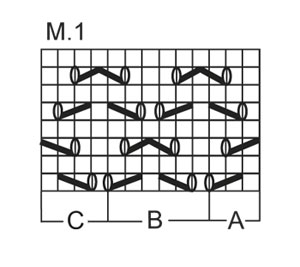
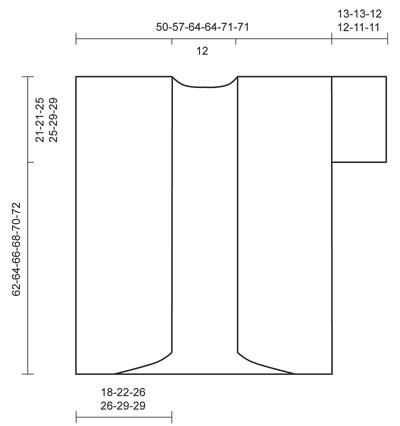
GARTER ST (back and forth on needle): K all rows. NOTE: All edge sts are worked in garter st. PATTERN: See diagrams M.1, M.1A = 3 sts, M.1B = 6 sts and M.1C = 4 sts. Diagrams show the pattern from RS. DECREASE TIP: Dec 1 st by working 2 sts tog. BUTTON HOLES: Cast off for 2 button holes on right band, approx. 33-34-35-36-37-38 cm and approx. 38-39-40-41-42-43 cm from the top of shoulder. 1 BUTTON HOLE = cast off 2 sts and cast on 2 new sts on next row over these sts. -------------------------------------------------------- BACK PIECE: Worked back and forth on needle. Cast on 172-196-220-220-244-244 sts (incl 1 edge st in each side) on circular needle size 4 mm with Lin or Belle. Then work rib as follows (1st row = RS): 1 edge sts in garter st - See explanation above, * K 2, P 4 *, repeat from *-*, finish with K 2 and 1 edge st in garter st = 28-32-36-36-40-40 P-sections (seen from RS). When piece measures 3-3-3-4-4-4 cm, dec 1 st in every P-section (seen from RS) - Read DECREASE TIP = 144-164-184-184-204-204 sts. Continue in rib with K 2/P 3 with 1 edge st in each side. When piece measures 5-5-5-6-6-6 cm, dec 1 more st in every P-section (seen from RS) = 116-132-148-148-164-164 sts. Continue in rib with K 2/P 2 with 1 edge st in each side. When piece measures 6-6-6-7-7-7 cm, dec 29-33-37-37-41-41 sts evenly on last row from WS = 87-99-111-111-123-123 sts. On next row from RS switch to circular needle size 5 mm and work as follows: 1 edge st, work diagram M.1A 1 time (= 3 sts), then diagram M.1B a total of 13-15-17-17-19-19 times and finally diagram M.1C 1 time (= 4 sts), finish with 1 edge st. Continue diagram M.1 with 1 edge st in each side until piece measures 41-43-41-43-41-43 cm. REMEMBER THE KNITTING TENSION! Now insert a marker in each side of piece (= armhole starts here). Continue to work until piece measures 60-62-64-66-68-70 cm. Then work in garter st over all sts until finished measurements - AT THE SAME TIME on 1st row from RS cast off the middle 17 sts for neck and finish each shoulder separately. Cast off 2 sts on next row from neck = 33-39-45-45-51-51 sts remain on shoulder. Loosely cast off all sts when piece measures 62-64-66-68-70-72 cm. LEFT FRONT PIECE: Worked back and forth on needle. Cast on 62-74-86-86-98-98 sts (incl 1 edge st in each side) on circular needle size 4 mm. Then work rib as follows (1st row = RS): 1 edge st, * P 4, K 2 *, repeat from *-*, finish with 1 edge st towards mid front = 10-12-14-14-16-16 P-sections (seen from RS). When piece measures 3-3-3-4-4-4 cm, dec 1 st in every P-section (seen from RS) = 52-62-72-72-82-82 sts. Continue in rib with K 2/P 3 with 1 edge st in each side. When piece measures 5-5-5-6-6-6 cm, dec 1 more st in every P-section (seen from RS) = 42-50-58-58-66-66 sts. Continue in rib with K 2/P 2 with 1 edge st in each side. When piece measures 6-6-6-7-7-7 cm, dec 9-11-13-13-15-15 sts evenly on last row from WS = 33-39-45-45-51-51 sts. On next row from RS switch to circular needle size 5 mm and work short rows for diagonal front edge as follows: 1 edge st, work diagram M.1A 1 time (= 3 sts), diagram M.1B a total of 1-2-3-3-4-4 times (= 6-12-18-18-24-24 sts) = 10-16-22-22-28-28 sts on needle, turn piece, tighten thread and work back. Work next row from RS as follows: 1 edge st, work diagram M.1A 1 time, diagram M.1B a total of 2-3-4-4-5-5 times = 16-22-28-28-34-34 sts on needle, turn piece, tighten thread and work back. Work next row from RS as follows: 1 edge st, work diagram M.1A 1 time, diagram M.1B a total of 3-4-5-5-6-6 times = 22-28-34-34-40-40 sts on needle, turn piece, tighten thread and work back. On next row from RS work all sts as follows: 1 edge st, work diagram M.1A 1 time, diagram M.1B a total of 4-5-6-6-7-7 times, then work diagram M.1C 1 time, finish with 1 edge st = 33-39-45-45-51-51 sts. Continue diagram M.1 with 1 edge st in each side until piece measures 41-43-41-43-41-43 cm. Now insert a marker in the right side of piece seen from RS (armhole starts here). Continue to work until piece measures 60-62-64-66-68-70 cm. Now work in garter st over all sts until finished measurements. Loosely cast off all sts when piece measures 62-64-66-68-70-72 cm. RIGHT FRONT PIECE: Work as left front piece but reversed. ASSEMBLY: Sew the shoulder seams. SLEEVE: Worked back and forth on needle. Knit up from RS on circular needle size 5 mm approx. 80 to 100 sts between markers along one armhole. K next row from WS - AT THE SAME TIME adjust no of sts to 75-75-87-87-99-99 (incl 1 edge st in each side). On next row from RS work as follows: 1 edge st, work diagram M.1A 1 time (= 3 sts), then diagram M.1B a total of 11-11-13-13-15-15 times, work diagram M.1C 1 time (= 4 sts), finish with 1 edge st. Continue to work diagram M.1 with 1 edge st in each side until piece measures approx. 9-9-8-8-7-7 cm (shorter measurements in the larger sizes because of broader shoulder width). On next row from RS switch to circular needle size 4 mm and dec 1 st on row - while AT THE SAME TIME working rib (K 2, P 2) with 1 edge st in each side = 74-74-86-86-98-98 sts. When sleeve measures 13-13-12-12-11-11 cm, loosely cast off sts with K over K and P over P. Knit another sleeve the same way. ASSEMBLY: Sew sleeve and side seams in one inside 1 edge st. RIGHT BAND: Worked back and forth on needle. Knit up from RS on circular needle size 4 mm approx. 110 to 130 sts along the entire right front piece, at the end of row cast on 15 new sts for collar at the back. K next row from WS - AT THE SAME TIME adjust no of sts along right front piece to 112-116-120-124-128-132 (do not inc/dec over the collar sts at the back) = 127-131-135-139-143-147 sts in total. Then work rib from RS as follows: * K 2, P 2 *, repeat from *-*, finish with K 2 and 1 edge st in garter st (= 31-32-33-34-35-36 P-sections). Continue in rib until band measures 3 cm, then inc from RS 1 P st in the last 12-12-14-14-16-16 P-sections (= inc around the neck) = 139-143-149-153-159-163 sts. When band measures 5-5-5-6-6-6 cm, cast off for button holes - see explanation above. Continue with K over K and P over P until band measures 6-6-6-7-7-7 cm, loosely cast off all sts with K over K and P over P. LEFT BAND: Cast on 15 sts on circular needle size 4 mm for collar at the back, then knit up sts along left front band as on right band. Work as right band but reversed and without button holes. ASSEMBLY: Sew collar tog mid back inside 1 edge st (with WS against WS), and sew collar to neck line at the back of neck. Sew the buttons on to the left band. |
||||||||||||||||
Diagram explanations |
||||||||||||||||
|
||||||||||||||||
 |
||||||||||||||||
 |
||||||||||||||||
Have you finished this pattern?Tag your pictures with #dropspattern #melaniejacket or submit them to the #dropsfan gallery. Do you need help with this pattern?You'll find 9 tutorial videos, a Comments/Questions area and more by visiting the pattern on garnstudio.com. © 1982-2026 DROPS Design A/S. We reserve all rights. This document, including all its sub-sections, has copyrights. Read more about what you can do with our patterns at the bottom of each pattern on our site. |
||||||||||||||||


With over 40 years in knitting and crochet design, DROPS Design offers one of the most extensive collections of free patterns on the internet - translated to 17 languages. As of today we count 324 catalogues and 12290 patterns translated into English (UK/cm). 12290
We work hard to bring you the best knitting and crochet have to offer, inspiration and advice as well as great quality yarns at incredible prices! Would you like to use our patterns for other than personal use? You can read what you are allowed to do in the Copyright text at the bottom of all our patterns. Happy crafting!
Post a comment to pattern DROPS 139-7
We would love to hear what you have to say about this pattern!
If you want to leave a question, please make sure you select the correct category in the form below, to speed up the answering process. Required fields are marked *.