
Popular categories
Looking for a yarn?


Comments / Questions (36)
![]() Régine wrote:
Régine wrote:
Mis à part la partie diagramme, les parties gauches et droites sont tricotées uniquement au point mousse ?
27.04.2026 - 17:33DROPS Design answered:
Bonjour Régine, tout à fait, les manches se tricotent elles en jersey, avec une bordure point mousse en bas. Bon tricot!
28.04.2026 - 08:17
![]() Michelle wrote:
Michelle wrote:
How is the back knit? I see that you bind off 41 stitches, but after that there are no other directions on how to shape the rest of the back.
13.02.2022 - 08:52DROPS Design answered:
Dear Michelle, each piece is worked from mid back towards mid front, ie on left front piece, the cast on edge is on mid piece, you cast on new sts for neck and cast off the 41 sts for armhole then continue working side (under sleeve/armhole), and now work the short rows to work the front piece and rounded edge. Work then right piece. At the very end, you will sew cast on edge together (= mid back). And sew shoulders (cast off sts on front piece along end of rows/side at the beg of first piece before casting off the 41 sts). Hope it will help. Happy knitting!
14.02.2022 - 10:18
![]() Daniela wrote:
Daniela wrote:
Hallo - wird das Muster M1 /M2 mehrmals in der Höhe gestrickt ? Und die 5 Maschen die aufgenommen werden nach ca. 6 cm sind die auch im Muster M1/M2 oder Kraus ? Also das Muster M1/M2 wird von anfang bis zum Schluss wiederholt ? Das verstehe ich nicht ganz... und wäre froh um Hilfe - VIELEN LIEBEN DANK
21.01.2017 - 21:16DROPS Design answered:
Liebe Daniela, M1 und M2 werden von Anfang bis zur Ende am Rand entlang gestrickt, siehe Anleitung und verkürzten Reihen. Viel Spaß beim stricken!
23.01.2017 - 10:09
![]() Atie Middelberg wrote:
Atie Middelberg wrote:
Wordt het voor- en achterpand in ribbelsteek gebreid en de mouwen in tricotsteek? Dit kan ik op de foto niet zien.
23.10.2014 - 19:57DROPS Design answered:
In het patroon staat bij elk deel beschreven in welke steek het gebreid wordt, dus als u het patroon doorleest, ziet u vanzelf hoe elk pand gebreid wordt.
23.10.2014 - 22:07
![]() Chaloup wrote:
Chaloup wrote:
Modèle très simple à réaliser si on suit bien les explications... Je l'ai réalisé sans les manches et le résultat est vraiment sympa! Que du bonheur...
28.08.2013 - 08:51
![]() Wendy Zwart wrote:
Wendy Zwart wrote:
Ik vind het een prachtig patroon. Ik snap alleen de herhalingen van de keerpunten niet. Wat is 1 herhaling? Zijn dat de eerste 6 nld zoals in de uitleg? M.vr.gr. Wendy
28.06.2013 - 10:18DROPS Design answered:
Hoi Wendy. 1 herhaling is niet alleen tot nld 6, maar daarna brei je verder met steeds 2 st meer over voor iedere keer TOT de nld alleen wordt gebreid over de st van M.1/M.2 = 1 herhaling van de keerpunten.
01.07.2013 - 11:48
![]() Chaloup wrote:
Chaloup wrote:
Bonjour, petite insertitude pour les rangs raccourcis... je répète les 6 rangs raccourcis décrits jusqu'à ce qu'il reste que les mailles M1 et ceci 3 fois ? merci
06.06.2013 - 07:22DROPS Design answered:
Bonjour Mme Chaloup, vous tricotez 2 m en moins tous les 2 rangs jusqu'à ce qu'il reste les mailles de M1/M2 puis 2 rangs sur ces mailles et ceci 3 fois au total. Vous obtenez ainsi l'arrondi du devant jusqu'aux pointillés sur le schéma. Bon tricot!
06.06.2013 - 08:45
![]() Lies Koster wrote:
Lies Koster wrote:
Ik begrijp niet hoe je het getekende patroon moet lezen. Moet je onderaan beginnen met lezen of middenin? En hoe zit het dan met de stekenaantallen?
25.12.2012 - 21:57DROPS Design answered:
Je begint onderaan en leest als volgt: 1e rij, goede kant, lees van rechts naar links. 2e rij is de verkeerde kant, lees van links naar rechts en zo voort. door de omslagen meerdert u steeds steken en vanaf nld 9 mindert u weer door samen te breien en eindigt na een volledig herhaling in de hoogte op hetzelfde aantal steken als in nld 1. Je breit volgens M.1 voor de linker voorpand en M.2 voor de rechter voorpand.
04.01.2013 - 16:45
![]() Wil Dijkstra wrote:
Wil Dijkstra wrote:
Wat is de betekenis van patroon: zwart rondje in vierkant( 4e uitleg regel teltekening)2st recht in 1 st?
17.10.2012 - 21:49DROPS Design answered:
Brei 2 st recht in 1 st
18.10.2012 - 10:08
![]() Rogier wrote:
Rogier wrote:
Bonjour je realise le modele mais je ne sais pas si je dois diminuer mes 20 fois 1 mailles a la suite des 39 m deja diminuee ou si je dois les diminuer juste avant le M1 merci
16.06.2012 - 11:26DROPS Design answered:
Bonjour Rogier, toutes ces mailles sont rabattues en début de rang sur l'endroit, donc, du côté opposé à M1. Bon tricot !
18.06.2012 - 09:33
|
|||||||||||||||||||||||||||||||
Gathering Storm#gatheringstormcardigan |
|||||||||||||||||||||||||||||||
|
|
|||||||||||||||||||||||||||||||
Knitted DROPS jacket with leaf pattern in ”Delight”. Size S - XXXL.
DROPS 121-8 |
|||||||||||||||||||||||||||||||
|
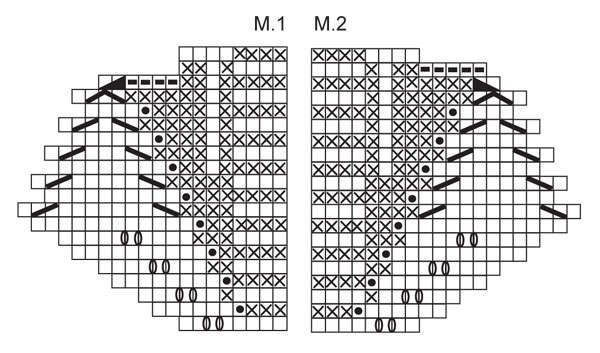
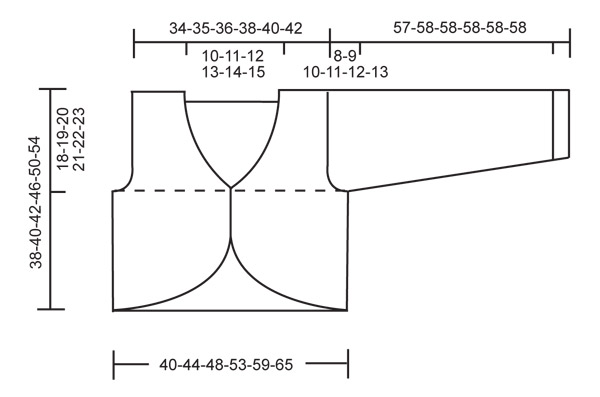
PATTERN: See diagram M.1 and M.2. Diagram shows the pattern from RS. GARTER ST (back and forth on needle): K all rows. DECREASING TIP: Make all dec from RS. Dec 1 st inside M.1/M.2 by K2 tog. TURNS: Work turns to shape the piece as follows (1 repeat): Row 1/2: work all sts, turn and work return row. Row 3/4: work row until 2 sts remain, turn and work return row. Row 5/6: work row until 4 sts remain, turn and work return row. Continue like this with 2 more sts remaining before each turn until row is only worked on sts in M.1/M.2. -------------------------------------------------------- JACKET: Worked in two pieces and sewn tog mid back afterwards. LEFT PIECE: Cast on 94-99-104-114-123-133 sts on circular needle size 3 mm with Delight. Insert a marker after 86-91-96-106-115-125 sts (as seen from RS), to mark where to work pattern. Continue as follows (row 1 = from RS): Work GARTER ST - see above - to marker and work M.1 on the remaining sts. When piece measures approx 5-5.5-6-6.5-7-7.5 cm cast on 5 sts at the end of next row from WS = 91-96-101-111-120-130 sts + M.1. Insert a marker, now measure piece from here. Continue back and forth on all sts (work M.1 as before) until piece measures 12-12-12-12.5-13-13.5 cm from marker. On beg of next row from RS cast off 41-41-40-39-36-36 sts and now cast off at the beg of every row from RS: 1 st 2-5-8-12-17-20 times = 48-50-53-60-67-74 sts + M.1. Continue back and forth until piece measures 15-16.5-18-20-22.5-24.5 cm from marker. Work 1 row from RS. On next row from WS work TURNS - see above. NOTE! Work M.1 as before. Work a total of 3 repeats of TURNS. Insert a marker, and now measure piece from here. Continue back and forth on all sts (work M.1 as before). AT THE SAME TIME cast off for armhole at beg of each row from RS: 5 sts 1 time and 1 st 2-6-9-13-18-21 times. AT THE SAME TIME when piece measures 2 cm from marker cast off to shape the neck - See DECREASING TIP! - 1 st on every 4th row a total of 12-10-10-12-13-16 times. Continue back and forth until piece measures 18-19-20-21-22-23 cm from marker. Now cast off 29-29-29-30-31-32 sts at beg of row from RS for shoulder = M.1 left on needle for collar. Continue back and forth in M.1 for approx 5-5.5-6-6.5-7-7.5 cm from shoulder (adjust to after a full vertical repeat of M.1) = neckline. Cast off with K over K and P over P. RIGHT PIECE: Like left piece but mirrored. I.e. insert a marker after 8 sts (as seen from RS). Work M.2 instead of M.1. SLEEVE: Worked back and forth on needle. Cast on 62-64-66-68-70-72 sts (includes 1 edge st each side) on needle size 3 mm with Delight. Work GARTER ST back and forth for approx 2-2-3-3-3-3 cm. Continue in stocking st with 1 edge st each side. When piece measures 7-7-8-8-8-8 cm inc 1 st each side inside 1 edge st, and repeat the inc on every 6-4.5-3.5-3-2-2 cm a total of 7-9-11-13-16-18 times = 76-82-88-94-102-108 sts. Continue until sleeve measures 49-49-48-47-46-45 cm (NOTE! less for the larger sizes because of longer sleeve cap and wider shoulders). Now cast off 4 sts each side and cast off for sleeve cap at beg of every row each side: 2 sts 3-4-4-4-5-5 times and 1 st 5-5-7-7-8-10 times, then 2 sts each side until piece measures 56-57-57-57-57-57 cm. Now cast off 4 sts 1 time each side and cast off remaining sts. Piece measures approx 57-58-58-58-58-58 cm. ASSEMBLY: Sew shoulder seams. Sew neckline to back piece. Sew seam mid back, beg at bottom edge and work up towards neckline. Sew edge to edge from RS with small neat sts to make an invisible seam. Sew sleeves tog inside 1 edge st and set in sleeves. |
|||||||||||||||||||||||||||||||
Diagram explanations |
|||||||||||||||||||||||||||||||
|
|||||||||||||||||||||||||||||||
 |
|||||||||||||||||||||||||||||||
 |
|||||||||||||||||||||||||||||||
Have you finished this pattern?Tag your pictures with #dropspattern #gatheringstormcardigan or submit them to the #dropsfan gallery. Do you need help with this pattern?You'll find 20 tutorial videos, a Comments/Questions area and more by visiting the pattern on garnstudio.com. © 1982-2026 DROPS Design A/S. We reserve all rights. This document, including all its sub-sections, has copyrights. Read more about what you can do with our patterns at the bottom of each pattern on our site. |
|||||||||||||||||||||||||||||||


With over 40 years in knitting and crochet design, DROPS Design offers one of the most extensive collections of free patterns on the internet - translated to 17 languages. As of today we count 324 catalogues and 12290 patterns translated into English (UK/cm). 12290
We work hard to bring you the best knitting and crochet have to offer, inspiration and advice as well as great quality yarns at incredible prices! Would you like to use our patterns for other than personal use? You can read what you are allowed to do in the Copyright text at the bottom of all our patterns. Happy crafting!
Post a comment to pattern DROPS 121-8
We would love to hear what you have to say about this pattern!
If you want to leave a question, please make sure you select the correct category in the form below, to speed up the answering process. Required fields are marked *.