
Popular categories
Looking for a yarn?


Comments / Questions (36)
![]() Anna wrote:
Anna wrote:
Hej igen, skulle uppskatta ett svar av frågan jag ställde för en månad sen!
14.11.2019 - 17:30
![]() Anna wrote:
Anna wrote:
Jag får inte rätt på del 1 för storlek S. Ser i frågetråden att man ska sticka två varv, göra omslag på tredje, sen sticka 3 varv, omslag på fjärde -sen börja om med två varv igen. Så det är en upprepning på 7 varv hela tiden? Det måste vara något tokigt för när jag mäter min färdiga stickningen av del 1 så stämmer den i bred (18cm) men inte i höjd (endast 32 cm, när det ska vara 41!). Vore väldigt tacksam för ett förtydligande, tack!
15.10.2019 - 20:20
![]() Yvonne Görmar wrote:
Yvonne Görmar wrote:
Das Muster ist ja eine schöne Herausforderung, und ich glaube, ich habe fast alles verstanden. Eine Frage: Warum muss man bei den Teilen 2, 4, 6 und 8 die Maschen auf einen HIlfsfaden legen? Zum Zusammennähen im Maschenstich? Oder kann man auch abketten und "normal" zusammennähen? Danke!
10.06.2019 - 13:10DROPS Design answered:
Liebe Frau Görmar, die Maschen werden dann im Maschentstich zusammengenäht, abketten können Sie, aber beachten Sie, das die Arbeit nicht zu eng wird. Viel Spaß beim stricken!
11.06.2019 - 11:50
![]() Reix wrote:
Reix wrote:
Bonsoir, j'aimerais savoir combien de pelotes il me faut pour ce modèle en taille 40 (L). De plus je voudrais que la jupe m'arrive à hauteur du genou, c'est à dire en longueur 52 cm. Combien de pelotes il faut rajouter? Merci de votre réponse. Cordialement
22.03.2018 - 19:22DROPS Design answered:
Bonjour Mme Reix, vous trouverez la quantité totale nécessaire pour chaque taille, au poids, sous l'en-tête des explications, soit 5 pelotes en taille L. Nous ne sommes malheureusement pas en mesure de pouvoir ajuster chacun de nos modèles à chaque demande individuelle, vous pouvez volontiers vous adresser à votre magasin DROPS ou à un forum de tricot pour toute assistance complémentaire pour adapter cette jupe à vos envies. Bon tricot!
26.03.2018 - 09:56Katerina wrote:
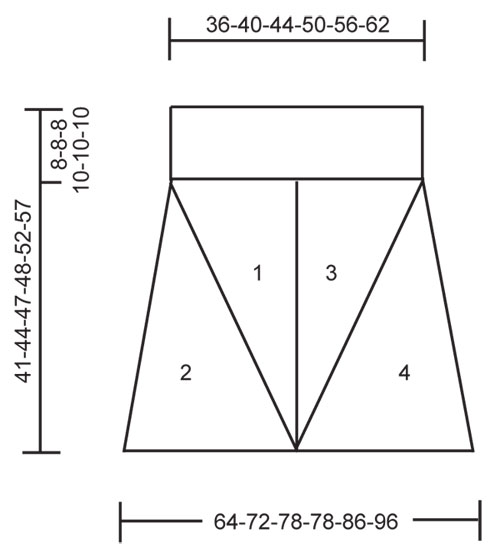
Hi! As far as I understand, first, in this pattern parts 1 and 3 are knitted from top to bottom, part 2 from right to left and part 4 from left to right. And second, the stitches from the stitch holder on part 2 are grafted with the stitches on the stitch holder from part 8. Am I right? Thank you.
03.01.2018 - 19:03DROPS Design answered:
Dear Katerina, part 1 and 3 are worked from the tip (= cast on 3 sts) to the top (= increase until there are 47-77 sts - see size). Part 2 and 4 are worked top down (= cast on 2 sts and increase until there are 78-115 sts). See also measurement chart with all parts. Happy knitting!
04.01.2018 - 13:25
![]() Tanja wrote:
Tanja wrote:
Hallo, wie ist das bei Teil 3 und 4 mit dem spiegelverkehrt stricken gemeint? Ist es so gemeint das ich da mit der hohen Maschenzahl anfange und dann entsprechend abnehme? LG Tanja
03.12.2017 - 16:21DROPS Design answered:
Liebe Tanja, spiegelverkehr bedeutet wenn Sie vor bzw nach der Markierer zugenommen haben, jetzt werden Sie nach bzw vor der Markierer zunehmen. Viel Spaß beim stricken!
04.12.2017 - 09:48
![]() Stephanie wrote:
Stephanie wrote:
Hi, do I work 3 rows and increase on that 3rd row, then work 4 rows and work inc on that row (2 inc at same side) Then again on following 3rd then again on following 4th (2 inc now at opposite side of marker). Can you explain the line on pattern, "inc 1 stitch on 3rd and 4th row alternately" please as I can't get this to work out. Thanks again for helping out.
27.06.2016 - 12:23DROPS Design answered:
Dear Stephanie, when inc alternately every 3rd and every 4th row, work as follows: *work 2 rows, inc on next row (= 3rd row), work 3 rows, inc on next row (= 4th row)* and repeat from *-*. Happy knitting!
27.06.2016 - 17:39
![]() Stephanie wrote:
Stephanie wrote:
Hi, confused starting section 1. If I inc on 3rd row, then 4th etc I'm inc 2 stitches on one side of marker then 2 stitches at other side, resulting in piece being a triangle. On chart, piece one has an angle at left and straight edge at right. Piece 3 being a mirror image and two pieces sewn together. Cannot understand why inc are not done at same side to give angle. Also can't figure out how a total of 104 stitches is enough for the waist of medium size. Help appreciated.
25.06.2016 - 13:24DROPS Design answered:
See answer below :)
27.06.2016 - 09:41
![]() Stephanie wrote:
Stephanie wrote:
Hi, confused starting section 1. If I inc on 3rd row, then 4th etc I'm inc 2 stitches on one side of marker then 2 stitches at other side, resulting in piece being a triangle. On chart, piece one has an angle at left and straight edge at right. Piece 3 being a mirror image and two pieces sewn together. Cannot understand why inc are not done at same side to give angle. Also can't figure out how a total of 104 stitches is enough for the waist of medium size. Help appreciated.
25.06.2016 - 12:26DROPS Design answered:
Dear Stephanie, you inc before last st seen from RS, so that right side of piece will be straight and left side of piece will create a diagonal. Part 1 and 3 are for front piece, you will work 2 similar pieces for back piece = 104 sts x 2 = 208 sts around the waist. Happy knitting!
27.06.2016 - 09:33
![]() Jess wrote:
Jess wrote:
Just to clarify size. Is the cm measurement on chart given for garment lying flat. So size Small would measure 64 cm from left to right and 128cm all the way around. Waist 36 flat left to right and 72cm all around waist. Thanks.
17.06.2016 - 15:46DROPS Design answered:
Dear Jess,you're right, these are the measurement for the bottom part; for size S waist measurement are 36 cm lying flat and 72 cm all the way round. Happy knitting!
17.06.2016 - 19:54
|
|
Evening Diamond#eveningdiamondskirt |
|
|
|
|
DROPS skirt in garter st in ”Delight”. Size S - XXXL.
DROPS 121-4 |
|
|
INCREASING TIP: Inc by making 1 YO, on next row K YO into back of loop to avoid a hole. BUTTONHOLES: Make buttonholes on button band. 1 buttonhole = cast off 3rd and 4th button band st and cast on 2 new sts on next row. Make buttonholes when button band measures: SIZE S + M + L: 1, 4 and 7 cm. SIZE XL + XXL + XXXL: 1, 4, 6 and 9 cm. -------------------------------------------------------- SKIRT: Worked in garter st, i.e. K all rows. The skirt is worked in 8 parts, back and forth on needle, and the parts are sewn tog afterwards. PART 1: Cast on 2 sts on circular needle size 3 mm with Delight. K 1 row from WS. Insert a marker in the 2nd st from RS. Continue back and forth on needle, AT THE SAME TIME inc as follows before marker - See INCREASING TIP: SIZE S + M + L: inc 1 st on every 3rd and 4th row alternately. SIZE XL + XXL + XXXL: inc 1 st on every 3rd row. Continue like this until there are a total of 47-52-56-63-69-77 sts on needle. Slip sts on a stitch holder. PART 2: Cast on 2 sts on circular needle size 3 mm with Delight. K 1 row from WS. Insert a marker in the first st from RS. Continue back and forth AT THE SAME TIME inc after marker: 1 st on every other row. Continue like this until there are a total of 78-87-94-94-103-115 sts on needle. Slip sts on another stitch holder. Sew part 1 to part 2, edge to edge in outer loops of sts to avoid a chunky seam. PART 3: Like part 1 but mirrored. PART 4: Like part 2, but mirrored. Sew part 3 to part 4, edge to edge in outer loops of sts to avoid a chunky seam PART 5, 6, 7 and 8: Iike part 1, 2, 3 and 4. ASSEMBLY: Sew tog part 1 / 2 and part 3 / 4 (= mid front) and part 5 / 6 and part 7 / 8 (= mid back). Sew edge to edge in outer loops of sts to avoid a chunky seam. Graft tog from WS sts on stitch holders each side. WAIST BAND: Beg on left side of piece in the middle of seam. Work all sts from stitch holders back on needle, and pick up 1-2 sts in each seam between all parts. K 1 row from WS and K 1 row from RS, AT THE SAME TIME adjust no of sts to 182-202-224-250-274-302 sts and AT THE SAME TIME cast on 6 new sts at the end of this row for button band = 188-208-230-256-280-308 sts. Continue back and forth on all sts. AT THE SAME TIME when button band measures approx 1 cm make BUTTONHOLES - see above. AT THE SAME TIME when waist band measures approx 7-7-7-8-8-8 cm dec 10-10-10-10-5-5 sts evenly (do not dec on button band) = 178-198-220-246-275-303 sts. Continue until button band measures 8-8-8-10-10-10 cm. Cast off. Sew on buttons. |
|
 |
|
Have you finished this pattern?Tag your pictures with #dropspattern #eveningdiamondskirt or submit them to the #dropsfan gallery. Do you need help with this pattern?You'll find 11 tutorial videos, a Comments/Questions area and more by visiting the pattern on garnstudio.com. © 1982-2026 DROPS Design A/S. We reserve all rights. This document, including all its sub-sections, has copyrights. Read more about what you can do with our patterns at the bottom of each pattern on our site. |


With over 40 years in knitting and crochet design, DROPS Design offers one of the most extensive collections of free patterns on the internet - translated to 17 languages. As of today we count 324 catalogues and 12290 patterns translated into English (UK/cm). 12290
We work hard to bring you the best knitting and crochet have to offer, inspiration and advice as well as great quality yarns at incredible prices! Would you like to use our patterns for other than personal use? You can read what you are allowed to do in the Copyright text at the bottom of all our patterns. Happy crafting!
Post a comment to pattern DROPS 121-4
We would love to hear what you have to say about this pattern!
If you want to leave a question, please make sure you select the correct category in the form below, to speed up the answering process. Required fields are marked *.