
Popular categories
Looking for a yarn?


Comments / Questions (33)
![]() Karen Keis wrote:
Karen Keis wrote:
Kære Drops design. Jeg er ved at strikke huen til Drops baby 19/33. Når man læser hue opskriften under 19/3 er teksten anderledes end her. På 19/3 står der ikke man skal skifte til større pind. Og når man læser både under 19/3 og 19/33 står der ikke noget om hvor lang/høj huen bliver i færdig mål. Der står kun” derefter fortsættes der i glatstrik og lys brunmeleret til færdig mål” men der er overhovedet ikke nævnt nogen mål, kun at ribben skal være 5 cm. Hvad gør jeg?
08.05.2021 - 10:29DROPS Design answered:
Hej Karen, jo om du holder den strikkefasthed som står i opskriften, så opnår du færdigt mål når du har strikket diagrammerne samt indtagningerne ifølge opskriften. God fornøjelse!
10.05.2021 - 09:25
![]() Louise wrote:
Louise wrote:
Hej. Kan inte hitta vilket mått mössan skall ha. Står att man skall sticka tills färdigt mått men hittar bara tröjan mått. Mvh Louise
22.11.2020 - 13:08DROPS Design answered:
Hei Louise. Når M.3C er ferdig strikket, skal det fortsettes med glstrikk og lys brunmelert til ferdig mål. Ferdig mål er når dette er strikket (det er ikke skrevet cm mål): – SAMTIDIG felles det nå på høyre side av alle merketrådene igjen. Gjenta fellingen på hver 2.omg totalt 3-3-4 (4-5) ganger = 24-30-24 (30-24) m på p. Strikk alle m sammen 2 og 2. Trekk tråden gjennom de resterende m og snurp sammen. mvh DROPS design
24.11.2020 - 12:51
![]() Susanne Lang wrote:
Susanne Lang wrote:
Der skal stå ryg og bærestykker
15.11.2020 - 14:08
![]() Susanne Lang wrote:
Susanne Lang wrote:
Hej, jeg kan ikke lige se hvordan der skal tages ind på bærestykket, jeg strikker den i mit eget mønster og er nået til der hvor man sætter ærmerne på rug og fodstykkerne, der hvor man har lukket de 6 masker af. Men der står bare at man skal tage ind i M 2. Men jeg kan ikke lige tyde hvor mange eller hvor jeg skal tage ind. Kan i hjælpe med det?
15.11.2020 - 14:03DROPS Design answered:
Hej Susanne, du kan se i M.2A at der bliver taget 1 maske ind på 1.pind ved at strikke 6masker og strikke de næste 2 sammen. På samme måde ser du på 5. pind i diagrammet hvor mange masker du skal have imellem indtagningerne. God fornøjelse!
18.11.2020 - 14:23
![]() Sonja wrote:
Sonja wrote:
Hej, mit spørgsmål går ud på om man kan strikke den til en trøje i st 6-9 mdr ?
26.04.2020 - 16:05DROPS Design answered:
Hei Sonja. Ja, dette er en oppskrift til en trøye og til størrelse 6/9 mnd. Les i oppskriften og der finner du størrelsene fra 1/3 mnd opp til 3/4 år. God Fornøyelse!
27.04.2020 - 14:29
![]() Cerina wrote:
Cerina wrote:
Hej! Jag förstår verkligen inte mössan. Efter det är minskat på sidan av markörerna så ska man fortsätta mönster. Men jag får inte till å stämma med mönstret, att d ligger så precis emellan varandra? Alltså att den vita hamnar mittemellan det mörkbruna.
10.12.2019 - 15:17DROPS Design answered:
Hej, Mönstret skapas helt automatiskt när man följer diagrammet. Så följ diagrammet för varje rad. Lycka till!
11.12.2019 - 09:00
![]() Nicole Anconina wrote:
Nicole Anconina wrote:
Bonjour Encore une fois, je ne comprends pas le diagramme: lorsque j'ai fait 5 rangs, il faut 3 mailles entre les motifs . Il y a une diminution à faire sur les 5 mailles suivantes donc il reste 4 mailles sur lesquelles on doit faire la maille de la croix du motif précédent et celle du motif suivant: il me manque donc une maille sur les 3. Merci pour votre aide
30.10.2019 - 17:53DROPS Design answered:
Bonjour Mme Anconina, dans M.2A, on tricote d'abord sur 8 m: donc au 1er rang: 2 m ens à l'end, 6 m = il reste 7 m. Puis au 5ème rang, on tricote les 5 premières m comme dans le diagramme et on termine par 2 m ens à l'end = on a 6 mailles. Quand M.2A est terminé, il reste 4 m dans chaque M.2A. Bon tricot!
04.11.2019 - 13:45
![]() Jette wrote:
Jette wrote:
Der står at jakken skal strikkes i retstrik, altså ret både frem og tilbage. På billeder ser det ud til at være glatstrikning ?
02.07.2019 - 19:34DROPS Design answered:
Hej Jette. Det är kun forkantm som strikkes i retstrik, ellers strikkes den i glatstrik (förutom där det är rib). Lycka till!
03.07.2019 - 08:57
![]() Marjo wrote:
Marjo wrote:
Bij het breien van de pas moet ik 11 steken minderen en komt mijn steken aantal zoals aangegeven op 172. Maar nu moet ik verder met M2A over 160 steken waar zijn dan de 12 steken gebleven. Ik kom er niet uit.
27.08.2017 - 11:35DROPS Design answered:
Hallo Marjo, Je breit eerst 4 voorbiessteken, dan M.2a over de volgende 160 stekn, dan M.2b over de volgende 4 steken, dan 4 voorbiesstken. Hiermee kom je in totaal op 172 steken.
28.08.2017 - 12:55
![]() Tina wrote:
Tina wrote:
Ich stricke die Jacke und bin bei der Passe zwei Reihen nach M2 angekommen. In der Anleitung steht 1cm * 1 re., 3 li.* stricken - heißt dass, das auf der Rückseite auch *1re.,3li.* gestrickt werden oder gespiegelt *1li., 3 re.*. Ich habe zum ersten Mal mit 2 Farben gestrickt, das Fair Isle Gestrickte ist ein wenig unregelmäßig geworden. Habt ihr einen Tipp, wie man die Jacke ein wenig glätten kann? Vielen Dank schonmal.
29.11.2015 - 23:58DROPS Design answered:
Es bedeutet, dass Sie im Rippenmuster 1 M re, 3 M li stricken, d.h. in der Rück-R entsprechend 3 M re und 1 M li, sodass also immer rechte M über rechten M liegen und linke M über linken. Glätten können Sie die Jacke, indem Sie sie am Ende etwas anfeuchten, vorsichtig in Form ziehen und dann trocknen lassen. Im Übrigen können Sie sich für die Norwegertechnik auch unsere Videos im Kopf neben dem Fotos anschauen.
05.12.2015 - 17:43
|
||||||||||||||||
First Snow Hat#firstsnowhat |
||||||||||||||||
 |
 |
|||||||||||||||
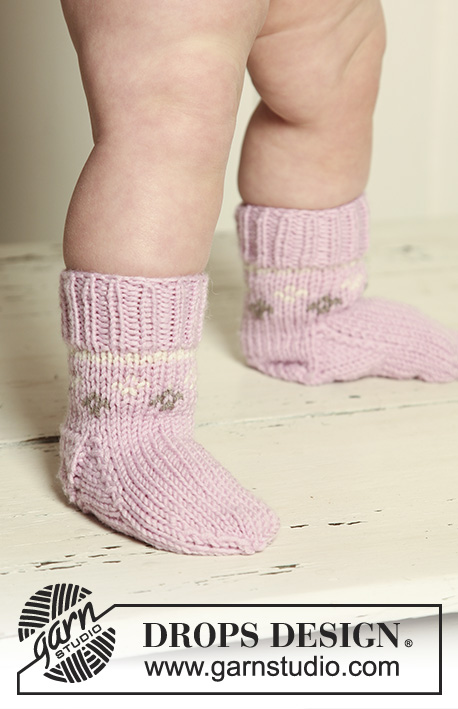
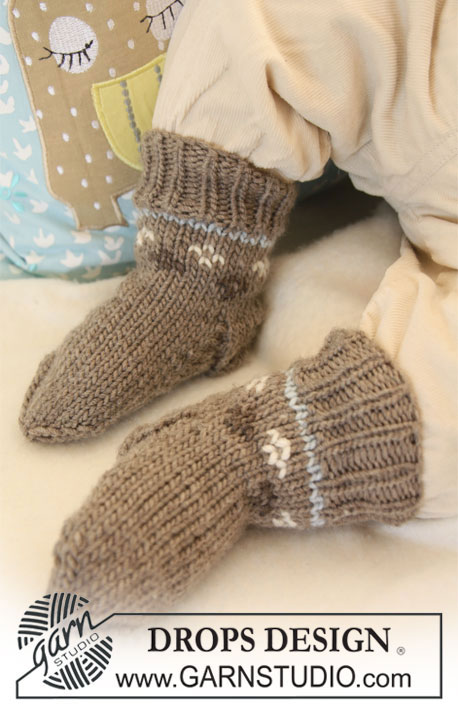
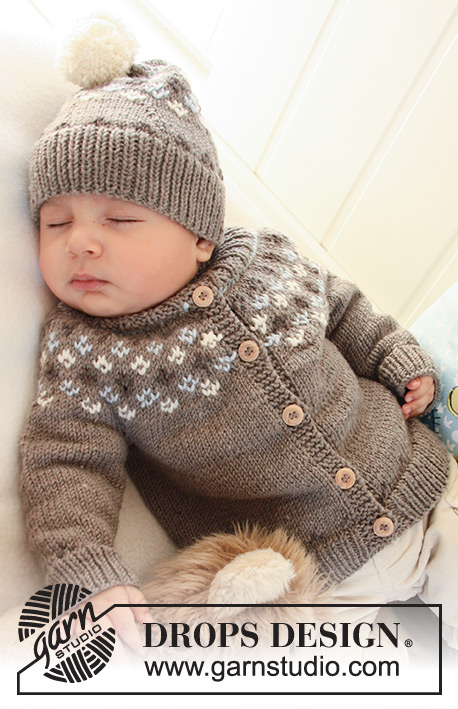
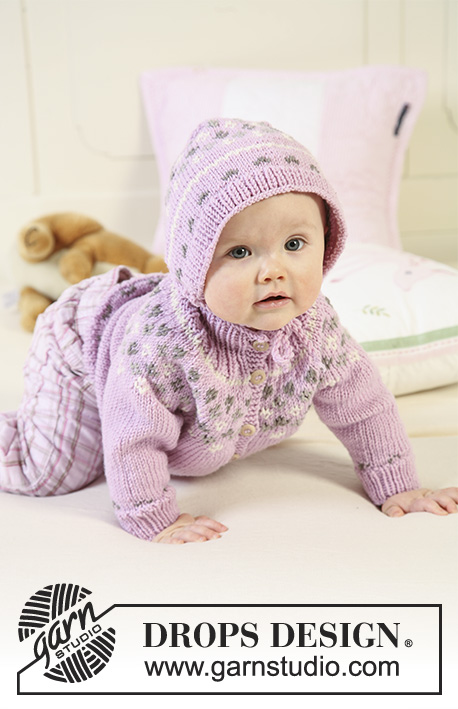
Set of knitted jacket with raglan sleeves and turtle neck, hat and socks with Nordic pattern for baby and children in DROPS Merino Extra Fine
DROPS Baby 19-33 |
||||||||||||||||
|
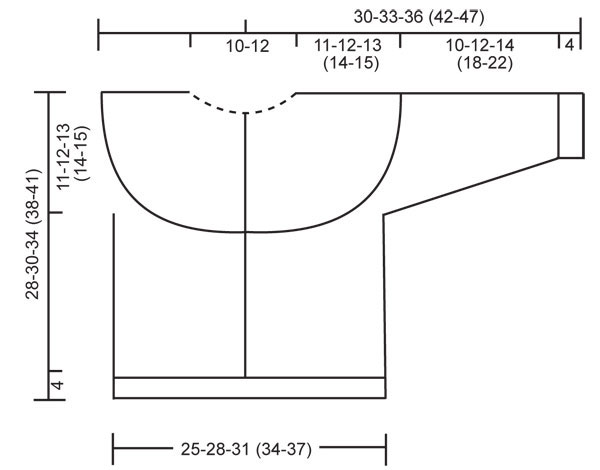
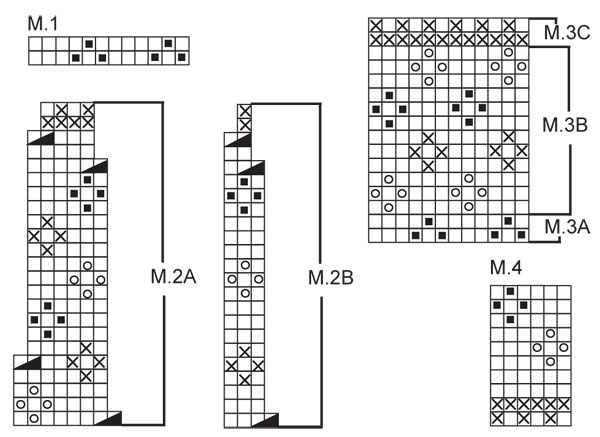
JACKET: GARTER ST (back and forth on needle): K all rows. PATTERN: See diagrams M.1 and M.2. Pattern is worked in stocking st. BUTTONHOLES: Make buttonholes on right front band. 1 BUTTONHOLE = K tog 2nd and 3rd st from mid front and make 1 YO. Make buttonholes when piece measures: SIZE 1/3 months: 2, 8, 14, 20 and 26 cm SIZE 6/9 months: 2, 8, 15, 21 and 28 cm SIZE 12/18 months: 2, 8, 14, 20, 26 and 32 cm SIZE 2 years: 2, 9, 16, 23, 30 and 36 cm SIZE 3/4 years: 2, 10, 17, 25, 32 and 39 cm The last buttonhole is made on neckline. --------------------------------------------------------- --------------------------------------------------------- BODY PIECE: Worked back and forth on circular needle from mid front. Cast on 119-133-145 (159-171) sts (includes 4 front band sts each side towards mid front) on circular needle size 3.5 mm with light brown mix. P 1 row from WS with 4 GARTER STS – see above – each side (front bands). Continue in rib as follows from RS: 4 front band sts in garter st, * K1/P1 *, repeat from *-* and finish with K1 and 4 front band sts in garter st – remember BUTTONHOLES on right front band. When rib measures 4 cm change to circular needle size 4.5 mm. Work 1 row stocking st (with front bands in garter st as before), AT THE SAME TIME dec 12-14-14 (16-16) sts evenly (do not dec on front bands) = 107-119-131 (143-155) sts. Now continue in M.1 with 4 front band sts in garter st each side. After M.1 continue in stocking st and light brown mix with front bands in garter st as before. REMEMBER THE KNITTING TENSION! When piece measures 17-18-21 (24-26) cm - adjust so that next row is from RS - work next row as follows: 26-29-32 (35-38) sts (= front piece), cast off 6 sts for armhole, 43-49-55 (61-67) sts (= back piece), cast off 6 sts for armhole, 26-29-32 (35-38) sts (= front piece). Put piece aside and knit the sleeves. SLEEVE: Worked in the round on double pointed needles. Cast on 34-36-38 (38-38) sts on double pointed needles size 3.5 mm with light brown mix. K 1 round and continue in rib, K1/P1. When rib measures 4 cm change to double pointed needles size 4.5 mm. K 1 round, AT THE SAME TIME dec 4-6-2 (2-2) sts evenly = 30-30-36 (36-36) sts. Now work M.1. After M.1 continue in stocking st and light brown mix. AT THE SAME TIME when piece measures 5 cm inc 2 sts mid under sleeve. Repeat the inc on every 4-4-6 (6-6) round a total of 5-7-6 (8-10) times = 40-44-48 (52-56) sts. When piece measures 14-16-18 (22-26) cm (inc are now complete) cast off 6 sts mid under sleeve = 34-38-42 (46-50) sts left on needle. Put piece aside and knit the other sleeve. YOKE: Slip sleeves on the same circular needle as body piece where cast off for armholes = 163-183-203 (223-243) sts. Continue back and forth on needle as follows: P 1 row from WS, AT THE SAME TIME dec 7-11-7 (11-7) sts evenly (do not dec on front bands) = 156-172-196 (212-236) sts. Work 0-1-2 (3-4) cm stocking st with light brown mix and work next row as follows from RS: 4 front band sts in garter st, M.2A on the next 144-160-184 (200-224) sts, M.2B (= 4 sts) and finish with 4 front band sts in garter st. Continue in pattern like this, AT THE SAME TIME dec sts in M.2 as per pattern diagram. After M.2 there are 81-89-101 (109-121) sts left on needle. P 1 row from WS with front band sts as before. Change to circular needle size 3.5 and work next row as follows from RS: 4 front band sts, * K1/P3 *, repeat from *-* and finish with K1 and 4 front band sts. When rib measures 1 cm dec all P3 to P2 and when rib measures 2 cm dec all P2 to P1 = 45-49-55 (59-65) sts on needle. Jacket now measures 28-30-34 (38-41) cm from cast on row to shoulder. Continue in rib K1/P1 for turtle neck (front bands as before). When rib measures 5-6-6 (7-7) cm from beg of rib make 1 buttonhole in line with the others on front band. When rib measures 6-7-7 (8-8) cm cast off with K over K and P over P. ASSEMBLY: Sew openings under sleeves. Sew on buttons. ---------------------------------------------------------------- HAT: PATTERN: See diagram M.3. Pattern is worked in stocking st. --------------------------------------------------------- --------------------------------------------------------- HAT: Worked in the round on needle from bottom up. Cast on 88-94-98 (104-106) sts on circular needle size 3.5 mm with light brown mix. Work rib, K1/P1, until piece measures 4-5-5 (6-6) cm. K 1 round, AT THE SAME TIME dec 10-10-14 (14-16) sts evenly = 78-84-84 (90-90) sts. Change to circular needle size 4.5 mm. Insert 6 markers in piece with 13-14-14 (15-15) sts between each marker. Work M.3A and then continue in stocking st and light brown mix - AT THE SAME TIME dec 1 st to the right of all markers by K2 tog (= 6 dec sts per round). Repeat the dec (with 1 less st between each dec each time) on every other round another 3 times = 54-60-60 (66-66) sts. After the last round with dec work M.3B and then continue in stocking st and light brown mix, AT THE SAME TIME dec 1 st to the right of all markers (= 6 dec sts). K 1 round and work another round with dec as before = 42-48-48 (54-54) sts. Work M.3C and then continue in stocking st and light brown mix until finished measurements, AT THE SAME TIME dec 1 st to the right off all markers as before. Repeat the dec on every other round a total of 3-3-4 (4-5) times = 24-30-24 (30-24) sts on needle. K2 tog all the way round, cut the thread, pull it through remaining sts, tighten and fasten. POMPOM: Make 1 pompom in off-white with a diameter of approx 4 cm. Attach it to the top of hat. ------------------------------------------------------------------- SOCK: PATTERN: See diagram M.4. The pattern is worked in stocking st. HEEL DECREASES: ROW 1 (= RS): work row until 5-5-5 (6-6) sts remain, slip next st as if to K, K1, psso, turn piece. ROW 2 (= WS): work row until 5-5-5 (6-6) sts remain, slip next st as if to P, P1, psso, turn piece. ROW 3 (= RS): work until 4-4-4 (5-5) sts remain, slip next st as if to K, K1, psso, turn piece. ROW 4 (= WS): work row until 4-4-4 (5-5) sts remain, slip next st as if to P, P1, psso, turn piece. Continue dec like this with 1 less st between each dec until there are 7-9-9 (9-9) sts on needle. DECREASING TIP: Dec as follows before marker: K2 tog. Dec as follows after marker: slip 1 st as if to K, K1, psso. --------------------------------------------------------- --------------------------------------------------------- SOCKS: Worked in the round on double pointed needles from top down. Cast on 34-34-40 (40-40) sts on double pointed needles size 3 mm with light brown mix. Work rib, K1/P1, for 4-4-5 (5-6) cm. K 1 round, AT THE SAME TIME dec 4 sts evenly = 30-30-36 (36-36) sts. Continue in M.4. After M.4 work 4 rounds stocking st with light brown mix, AT THE SAME TIME on first round (after M.4) dec 2-0-4 (2-0) sts evenly = 28-30-32 (34-36) sts. After the 4 rounds stocking st keep the first 15-17-17 (19-19) sts on needle for heel, and slip the remaining 13-13-15 (15-17) sts on a stitch holder (= mid upper foot). Work stocking st back and forth on heel sts for 3-3.5-4 (4-4.5) cm – insert a marker. Now work HEEL DECREASES – SEE ABOVE! After heel dec pick up 7-8-9 (9-10) new sts each side of heel and slip sts from stitch holder back on needle = 34-38-42 (42-46) sts. Continue in stocking st in the round on all sts with light brown mix, AT THE SAME TIME on first round dec as follows: K2 tog into back of loop before the 13-13-15 (15-17) sts mid upper foot and K2 tog after the 13-13-15 (15-17) sts mid upper foot. Repeat the dec on every other round a total of 4-6-6 (6-6) times = 26-26-30 (30-34) sts. When piece measures approx 8-9-9.5 (11.5-12.5) cm from marker on heel (approx 2-2-2.5 (2.5-3.5) cm remain) insert a new marker each side with 13-13-15 (15-17) sts on upper foot and under foot. Now dec for toes on each side of both markers – SEE DECREASING TIP – on every other round 2-2-3 (3-5) times and then on every round 3-3-3 (3-2) times = 6 sts left on needle. Cut the thread, pull it through remaining sts, tighten and fasten. Foot measures approx 10-11-12 (14-16) cm. |
||||||||||||||||
Diagram explanations |
||||||||||||||||
|
||||||||||||||||
 |
||||||||||||||||
 |
||||||||||||||||
Have you finished this pattern?Tag your pictures with #dropspattern #firstsnowhat or submit them to the #dropsfan gallery. Do you need help with this pattern?You'll find 25 tutorial videos, a Comments/Questions area and more by visiting the pattern on garnstudio.com. © 1982-2026 DROPS Design A/S. We reserve all rights. This document, including all its sub-sections, has copyrights. Read more about what you can do with our patterns at the bottom of each pattern on our site. |
||||||||||||||||


With over 40 years in knitting and crochet design, DROPS Design offers one of the most extensive collections of free patterns on the internet - translated to 17 languages. As of today we count 324 catalogues and 12290 patterns translated into English (UK/cm). 12290
We work hard to bring you the best knitting and crochet have to offer, inspiration and advice as well as great quality yarns at incredible prices! Would you like to use our patterns for other than personal use? You can read what you are allowed to do in the Copyright text at the bottom of all our patterns. Happy crafting!
Post a comment to pattern DROPS Baby 19-33
We would love to hear what you have to say about this pattern!
If you want to leave a question, please make sure you select the correct category in the form below, to speed up the answering process. Required fields are marked *.