
Popular categories
Looking for a yarn?


Comments / Questions (238)
![]() Judith wrote:
Judith wrote:
Last question I hope- on row where all sts are knit we are to pearl 20? InnerMost in circle. When does this occur?
13.09.2014 - 03:33
![]() Judith wrote:
Judith wrote:
Are the short rows 3 and 4?
11.09.2014 - 03:26
![]() Judith wrote:
Judith wrote:
Where is reduction of stitches-does this shift pattern?
10.09.2014 - 03:06DROPS Design answered:
Dear Judith, you reduce number of sts worked when working short rows. Pattern won't be shifted, but you will then work more rows on the outer edge of circle and less on the middle (inwards) of the circle to get the correct shape. Happy knitting!
10.09.2014 - 09:31
![]() Judy wrote:
Judy wrote:
So the pattern shows two rows of right side?
09.09.2014 - 23:06DROPS Design answered:
Dear Judy, in diagrams, 1 square = 1 st x 1 row, so that you see the 4 first rows over the first 16-20 sts + 2 rows (1 row from RS + 1 row from WS) over the last sts. Happy knitting!
10.09.2014 - 09:32
![]() Judy wrote:
Judy wrote:
Can't get started. Does the printed pattern show two rows? Which end do I decrease at.
09.09.2014 - 03:13DROPS Design answered:
Dear Judy, start the pattern on the bottom corner on the right side from RS (with the 18-16-20-20 sts for edge) towards the left side (towards middle of circle), and from WS work from the mid of circle towards the outer edge. Pattern is a 4 rows repeat on the first sts from RS, and a 2 rows repeat on the other sts. Reduce the number of sts worked every time you work row 1 (from RS). Happy knitting!
09.09.2014 - 09:06
![]() Hanne Korsbæk wrote:
Hanne Korsbæk wrote:
Når man vender for 24.gang (svare til 2 pind i jeres forklaring) på pind nr.94 få jeg en vending efter 16 masker. Skal jeg da skrikke pind 95 og 96 som 3.og 4. pind jf. jeres forklaring? Da får jeg jo 2 vendinger i samme mellemrum og huldet bliver stort. Kan dette passe?
05.09.2014 - 20:53
![]() Tina wrote:
Tina wrote:
Teil 2 d. Frage: Bedeutet das, dass ich nun keine verkürzten Reihen mehr stricken soll? Also geradeaus in kompletten Reihen nach oben? Aber dann würde es sicher kein Kreis, oder? Ab wann soll ich dann wieder verkürzte Reihen stricken? Beginne ich wieder genau von vorn, also wieder 2 M kürzer (10 mal), 4 M weniger (9 mal) usw.? Vielen Dank schon mal!
01.09.2014 - 21:54DROPS Design answered:
Genau, wenn Sie die verkürzten R 1x wie beschrieben gestrickt haben und nur noch 16 M ganz außen übrig sind, beginnen Sie mit den verkürzten R wieder von vorn, d.h. Sie wiederholen wie zuvor die 1.-4. R. wie beschrieben. Beachten Sie, wenn Sie wieder über alle M stricken, den Stricktipp 2.
01.09.2014 - 22:57
![]() Tina wrote:
Tina wrote:
Hallo! Ich bin jetzt soweit, dass ich die verkürzten Reihen soweit gestrickt habe "bis aussen am Kreis nur noch 16 M. übrig sind. Jetzt wieder über alle M. stricken." Teil 2 d. Frage folgt
01.09.2014 - 21:52Michelle wrote:
Yes, this part I can totally understand. The problem happened when I was making the last st reduce by 8 stitches ( starting the 45th row), I was turning at the outmost 18 sts, where I just made a turn for last 3rd/ 4th rows. And if I do make a turn here, knit back the remained 18 sts (the 46th row), and knit 47th & 48th (3&4 on M.1) rows to finish this last round of short rows, the hole between st 18th and 19th would be quite big. How can I fix it?
20.01.2014 - 17:09DROPS Design answered:
Dear Michelle, after reducing number of sts to the outermost 18 sts, just work 2 rows on these and start again short rows over all sts from beg. Happy knitting!
21.01.2014 - 08:55Michelle wrote:
Hi, I'm at the end of making the first piece of circle, and I found that when I made the 5th 8st-reduce turning, I was actually turning at the 18 outermost st of circle, where I just made a 3rd/ 4th turning last round. And if I continued to work with chart M.1, I was actually making 3 consecutive turns here and it's becoming a really huge hole. Was I counting incorrectly? How do I do to prevent from a huge hole here?
20.01.2014 - 05:24DROPS Design answered:
Dear Michelle, you work M.1 at the same time as short rows, so after first 4 rows, repeat rows 1 & 2 with 2 sts less, then repeat rows 3 & 4 on 18 sts, ie rows 5&6 are worked on 100 sts, and 7&8 on 18 sts, and so on. Happy knitting!
20.01.2014 - 10:48
|
||||||||||||||||
Blue Moon |
||||||||||||||||
 |
 |
|||||||||||||||
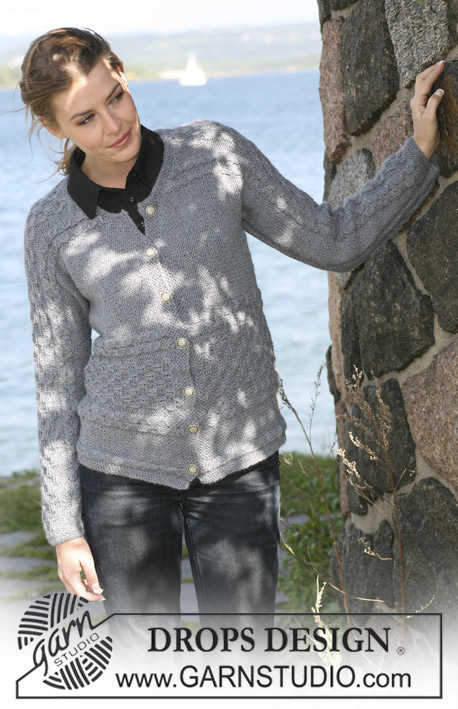
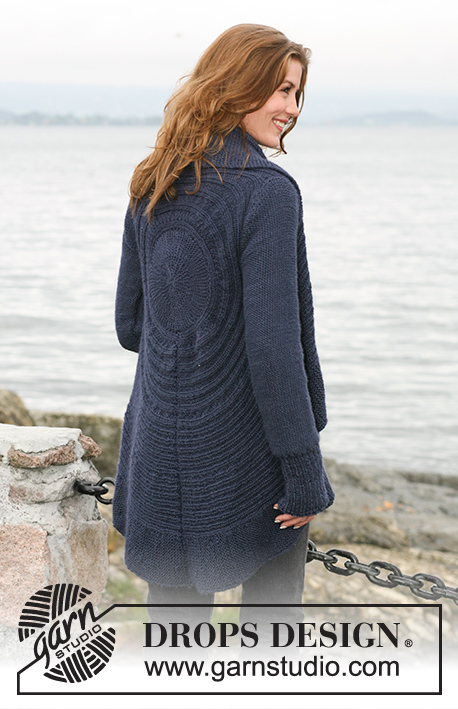
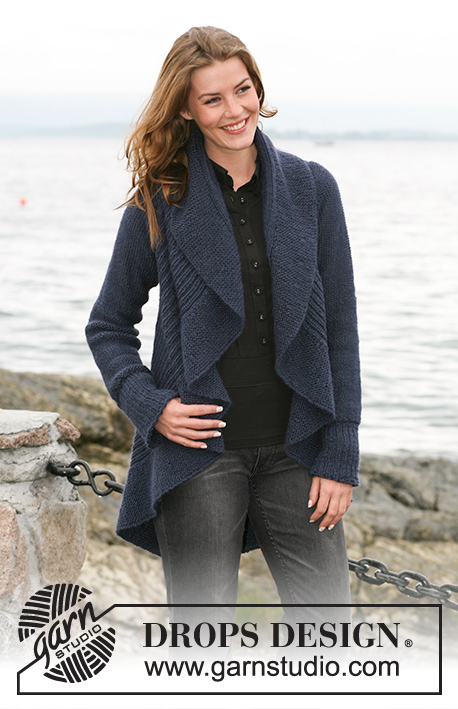
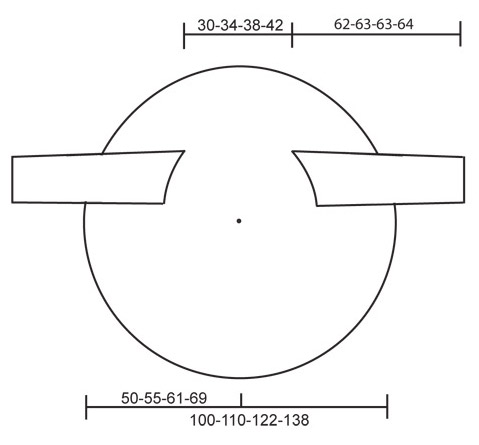
Knitted circular jacket in DROPS Silke Alpaca or DROPS Air, with texture pattern Size: S – XXXL
DROPS 102-6 |
||||||||||||||||
|
Knitting tension: 17 sts x 22 rows stocking sts = 10 x 10 cm Pattern: See diagram M.1. Diagrams are seen from RS. NOTE: Each size has own diagram. Short rows: Work short rows to ensure circular shape of piece, as follows: 1st / 2nd row: Knit 102-112-124-140 sts, turn piece and knit back. 3rd / 4th row: Knit back and forth over 18-16-20-20 first sts on row (these sts = outermost on circle) – read knitting tip 1 below. Repeat 1st to 4th rows, but reduce stitch number by 2 sts on every 1st/2nd row before turning piece – repeat this 10-10-12-12 times in total, then reduce sts number knitted by 4 sts before piece is turned – repeat this 6-9-8-12 times in total and from this point reduce sts number by 8 sts before piece is turned – repeat 5-5-6-6 times in total. Remaining are 18-16-20-20 outermost sts of circle. Start again from beginning over all sts. – read Knitting tip 2 below. Knitting tip 1: When turning piece slip the first st as if to knit and tighten yarn before continuing knitting. This is done to avoid holes when turning. This does not applies to innermost 20-20-24-24 sts of circle – when piece is turned knit all sts as normal. Knitting tip 2: On row where all sts are knit, P 20-20-24-24 innermost sts in circle (seen from RS). Then continue as before with chart M.1. Measuring tip: All measurements on circle are done with piece lying flat. Do not measure across! Measurements follow curve to 63rd - 69th -73rd - 81st sts. Circle: Knit piece back and forth on needle to make room for all sts. Cast on 102-112-124-140 sts on circular needle size 4.5 mm with Silke Alpaca or Air. Insert 1 marking thread or stitch marker after 63-69-73-81 sts, make all measurements from this point. Knit chart M.1 (see diagram for your size) from right to left (i.e. from outside towards inside on circle) 1st row = RS. At the same time as chart M.1 knit Short rows – see explanation above – to make circular shape. When piece measures 37-40-49-57 cm from marking thread or stitch marker – read measuring tip – knit armholes. Armhole: Slip outermost 63-69-73-81 sts onto an extra needle size 4.5 mm (circular needle to make room for all sts). Continuing, cast off next 2 sts (= armhole). Insert 1 marking thread or stitch marker between 2 cast off sts. Leave remaining sts on needle. Continuing, knit 2 parts (sts before and after armhole) separately, but knit them at the same time on separate needles with separate balls of yarn. This is done so the short rows are correct on both sides of armhole. Continue with pattern and short rows as earlier. When armhole measures 18-21-23-25 cm cast on 2 new sts over armhole(i.e. between the 2 parts). Continuing, slip all sts onto one needle again = 102-112-124-140 sts. Insert 1 marking thread or stitch marker after 63-69-73-81 sts. Continuing, measure piece from this point. Now knit chart M.1 and short rows on all sts. Continue like this until piece measures approx 15-17-19-21 cm, this should be a ½ circle. Continue until piece measures approx 30-34-38-42 cm from marking thread – read measuring tip. Now make armholes in same way. When all sts are back on one needle again insert 1 marking thread or stitch marker after 63-69-73-81 sts. Continue measuring from here. Continue with M.1 and short rows until piece measures approx 37-40-49-57 cm from marking thread or stitch markers (adjust to 1 whole pattern repeat with short rows). Cast off loosely. Sleeve: Knit piece back and forth on circular needles. Cast on 56-59-65-68 sts (incl 1 front edge sts on each side) on needles size 4.5 mm with Silke Alpaca or Air. P1 row from WS. Continue with Rib K2/P1 and 1 edge sts on each side. When Rib measures 13-13-14-14 cm K 1 row from WS at the same time dec 10-11-13-14 sts evenly = 46-48-52-54 sts. Continue in stocking sts with WS out until complete measurement. When piece measures 16 cm inc 1 sts on each side on every 9 -4.5 -3.5 -3 cm 5-9-11-13 times in total = 56-66-74-80 sts. When piece measures 56 cm cast off top shape sleeve top on each side on every other row: 4 sts 1-2-2-2 times. Continuing, cast off 2 sts on each side until piece measures approx 61-62-62-63 cm. Then cast off 4 sts 1 time on each side. Piece measures approx 62-63-63-64 cm. Cast off remaining sts. Assembly: Sew circle tog in outermost edge of cast on sts and cast off edge. Sew in sleeves so seams under sleeve meet at middle of marking thread or stitch marker placed at bottom of armhole and middle of sleeve top meet marking thread or stitch marker placed on top of armhole. Sew sleeve seams. |
||||||||||||||||
Diagram explanations |
||||||||||||||||
|
||||||||||||||||
 |
||||||||||||||||
 |
||||||||||||||||
Have you finished this pattern?Tag your pictures with #dropspattern or submit them to the #dropsfan gallery. Do you need help with this pattern?You'll find 15 tutorial videos, a Comments/Questions area and more by visiting the pattern on garnstudio.com. © 1982-2026 DROPS Design A/S. We reserve all rights. This document, including all its sub-sections, has copyrights. Read more about what you can do with our patterns at the bottom of each pattern on our site. |
||||||||||||||||


With over 40 years in knitting and crochet design, DROPS Design offers one of the most extensive collections of free patterns on the internet - translated to 17 languages. As of today we count 324 catalogues and 12245 patterns translated into English (UK/cm). 12245
We work hard to bring you the best knitting and crochet have to offer, inspiration and advice as well as great quality yarns at incredible prices! Would you like to use our patterns for other than personal use? You can read what you are allowed to do in the Copyright text at the bottom of all our patterns. Happy crafting!
Post a comment to pattern DROPS 102-6
We would love to hear what you have to say about this pattern!
If you want to leave a question, please make sure you select the correct category in the form below, to speed up the answering process. Required fields are marked *.