
Popular categories
Looking for a yarn?


Comments / Questions (23)
![]() Sylvia Karlsson wrote:
Sylvia Karlsson wrote:
Fråga Jag förstår inte hur jag ska göra när jag stickar picotkanten från hals till nederkanten, dessa 8 varav förbryllar mig. snälla hjälp mig
20.02.2015 - 08:55
![]() Benedetta wrote:
Benedetta wrote:
Buongiorno,rieccomi per un altro passaggio.quando avvio le nuove 14 m dove le avvio sul ferma maglie o sulle maglie che sono rimaste in attesa?quindi il lavoro viene completamente staccato dalle maglie per il dietro?scusatemi forse sono poco chiara!grazie
21.06.2014 - 10:33DROPS Design answered:
Buonasera Benedetta. Dopo aver messo le m in attesa, sul ferro rimangono 47-49-51-53-56 m (a seconda della taglia) che corrispondono alla spalla. Su questi ferri, avvii 14 m. Inizialmente lavorerà solo su queste nuove m e resteranno staccate dal resto del lavoro. Dopo gli aumenti e dopo 2 cm, riprenderà a lavorare su tutte le m, unendo così le nuove m per la manica alla spalla. Ci riscriva se non è chiaro. Buon lavoro!
21.06.2014 - 22:27
![]() Benedetta wrote:
Benedetta wrote:
Buongiorno,non capisco questo passaggio: (davanti sx -inizio manica)avviare 14 m nuove sulle m sul ferma maglie,ma poi dove continuo a lavorare andando verso lo scollo ele passo sul ferro insieme alle m che vanno verso lo scollo tralasciando le m. Del fianco?grazie mille
20.06.2014 - 17:18DROPS Design answered:
Buonasera Benedetta. Dopo aver avviato le 14 m, lavora solo su queste m, aumentando come indicato per avere tutte le m della manica. Dopo 2 cm lavora anche le m della spalla (le m verso lo scollo), tralasciando per il momento le m del fianco. Finita la manica, riprenderà a lavorare le m del fianco. Ci riscriva se ancora in difficoltà. Buon lavoro!
20.06.2014 - 21:40
![]() Benedetta wrote:
Benedetta wrote:
Buongiorno, non capisco bene questo passaggio:il bordo a picot si comincia dopo aver lavorato i 2,5 cm per il bordo o in contemporanea? Grazie per il vs preziosissimo aiuto!
12.06.2014 - 11:21DROPS Design answered:
Buongiorno Benedetta, il bordo a picot inizia dopo aver lavorato i 2,5 cm, quando iniziano i ferri accorciati. Buon lavoro!!
12.06.2014 - 13:45Merethe wrote:
Meget fin og let.
11.01.2007 - 14:27
![]() Marianne wrote:
Marianne wrote:
Super flot
03.01.2007 - 19:43birgitta wrote:
Söt och mer änvändbar än den med korta armar.
21.12.2006 - 15:42
![]() karin wrote:
karin wrote:
fin og let
19.12.2006 - 15:26
![]() lotti hellströ wrote:
lotti hellströ wrote:
helt bedårande!
13.12.2006 - 12:32ma wrote:
Mycket fin; enkel, användbar, bekväm.
12.12.2006 - 21:55
|
|||||||||||||
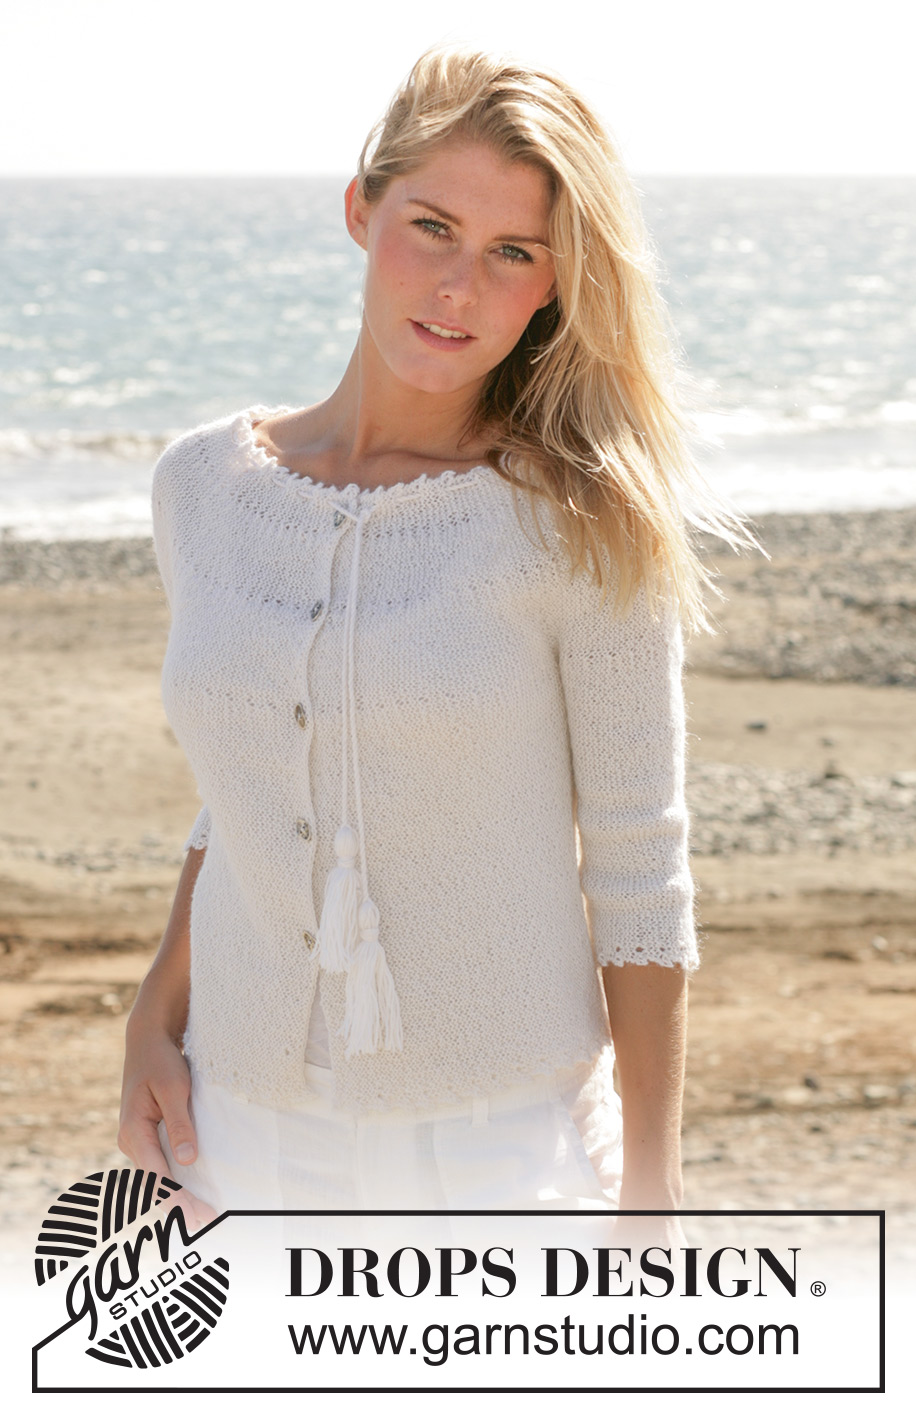
Tossed Tassel Cardigan#tossedtasselcardigan |
|||||||||||||
|
|
|||||||||||||
DROPS jacket in garter sts knitted from side to side with picot borders in “Alpaca”.
DROPS 100-7 |
|||||||||||||
|
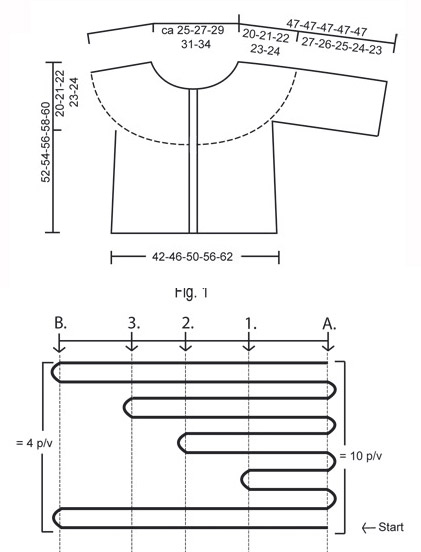
Knitting tension: 23 sts x 45 rows on needles size 3 mm in garter sst = 10 x 10 cm. Knitting tips -1: For every turning slip first st as if to knit and tighten the thread in order to avoid a hole in the transitions. Knitting tips –2: When knitting with a 4 ply yarn on small needles it is always a good idea to finish a row before putting the work aside. This will make it as even as possible. Turnings: See Fig. 1. Knit with shortened rows in the middle of piece to slightly shape the jumper. *knit from bottom edge on all sts to neckline, turn and knit return row. - knit to MT-1, turn and knit return row turn – see Knitting tip - knit to MT-2, turn and knit return row - knit to MT-3, turn, knit return row - knit on all sts, turn and knit return row* Repeat from *-*. Picot border: When knitting the picot border on neckline, only the 4 rows knitted all the way to neckline (see Fig.1) are part of the pattern. Knit picot border as follows: Row 1 to 6: garter sts Row 7: knit garter sts until 4 sts left on needle and knit these as follows: K2 tog, yo, and knit 2 sts in each of the remaining 2 sts = 2 new sts on row Row 8: slip 1 st as if to knit, K1, psso, K1, lift 2nd st on right needle over 1st st = 2 dec sts on row. Finish row in garter st. Repeat row 1-8. The jacket is knitted from side to side from bottom edge towards collar in garter st. Beg mid front on left front piece, continue on sleeve, back piece, the other sleeve, and then right front piece. Read knitting tips-2 Left front piece: Loosely cast on 110-115-120-124-129 sts on needle size 3 mm with Alpaca. The garment is knitted in garter sts through out, i.e. knit on all rows. Insert 3 marking threads, from bottom edge towards the collar, as follows: MT-1 after 68-71-74-76-78 sts MT-2 after 87-92-95-97-101 sts MT-3 after 101-106-110-113-117 sts Leave all MT in the same place until piece is completed to make sure the shortened rows are in line throughout. The number of sts before and after the marking threads will vary because of the picot border. 1st row = RS (from bottom edge towards neckline). Knit approx 2.5 cm over all sts = front band (last row should be from neckline towards bottom edge). Now continue (from RS = from bottom edge) with turnings as described above, at the same time knit picot border – see above - at the end of each row (i.e. at neckline on 1st row and at bottom edge on 2nd row). Continue like this until piece measures approx 22.5-24.5-26.5-29.5-32.5 cm (measured inside the picot border at bottom edge). Piece measures approx 10.5-11.5-12-13.5-14.5 cm from casting on row at neckline. Now continue with side piece as follows: Knit 1 cm but only on the 63-66-69-71-73 sts towards bottom edge. Insert a MT (= mid side). Knit 1 cm on the 63-66-69-71-73 sts and put them on a thread or a stitch holder (to be used for back piece). Continue with sleeve. Left sleeve: = 47-49-51-53-56 sts on needle. Loosely cast on 14 new sts over sts on thread or stitch holder. Continue but only on the new sts (= edge under sleeve), at the same time cast on new sts on every other row: 15-14-14-13-13 sts 2 times and 17-17-15-15-12 sts 1 time. At the same time after 2 cm continue on all sts on needle. Knit with turnings - see explanation above - and picot border at neckline. After all inc are complete = 108 sts on needle. Now also knit picot border at the bottom of sleeve. Continue like this until piece measures approx 22-24-24-25-26 cm from the last row with inc for sleeve (adjust to after a full repeat of the picot border pattern at sleeve). Loosely cast off the lower 17-17-15-15-12 sts on sleeve and cast off sts on every other row: 15-14-14-13-13 sts 2 times and 14 sts 1 time = 47-49-51-53-56 sts left on needle. Back piece: Put the 63-66-69-71-73 sts from thread back on needle = 110-115-120-124-129 sts. Continue with turnings and picot border at neckline and bottom edge. When piece measures approx 21-23-25-28-31 cm (measured from inside the picot border at bottom edge) from MT at the side, insert a new MT = mid back (piece measures approx. 28-31-33-35-37 at the neck, measured from the casting on edge mid front). Continue until piece measures approx 20-22-24-27-30 cm (measured from inside the picot border at bottom edge) from MT mid back. Now knit side piece as follows: 1 cm but only on the 63-66-69-71-73 towards bottom edge. Insert a MT (= mid side). Knit 1 cm on the same 63-66-69-71-73 sts and then put these sts on a thread or a stitch holder. Right sleeve: Knit like left sleeve. Right front piece: Put the 63-66-69-71-73 sts from thread or stitch holder back on needle = 110-115-120-124-129 sts. Continue with turnings as on back piece. Knit the same number of rows as on left front piece and then knit front band as follows: Knit 1.5 cm on all sts. On next row make 5-5-6-6-6 buttonholes as follows (beg from bottom edge): Knit 27-28-23-27-27 sts, K2 tog, make a yo, knit 17-18-16-16-17 sts, K2 tog, make a yo, knit 17-18-16-16-17 sts, K2 tog, make a yo, knit 17-18-16-16-17 sts, K2 tog, make a yo, knit 17-18-16-16-17 sts, K2 tog, make a yo. Size L, XL and XXL: Knit 16-16-17 sts, K2 tog, make a yo. All sizes: Now knit the 5 last sts towards neckline. Turn and knit return row. Then knit approx 1 cm on all sts (adjust to a full repeat of the picot border pattern) and cast off loosely. Assembly: Sew under arm seams with small, neat sts. Seam will be displaced 1 cm off the middle of sleeve because of the edge knitted under the sleeve. Sew opening under the arms. Sew on buttons. Ribbon: Cut 2 threads measuring approx 300 cm each. Twist until they resist and fold them double. Tie a knot either end and pull ribbon through the picot border at neckline. Tassel: Make a tassel for each end: Cut a total of 28 threads measuring 20 cm each. Fold them double and wind one of the treads round the top of tassel to keep it in place. Attach to end of ribbon. |
|||||||||||||
Diagram explanations |
|||||||||||||
|
|||||||||||||
 |
|||||||||||||
Have you finished this pattern?Tag your pictures with #dropspattern #tossedtasselcardigan or submit them to the #dropsfan gallery. Do you need help with this pattern?You'll find 17 tutorial videos, a Comments/Questions area and more by visiting the pattern on garnstudio.com. © 1982-2026 DROPS Design A/S. We reserve all rights. This document, including all its sub-sections, has copyrights. Read more about what you can do with our patterns at the bottom of each pattern on our site. |
|||||||||||||


With over 40 years in knitting and crochet design, DROPS Design offers one of the most extensive collections of free patterns on the internet - translated to 17 languages. As of today we count 324 catalogues and 12290 patterns translated into English (UK/cm). 12290
We work hard to bring you the best knitting and crochet have to offer, inspiration and advice as well as great quality yarns at incredible prices! Would you like to use our patterns for other than personal use? You can read what you are allowed to do in the Copyright text at the bottom of all our patterns. Happy crafting!
Post a comment to pattern DROPS 100-7
We would love to hear what you have to say about this pattern!
If you want to leave a question, please make sure you select the correct category in the form below, to speed up the answering process. Required fields are marked *.