
Popular categories
Looking for a yarn?


Comments / Questions (166)
![]() Adéla Honcikova wrote:
Adéla Honcikova wrote:
Hello. Although I am knitting the sleeve from the underarm according to A2, the number of stitches is increased and the sleeve is getting wider. Knitting every 3 cm is not enough. This part of the pattern is not clearly described and seems to me to be incorrect. Or am I wrong? I have mended the sleeve twice and still can't get a successful finish. Please advise. Thank you
12.10.2024 - 11:56DROPS Design answered:
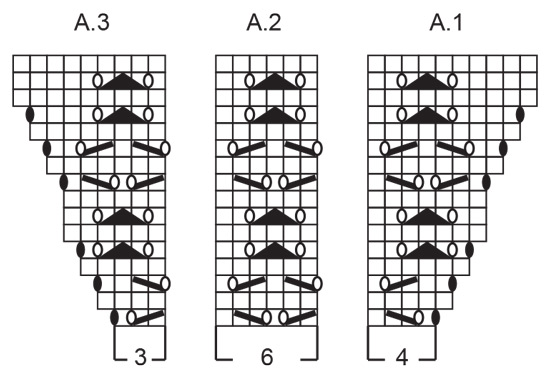
Dear Adéla , if you are working A.2 then the number of stitches shouldn't change. As you can see in the chart itself, there is always the same number of stitches, since the decreases and increases even themselves out. A.1 and A.3 are also worked, but without increases (just as before, at the end of the yoke), so they look exactly like A.2 in that case, and you can simply substitute them for A.2. After the first 3 or 4cm (depending on your size) you start decreasing every few cm, so the sleeve will slowly get narrower, not wider. Happy knitting!
13.10.2024 - 23:04
![]() Redureau Monique wrote:
Redureau Monique wrote:
Est-ce que je pourrais avoir la traduction en français de ce modèle ?
12.10.2024 - 09:55DROPS Design answered:
Bonjour Mme Redureau, volontiers, cliquez à chaque instant sur le menu déroulant à gauche de l'icone "imprimante" pour changer de langue, ou bien ici pour celui-ci. Bon tricot!
14.10.2024 - 10:01
![]() Cristina wrote:
Cristina wrote:
Boa tarde. Estou a fazer o tamanho L. No encaixe diminui 12 malhas e fiquei com 102 malhas. ao dividir as malhas pelas costas, frentes e mangas sobram 4 malhas: - 15 malhas ( meias costas) -19 malhas ( mangas) -30 malhas (frente) -19 malhas ( mangas) - 15 malhas ( metade das costas). Esta divisão dá 98 malhas e as 102 que deve ter. Está correto? Obrigada Cristina Cardoso
03.10.2024 - 19:55DROPS Design answered:
Bom dia, Dever contar também as malhas em que colocou os marcadores, o que dá 102 malhas. Exemplo: 15 malhas + 1 malha com o marcador + 19 malhas + 1 malha com o marcador, etc. Bons tricôs!
07.10.2024 - 10:31
![]() Donna Bertrand wrote:
Donna Bertrand wrote:
OMG, what brilliant insight!! Thank you so much!
30.09.2024 - 01:36
![]() Donna Bertrand wrote:
Donna Bertrand wrote:
Hi there, I'm knitting Remembering Spring in XL. The 2nd paragraph in the Yoke section says to "work A1 & A2 over next 12 stitches", but the diagram only covers 11 stitches. Do I repeat the 1st and 2nd stitch in A1 (y/o, no hole + K1) to involve the 12th stitch? That would give me 10 stitches to work with to get to the 2nd marker. To get there, do I work A3 3x, followed by the one K1 stated in the written instructions? If I can get this sorted, I'll be on my way - thank you for helping!
29.09.2024 - 22:17DROPS Design answered:
Dear Donna, the instructions are separated by commas. Work A.1 (1 time), work A.2 over the next 12 stitches (so 2 times, since A.2 = 6 stitches). Happy knitting!
29.09.2024 - 23:51
![]() Yvonne De Jager wrote:
Yvonne De Jager wrote:
Er staat een foutje bij de uitleg van het telpatroon: 0 (open rondje)= zodat er gaatjes ontstaan ipv geen gaatjes
25.09.2024 - 15:04
![]() Doudan wrote:
Doudan wrote:
Je suis sur les manches et je ne comprends pas. Si je suis le point fantaisie correctement je me retrouve avec des augmentations donc arrivée au 4 cm de hauteur j'aurais bien plus que 79 mailles (taille XL), et les diminutions ne me feront pas arriver à 59 m. Faut-il ne pas faire les augmentations??? Merci de votre attention
23.08.2024 - 21:29DROPS Design answered:
Bonjour Mme Doudan, lorsque vous terminez les manches, vous n'augmentez plus, vous tricotez simplement les 79 mailles comme avant (tricotez en jersey les mailles sous la manche que l'on ne peut plus tricoter en point ajouré) pendant 4 cm puis commencez à diminuer jusqu'à ce qu'il reste 59 mailles. Bon tricot!
26.08.2024 - 07:40
![]() Ene-Rita Sjögren wrote:
Ene-Rita Sjögren wrote:
Var görs raglanökning för fram och bakstycke stl L, finns det inritat i diagrammet för ärmmönster?
23.08.2024 - 12:35DROPS Design answered:
Hei Ene-Rita. Det er ingen diagram for økninger til forstykket og bakstykket. Økningene er forklart i oppskriften (= øk på hver 2.omgang totalt 26 ganger, str L). Økningene til ermene er tegnet inn i diagrammene (A.1 & A.3). mvh DROPS Design
26.08.2024 - 09:31
![]() Ene-Rita Sjögren wrote:
Ene-Rita Sjögren wrote:
ökn. ragglan ?? det sätts 4 markörer, enl mönster skall det ökas till raglan stl L vartannat varv, armens mönster stickas tror jag enligt bild där man börjar med 4+6+3 (längst ner)sen ökar hela vägen enl diagrammet, då sitter ju markören för raglan längre in på armen när det ökas i armen, var finns info om var raglanökningen skall vara, ser ut enligt bilden att det skall vara före mönstret börjar på armen, inte vid markören (som det står) finner inte svar på detta??
23.08.2024 - 12:15
![]() Helena wrote:
Helena wrote:
Dobrý den, už jsem návod pochopila, pomohla mi Vaše odpověď na dotaz od Micky, děkuji
15.08.2024 - 09:19
|
|||||||||||||||||||
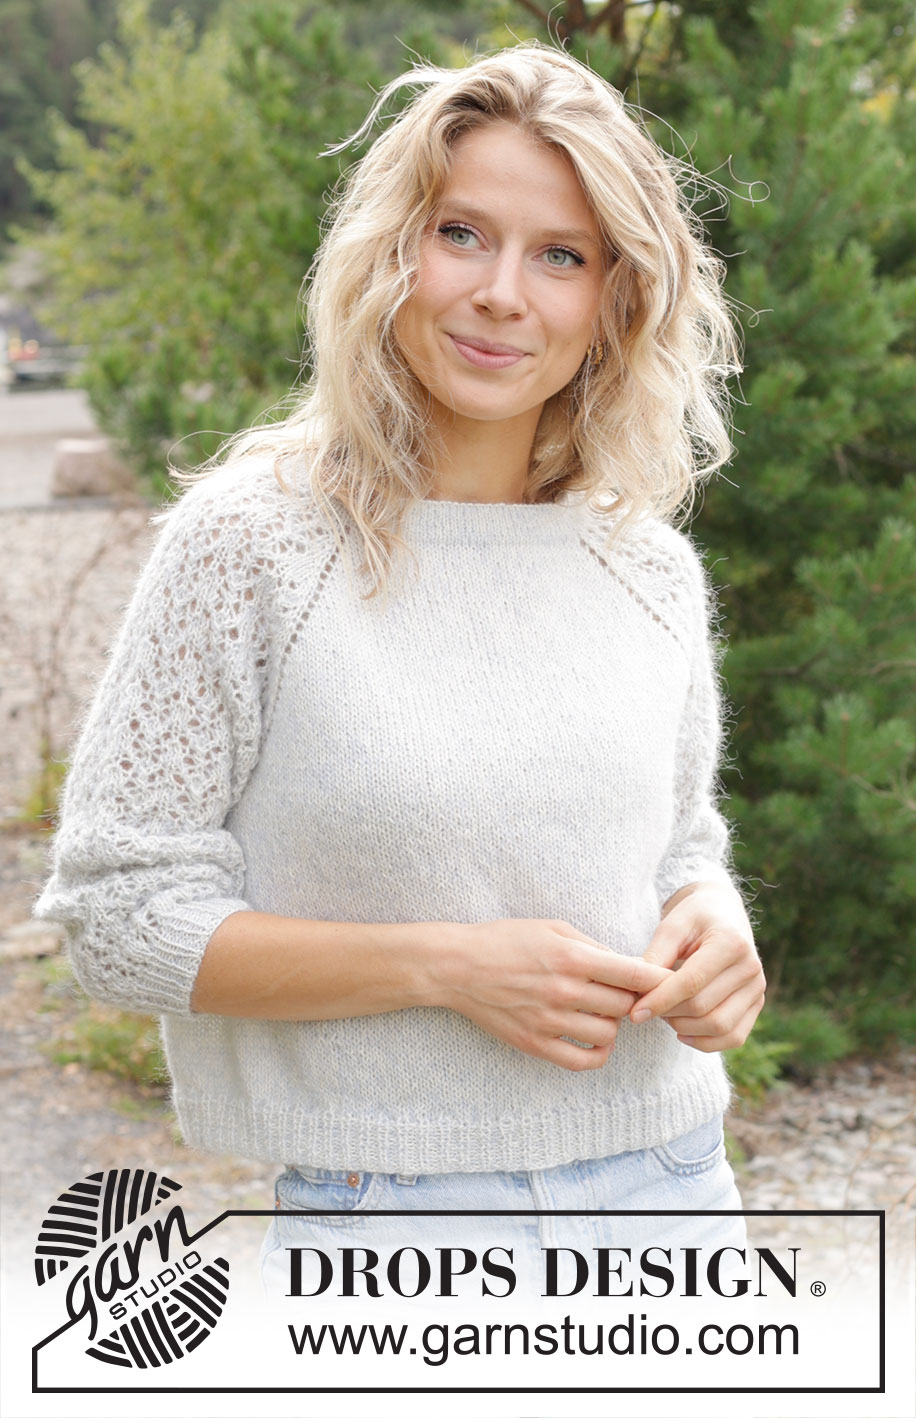
Remembering Spring#rememberingspringsweater |
|||||||||||||||||||
 |
 |
||||||||||||||||||
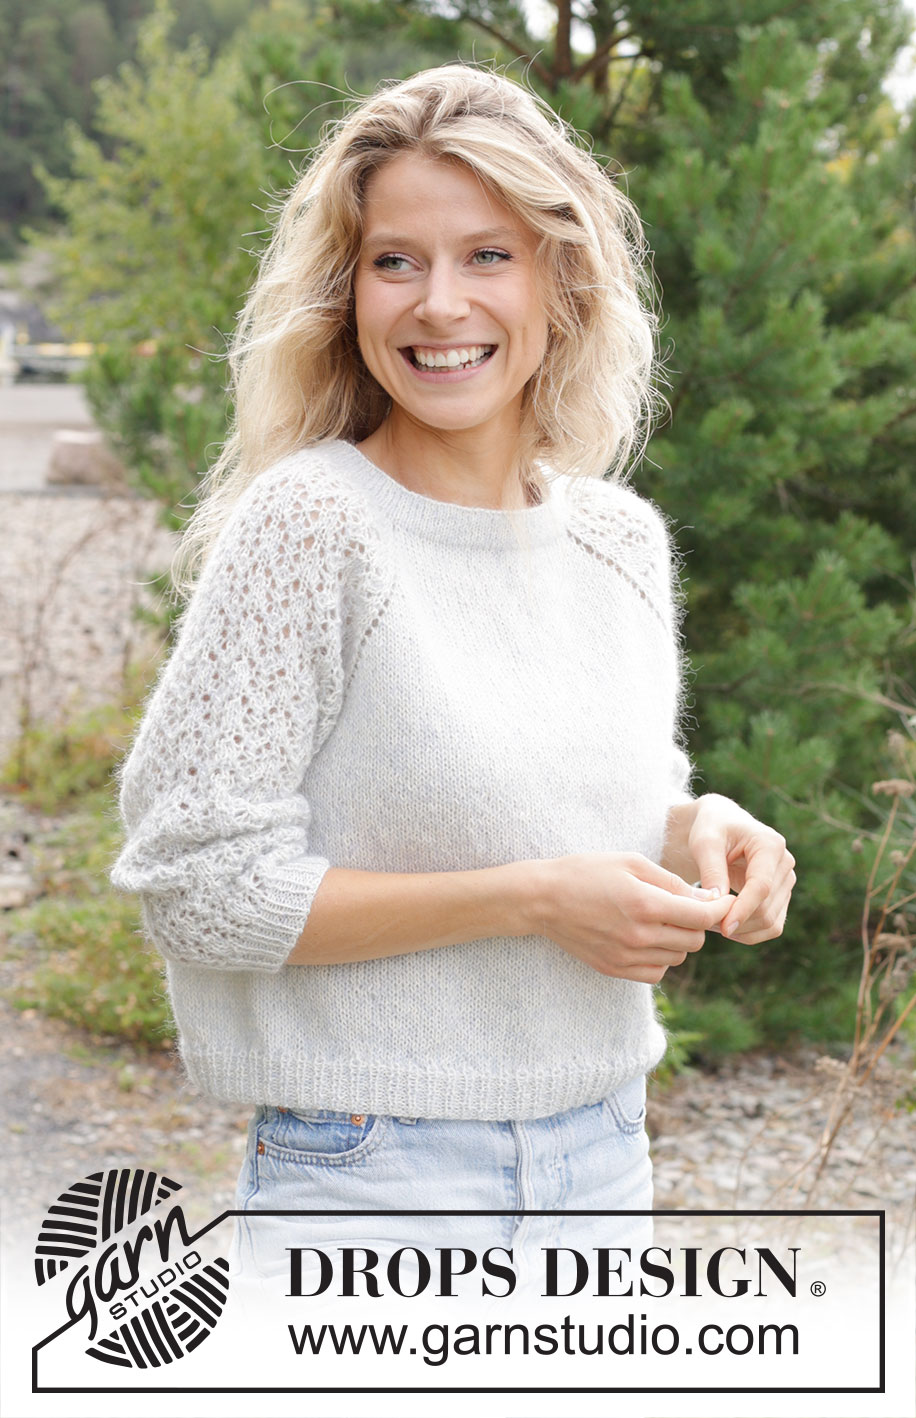
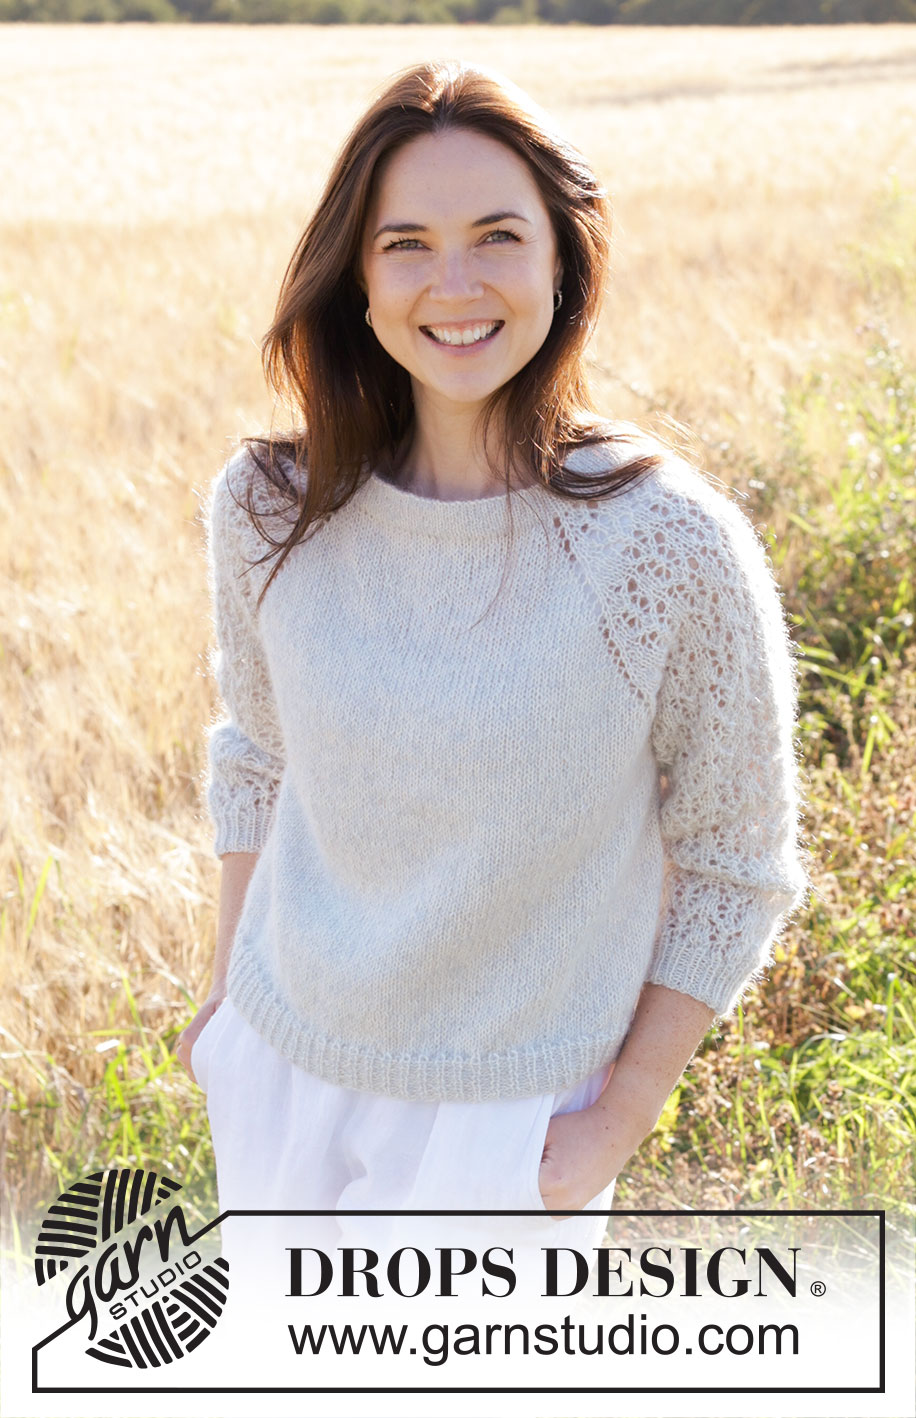
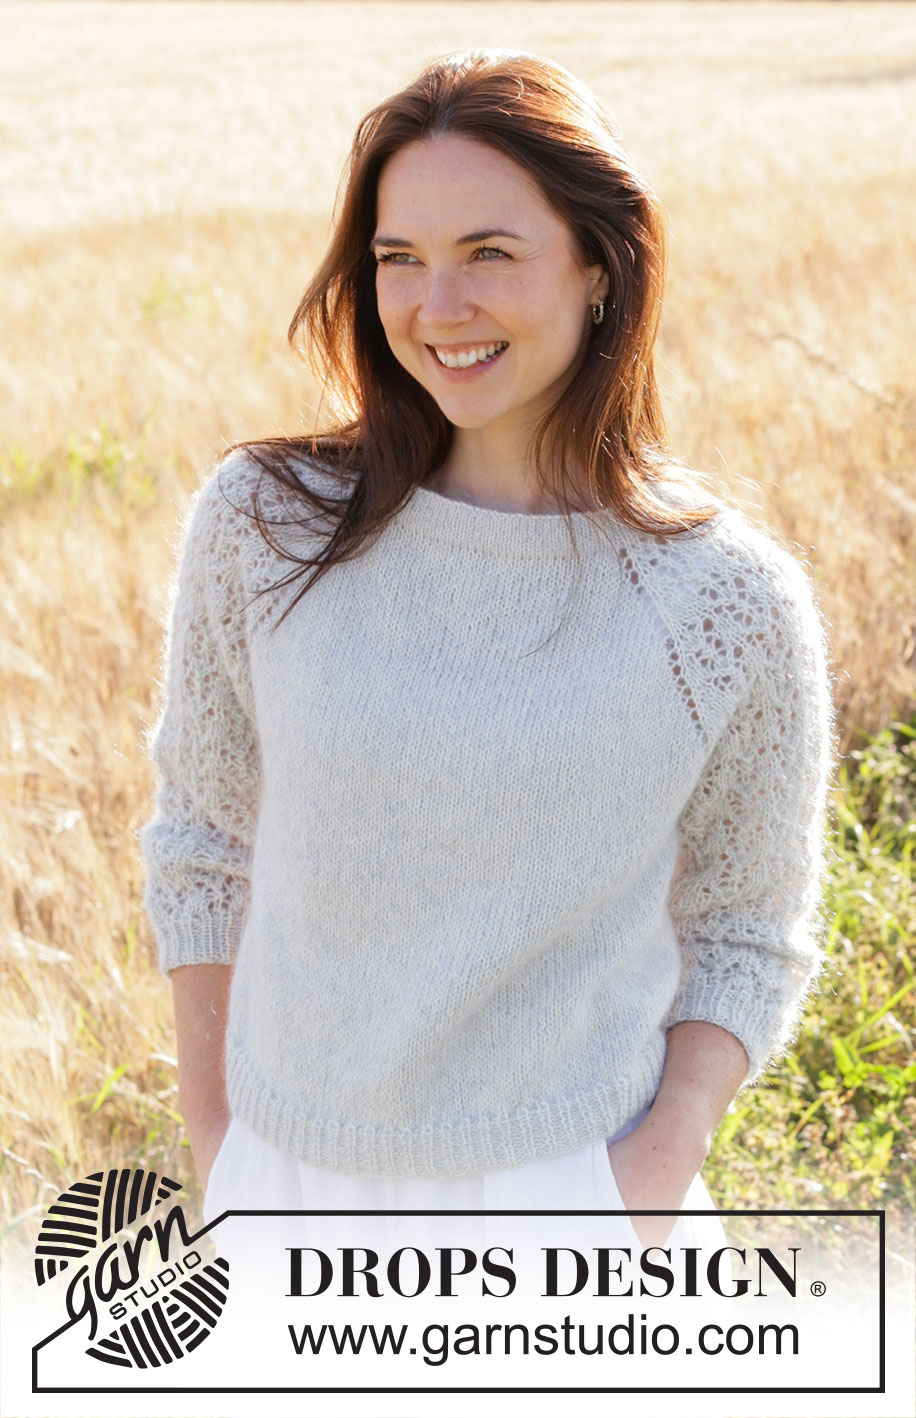
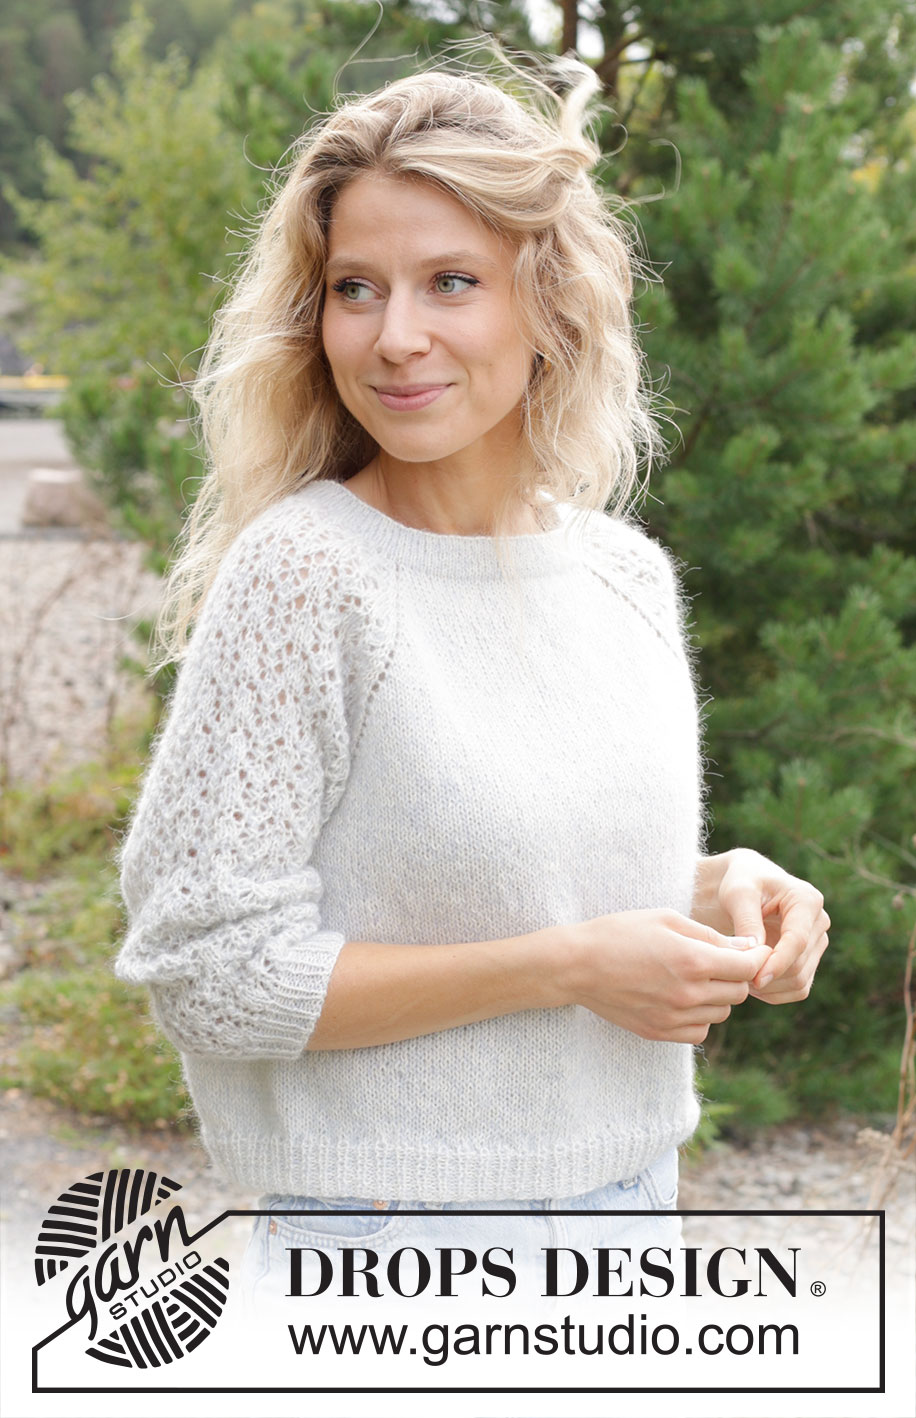
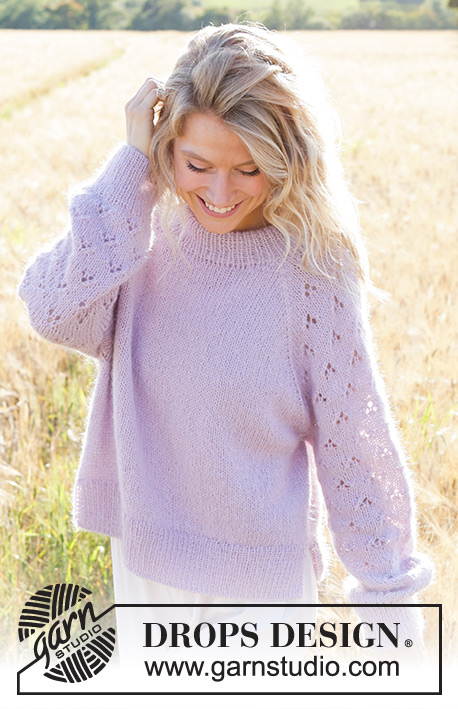
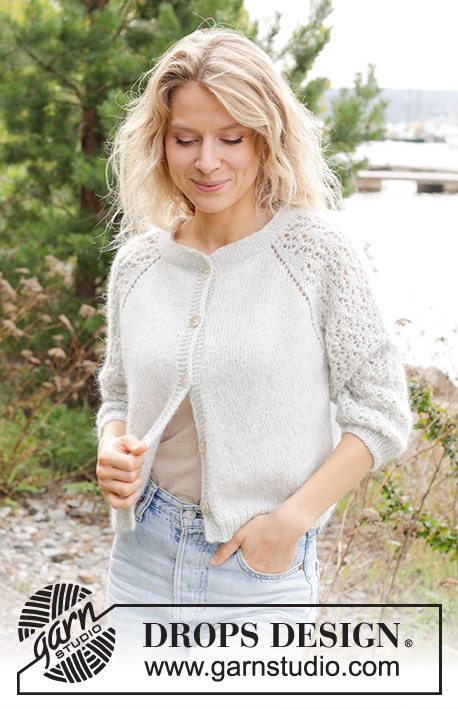
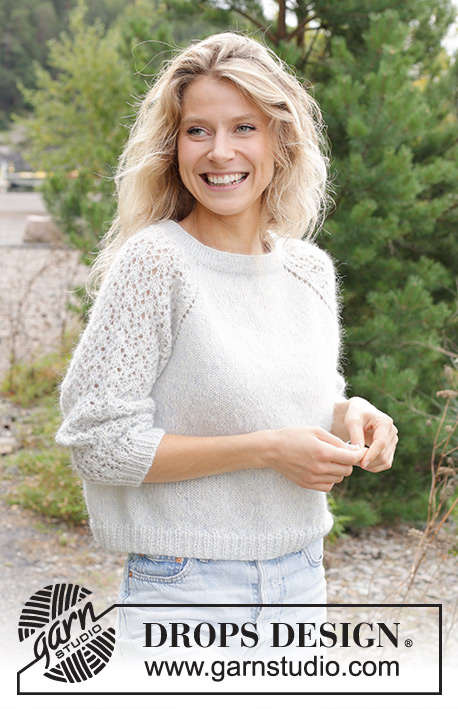
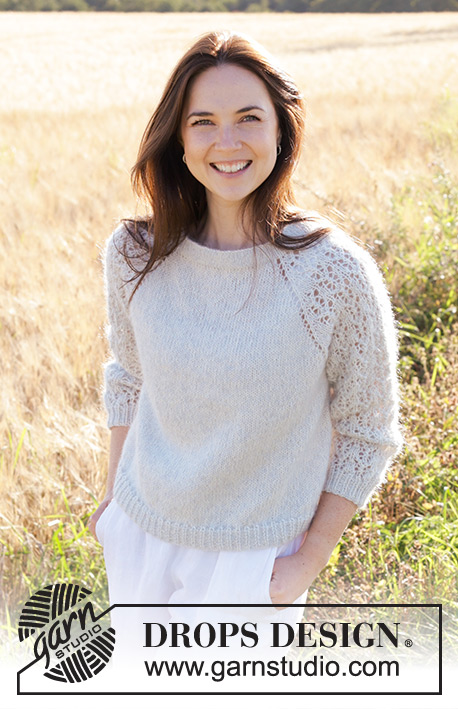
Knitted jumper in DROPS Alpaca and DROPS Kid-Silk. The piece is worked top down with double neck, raglan, lace pattern and ¾-length sleeves. Sizes S - XXXL.
DROPS 250-1 |
|||||||||||||||||||
|
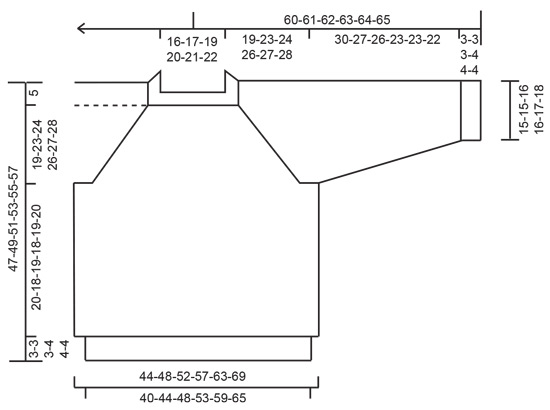
------------------------------------------------------- EXPLANATIONS FOR THE PATTERN: ------------------------------------------------------- PATTERN: See diagrams A.1 to A.3. RAGLAN: Increase 1 stitch by making 1 yarn over before/after each marker-stitch. On the next round knit the yarn overs on the front and back pieces – leaving holes. The yarn overs on the sleeves are knitted twisted – no holes. Work the new stitches in stocking stitch on the front and back pieces and into the pattern on the sleeves. DECREASE TIP (for sleeves): Decrease 1 stitch on each side of the marker-thread as follows: Work until there are 3 stitches left before the marker-thread, knit 2 together, knit 2 (marker-thread sits between these 2 stitches), slip 1 stitch knit-wise, knit 1 and pass the slipped stitch over the knitted stitch (2 stitches decreased). ------------------------------------------------------- START THE PIECE HERE: ------------------------------------------------------- JUMPER – SHORT OVERVIEW OF THE PIECE: The pattern uses both long and short needles; start with the length which fits the number of stitches and change when necessary. The double neck and yoke are worked in the round with circular needle, top down. When the yoke is finished, it is divided for body and sleeves and the body is continued in the round, while the sleeves wait. The sleeves are worked in the round, top down. The neck is folded to the inside and sewn down. If there is a «0» in your chosen size, skip the information and go straight to the next instruction. DOUBLE NECK: Cast on 104-108-114-118-122-126 stitches with circular needle size 4.5 mm, 1 strand DROPS Alpaca and 1 strand DROPS Kid-Silk (= 2 strands). Change to circular needle size 3.5 mm (casting on with a larger needle size gives and elastic cast-on edge). Work stocking stitch in the round for 2½ to 3 cm. Purl 1 round, the neck is later folded along this round. Continue with stocking stitch until the neck measures 6 cm. It will be approx. 3 cm when folded double. Insert 1 marker at the beginning of the round (= mid-back), the yoke is measured from here. YOKE: Change to circular needle size 4.5 mm. Knit 1 round and decrease 10-10-12-12-12-12 stitches evenly spaced = 94-98-102-106-110-114 stitches. Insert 4 markers without working the stitches (these are used when increasing for raglan) as follows: Count 13-14-15-16-17-18 stitches (= half back piece), insert 1 marker in the next stitch, count 19 stitches (= sleeve), insert 1 marker in the next stitch, count 26-28-30-32-34-36 stitches (= front piece), insert 1 marker in the next stitch, count 19 stitches (= sleeve), insert 1 marker in the next stitch, there are 13-14-15-16-17-18 stitches left after the last marker (= half back piece). On the next round, work PATTERN and increase for RAGLAN – read description above, as follows: Knit 13-14-15-16-17-18 (= half back piece), increase 1 stitch for raglan, knit 1 (first marker sits in this stitch), work A.1, A.2 over the next 12 stitches, work A.3, knit 1 (second marker sits in this stitch) (= sleeve), increase 1 stitch for raglan, knit 26-28-30-32-34-36, increase 1 stitch for raglan (= front piece), knit 1 (third marker sits in this stitch), work A.1, A.2 over the next 12 stitches, work A.3, knit 1 (fourth marker sits in this stitch) (= sleeve),increase 1 stitch for raglan, knit 13-14-15-16-17-18 (= half back piece). REMEMBER THE KNITTING TENSION! Continue this pattern but note that the increases are different on the front/back pieces and the sleeves – read INCREASES FOR SLEEVES and INCREASES FOR FRONT/BACK PIECES before continuing! INCREASES FOR SLEEVES: On the sleeves you increase 17-20-21-23-24-25 times on each side (including the first increase described above). The sleeve increases are drawn into diagrams A.1 and A.3. Each time A.1, A.2 and A.3 are finished in height, there is room for 2 more repeats of A.2 between A.1 and A.3. The stitches which do not fit into the pattern on each side of the sleeve are worked in stocking stitch. INCREASES FOR FRONT/BACK PIECES: On the front and back pieces, you increase 22-24-26-29-33-36 times (including the first increase described above), as follows: Increase on each round 0-0-0-0-4-6 times, then every 2nd round 22-24-26-29-29-30 times. AFTER THE LAST INCREASE: When all the increases are finished there are 250-274-290-314-338-358 stitches (70-76-82-90-100-108 stitches on the front/back pieces and 55-61-63-67-69-71 stitches on each sleeve (including the marker-stitches on each side of the sleeves). Continue with pattern and stocking stitch but without further increases. The stitches which do not fit into the pattern on each side of the sleeve are worked in stocking stitch. Work until the yoke measures 19-23-24-26-27-28 cm from the marker. DIVIDE FOR BODY AND SLEEVES: Now divide for the body and sleeves as follows: Knit 35-38-41-45-50-54 (= half back piece), place the next 55-61-63-67-69-71 stitches on a thread for the sleeve, cast on 10-10-12-12-14-16 stitches (in side under sleeve), knit 70-76-82-90-100-108 (= front piece), place the next 55-61-63-67-69-71 stitches on a thread for the sleeve, cast on 10-10-12-12-14-16 stitches (in side under sleeve), knit the last 35-38-41-45-50-54 stitches (= half back piece). The body and sleeves are finished separately. The piece is now measured from here! BODY: = 160-172-188-204-228-248 stitches. Continue with stocking stitch in the round until the body measures 20-18-19-18-19-20 cm from the division. On the next round begin working rib, AT THE SAME TIME on the first round increase 0-4-4-8-8-12 stitches evenly spaced = 160-176-192-212-236-260 stitches, as follows: Change to circular needle size 3.5 mm, work rib (knit 1, purl 1 – remember the increases). When the rib measures 3-3-3-4-4-4 cm, cast off a little loosely with rib. The jumper measures approx. 47-49-51-53-55-57 cm from the shoulder. SLEEVES: Place the 55-61-63-67-69-71 stitches from the thread on the one side of the piece on circular needle size 4.5 mm and knit up 1 stitch in each of the 10-10-12-12-14-16 stitches cast on under the sleeve = 65-71-75-79-83-87 stitches. Insert a marker-thread in the middle of the 10-10-12-12-14-16 stitches under the sleeve. Start at the marker-thread and continue the pattern in the round. The stitches which do not fit into the pattern under the sleeve are worked in stocking stitch. AT THE SAME TIME when the sleeve measures 3-3-3-4-4-4 cm from the division, decrease 2 stitches under the sleeve – read DECREASE TIP. Decrease like this every 4-2½-2-1½-1½-1 cm a total of 6-8-9-10-11-12 times = 53-55-57-59-61-63 stitches. Continue working until the sleeve measures 30-27-26-23-23-22 cm from the division. Change to double pointed needles size 3.5 mm and work rib (knit 1, purl 1). AT THE SAME TIME on the first round increase 1-1-3-3-5-7 stitches evenly spaced = 54-56-60-62-66-70 stitches. When the rib measures 3-3-3-4-4-4 cm, cast off a little loosely with rib. The sleeve measures approx. 33-30-29-27-27-26 cm from the division. ASSEMBLY: Fold the neck double to the inside and sew down. To avoid the neck being tight and rolling outwards, it is important that the seam is elastic. |
|||||||||||||||||||
Diagram explanations |
|||||||||||||||||||
|
|||||||||||||||||||
 |
|||||||||||||||||||
 |
|||||||||||||||||||
Have you finished this pattern?Tag your pictures with #dropspattern #rememberingspringsweater or submit them to the #dropsfan gallery. Do you need help with this pattern?You'll find 30 tutorial videos, a Comments/Questions area and more by visiting the pattern on garnstudio.com. © 1982-2026 DROPS Design A/S. We reserve all rights. This document, including all its sub-sections, has copyrights. Read more about what you can do with our patterns at the bottom of each pattern on our site. |
|||||||||||||||||||


With over 40 years in knitting and crochet design, DROPS Design offers one of the most extensive collections of free patterns on the internet - translated to 17 languages. As of today we count 324 catalogues and 12290 patterns translated into English (UK/cm). 12290
We work hard to bring you the best knitting and crochet have to offer, inspiration and advice as well as great quality yarns at incredible prices! Would you like to use our patterns for other than personal use? You can read what you are allowed to do in the Copyright text at the bottom of all our patterns. Happy crafting!
Post a comment to pattern DROPS 250-1
We would love to hear what you have to say about this pattern!
If you want to leave a question, please make sure you select the correct category in the form below, to speed up the answering process. Required fields are marked *.