
Popular categories
Looking for a yarn?


Comments / Questions (14)
![]() Margherita wrote:
Margherita wrote:
Salve! Chiedo aiuto se possibile per piacere 🙏 non ho capito cosa si intenda per “piegare il braccio a metà e riprendere una maglia in ognuna delle 4 maglie di avvio”. Sarebbe possibile avere gentilmente un breve video esplicativo? Grazie mille 🙏
20.02.2025 - 22:07DROPS Design answered:
Buonasera Margherita, provi a vedere se questo videole può essere utile. Buon lavoro!
24.02.2025 - 00:11
![]() Dominique wrote:
Dominique wrote:
Je ne comprends pas les consignes pour l'augmentation (rangs 4/6) et diminution pour le nez (rangs 3/6) et notamment les mots "avant/après". Merci pour votre aide !
06.12.2024 - 15:59DROPS Design answered:
Bonjour Dominique, pour former le nez, vous devez continuer à augmenter comme vous l'avez fait auparavant de chaque côté des 4 mailles endroit, autrement dit avant ces 4 mailles et après ces 4 mailles, augmentez ainsi tous les rangs (sur l'endroit et sur l'envers). Bon tricot!
09.12.2024 - 07:34
![]() Shirley Watkinson wrote:
Shirley Watkinson wrote:
I am also struggling with the arm. Your pattern is super up to there, but confusing from there on.
17.11.2024 - 11:42DROPS Design answered:
Dear Shirley, knit the first 9 stitches from the head. Cast on 4 stitches for the arm. Turn the work and work over these 4 stitches + the next 4 stitches (the 4 knit stitches from the head which were closest to the cast-on stitches). Work 10 ridges over these 8 stitches and cut the thread. Join the thread in the next stitch from the head and knit over 10 stitches, cast on and work over 8 stitches as with the first arm. Cut and join the thread in the next stitch from head, knit the last 5 stitches. Now, work over the body stitches, fold the arms and work only over the first 4 stitches of each arm. The other 4 stitches of each arm will form holes, which you will sew later. Happy knitting!
17.11.2024 - 22:56
![]() GOUBIER Jocelyne wrote:
GOUBIER Jocelyne wrote:
Je vous remercie, surtout pour la rapidité de votre réponse. Je vais effectivement puiser dans vos nombreux modèles de doudous. Cordialement
13.11.2024 - 17:57
![]() GOUBIER wrote:
GOUBIER wrote:
Re-bonjour, suite à ma question de tout à l'heure, au lieu de m'indiquer comment convertir ce modèle pour un plus grand, avez-vous un modèle d'ours plus grand déjà existant (18 à 20 cm) ? Merci beaucoup
13.11.2024 - 15:24DROPS Design answered:
Bonjour Mme Goubier, nous ne sommes malheureusement pas en mesure de pouvoir adapter chacun de nos modèles à chaque demande; merci pour votre compréhension. N'hésitez pas à demander conseil à votre magasin DROPS, même par mail ou téléphone. Vous pourrez sinon retrouver tous nos modèles type doudou ici, l'un d'eux vous inspirera peut-être. Bon tricot!
13.11.2024 - 17:27
![]() GOUBIER Jocelyne wrote:
GOUBIER Jocelyne wrote:
Comment convertir les nombres de mailles pour faire un ourson plus grand (18 cm environ, 20 cm maxi) ? merci de votre réponse
13.11.2024 - 15:06DROPS Design answered:
Bonjour Mme Goubier, vous pouvez essayer de calculer si avec une laine plus épaisse (et une tension différente) vous pouvez obtenir les mesures souhaitées. Bon tricot!
13.11.2024 - 17:24
![]() Anette Rendbæk wrote:
Anette Rendbæk wrote:
Hvad er det for noget vat bamsen monteres med, tænker, den skal jo gerne kunne vaskes?
11.11.2024 - 14:39DROPS Design answered:
Hei Anette. Er nok vanlig fyll vat (polyester) som vaskes med samme vaskeanvisning som garnet leke bamsen er strikket med. Ønsker du å fylle med ull, kan du evnt klippe opp små lengder av samme garn som bamsen og bruke det som fyll. mvh DROPS Design
18.11.2024 - 10:48
![]() Lefrancois Isabelle wrote:
Lefrancois Isabelle wrote:
Je n' arrive pas à comprendre comment de 4 a 8 augmentation pour le bras. J'ai bien tricoter les 9 premieres mailles. J'attends votre réponse. Merci
14.10.2024 - 16:33DROPS Design answered:
Bonjour Mme Lefrancois, lorsque vous avez tricoté les 9 premières m du rang, montez 4 m (cf cette leçon, tournez et tric les 8 premières m (= les 4 nouvelles + les 4 m suiv - il reste 5 m sur l'aig. gauche, ne les tric pas) pendant 20 rgs, au rg suiv sur l'endroit, rabattez ces 8 m, coupez le fil. Tric maintenant les 10 m suiv du corps (après les 9 premières m tricotées au début du bras), montez 4 m, tournez et tric ces 8 m (les 4 nouvelles + les 4 suivantes - laissez les autres en attente) pendant 20 rgs , rabattez les m du bras, coupez le fil et tric les 5 dernières m du rang. Bon tricot!
15.10.2024 - 09:03
![]() Jayne wrote:
Jayne wrote:
Hi, Struggling too with the arms. I see that you have answered Louise, but I am not clear on the OUTERMOST STITCHES. Is this at the end or in the middle? Are the 8 Outermost stitches at the edge of the fabric? Or is it starting from the new cast on stitches, so you are left with 5 stitches at end?
06.08.2024 - 16:02DROPS Design answered:
Hi Jayne, The outermost 8 stitches are at the end of the row and you work back and forth across these stitches for the arm. Happy crafting!
07.08.2024 - 06:36
![]() Ellen wrote:
Ellen wrote:
Hej! När man lägger upp för armarna blir de inte spegelvända - eller är det jag som gör fel? Tänker att det blir lättare att montera om båda ”armflärparna” pekar inåt, dvs en höger och en vänster. Som jag får det nu pekar de fyra extra upplagda maskorna åt samma håll på båda sidor om nosen. Stämmer det?
31.07.2024 - 20:06DROPS Design answered:
Hej Ellen, ved ikke rigtig hvad som går galt... når jeg læser opskriften får man en arm i hver side af arbejdet - prøv igen :)
06.08.2024 - 13:27
|
|||||||
Tiny Bear#dropstinybear |
|||||||
 |
 |
||||||
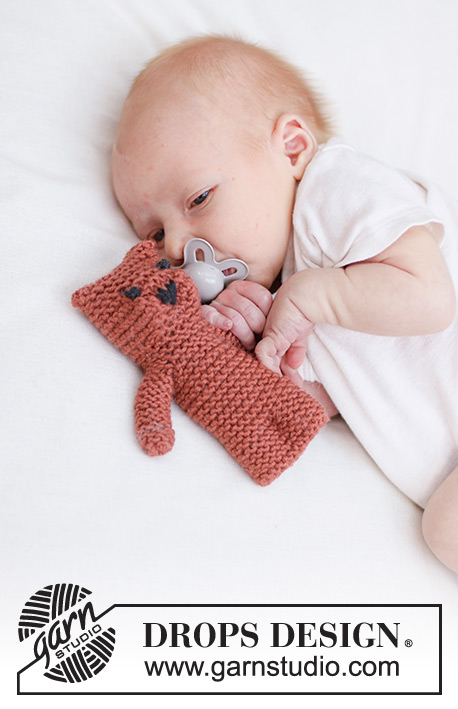
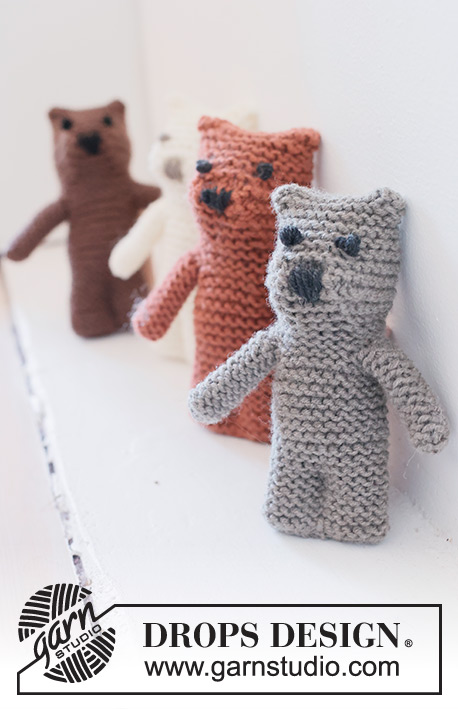
Knitted teddy bear for babies and children in DROPS Merino Extra Fine. The piece is worked top down, with garter stitch and embroidered eyes and nose. Theme: Soft toys.
DROPS Baby 46-17 |
|||||||
|
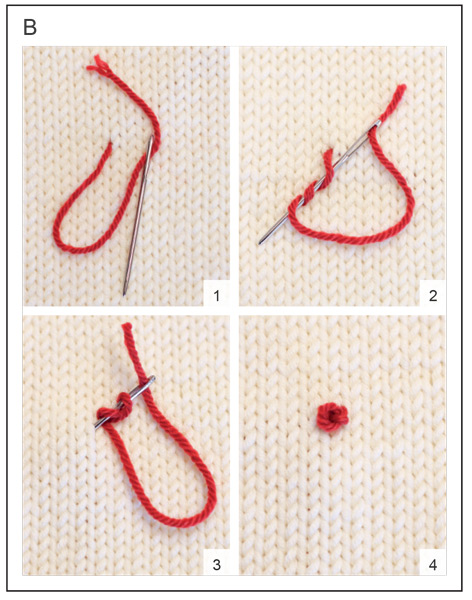
------------------------------------------------------- EXPLANATIONS FOR THE PATTERN: ------------------------------------------------------- GARTER STITCH (worked back and forth): Knit all rows. 1 ridge = knit 2 rows. PATTERN: See diagrams A and B. The diagrams show how to embroider the stitches. ------------------------------------------------------- START THE PIECE HERE: ------------------------------------------------------- TEDDY BEAR – SHORT OVERVIEW OF THE PIECE: The piece is worked back and forth in garter stitch, from the head to the legs. The arms are worked in as you go. The eyes and nose are embroidered, the teddy bear sewn together and filled with wadding. HEAD AND EARS: Cast on 36 stitches with needle size 3.5 mm and DROPS Merino Extra Fine. Work GARTER STITCH – read description above – AT THE SAME TIME decrease for the ears as follows: ROW 1: Knit 7, knit 2 together, knit 1, knit 2 together, knit 12, knit 2 together, knit 1, knit 2 together, knit 7 = 32 stitches. ROW 2: Knit. ROW 3: Knit. ROW 4: Knit 4, knit 2 together, knit 2 together, Knit 1, knit 2 together, knit 2 together, Knit 6, knit 2 together, knit 2 together, knit 1, knit 2 together, knit 2 together, knit 4 = 24 stitches. Work 2 ridges back and forth over all stitches. REMEMBER THE KNITTING TENSION! NOSE: Now increase for the nose as follows: ROW 1: Knit 10, 1 yarn over, knit 4, 1 yarn over, knit 10 = 26 stitches. ROW 2: Knit 10, knit the yarn over twisted (to avoid a hole), 1 yarn over, knit 4, 1 yarn over, knit the yarn over twisted, knit 10 = 28 stitches. ROW 3: Knit 11, knit the yarn over twisted, 1 yarn over, knit 4, 1 yarn over, knit the yarn over twisted, knit 11 = 30 stitches. ROWS 4-6: Work in the same way as row 3 but working 1 more knitted stitch at the beginning and end of the row, before/after the increase = 36 stitches. Work 1 ridge over all stitches. Now decrease for the nose as follows: ROW 1: Knit 14, knit 2 together, knit 4, knit 2 together, knit 14 = 34 stitches. ROW 2: Knit 13, knit 2 together, knit 4, knit 2 together, knit 13 = 32 stitches. ROWS 3-6: Work in the same way as row 2 but working 1 less knitted stitch at the beginning and end of the row, before/after the decrease = 24 stitches. Work 2 ridges over all stitches. BODY AND ARMS: Knit the first 9 head-stitches, cast on 4 stitches for the arm. Turn, work 10 ridges back and forth over the 8 outermost stitches, then cast off with knit from the right side. Cut the strand, leaving an end of 25 cm (to sew the arm-seam with). The first arm is finished Continue the body as follows: Knit the next 10 body-stitches, cast on 4 stitches for the arm. Turn, work 10 ridges back and forth over the 8 outermost stitches, then cast off with knit from the right side. Cut the strand, leaving an end of 25 cm. The second arm is finished. Knit the last 5 stitches. Work as follows from the wrong side: Knit 5 (body), fold the arm double and knit up 1 stitch in each of the 4 cast-on stitches, skip the last 4 arm-stitches, knit 6 (between the arms), fold the second arm double and knit up 1 stitch in each of the 4 cast-on stitches, skip the last 4 arm-stitches, knit 5 = 24 stitches. Insert 1 marker – the piece is now measured from here. BODY AND LEGS: Work garter stitch back and forth over all 24 stitches for 7 cm (= approx. 16 ridges). Cast off a little loosely, with knit from the right side. ASSEMBLY: Embroider the nose and eyes with left-over yarn. The nose has 4-5 vertical flat stitches, each 1 cm long - see diagram A and photo. The eyes are worked with French knots – see diagram B and photo. Sew the back seam – sewing edge to edge in the outermost loop of the outermost stitch so the seam is flat. Sew together the top of the head. Sew each arm seamy – sewing in the outermost loop of the outermost stitch. Tack a strand through the stitches as the bottom of each arm, tighten and fasten well. Fill the arms and body with wadding. Sew the bottom of the body together, then sew a leg-seam through both layers and wadding to separate the legs – leg-length = approx. 1/3 of body-length. |
|||||||
Diagram explanations |
|||||||
|
|||||||
 |
|||||||
 |
|||||||
Have you finished this pattern?Tag your pictures with #dropspattern #dropstinybear or submit them to the #dropsfan gallery. Do you need help with this pattern?You'll find 14 tutorial videos, a Comments/Questions area and more by visiting the pattern on garnstudio.com. © 1982-2026 DROPS Design A/S. We reserve all rights. This document, including all its sub-sections, has copyrights. Read more about what you can do with our patterns at the bottom of each pattern on our site. |
|||||||


With over 40 years in knitting and crochet design, DROPS Design offers one of the most extensive collections of free patterns on the internet - translated to 17 languages. As of today we count 324 catalogues and 12290 patterns translated into English (UK/cm). 12290
We work hard to bring you the best knitting and crochet have to offer, inspiration and advice as well as great quality yarns at incredible prices! Would you like to use our patterns for other than personal use? You can read what you are allowed to do in the Copyright text at the bottom of all our patterns. Happy crafting!
Post a comment to pattern DROPS Baby 46-17
We would love to hear what you have to say about this pattern!
If you want to leave a question, please make sure you select the correct category in the form below, to speed up the answering process. Required fields are marked *.