
Popular categories
Looking for a yarn?


Comments / Questions (57)
![]() Mariza wrote:
Mariza wrote:
I have got to the shoulder increases and the numbers do not add up if I increase every 2nd round… The pattern reads every 2nd round for 264sts Could you tell me if I should increase every 2nd round for a total of 228sts? Or increase every round for a total of 264sts ? I’m not sure which information to trust!
19.04.2026 - 21:05DROPS Design answered:
Hi Mariza, It looks like you are working size M. The Saddle shoulder increases are only on the body (before markers 1 and 3 and after markers 2 and 4) every round x 21 = 192 stitches . Then you increase only on the sleeves every 2nd round (after markers 1 and 3 and before markers 2 and 4) x 18 = 264 stitches . Regards, Drops Team.
20.04.2026 - 06:04
![]() Judy Canning wrote:
Judy Canning wrote:
Hi. Will Drops Lima respond well to dry cleaning? I do not have good results when I hand wash adult sweaters. Thank you.
23.02.2026 - 16:32
![]() Martine wrote:
Martine wrote:
Bonjour, Est-ce-qu'il existe un modèle similaire pour homme , manches marteau, n° aiguilles 4 et 4,5 ou 5. Réalisation par le haut ou le bas du pull, type de laine Karisma ? Je cherche un modèle homme identiques avec la réalisation des Manches marteau identiques au modèle pour femme Glaciers Waters n° 26/9. Merci pour votre réponse. Cordialement.
12.02.2026 - 15:27DROPS Design answered:
Bonjour Martine, retrouvez ici tous nos pulls homme avec manches marteau (toutes tensions confondues). Bon tricot!
12.02.2026 - 18:18
![]() Heike wrote:
Heike wrote:
Bei der Ärmellänge sind anscheinend die Maße vertauscht zwischen den Größen. Ansonsten ist d er pullover ist wunderschön und sitzt traumhaft.
08.02.2026 - 08:47DROPS Design answered:
Liebe Heike, die Maße sind nicht vertauscht, die Ärmel werden bei den größeren Größen kürzer gestrickt, weil die Schulter länger gestrickt wird. Zusammen ergibt das dann für die größeren Größen auch längere Ärmel. Viel Spaß mit dem Pullover!
08.02.2026 - 08:49
![]() Rachel wrote:
Rachel wrote:
Sur la photo, on voit que le col est doublé pourtant cela n’est pas précisé dans les explications, pourquoi ? Merci
14.01.2026 - 15:34DROPS Design answered:
Bonjour Rachel, le col est replié à la toute fin pour être doublé, retrouvez cette mention à la fin des explications sous ASSEMBLAGE. Bon tricot!
15.01.2026 - 10:07
![]() Verbeeren Marleen wrote:
Verbeeren Marleen wrote:
Kan deze pul met gewone breinaalden worden gebreid . Pul met zadelsruk of schouderstuk . Heb geen ronbreinaalden
23.12.2025 - 15:53
![]() Sylvie wrote:
Sylvie wrote:
Bonjour, je m’apprête à tricoter ce chandail. Il est mentionné qu’il y a eu des corrections. Quand je clique sur le lien, je ne vois rien. Est-ce que les corrections sont déjà faites , sinon qu’est ce que je dois modifier? Merci pour tous ces beaux patrons
16.12.2025 - 05:18DROPS Design answered:
Bonjour Sylvie, tout à fait, les corrections ne s'appliquent que si vous aviez imprimé les explications avant ces dates, sinon, les explications sont justes ainsi. Bon tricot!
17.12.2025 - 10:11
![]() Barbara wrote:
Barbara wrote:
Wie verschließe ich denn die Zunahmen unter dem Armen 10 M Zunahme vom Rumpfteil, 10 M Zunahme vom Ärmel. Als Matratzensticht längst zum Rumpfteil, oder parallel zum Ärmel?
14.12.2025 - 23:42DROPS Design answered:
Liebe Barbara, in diesem Video ziegen wir 2 verchiedenen Arten, diese Öffnung zu schliessen. Viel Spaß beim Fertigstellen!
15.12.2025 - 15:48
![]() Sylvia wrote:
Sylvia wrote:
Bonjour, la base du col devant baille un peu. Pour avoir une plus belle finition, pensez-vous que je puisse faire quelques rangs raccourcis et obtenir un bon arrondi devant? Cordialement
26.09.2025 - 15:21DROPS Design answered:
Bonjour Sylvia, probablement, pensez à bien faire les ajustements nécessaires si besoin. Bon tricot!
26.09.2025 - 17:05
![]() Amelie wrote:
Amelie wrote:
Hallo, ich habe ein Problem beim Stricken dieses Pullovers: Bis zur Teilung in Ärmel und Rumpfteil sieht alles super aus und passt perfekt. Allerdings ist der Rumpfteil nach der Teilung riesig. Ich stricke Größe L, aber bin trotz der ersten Abnahmen bei einer Breite des Rumpfteils von 56 cm. Das passt gar nicht zu den Maßen, die im Muster angegeben waren. Meine Maschenprobe entsprach aber auch den richtigen Maßen. Ich verstehe nicht ganz woran das liegen kann...
13.08.2025 - 12:27DROPS Design answered:
Liebe Amelie, mit 20 Maschen = 10 cm, sollen die 216 Maschen nach der Aufteilung 108 cm insgesamt messen, dh 54 cm flach gemessen. Nach den Abnahmen sind es nur noch 200 Maschen = 100 cm in der Runde und 50 cm flach gemessen. Viel Spaß beim Stricken!
13.08.2025 - 14:32
|
|||||||||||||
Glacier Waters#glacierwaters |
|||||||||||||
 |
 |
||||||||||||
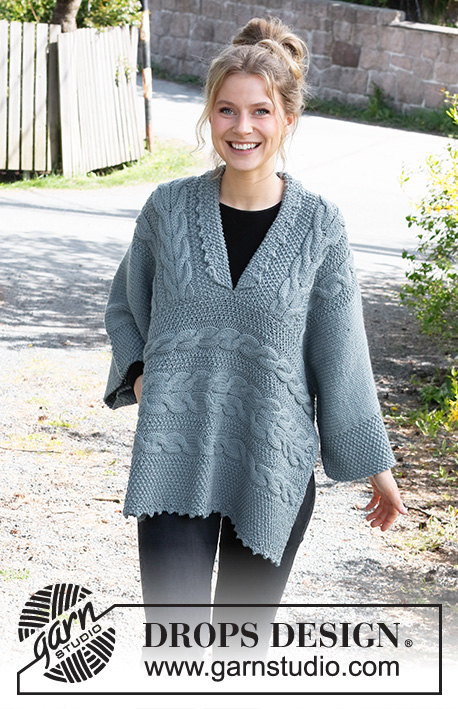
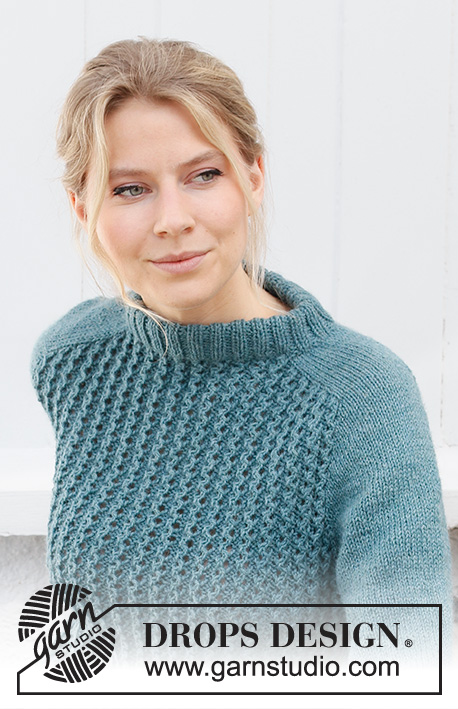
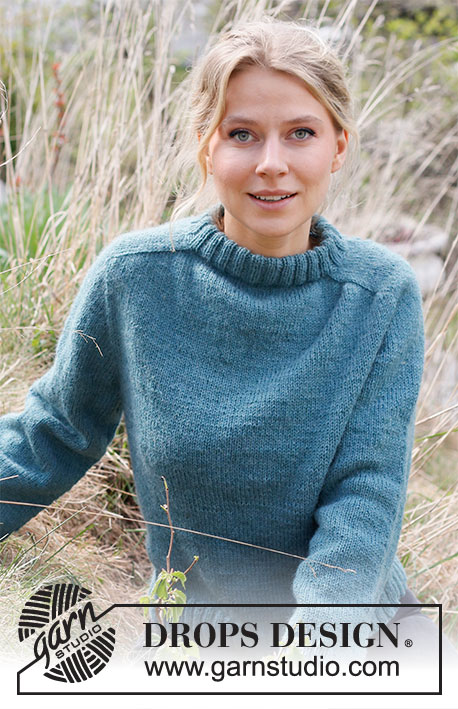
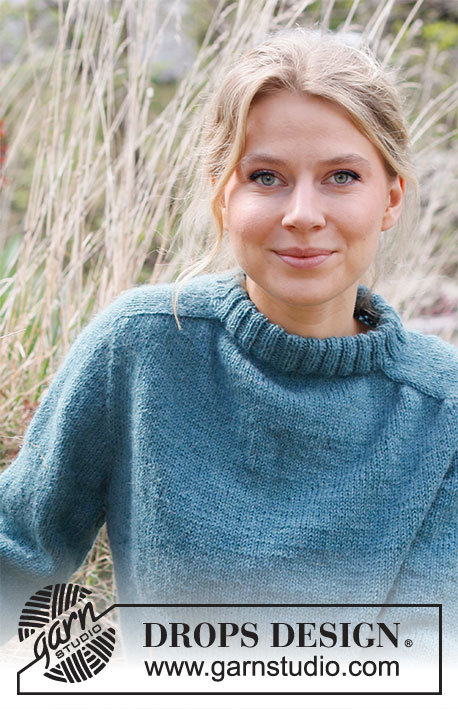
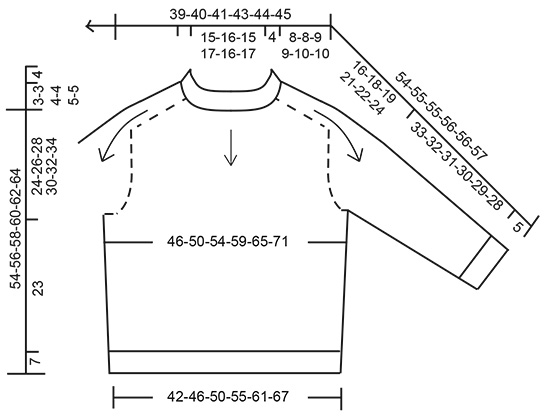
Knitted jumper with saddle shoulders in DROPS Lima or DROPS Soft Tweed. The piece is worked top down. Sizes S - XXXL.
DROPS 216-9 |
|||||||||||||
|
------------------------------------------------------- EXPLANATIONS FOR THE PATTERN: ------------------------------------------------------- INCREASE TIP-1 (evenly spaced): To work out how to increase evenly, count the total number of stitches on the needle (e.g. 96 stitches) and divide by the number of increases to be made (e.g. 12) = 8. In this example, increase by making 1 yarn over after each 8th stitch. On the next round work the yarn overs twisted to avoid holes. INCREASE TIP-2: BEFORE MARKER: The new stitch will be twisted, leaning towards the right. Use left needle to pick up strand between 2 stitches from the row below, pick up strand from behind and knit stitch in front loop. AFTER MARKER: The new stitch will be twisted, leaning towards the left. Use left needle to pick up strand between 2 stitches from the row below, pick up strand from the front and knit stitch in back loop. DECREASE TIP (for body and sleeves): Decrease 1 stitch on either side of the marker thread as follows: Work until there are 3 stitches left before the marker thread, knit 2 together, knit 2 (marker thread sits between these 2 stitches), slip 1 stitch as if to knit, knit 1 and pass the slipped stitch over the knitted stitch. CASTING-OFF TIP: To avoid the cast-off edge being tight you can cast off with a larger size needle. If the edge is still tight, make 1 yarn over after approx. each 4th stitch at the same time as casting off; the yarn overs are cast off as normal stitches. ------------------------------------------------------- START THE PIECE HERE: ------------------------------------------------------- JUMPER – SHORT OVERVIEW OF THE PIECE: The neck and yoke are worked in the round with circular needle, top down. Stiches are increased for the shoulders, then for the sleeves. The yoke is divided for body and sleeves and the body is continued in the round with circular needle. The sleeves are worked with double pointed needles, top down. NECK: Cast on 92-96-100-108-112-116 stitches with circular needle size 3.5 mm and Lima. Knit 1 round. Then work rib (= knit 2. purl 2) in the round for 8½ cm. Knit 1 round where you increase 12-12-20-20-24-28 stitches evenly spaced – read INCREASE TIP-1 = 104-108-120-128-136-144 stitches. Change to circular needle size 4.5 mm. Insert a marker at the beginning of the round (mid-back). THE PIECE IS NOW MEASURED FROM HERE! YOKE: Insert 4 markers in the piece, without working the stitches and between the stitches, as follows: Count 18-19-20-22-22-24 stitches (= half back piece), insert marker 1, count 16-16-20-20-24-24 stitches (= shoulder), insert marker 2, count 36-38-40-44-44-48 stitches (= front piece), insert marker 3, count 16-16-20-20-24-24 stitches (= shoulder), insert marker 4, there are 18-19-20-22-22-24 stitches left after the last marker (= half back piece). SADDLE SHOULDER INCREASE: Continue with stocking stitch and increase on the shoulders as follows: Increase 1 stitch BEFORE markers 1 and 3 and AFTER markers 2 and 4 – read INCREASE TIP-2 (=4 stitches increased); there are increases on back piece and front piece, number of shoulder stitches remain the same. The increased stitches are worked in stocking stitch. Increase like this every round a total of 21-21-24-24-26-26 times = 188-192-216-224-240-248 stitches. The piece measures approx. 8-8-9-9-10-10 cm from the marker on the neck. REMEMBER THE KNITTING TENSION! SLEEVE INCREASES: Now increase for the sleeves as follows: Increase 1 stitch AFTER markers 1 and 3 and BEFORE markers 2 and 4 (= 4 stitches increased). There are only increases on shoulder stitches and number of stitches on front piece and back piece remains the same. Number of shoulder stitches increases. Increase like this every 2nd round a total of 17-18-18-17-17-17 times = 256-264-288-292-308-316 stitches. The piece measures approx. 21-22-23-22-23-23 cm from the neck. If your measurements are shorter, continue with stocking stitch without increasing until the piece measures 21-22-23-22-23-23 cm. YOKE INCREASE: Now increase 1 stitch on each side of all markers as follows: Work until there is 1 stitch left before markers 1 and 3, increase 1 stitch BEFORE these markers, work 1 stitch, move the marker onto the right needle and increase 1 stitch AFTER these markers. Work to markers 2 and 4, increase 1 stitch BEFORE these markers, move the marker onto the right needle, work 1 stitch and increase 1 stitch AFTER these markers – remember INCREASE TIP-2 (= a total of 8 stitches increased). Increase like this every 2nd round a total of 4-5-6-10-11-14 times = 288-304-336-372-396-428 stitches. When all the increases are finished, the piece measures approx. 24-26-28-30-32-34 cm from the neck. Divide the piece for body and sleeves on the next round as follows: Work the first 42-45-49-54-59-65 stitches (half back piece), place the next 60-62-70-78-80-84 stitches on a thread for the sleeve, cast on 8-10-10-10-12-12 stitches under the sleeve, work 84-90-98-108-118-130 stitches (= front piece), place the next 60-62-70-78-80-84 stitches on a thread for the sleeve, cast on 8-10-10-10-12-12 stitches under the sleeve, work the last 42-45-49-54-59-65 stitches (= half back piece). Body and sleeves are finished separately. BODY: = 184-200-216-236-260-284 stitches. Insert 1 marker in the middle of the 8-10-10-10-12-12 stitches cast on under each sleeve; these will be used when decreasing in the sides. Work stocking stitch in the round. When the piece measures 4 cm from the division, decrease 1 stitch on each side of both markers – read DECREASE TIP (= 4 stitches decreased). Decrease like this every 5 cm a total of 4 times = 168-184-200-220-244-268 stitches. When the piece measures 23 cm from the division, knit 1 round where you increase 40 stitches evenly spaced = 208-224-240-260-284-308 stitches. Change to circular needle size 3.5 mm and work rib (= knit 2, purl 2) for 7 cm. Cast off with knit over knit and purl over purl – read CASTING OFF TIP! SLEEVE: Place the 60-62-70-78-80-84 stitches from the thread on the one side of the piece on double pointed needles size 4.5 mm and knit up 1 stitch in each of the 8-10-10-10-12-12 stitches cast on under the sleeve = 68-72-80-88-92-96 stitches. Insert a marker thread in the middle of the 8-10-10-10-12-12 stitches under the sleeve; you will decrease stitches either side of this marker. Work stocking stitch in the round. When the piece measures 3 cm from the division, decrease 1 stitch on each side of the marker thread – remember DECREASE TIP. Decrease like this every 6-5-3-2-2-1½ cm a total of 5-6-9-12-13-14 times = 58-60-62-64-66-68 stitches. Continue working until the sleeve measures 33-32-31-30-29-28 cm from the division. Knit 1 round where you increase 18-16-18-16-18-16 stitches evenly spaced = 76-76-80-80-84-84 stitches. Change to double pointed needles size 3.5 mm and work rib (= knit 2, purl 2) for 5 cm. Cast off with knit over knit and purl over purl – remember CASTING-OFF TIP. Work the other sleeve in the same way. ASSEMBLY: Fold the neck to the inside and sew down. To avoid the neck being tight and rolling outwards, it is important that the seam is elastic. |
|||||||||||||
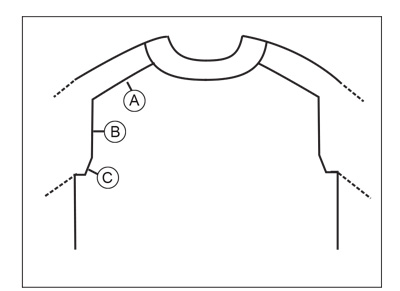
Diagram explanations |
|||||||||||||
|
|||||||||||||
 |
|||||||||||||
 |
|||||||||||||
Have you finished this pattern?Tag your pictures with #dropspattern #glacierwaters or submit them to the #dropsfan gallery. Do you need help with this pattern?You'll find 24 tutorial videos, a Comments/Questions area and more by visiting the pattern on garnstudio.com. © 1982-2026 DROPS Design A/S. We reserve all rights. This document, including all its sub-sections, has copyrights. Read more about what you can do with our patterns at the bottom of each pattern on our site. |
|||||||||||||


With over 40 years in knitting and crochet design, DROPS Design offers one of the most extensive collections of free patterns on the internet - translated to 17 languages. As of today we count 324 catalogues and 12290 patterns translated into English (UK/cm). 12290
We work hard to bring you the best knitting and crochet have to offer, inspiration and advice as well as great quality yarns at incredible prices! Would you like to use our patterns for other than personal use? You can read what you are allowed to do in the Copyright text at the bottom of all our patterns. Happy crafting!
Post a comment to pattern DROPS 216-9
We would love to hear what you have to say about this pattern!
If you want to leave a question, please make sure you select the correct category in the form below, to speed up the answering process. Required fields are marked *.